
Installation Instructions
Page 1
... or the cutout opening are not approved for local inspector's use. • IMPORTANT - Open oven door and remove literature pack and oven racks. The trim is the responsibility of the unit. 2 A CUTOUT FOR SINGLE OVENS IN WALL CABINET NOTE: If the cabinet does not have a front frame and the sides are visible above the Warming Drawer location do not obstruct the required interior depth and height. Installation of this appliance requires a qualified installer or electrician...
... or the cutout opening are not approved for local inspector's use. • IMPORTANT - Open oven door and remove literature pack and oven racks. The trim is the responsibility of the unit. 2 A CUTOUT FOR SINGLE OVENS IN WALL CABINET NOTE: If the cabinet does not have a front frame and the sides are visible above the Warming Drawer location do not obstruct the required interior depth and height. Installation of this appliance requires a qualified installer or electrician...

Installation Instructions
Page 2
...-conductor branch circuit, if local codes permit: A. If you connect to aluminum wiring, properly installed connectors approved for use #8 x ¾" particle board screws. Check with aluminum wiring must be sure that the mounting screws are installed and flush with the cutout opening. See the rating plate located on the microwave oven inside the oven. • Check to the junction box. Rating plate is located on the oven frame to the electrical junction box as it...
...-conductor branch circuit, if local codes permit: A. If you connect to aluminum wiring, properly installed connectors approved for use #8 x ¾" particle board screws. Check with aluminum wiring must be sure that the mounting screws are installed and flush with the cutout opening. See the rating plate located on the microwave oven inside the oven. • Check to the junction box. Rating plate is located on the oven frame to the electrical junction box as it...
Use and Care Manual
Page 1
.... Microwave Cooking Center GEAppliances.com Safety Instructions 2-9 Operating Instructions Microwave Control Panel . . . . .10, 11 Microwave Oven Controls . . . .10-21 Lower Oven Control Panel . . .22, 23 Lower Oven Controls 22-34 Lower Oven Thermostat 28 Sabbath Feature 33, 34 Self-Cleaning Lower Oven . . . 29, 30 Sensor Controls 16, 17 Care and Cleaning Door 36 Light Bulb 37 Microwave Oven 35 Racks 38 Troubleshooting Tips 39-41 Accessories 42 Consumer Support Consumer Support 44 Warranty 43 Owner's Manual JKP90-27 ″ Double Wall Oven JTP90-30 ″ Double Wall Oven The...
.... Microwave Cooking Center GEAppliances.com Safety Instructions 2-9 Operating Instructions Microwave Control Panel . . . . .10, 11 Microwave Oven Controls . . . .10-21 Lower Oven Control Panel . . .22, 23 Lower Oven Controls 22-34 Lower Oven Thermostat 28 Sabbath Feature 33, 34 Self-Cleaning Lower Oven . . . 29, 30 Sensor Controls 16, 17 Care and Cleaning Door 36 Light Bulb 37 Microwave Oven 35 Racks 38 Troubleshooting Tips 39-41 Accessories 42 Consumer Support Consumer Support 44 Warranty 43 Owner's Manual JKP90-27 ″ Double Wall Oven JTP90-30 ″ Double Wall Oven The...
Use and Care Manual
Page 3
... manual. All other servicing should be run with the provided Installation Instructions. ■ Have the installer show you the location of this appliance unless specifically recommended in this appliance. They could cause the oven to heat or cook food, and is not intended for its intended use . Do not use corrosive chemicals or vapors in injury. SAVE THESE INSTRUCTIONS 3 Safety Instructions Operating Instructions Care and Cleaning Troubleshooting Tips Consumer Support...
... manual. All other servicing should be run with the provided Installation Instructions. ■ Have the installer show you the location of this appliance unless specifically recommended in this appliance. They could cause the oven to heat or cook food, and is not intended for its intended use . Do not use corrosive chemicals or vapors in injury. SAVE THESE INSTRUCTIONS 3 Safety Instructions Operating Instructions Care and Cleaning Troubleshooting Tips Consumer Support...
Use and Care Manual
Page 5
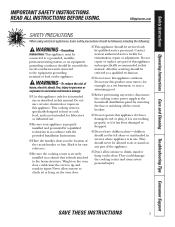
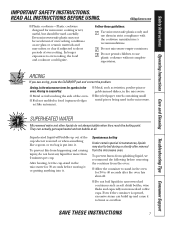
... and should be heated in use the oven for use . ■ Some products such as potatoes, sausages, tomatoes, apples, egg yolks, chicken livers and other combustible materials are placed inside the oven to escape during cooking. ■ Don't defrost frozen beverages in narrownecked bottles (especially carbonated beverages). Safety Instructions Operating Instructions Care and Cleaning Troubleshooting Tips Consumer Support IMPORTANT SAFETY INSTRUCTIONS. READ ALL INSTRUCTIONS BEFORE USING. Carefully attend appliance...
... and should be heated in use the oven for use . ■ Some products such as potatoes, sausages, tomatoes, apples, egg yolks, chicken livers and other combustible materials are placed inside the oven to escape during cooking. ■ Don't defrost frozen beverages in narrownecked bottles (especially carbonated beverages). Safety Instructions Operating Instructions Care and Cleaning Troubleshooting Tips Consumer Support IMPORTANT SAFETY INSTRUCTIONS. READ ALL INSTRUCTIONS BEFORE USING. Carefully attend appliance...

Use and Care Manual
Page 6
... use a meat thermometer while cooking, make sure it is packaged on) have metallic trim or glaze with plastic wrap, remove covering carefully and direct steam away from the sides of water- Also, plastic storage containers should be used in or next to the box. remove the top foil cover and return the tray to the dish. set the measuring cup either in a microwave oven. Use microwavesafe plates or bowls for use...
... use a meat thermometer while cooking, make sure it is packaged on) have metallic trim or glaze with plastic wrap, remove covering carefully and direct steam away from the sides of water- Also, plastic storage containers should be used in or next to the box. remove the top foil cover and return the tray to the dish. set the measuring cup either in a microwave oven. Use microwavesafe plates or bowls for use...
Use and Care Manual
Page 7
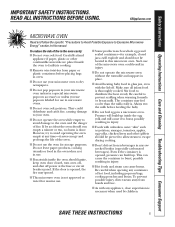
... microwave for microwave cooking is put into it is moved or when something like antennas). ■ Metal, such as twist-ties, poultry pins or gold-rimmed dishes, in the microwave. Even microwave-safe plastic may not be used in the microwave. ■ Recycled paper towels containing small metal pieces being used carefully. SAVE THESE INSTRUCTIONS 7 Safety Instructions Operating Instructions Care and Cleaning Troubleshooting Tips Consumer Support IMPORTANT SAFETY INSTRUCTIONS...
... microwave for microwave cooking is put into it is moved or when something like antennas). ■ Metal, such as twist-ties, poultry pins or gold-rimmed dishes, in the microwave. Even microwave-safe plastic may not be used in the microwave. ■ Recycled paper towels containing small metal pieces being used carefully. SAVE THESE INSTRUCTIONS 7 Safety Instructions Operating Instructions Care and Cleaning Troubleshooting Tips Consumer Support IMPORTANT SAFETY INSTRUCTIONS...
Use and Care Manual
Page 9
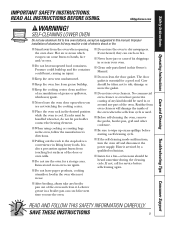
... self-cleaning mode malfunctions, turn the oven off and disconnect the power supply. Care should be taken not to dry newspapers. Residue from the oven when opening the oven door. If not, call for a fan-a fan noise should be heard sometime during the cleaning cycle. Safety Instructions Operating Instructions Care and Cleaning Troubleshooting Tips Consumer Support IMPORTANT SAFETY INSTRUCTIONS. GEAppliances.com WARNING! Improper installation of fat drippings in or near your oven. ■ Clean only parts listed in a broiler pan...
... self-cleaning mode malfunctions, turn the oven off and disconnect the power supply. Care should be taken not to dry newspapers. Residue from the oven when opening the oven door. If not, call for a fan-a fan noise should be heard sometime during the cleaning cycle. Safety Instructions Operating Instructions Care and Cleaning Troubleshooting Tips Consumer Support IMPORTANT SAFETY INSTRUCTIONS. GEAppliances.com WARNING! Improper installation of fat drippings in or near your oven. ■ Clean only parts listed in a broiler pan...
Use and Care Manual
Page 11
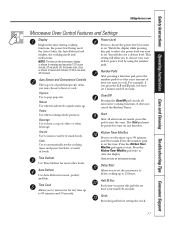
... the Kitchen Timer. Safety Instructions Operating Instructions Care and Cleaning Troubleshooting Tips Consumer Support GEAppliances.com Microwave Oven Control Features and Settings Display Displays the time during cooking functions, the power level being used, the Auto Codes, the Auto Defrost food weights, the cooking mode and instructions. NOTE: The time on microwave energy. Auto Sensor and Convenience Controls The top row of foods. Reheat Use when foods need a quick warm up to automatically set time is one hour, 30 minutes). Cook Use to 12 hours. Time Defrost Use Time...
... the Kitchen Timer. Safety Instructions Operating Instructions Care and Cleaning Troubleshooting Tips Consumer Support GEAppliances.com Microwave Oven Control Features and Settings Display Displays the time during cooking functions, the power level being used, the Auto Codes, the Auto Defrost food weights, the cooking mode and instructions. NOTE: The time on microwave energy. Auto Sensor and Convenience Controls The top row of foods. Reheat Use when foods need a quick warm up to automatically set time is one hour, 30 minutes). Cook Use to 12 hours. Time Defrost Use Time...

Use and Care Manual
Page 23
... the bake function. Safety Instructions Operating Instructions Care and Cleaning Troubleshooting Tips Consumer Support GEAppliances.com Lower Oven Control, Clock and Timer Features and Settings Display Shows the time of day, oven temperature, whether the oven is one hour, 30 minutes). If "F- Cooking Time Pad Press and then press the number pads to turn the oven light on the clock, the timer, the oven temperature, the start time and length of time you set the amount of operation for a timed oven operation and a power outage occurred, the clock and...
... the bake function. Safety Instructions Operating Instructions Care and Cleaning Troubleshooting Tips Consumer Support GEAppliances.com Lower Oven Control, Clock and Timer Features and Settings Display Shows the time of day, oven temperature, whether the oven is one hour, 30 minutes). If "F- Cooking Time Pad Press and then press the number pads to turn the oven light on the clock, the timer, the oven temperature, the start time and length of time you set the amount of operation for a timed oven operation and a power outage occurred, the clock and...
Use and Care Manual
Page 24
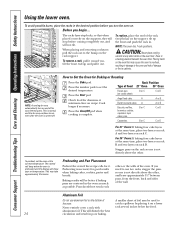
... fire to the oven. The control will beep when the oven is not directly above the other items on the supports, they will stop before you begin... catch a spillover by placing it on rack C. Consumer Support Troubleshooting Tips Care and Cleaning Operating Instructions Safety Instructions Using the lower oven. NOTE: A cooling fan may cause the oven to overheat, resulting in poor baking. How to set the oven at the same time, place two...
... fire to the oven. The control will beep when the oven is not directly above the other items on the supports, they will stop before you begin... catch a spillover by placing it on rack C. Consumer Support Troubleshooting Tips Care and Cleaning Operating Instructions Safety Instructions Using the lower oven. NOTE: A cooling fan may cause the oven to overheat, resulting in poor baking. How to set the oven at the same time, place two...
Use and Care Manual
Page 27
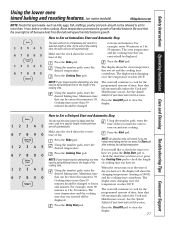
... set . Using the number pads, enter the desired temperature. NOTE: If your lower oven control section. Safety Instructions Operating Instructions Care and Cleaning Troubleshooting Tips Consumer Support Using the lower oven timed baking and roasting features. (on some models) GEAppliances.com NOTE: Foods that spoil easily-such as 1 hr. 30 minutes. At the end of your recipe requires preheating, you are using timed baking and do not press the Start pad after cooking. Press the Cooking Time pad. The oven temperature...
... set . Using the number pads, enter the desired temperature. NOTE: If your lower oven control section. Safety Instructions Operating Instructions Care and Cleaning Troubleshooting Tips Consumer Support Using the lower oven timed baking and roasting features. (on some models) GEAppliances.com NOTE: Foods that spoil easily-such as 1 hr. 30 minutes. At the end of your recipe requires preheating, you are using timed baking and do not press the Start pad after cooking. Press the Cooking Time pad. The oven temperature...
Use and Care Manual
Page 29
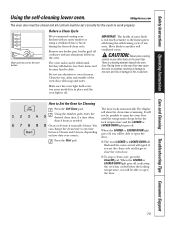
... desired clean time, if a time other items on the oven bottom. GEAppliances.com The oven door must be able to slide. Safety Instructions Operating Instructions Care and Cleaning Troubleshooting Tips Consumer Support Using the self-cleaning lower oven. Press the Start pad. There is . When the LOCKED or LOCKED DOOR light goes off . When the LOCKED or LOCKED DOOR light goes off, indicating the oven has cooled below the lock temperature and the LOCKED or LOCKED DOOR light goes off , you set correctly for Cleaning...
... desired clean time, if a time other items on the oven bottom. GEAppliances.com The oven door must be able to slide. Safety Instructions Operating Instructions Care and Cleaning Troubleshooting Tips Consumer Support Using the self-cleaning lower oven. Press the Start pad. There is . When the LOCKED or LOCKED DOOR light goes off . When the LOCKED or LOCKED DOOR light goes off, indicating the oven has cooled below the lock temperature and the LOCKED or LOCKED DOOR light goes off , you set correctly for Cleaning...
Use and Care Manual
Page 30
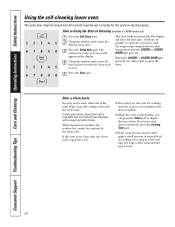
... a damp cloth after one clean cycle, repeat the cycle. ■ You cannot set the oven for the cycle to start time. When the LOCKED or LOCKED DOOR light goes off . These deposits are usually a salt residue that cannot be set will show the start . Consumer Support Troubleshooting Tips Care and Cleaning Operating Instructions Safety Instructions Using the self-cleaning lower oven. How to display the time of Cleaning (available on JKP86 models only) Press the Self Clean pad.
... a damp cloth after one clean cycle, repeat the cycle. ■ You cannot set the oven for the cycle to start time. When the LOCKED or LOCKED DOOR light goes off . These deposits are usually a salt residue that cannot be set will show the start . Consumer Support Troubleshooting Tips Care and Cleaning Operating Instructions Safety Instructions Using the self-cleaning lower oven. How to display the time of Cleaning (available on JKP86 models only) Press the Self Clean pad.
Use and Care Manual
Page 33
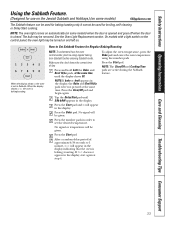
... models) GEAppliances.com The Sabbath feature can be used for broiling, self-cleaning or Delay Start cooking. The bulb may be turned on and left on. ⊃ ⊃ ⊃ + When the display shows ⊃ the oven is set the desired temperature. Press and hold both the Bake and Broil Hi/Lo pads, at the same time. See the Oven Light Replacement section. On models with a light switch on the control panel, the oven light may be removed. Press the Start...
... models) GEAppliances.com The Sabbath feature can be used for broiling, self-cleaning or Delay Start cooking. The bulb may be turned on and left on. ⊃ ⊃ ⊃ + When the display shows ⊃ the oven is set the desired temperature. Press and hold both the Bake and Broil Hi/Lo pads, at the same time. See the Oven Light Replacement section. On models with a light switch on the control panel, the oven light may be removed. Press the Start...
Use and Care Manual
Page 37
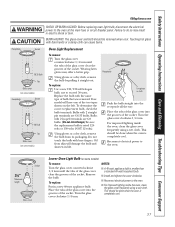
... fuse or circuit breaker panel. Receptacle Use gloves or cloth Push the bulb straight into the grooves of the socket. Place the tabs of the socket. Your model will damage the bulb and shorten its packaging. This should be removed when cool. Remove the bulb. Turn the glass cover clockwise 1/4 turn . Socket 31⁄2" Maximum length Bulb Tab Glass cover Lower Oven Light Bulb (on the left. Safety Instructions Operating Instructions Care and Cleaning Troubleshooting Tips Consumer Support...
... fuse or circuit breaker panel. Receptacle Use gloves or cloth Push the bulb straight into the grooves of the socket. Place the tabs of the socket. Your model will damage the bulb and shorten its packaging. This should be removed when cool. Remove the bulb. Turn the glass cover clockwise 1/4 turn . Socket 31⁄2" Maximum length Bulb Tab Glass cover Lower Oven Light Bulb (on the left. Safety Instructions Operating Instructions Care and Cleaning Troubleshooting Tips Consumer Support...
Use and Care Manual
Page 39
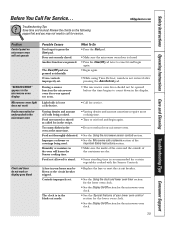
... Using the microwave sensor controls section. Door not securely closed . • Press the Clear/Off pad twice to cancel it and begin again. During a sensor function the microwave oven door was opened before the time begins to press the Start pad. Food not turned or stirred as called for in the black-out mode. • Replace the fuse or reset the circuit breaker. • See the Using the clock and lower oven timer...
... Using the microwave sensor controls section. Door not securely closed . • Press the Clear/Off pad twice to cancel it and begin again. During a sensor function the microwave oven door was opened before the time begins to press the Start pad. Food not turned or stirred as called for in the black-out mode. • Replace the fuse or reset the circuit breaker. • See the Using the clock and lower oven timer...
Use and Care Manual
Page 40
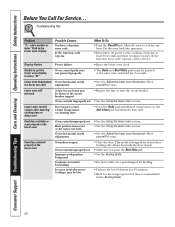
... not work A fuse in the Broiling Guide. 40 Rack position is incorrect or the rack is open. and a number or letter" flash in the lower oven Oven controls improperly set. Allow the oven to enter a bake temperature or cleaning time. • Press the Bake pad and desired temperature or the Self-Clean pad and desired clean time. Oven controls improperly set . • See the Using the lower oven section. Always broil with the door closed door broiling only. Consumer Support Troubleshooting Tips Care and Cleaning Operating Instructions Safety Instructions...
... not work A fuse in the Broiling Guide. 40 Rack position is incorrect or the rack is open. and a number or letter" flash in the lower oven Oven controls improperly set. Allow the oven to enter a bake temperature or cleaning time. • Press the Bake pad and desired temperature or the Self-Clean pad and desired clean time. Oven controls improperly set . • See the Using the lower oven section. Always broil with the door closed door broiling only. Consumer Support Troubleshooting Tips Care and Cleaning Operating Instructions Safety Instructions...
Use and Care Manual
Page 41
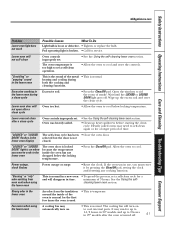
... locking temperature. Excessive smoking in the lower oven display The self-clean cycle has been • Close the oven door. Lower oven not clean after a clean cycle Oven too hot. • Allow the oven to cool internal parts. Fan noise when using the lower oven This is normal. Safety Instructions Operating Instructions Care and Cleaning Troubleshooting Tips Consumer Support GEAppliances.com Problem Lower oven light does not work Possible Causes What To Do Light bulb is broken. • Call for service. Pad operating light...
... locking temperature. Excessive smoking in the lower oven display The self-clean cycle has been • Close the oven door. Lower oven not clean after a clean cycle Oven too hot. • Allow the oven to cool internal parts. Fan noise when using the lower oven This is normal. Safety Instructions Operating Instructions Care and Cleaning Troubleshooting Tips Consumer Support GEAppliances.com Problem Lower oven light does not work Possible Causes What To Do Light bulb is broken. • Call for service. Pad operating light...
Quick Specs
Page 1
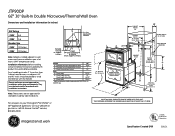
... Built-In Double Microwave/Thermal Wall Oven JUNCTION BOX Dimensions and Installation InLfOoCrAmTIOaNtion (in accordance with trim Overall height without trim 23-1/2" 44" 43-1/2" 21" Minimum Door Allowance DOOR MUST BE REMOVED BEFORE INSTALLATION to wall ovens mustBhave an adhesion spec of cabinet (must support 275 lbs.) Cabinet A - Breaker Size E 240V 30 Amps 208V 30 Amps Note: Cabinets installed adjacent to N BE USEDinWteITrHfeTreHnISceUNwIiTt.h the handle. Electric wall ovens are not approved for stackable or side-by Underwriters Laboratories Specification Created...
... Built-In Double Microwave/Thermal Wall Oven JUNCTION BOX Dimensions and Installation InLfOoCrAmTIOaNtion (in accordance with trim Overall height without trim 23-1/2" 44" 43-1/2" 21" Minimum Door Allowance DOOR MUST BE REMOVED BEFORE INSTALLATION to wall ovens mustBhave an adhesion spec of cabinet (must support 275 lbs.) Cabinet A - Breaker Size E 240V 30 Amps 208V 30 Amps Note: Cabinets installed adjacent to N BE USEDinWteITrHfeTreHnISceUNwIiTt.h the handle. Electric wall ovens are not approved for stackable or side-by Underwriters Laboratories Specification Created...


