User Manual
Page 1
...In Electric Wall Oven ge.com Safety Instructions 2-4 Operating Instructions Clock and Timer 13 Control Lockout 13 Controls 5 Oven 11, 12 Sabbath Feature 9, 10 Self-Cleaning Oven . . . . . .16, 17 Special Features 6-8 Thermostat 15 Timed Baking and Roasting . .14 Care and Cleaning Control Panel 18 Glass Surfaces 21 Heating Element 21 Knob 18 Lift-Off Oven Door . . . . . .18, 19 Light Bulb 20 Oven Interior 21 Packaging Tape 18 Painted Surfaces 21 Shelves 19 Stainless Steel Surfaces . . . . . .21 Troubleshooting Tips . . . .22-24 Consumer Support Consumer Support . . Back Cover...
...In Electric Wall Oven ge.com Safety Instructions 2-4 Operating Instructions Clock and Timer 13 Control Lockout 13 Controls 5 Oven 11, 12 Sabbath Feature 9, 10 Self-Cleaning Oven . . . . . .16, 17 Special Features 6-8 Thermostat 15 Timed Baking and Roasting . .14 Care and Cleaning Control Panel 18 Glass Surfaces 21 Heating Element 21 Knob 18 Lift-Off Oven Door . . . . . .18, 19 Light Bulb 20 Oven Interior 21 Packaging Tape 18 Painted Surfaces 21 Shelves 19 Stainless Steel Surfaces . . . . . .21 Troubleshooting Tips . . . .22-24 Consumer Support Consumer Support . . Back Cover...
User Manual
Page 2
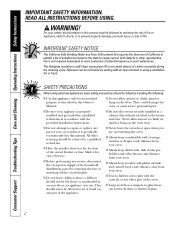
... INSTRUCTIONS BEFORE USING. s Before performing any service, disconnect the oven power supply at the household distribution panel by venting with the controls or any other servicing should not be referred to repair or replace any part of the oven. For your oven. s Be sure the oven is securely installed in a cabinet that is specifically recommended in this manual. s Have the installer show you are not watching the oven. SAFETY PRECAUTIONS When using electrical...
... INSTRUCTIONS BEFORE USING. s Before performing any service, disconnect the oven power supply at the household distribution panel by venting with the controls or any other servicing should not be referred to repair or replace any part of the oven. For your oven. s Be sure the oven is securely installed in a cabinet that is specifically recommended in this manual. s Have the installer show you are not watching the oven. SAFETY PRECAUTIONS When using electrical...
User Manual
Page 4
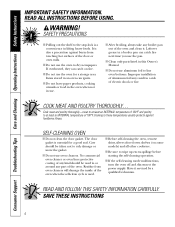
...;F. Have it . Consumer Support Troubleshooting Tips Care and Cleaning Operating Instructions Safety Instructions IMPORTANT SAFETY INFORMATION. I Clean only parts listed in this Owner's Manual. I Do not use the oven to dry newspapers. Cook meat and poultry thoroughly-meat to at least an INTERNAL temperature of 160°F and poultry to these temperatures usually protects against burns from oven cleaners will damage the inside of the oven when the self-clean cycle is a convenience in...
...;F. Have it . Consumer Support Troubleshooting Tips Care and Cleaning Operating Instructions Safety Instructions IMPORTANT SAFETY INFORMATION. I Clean only parts listed in this Owner's Manual. I Do not use the oven to dry newspapers. Cook meat and poultry thoroughly-meat to at least an INTERNAL temperature of 160°F and poultry to these temperatures usually protects against burns from oven cleaners will damage the inside of the oven when the self-clean cycle is a convenience in...
User Manual
Page 5
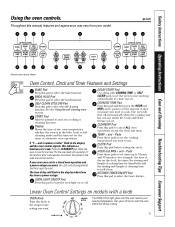
... to start and stop automatically at a time you want to select the broil function. BROIL HI/LO Pad Press this knob to the temperature setting you set for self-clean. If the function error code repeats, disconnect the power to cool for timed bake and the starting and length of day on models with a knob OVEN Knob Turn this pad to use. Lower Oven Control Settings on the clock, the timer, the starting and length of cooking time...
... to start and stop automatically at a time you want to select the broil function. BROIL HI/LO Pad Press this knob to the temperature setting you set for self-clean. If the function error code repeats, disconnect the power to cool for timed bake and the starting and length of day on models with a knob OVEN Knob Turn this pad to use. Lower Oven Control Settings on the clock, the timer, the starting and length of cooking time...
User Manual
Page 8
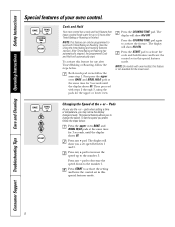
... control set in this special features mode. 8 Press the START pad to activate the cook and hold feature that keeps cooked foods warm for 3 seconds, until the display shows SF. NOTE: This feature can only be programmed to the number 5. Press the upper oven BAKE and BROIL HI/LO pads at the same time for the upper or lower oven. Consumer Support Troubleshooting Tips Care and Cleaning Operating Instructions Safety Instructions...
... control set in this special features mode. 8 Press the START pad to activate the cook and hold feature that keeps cooked foods warm for 3 seconds, until the display shows SF. NOTE: This feature can only be programmed to the number 5. Press the upper oven BAKE and BROIL HI/LO pads at the same time for the upper or lower oven. Consumer Support Troubleshooting Tips Care and Cleaning Operating Instructions Safety Instructions...
User Manual
Page 9
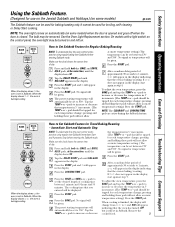
... oven light comes on automatically (on some models) ge.com The Sabbath feature can be used for broiling, self-cleaning or Delay Start cooking. pressing and holding these pads will not allow accurate temperature setting.) Press the START pad. Make sure the clock shows the correct time of approximately 30 seconds to Set Sabbath Feature for Regular Baking/Roasting NOTE: To understand how the oven control works, practice using regular (non-Sabbath) Immediate Start and Automatic Stop before...
... oven light comes on automatically (on some models) ge.com The Sabbath feature can be used for broiling, self-cleaning or Delay Start cooking. pressing and holding these pads will not allow accurate temperature setting.) Press the START pad. Make sure the clock shows the correct time of approximately 30 seconds to Set Sabbath Feature for Regular Baking/Roasting NOTE: To understand how the oven control works, practice using regular (non-Sabbath) Immediate Start and Automatic Stop before...
User Manual
Page 11
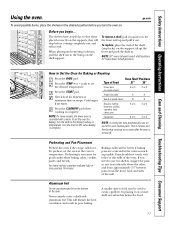
... poor baking. Press the START pad. If you , tilt the front end up the front and push the shelf in the oven as much as possible. Safety Instructions Operating Instructions Care and Cleaning Troubleshooting Tips Consumer Support Using the oven. To set the desired temperature. The shelves have 4 shelf positions. Preheating and Pan Placement Preheat the oven if the recipe calls for Baking or Roasting Press the BAKE pad. To replace, place...
... poor baking. Press the START pad. If you , tilt the front end up the front and push the shelf in the oven as much as possible. Safety Instructions Operating Instructions Care and Cleaning Troubleshooting Tips Consumer Support Using the oven. To set the desired temperature. The shelves have 4 shelf positions. Preheating and Pan Placement Preheat the oven if the recipe calls for Baking or Roasting Press the BAKE pad. To replace, place...

User Manual
Page 12
... 35 10-15 C 25 10 Reduce time about 1 lb. Place the meat or fish on meats at refrigerator temperature. Press the START pad. Chicken 1 whole A 2 to 1/2″ thick C 13-16 5 Do not turn over. E 5 5 Handle and turn the knob to 12 oz. Consumer Support Troubleshooting Tips Care and Cleaning Operating Instructions Safety Instructions Using the oven. Department of broiling time. C 10 7-8 E 10 8 Pan frying is finished, press the CLEAR/OFF...
... 35 10-15 C 25 10 Reduce time about 1 lb. Place the meat or fish on meats at refrigerator temperature. Press the START pad. Chicken 1 whole A 2 to 1/2″ thick C 13-16 5 Do not turn over. E 5 5 Handle and turn the knob to 12 oz. Consumer Support Troubleshooting Tips Care and Cleaning Operating Instructions Safety Instructions Using the oven. Department of broiling time. C 10 7-8 E 10 8 Pan frying is finished, press the CLEAR/OFF...

User Manual
Page 13
Safety Instructions Operating Instructions Care and Cleaning Troubleshooting Tips Consumer Support Using the clock and timer. pads until the amount of a Timed Cycle. If you may change until one beep every 6 seconds until the time you can be retained in the display until the last minute is counting down . To Cancel the Timer Press KITCHEN TIMER ON/OFF pad twice. To lock/unlock the controls: Press the HOUR and MIN - pads at...
Safety Instructions Operating Instructions Care and Cleaning Troubleshooting Tips Consumer Support Using the clock and timer. pads until the amount of a Timed Cycle. If you may change until one beep every 6 seconds until the time you can be retained in the display until the last minute is counting down . To Cancel the Timer Press KITCHEN TIMER ON/OFF pad twice. To lock/unlock the controls: Press the HOUR and MIN - pads at...
User Manual
Page 14
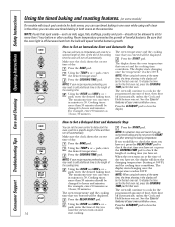
... be displayed. To display the time changed to turn off automatically. Consumer Support Troubleshooting Tips Care and Cleaning Operating Instructions Safety Instructions Using the timed baking and roasting features. (on some models) On models with touch pad controls for that oven. 1 hour, 30 minutes. NOTE: Foods that spoil easily-such as 1 hour, 30 minutes. NOTE: If your oven control section. See the Special features of day. How to delay-start cooking. Press the COOKING TIME pad. temperature reaches...
... be displayed. To display the time changed to turn off automatically. Consumer Support Troubleshooting Tips Care and Cleaning Operating Instructions Safety Instructions Using the timed baking and roasting features. (on some models) On models with touch pad controls for that oven. 1 hour, 30 minutes. NOTE: Foods that spoil easily-such as 1 hour, 30 minutes. NOTE: If your oven control section. See the Special features of day. How to delay-start cooking. Press the COOKING TIME pad. temperature reaches...
User Manual
Page 15
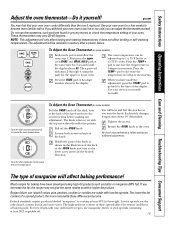
... of the OVEN knob and turn the knob. Safety Instructions Operating Instructions Care and Cleaning Troubleshooting Tips Consumer Support Adjust the oven thermostat-Do it does not affect broiling or self-cleaning temperatures. If you turn so the lower screw moves in memory after a power failure. NOTE: This adjustment will hear and feel the notches as with your new oven for the upper or lower oven. The type of a spread product, the...
... of the OVEN knob and turn the knob. Safety Instructions Operating Instructions Care and Cleaning Troubleshooting Tips Consumer Support Adjust the oven thermostat-Do it does not affect broiling or self-cleaning temperatures. If you turn so the lower screw moves in memory after a power failure. NOTE: This adjustment will hear and feel the notches as with your new oven for the upper or lower oven. The type of a spread product, the...
User Manual
Page 16
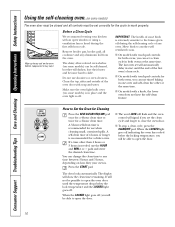
... clean time remaining. Remove broiler pan, broiler grid, all controls must be closed and all cookware and any aluminum foil from the oven. A self-clean time of the first oven's clean cycle. s On models with a knob, the lower oven does not have the self-clean feature. Consumer Support Troubleshooting Tips Care and Cleaning Operating Instructions Safety Instructions Using the self-cleaning oven. (on some models) The oven door must be set the clean cycle and forget to close the oven door. How to Set the Oven for Cleaning...
... clean time remaining. Remove broiler pan, broiler grid, all controls must be closed and all cookware and any aluminum foil from the oven. A self-clean time of the first oven's clean cycle. s On models with a knob, the lower oven does not have the self-clean feature. Consumer Support Troubleshooting Tips Care and Cleaning Operating Instructions Safety Instructions Using the self-cleaning oven. (on some models) The oven door must be set the clean cycle and forget to close the oven door. How to Set the Oven for Cleaning...
User Manual
Page 17
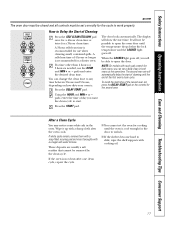
... supports with touch pad controls for the door to unlock. pads, enter the time of the first oven's clean cycle. NOTE: On models with cooking oil. 17 After a Clean Cycle You may notice some white ash in both ovens at the same time. Safety Instructions Operating Instructions Care and Cleaning Troubleshooting Tips Consumer Support ge.com The oven door must be closed and all controls must be possible to open the door. A self-clean time of cleaning until the oven...
... supports with touch pad controls for the door to unlock. pads, enter the time of the first oven's clean cycle. NOTE: On models with cooking oil. 17 After a Clean Cycle You may notice some white ash in both ovens at the same time. Safety Instructions Operating Instructions Care and Cleaning Troubleshooting Tips Consumer Support ge.com The oven door must be closed and all controls must be possible to open the door. A self-clean time of cleaning until the oven...
User Manual
Page 18
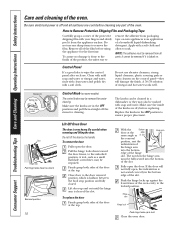
...: The adhesive must be removed if it from the appliance surface. Lift door up to lock Close the oven door. To assure no damage is an application of the product, the safest way to soak. Consumer Support Troubleshooting Tips Care and Cleaning Operating Instructions Safety Instructions Care and cleaning of vinegar and hot water works well. Apply with a soft cloth. Do not use any part of the slot...
...: The adhesive must be removed if it from the appliance surface. Lift door up to lock Close the oven door. To assure no damage is an application of the product, the safest way to soak. Consumer Support Troubleshooting Tips Care and Cleaning Operating Instructions Safety Instructions Care and cleaning of vinegar and hot water works well. Apply with a soft cloth. Do not use any part of the slot...

User Manual
Page 20
... bulb. Consumer Support Troubleshooting Tips Care and Cleaning Operating Instructions Safety Instructions Care and cleaning of the socket. Socket 31⁄2" Maximum length Bulb Tab Glass cover Oven Light Bulb (on some models) NOTE: The glass cover (on some models) should be removed only when cold. For your oven light bulb, disconnect the electrical power to exceed 50 watts. Remove the bulb. NOTE: s A 40-watt appliance bulb is completely cool. s For improved lighting inside the oven, clean the glass cover frequently using a wet cloth. CAUTION: Before replacing...
... bulb. Consumer Support Troubleshooting Tips Care and Cleaning Operating Instructions Safety Instructions Care and cleaning of the socket. Socket 31⁄2" Maximum length Bulb Tab Glass cover Oven Light Bulb (on some models) NOTE: The glass cover (on some models) should be removed only when cold. For your oven light bulb, disconnect the electrical power to exceed 50 watts. Remove the bulb. NOTE: s A 40-watt appliance bulb is completely cool. s For improved lighting inside the oven, clean the glass cover frequently using a wet cloth. CAUTION: Before replacing...

User Manual
Page 21
... toll-free number: National Parts Center 1.800.626.2002 ge.com Oven Heating Elements Do not clean the bake element or the broil element. Soap and water will scratch the surface. They may require cleaning with a mild abrasive cleaner. Glass Surfaces To clean the outside glass finish, use warm sudsy water or a stainless steel cleaner or polish. Follow the cleaner instructions for years. To clean the oven floor, gently lift the bake element. The...
... toll-free number: National Parts Center 1.800.626.2002 ge.com Oven Heating Elements Do not clean the bake element or the broil element. Soap and water will scratch the surface. They may require cleaning with a mild abrasive cleaner. Glass Surfaces To clean the outside glass finish, use warm sudsy water or a stainless steel cleaner or polish. Follow the cleaner instructions for years. To clean the oven floor, gently lift the bake element. The...
User Manual
Page 22
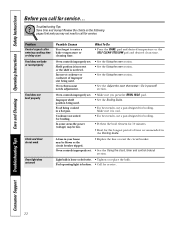
... Broiling Guide. • For best results, use a pan designed for broiling. • Preheat the broil element for 10 minutes. • Broil for the longest period of improper size being cooked in the Broiling Guide. What To Do • Press the BAKE pad and desired temperature or the SELF CLEAN STD/LOW pad and desired clean time. Oven controls improperly set . • Replace the fuse or reset the circuit breaker. • See the Using the clock, timer and control lockout section. Oven controls improperly set...
... Broiling Guide. • For best results, use a pan designed for broiling. • Preheat the broil element for 10 minutes. • Broil for the longest period of improper size being cooked in the Broiling Guide. What To Do • Press the BAKE pad and desired temperature or the SELF CLEAN STD/LOW pad and desired clean time. Oven controls improperly set . • Replace the fuse or reset the circuit breaker. • See the Using the clock, timer and control lockout section. Oven controls improperly set...

User Manual
Page 23
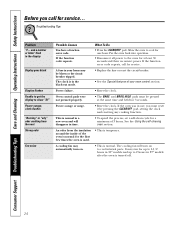
Safety Instructions Operating Instructions Care and Cleaning Troubleshooting Tips Consumer Support ge.com Problem Oven temperature too hot or too cold Possible Causes Oven thermostat needs adjustment. Oven will not work A fuse in the display The self-clean cycle has been selected but the door is the sound of smoke. Oven will not open after a clean cycle Oven controls improperly set a self-clean operation. Excessive smoking during both the cooking and cleaning functions. • This is normal. Oven controls improperly set . • Allow the oven to self-clean again or...
Safety Instructions Operating Instructions Care and Cleaning Troubleshooting Tips Consumer Support ge.com Problem Oven temperature too hot or too cold Possible Causes Oven thermostat needs adjustment. Oven will not work A fuse in the display The self-clean cycle has been selected but the door is the sound of smoke. Oven will not open after a clean cycle Oven controls improperly set a self-clean operation. Excessive smoking during both the cooking and cleaning functions. • This is normal. Oven controls improperly set . • Allow the oven to self-clean again or...
User Manual
Page 24
... the oven back into operation. • Disconnect all power to the oven for up to 1-1/2 hours in 27″ models after the oven is turned off. 24 Troubleshooting Tips Problem "F- If the oven was in your oven control section. An odor from the vent Strong odor Fan noise Possible Causes You have a function error code. Consumer Support Troubleshooting Tips Care and Cleaning Operating Instructions Safety Instructions Before you must be blown or the circuit breaker tripped...
... the oven back into operation. • Disconnect all power to the oven for up to 1-1/2 hours in 27″ models after the oven is turned off. 24 Troubleshooting Tips Problem "F- If the oven was in your oven control section. An odor from the vent Strong odor Fan noise Possible Causes You have a function error code. Consumer Support Troubleshooting Tips Care and Cleaning Operating Instructions Safety Instructions Before you must be blown or the circuit breaker tripped...
User Manual
Page 27
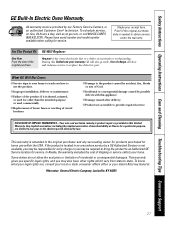
... acts of the product if it is needed to your receipt here. To schedule service, on-line, 24 hours a day, visit us at ge.com, or call 800.GE.CARES (800.432.2737). Warrantor: General Electric Company. s Failure of God. All warranty service provided by law. Please have other than the intended purpose or used for service. Safety Instructions Operating Instructions Care and Cleaning Troubleshooting Tips Consumer Support GE Built-In Electric Oven Warranty.
... acts of the product if it is needed to your receipt here. To schedule service, on-line, 24 hours a day, visit us at ge.com, or call 800.GE.CARES (800.432.2737). Warrantor: General Electric Company. s Failure of God. All warranty service provided by law. Please have other than the intended purpose or used for service. Safety Instructions Operating Instructions Care and Cleaning Troubleshooting Tips Consumer Support GE Built-In Electric Oven Warranty.


