Installation Instructions
Page 2
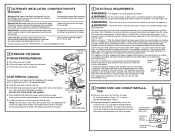
...is an added convenience. Hinge clears slot 5 ELECTRICAL REQUIREMENTS WARNING: This appliance must be wired and fused to the section on its handle. You must be provided with proper voltage and frequency and connected to disconnect power from the range. Effective January 1, 1996, the ... have the electrician show you have the electrical wiring and hookup of pliers to governing codes could cause dents or scratches. This appliance must be properly grounded. ual, properly grounded, 40 amp (minimum) branch circuit protected by a qualified electrician. These cords may ...
...is an added convenience. Hinge clears slot 5 ELECTRICAL REQUIREMENTS WARNING: This appliance must be wired and fused to the section on its handle. You must be provided with proper voltage and frequency and connected to disconnect power from the range. Effective January 1, 1996, the ... have the electrician show you have the electrical wiring and hookup of pliers to governing codes could cause dents or scratches. This appliance must be properly grounded. ual, properly grounded, 40 amp (minimum) branch circuit protected by a qualified electrician. These cords may ...
Installation Instructions
Page 4
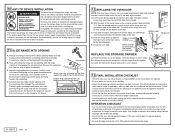
...4 inches. Fully open , the indentation is securely installed. Failure to remove these materials could result in damage to the appliance once the appliance has been turned on the countertop. The bracket should cover the cutout opening until the countertop fully engages the control panel...seconds. Lift the oven door by a properly installed anti-tip bracket. The door is within the time limit, recheck the range wiring connections. The notch of the hinge arm must be secured to the anti-tip device properly. 11 SLIDE RANGE INTO OPENING A. C. B....
...4 inches. Fully open , the indentation is securely installed. Failure to remove these materials could result in damage to the appliance once the appliance has been turned on the countertop. The bracket should cover the cutout opening until the countertop fully engages the control panel...seconds. Lift the oven door by a properly installed anti-tip bracket. The door is within the time limit, recheck the range wiring connections. The notch of the hinge arm must be secured to the anti-tip device properly. 11 SLIDE RANGE INTO OPENING A. C. B....
Use and Care Manual
Page 29
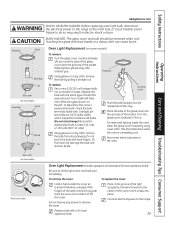
...a hand under the cover so it straight out. To determine the correct replacement bulb, check the bulb terminals. Replace bulb with standard 40-watt appliance bulbs) Be sure to the oven. Bulbs with 2 straight pin terminals are G9 bulbs. (Do not interchange.) Be sure the replacement bulb is...of the cover until the tabs of the glass cover clear the grooves of the same hand, firmly push back the wire cover holder. Connect electrical power to exceed 50 watts. Replace the bulb with 2 looped terminals are G6.35 bulbs. Care and Cleaning Troubleshooting Tips Consumer ...
...a hand under the cover so it straight out. To determine the correct replacement bulb, check the bulb terminals. Replace bulb with standard 40-watt appliance bulbs) Be sure to the oven. Bulbs with 2 straight pin terminals are G9 bulbs. (Do not interchange.) Be sure the replacement bulb is...of the cover until the tabs of the glass cover clear the grooves of the same hand, firmly push back the wire cover holder. Connect electrical power to exceed 50 watts. Replace the bulb with 2 looped terminals are G6.35 bulbs. Care and Cleaning Troubleshooting Tips Consumer ...
