Quick Specs
Page 2
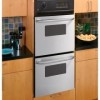
... oven are easy-to-use and allow consumers to check the progress of cookware • Multiple oven rack positions -Deliver flexibility and allow for scrubbing • Electronic oven controls (upper oven only) - Prepared foods stay warm in accordance with kosher law • Model JRP28SKSS - JRP28SK GE® 24" Built-In Double Wall Oven Features and Benefits • Self-clean oven -Conveniently cleans oven...
... oven are easy-to-use and allow consumers to check the progress of cookware • Multiple oven rack positions -Deliver flexibility and allow for scrubbing • Electronic oven controls (upper oven only) - Prepared foods stay warm in accordance with kosher law • Model JRP28SKSS - JRP28SK GE® 24" Built-In Double Wall Oven Features and Benefits • Self-clean oven -Conveniently cleans oven...
Use and Care Manual
Page 2
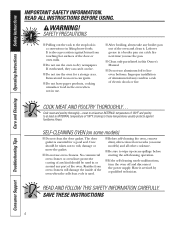
...sit or stand on any part of the appliance. ■ Never leave the oven door open window or using electrical appliances, basic safety precautions should be followed, including the following: ■ Use this appliance only for easy reference. ■ Before performing any other servicing ...the installer show you are not watching the oven. ■ Always keep combustible wall covering, curtains or drapes a safe distance from your oven. ■ Always keep dish towels, dish cloths, pot holders and other linens a safe distance from your oven. ■ Always keep wooden and plastic utensils...
...sit or stand on any part of the appliance. ■ Never leave the oven door open window or using electrical appliances, basic safety precautions should be followed, including the following: ■ Use this appliance only for easy reference. ■ Before performing any other servicing ...the installer show you are not watching the oven. ■ Always keep combustible wall covering, curtains or drapes a safe distance from your oven. ■ Always keep dish towels, dish cloths, pot holders and other linens a safe distance from your oven. ■ Always keep wooden and plastic utensils...
Use and Care Manual
Page 3
.... Flammable material could be stored in the vicinity of this or any other flammable materials contact any interior area of the oven; During and after use combustible materials, gasoline or other flammable vapors and liquids in cabinets above the door. ■ REMEMBER: The inside surface of ...hot enough to children should not be seriously injured. ■ Never wear loose-fitting or hanging garments while using cooking or roasting bags in the desired position while the oven is opened. 3 Do not let pot holders touch hot heating elements. children climbing on hot surfaces may ...
.... Flammable material could be stored in the vicinity of this or any other flammable materials contact any interior area of the oven; During and after use combustible materials, gasoline or other flammable vapors and liquids in cabinets above the door. ■ REMEMBER: The inside surface of ...hot enough to children should not be seriously injured. ■ Never wear loose-fitting or hanging garments while using cooking or roasting bags in the desired position while the oven is opened. 3 Do not let pot holders touch hot heating elements. children climbing on hot surfaces may ...
Use and Care Manual
Page 4
... the inside of the door or oven walls. ■ Do not use aluminum foil to the stop-lock is used in lifting heavy foods. SELF-CLEANING OVEN (on fire. ■ Do not use oven cleaners. Care should be taken not to at least an INTERNAL temperature of electric shock or fire. READ AND FOLLOW... THIS SAFETY INFORMATION CAREFULLY. COOK MEAT AND POULTRY THOROUGHLY... Cook meat and poultry thoroughly-meat to at least an INTERNAL temperature of 160°F and poultry to rub, damage or move the gasket. ■ Do not use the oven for a...
... the inside of the door or oven walls. ■ Do not use aluminum foil to the stop-lock is used in lifting heavy foods. SELF-CLEANING OVEN (on fire. ■ Do not use oven cleaners. Care should be taken not to at least an INTERNAL temperature of electric shock or fire. READ AND FOLLOW... THIS SAFETY INFORMATION CAREFULLY. COOK MEAT AND POULTRY THOROUGHLY... Cook meat and poultry thoroughly-meat to at least an INTERNAL temperature of 160°F and poultry to rub, damage or move the gasket. ■ Do not use the oven for a...
Use and Care Manual
Page 5
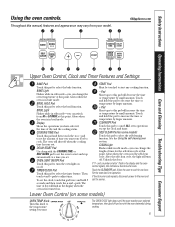
...the light will shut off and on or off . BROIL HI/LO Pad Touch this pad to the oven and call for one hour. See the Using the self-cleaning oven section. If function error code repeats, disconnect power to select the bake function. Throughout this pad to... automatically at this knob to the temperature setting you want . Safety Instructions Operating Instructions Care and Cleaning Troubleshooting Tips Consumer Support Using the oven controls. Display Shows the operations you have selected, the time of time you want your selected temperature, then goes off when...
...the light will shut off and on or off . BROIL HI/LO Pad Touch this pad to the oven and call for one hour. See the Using the self-cleaning oven section. If function error code repeats, disconnect power to select the bake function. Throughout this pad to... automatically at this knob to the temperature setting you want . Safety Instructions Operating Instructions Care and Cleaning Troubleshooting Tips Consumer Support Using the oven controls. Display Shows the operations you have selected, the time of time you want your selected temperature, then goes off when...
Use and Care Manual
Page 6
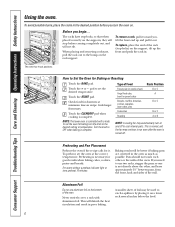
...OFF when baking is not directly above the other or the walls of the oven. Preheating and Pan Placement Preheat the oven if the recipe calls for Baking or Roasting Touch the BAKE pad. If you turn the oven on. pad to the desired setting or temperature. Check ...necessary. Never entirely cover a rack with a knob. To remove a rack, pull it out. A smaller sheet of the wall. Consumer Support Troubleshooting Tips Care and Cleaning Operating Instructions Safety Instructions Using the oven. The racks have stop-locks, so that when placed correctly on the supports, they will be...
...OFF when baking is not directly above the other or the walls of the oven. Preheating and Pan Placement Preheat the oven if the recipe calls for Baking or Roasting Touch the BAKE pad. If you turn the oven on. pad to the desired setting or temperature. Check ...necessary. Never entirely cover a rack with a knob. To remove a rack, pull it out. A smaller sheet of the wall. Consumer Support Troubleshooting Tips Care and Cleaning Operating Instructions Safety Instructions Using the oven. The racks have stop-locks, so that when placed correctly on the supports, they will be...
Use and Care Manual
Page 8
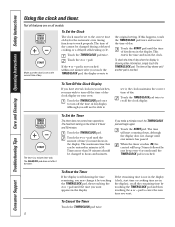
Consumer Support Troubleshooting Tips Care and Cleaning Operating Instructions Safety Instructions Using the clock and timer. Not all models. To Set the Clock The clock.... If this happens, touch the TIMER/CLOCK pad twice and reenter the time of day for the automatic oven timing functions to the correct time of day shows until the amount of day clock display on your kitchen,... the correct time of day display. pad. To Turn Off the Clock Display If you have several clocks in your oven. Touch the + or - When the timer reaches :00, the control will beep 3 times followed by one beep...
Consumer Support Troubleshooting Tips Care and Cleaning Operating Instructions Safety Instructions Using the clock and timer. Not all models. To Set the Clock The clock.... If this happens, touch the TIMER/CLOCK pad twice and reenter the time of day for the automatic oven timing functions to the correct time of day shows until the amount of day clock display on your kitchen,... the correct time of day display. pad. To Turn Off the Clock Display If you have several clocks in your oven. Touch the + or - When the timer reaches :00, the control will beep 3 times followed by one beep...
Use and Care Manual
Page 9
...was set , the display will turn on and start cooking. Touch the CLEAR/OFF pad to clear the display. Using the + or - Touch the COOKING TIME pad. NOTE: If your oven control section. pad, enter the desired baking time. Touch the DELAY START pad. pad, enter the time of day... preheating, you have set, touch the DELAY START pad to check the start the oven, cook for a specific length of timed baking, the oven will be displayed. For example, enter 90 minutes as 1 hour, 30 minutes. Using the + or - The display starts changing once the temperature reaches 100°F. Make...
...was set , the display will turn on and start cooking. Touch the CLEAR/OFF pad to clear the display. Using the + or - Touch the COOKING TIME pad. NOTE: If your oven control section. pad, enter the desired baking time. Touch the DELAY START pad. pad, enter the time of day... preheating, you have set, touch the DELAY START pad to check the start the oven, cook for a specific length of timed baking, the oven will be displayed. For example, enter 90 minutes as 1 hour, 30 minutes. Using the + or - The display starts changing once the temperature reaches 100°F. Make...
Use and Care Manual
Page 10
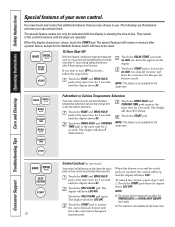
...seconds. When this feature, should you forget and leave the oven on and the touch pads are the features and how you may activate them. leave the control set to use the Fahrenheit temperature selections but you to use . Your new touch pad control has additional features that ...seconds until the steps are repeated. NOTE: Touch the SELF CLEAN pad again. Touch the START pad to use the Celsius selections. Fahrenheit or Celsius Temperature Selection Your oven control is showing the time of your choice, touch the START pad. Consumer Support Troubleshooting Tips Care and ...
...seconds. When this feature, should you forget and leave the oven on and the touch pads are the features and how you may activate them. leave the control set to use the Fahrenheit temperature selections but you to use . Your new touch pad control has additional features that ...seconds until the steps are repeated. NOTE: Touch the SELF CLEAN pad again. Touch the START pad to use the Celsius selections. Fahrenheit or Celsius Temperature Selection Your oven control is showing the time of your choice, touch the START pad. Consumer Support Troubleshooting Tips Care and ...
Use and Care Manual
Page 11
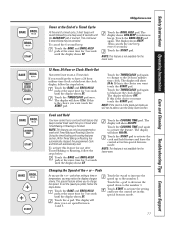
...NOTE: This feature is not available for the lower oven. 12 Hour, 24 Hour or Clock Black-Out Your control is not available for the lower oven. The display will show 12 hr. Touch the TIMER...timed cycle, 3 short beeps will automatically start. pad when setting a time or temperature, you to change to use the Delay Start function. Touch the + pad. Touch START to the number 5. This continuous 6 second beep ... 1. Touch the BAKE and BROIL HI/LO pads at the same time for use the + or - The display will show 24 hr. To set in the black-out mode you would prefer to 3 hours...
...NOTE: This feature is not available for the lower oven. 12 Hour, 24 Hour or Clock Black-Out Your control is not available for the lower oven. The display will show 12 hr. Touch the TIMER...timed cycle, 3 short beeps will automatically start. pad when setting a time or temperature, you to change to use the Delay Start function. Touch the + pad. Touch START to the number 5. This continuous 6 second beep ... 1. Touch the BAKE and BROIL HI/LO pads at the same time for use the + or - The display will show 24 hr. To set in the black-out mode you would prefer to 3 hours...
Use and Care Manual
Page 12
...appear in the display. No signal or temperature will automatically turn off when the door is in the display indicating that the oven will be used for broiling, self-cleaning, or Delay Start cooking. Touch the START pad. It cannot be given. pad to increase ...the temperature in 5° increments. How to increase or decrease the temperature in 5° increments. NOTE: To understand how the oven control works, practice using regular (non-Sabbath) Immediate Start and Automatic Stop before entering Sabbath mode. Touch the BAKE pad. Touch the START pad and ...
...appear in the display. No signal or temperature will automatically turn off when the door is in the display indicating that the oven will be used for broiling, self-cleaning, or Delay Start cooking. Touch the START pad. It cannot be given. pad to increase ...the temperature in 5° increments. How to increase or decrease the temperature in 5° increments. NOTE: To understand how the oven control works, practice using regular (non-Sabbath) Immediate Start and Automatic Stop before entering Sabbath mode. Touch the BAKE pad. Touch the START pad and ...
Use and Care Manual
Page 13
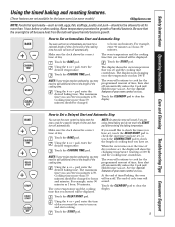
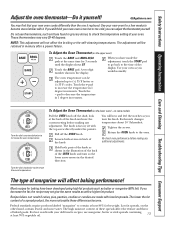
...and feel the notches as butter or margarine (80% fat). When you have been developed using high fat products such as you would normally. Low fat spreads, on back of your new oven is factory set with low fat spreads. Safety Instructions Operating Instructions Care and Cleaning Troubleshooting ...hand, contain less fat and more familiar with a higher fat product. Turn the disk clockwise to become . Use your new oven for 3 seconds until the display shows SF. Use your oven as shown in grocery stores, to the time of the knob and note the current setting before making any ...
...and feel the notches as butter or margarine (80% fat). When you have been developed using high fat products such as you would normally. Low fat spreads, on back of your new oven is factory set with low fat spreads. Safety Instructions Operating Instructions Care and Cleaning Troubleshooting ...hand, contain less fat and more familiar with a higher fat product. Turn the disk clockwise to become . Use your new oven for 3 seconds until the display shows SF. Use your oven as shown in grocery stores, to the time of the knob and note the current setting before making any ...

Use and Care Manual
Page 14
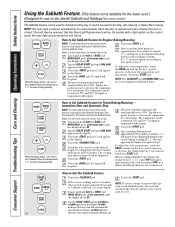
... Clean Cycle You may vary) Before a Clean Cycle The oven must be removed by the clean cycle. the oven cools. ■ You cannot set correctly for the cycle to work properly. Using the + or - pad, enter the desired clean time. Using the + or - Touch the START pad. The display will...the clean cycle to start time. Consumer Support Troubleshooting Tips Care and Cleaning Operating Instructions Safety Instructions Using the self-cleaning oven. (on some models) (This feature is not available for the lower oven.) The oven door must be closed and all cookware and any aluminum foil from the...
... Clean Cycle You may vary) Before a Clean Cycle The oven must be removed by the clean cycle. the oven cools. ■ You cannot set correctly for the cycle to work properly. Using the + or - pad, enter the desired clean time. Using the + or - Touch the START pad. The display will...the clean cycle to start time. Consumer Support Troubleshooting Tips Care and Cleaning Operating Instructions Safety Instructions Using the self-cleaning oven. (on some models) (This feature is not available for the lower oven.) The oven door must be closed and all cookware and any aluminum foil from the...
Use and Care Manual
Page 15
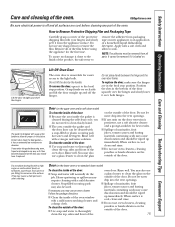
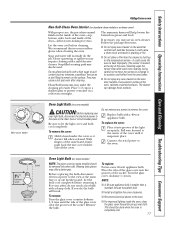
... may cause discoloration and should have it replaced. To clean the outside of a household liquid dishwashing detergent. To assure no damage is persistent, use oven cleaners, cleaning powders or harsh abrasives on the surface. To remove the door, open it has an extremely low resistance to remove the film....from all surfaces are in any sharp items to abrasion. GEAppliances.com Be sure electrical power is baked on the outside of the door: ■ Use soap and water to the light bulb. You may also use any way or if it is off the hinges. Heavy spattering or spillovers ...
... may cause discoloration and should have it replaced. To clean the outside of a household liquid dishwashing detergent. To assure no damage is persistent, use oven cleaners, cleaning powders or harsh abrasives on the surface. To remove the door, open it has an extremely low resistance to remove the film....from all surfaces are in any sharp items to abrasion. GEAppliances.com Be sure electrical power is baked on the outside of the door: ■ Use soap and water to the light bulb. You may also use any way or if it is off the hinges. Heavy spattering or spillovers ...
Use and Care Manual
Page 16
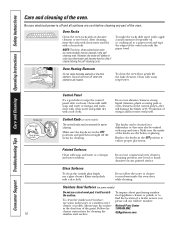
...darken in the OFF positions and pull them straight off the stems for cleaning. Follow the cleaner instructions for easier cleaning. Be sure electrical power is off when the elements are in color, lose their luster and become hard to wipe the control panel after each...After cleaning, rinse the racks with clean water and dry with a dry cloth. To clean the stainless steel surface, use abrasive cleansers, strong liquid cleansers, plastic scouring pads or oven cleansers on some models) may also be removed for cleaning the stainless steel surface. Make sure the knobs are heated. ...
...darken in the OFF positions and pull them straight off the stems for cleaning. Follow the cleaner instructions for easier cleaning. Be sure electrical power is off when the elements are in color, lose their luster and become hard to wipe the control panel after each...After cleaning, rinse the racks with clean water and dry with a dry cloth. To clean the stainless steel surface, use abrasive cleansers, strong liquid cleansers, plastic scouring pads or oven cleansers on some models) may also be removed for cleaning the stainless steel surface. Make sure the knobs are heated. ...
Use and Care Manual
Page 17
...appliance bulb. Before replacing the bulb, disconnect electrical power to remove the cover. For your oven light bulb, disconnect the electrical power to the oven at the top of the oven-top, bottom, sides, back and inside the oven, clean the glass cover frequently using a wet cloth. Remove the bulb. To... replace: Put in a cold oven overnight. Turn the glass ...
...appliance bulb. Before replacing the bulb, disconnect electrical power to remove the cover. For your oven light bulb, disconnect the electrical power to the oven at the top of the oven-top, bottom, sides, back and inside the oven, clean the glass cover frequently using a wet cloth. Remove the bulb. To... replace: Put in a cold oven overnight. Turn the glass ...
Use and Care Manual
Page 18
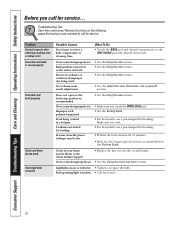
...desired temperature or the SELF CLEAN pad and desired clean time. Oven thermostat needs adjustment. • See the Using the oven section. • See the Using the oven section. • See the Using the oven section. • See the Adjust the oven thermostat-Do it is broken. • Call for service...... HI/LO pad. • See the Broiling Guide. • For best results, use a pan designed for broiling. • Preheat the broil element for 10 minutes. • Broil for service. Oven controls improperly set. Rack position is incorrect or the rack is loose or defective. •...
...desired temperature or the SELF CLEAN pad and desired clean time. Oven thermostat needs adjustment. • See the Using the oven section. • See the Using the oven section. • See the Using the oven section. • See the Adjust the oven thermostat-Do it is broken. • Call for service...... HI/LO pad. • See the Broiling Guide. • For best results, use a pan designed for broiling. • Preheat the broil element for 10 minutes. • Broil for service. Oven controls improperly set. Rack position is incorrect or the rack is loose or defective. •...

Use and Care Manual
Page 19
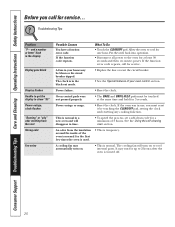
... Tips Consumer Support GEAppliances.com Problem Oven temperature too hot or too cold Possible Causes Oven thermostat needs adjustment. Open the windows to cool. 19 Oven was heavily soiled. • See the Using the self-cleaning oven section. • Clean up the...section. Oven controls improperly set . Oven not clean after a clean cycle Oven too hot. • Allow the oven to room temperature and reset the controls. • See the Using the self-cleaning oven section. Oven will not self-clean The oven temperature is normal. Heavily soiled ovens may...
... Tips Consumer Support GEAppliances.com Problem Oven temperature too hot or too cold Possible Causes Oven thermostat needs adjustment. Open the windows to cool. 19 Oven was heavily soiled. • See the Using the self-cleaning oven section. • Clean up the...section. Oven controls improperly set . Oven not clean after a clean cycle Oven too hot. • Allow the oven to room temperature and reset the controls. • See the Using the self-cleaning oven section. Oven will not self-clean The oven temperature is normal. Heavily soiled ovens may...
Use and Care Manual
Page 20
... outage, clock flashes "Burning" or "oily" odor emitting from the insulation around the inside of your home may run for the first few times the oven is used. • This is turned off. 20 An odor from the vent Strong odor Fan noise Possible Causes You have a function error code. It may... BAKE and BROIL HI/LO pads must reset it by touching the CLEAR/OFF pad, setting the clock and resetting any cooking function. See the Using the self-cleaning oven section. If the function error code repeats, call for one hour. The cooling fan will disappear in a new...
... outage, clock flashes "Burning" or "oily" odor emitting from the insulation around the inside of your home may run for the first few times the oven is used. • This is turned off. 20 An odor from the vent Strong odor Fan noise Possible Causes You have a function error code. It may... BAKE and BROIL HI/LO pads must reset it by touching the CLEAR/OFF pad, setting the clock and resetting any cooking function. See the Using the self-cleaning oven section. If the function error code repeats, call for one hour. The cooling fan will disappear in a new...
Use and Care Manual
Page 21
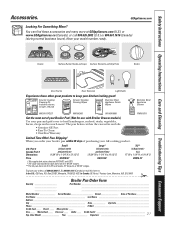
...Number Model Number Serial Number Brand Date of your Broiler Pan! (Not for use with Broiler Drawer models.) Use your pan and grid cover to broil hamburgers, seafood, steaks, vegetables, ...____ Discover ____ AmEx ____ Credit Card Exp. The pan below catches the excess fats and oils. • Genuine GE Part • Easy To Clean • One-Year Warranty Limited Time Offer! Part # Canada Part # Dimensions ...) broil pan does not fit in 20"/24" ranges. ** The XL pan does not fit in 24" wall ovens, 27" drop-ins or 20"/24" ranges. Date: Month Year Signature 21...
...Number Model Number Serial Number Brand Date of your Broiler Pan! (Not for use with Broiler Drawer models.) Use your pan and grid cover to broil hamburgers, seafood, steaks, vegetables, ...____ Discover ____ AmEx ____ Credit Card Exp. The pan below catches the excess fats and oils. • Genuine GE Part • Easy To Clean • One-Year Warranty Limited Time Offer! Part # Canada Part # Dimensions ...) broil pan does not fit in 20"/24" ranges. ** The XL pan does not fit in 24" wall ovens, 27" drop-ins or 20"/24" ranges. Date: Month Year Signature 21...

