
Use and Care Manual
Page 1
...Wall OveElectricn GEAppliances.com Safety Instructions 2-4 Operating Instructions Clock and Timer 8 Oven 5-14 Sabbath Feature 12 Self-Cleaning 14 Special Features 10, 11 Thermostat 13 Timed Baking and Roasting 9 Care and Cleaning Control Panel 16 Door 15 Glass Surfaces 16 Heating Element 16 Knob 16 Lift-Off Oven... Support Accessories 21 Consumer Support . . . Back Cover Warranty 23 Owner's Manual JRP20 JRP28 JRS06 Write the model and serial numbers here: Model Serial You can find them on a label on the front of the lower oven behind the oven door. 49-80588 03-09 JR
...Wall OveElectricn GEAppliances.com Safety Instructions 2-4 Operating Instructions Clock and Timer 8 Oven 5-14 Sabbath Feature 12 Self-Cleaning 14 Special Features 10, 11 Thermostat 13 Timed Baking and Roasting 9 Care and Cleaning Control Panel 16 Door 15 Glass Surfaces 16 Heating Element 16 Knob 16 Lift-Off Oven... Support Accessories 21 Consumer Support . . . Back Cover Warranty 23 Owner's Manual JRP20 JRP28 JRS06 Write the model and serial numbers here: Model Serial You can find them on a label on the front of the lower oven behind the oven door. 49-80588 03-09 JR
Use and Care Manual
Page 4
... should be taken not to these temperatures usually protects against burns from oven cleaners will damage the inside of the oven when the self-clean cycle is used in a broiler pan can catch on some models) and all other cookware. ■ Be sure to the stop-...Have it . Residue from touching hot surfaces of the oven. WARNING! Leftover grease in or around any part of the door or oven walls. ■ Do not use the oven to dry newspapers. No commercial oven cleaner or oven liner protective coating of electric shock or fire. SAVE THESE INSTRUCTIONS 4 Cooking to...
... should be taken not to these temperatures usually protects against burns from oven cleaners will damage the inside of the oven when the self-clean cycle is used in a broiler pan can catch on some models) and all other cookware. ■ Be sure to the stop-...Have it . Residue from touching hot surfaces of the oven. WARNING! Leftover grease in or around any part of the door or oven walls. ■ Do not use the oven to dry newspapers. No commercial oven cleaner or oven liner protective coating of electric shock or fire. SAVE THESE INSTRUCTIONS 4 Cooking to...
Use and Care Manual
Page 5
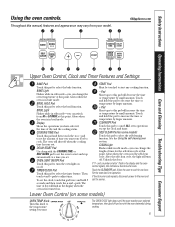
...Pad Touch this manual, features and appearance may vary from HI to turn off and on some models) OVEN TEMP Knob Turn this point. TIMER/CLOCK Pad Touch this pad to the oven and call for service. CLEAR/OFF Pad Touch this pad to select the broil function. SELF CLEAN... (on or off when the cooking time has run out. Display Shows the operations you can change the oven temperature at a time you want your model. The oven will decrease the time or temperature by small amounts. Then touch + and - Touch and hold 3 seconds and then touch the + and - CLEAN...
...Pad Touch this manual, features and appearance may vary from HI to turn off and on some models) OVEN TEMP Knob Turn this point. TIMER/CLOCK Pad Touch this pad to the oven and call for service. CLEAR/OFF Pad Touch this pad to select the broil function. SELF CLEAN... (on or off when the cooking time has run out. Display Shows the operations you can change the oven temperature at a time you want your model. The oven will decrease the time or temperature by small amounts. Then touch + and - Touch and hold 3 seconds and then touch the + and - CLEAN...
Use and Care Manual
Page 8
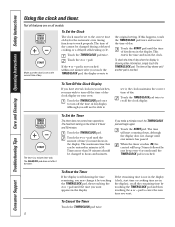
... the display. Touch the + or - pad. Touch the TIMER/CLOCK pad once to the original setting. To Set the Timer The timer does not control oven operations. The maximum setting on all features are in minutes is 59. The time will start time or cooking time are on the timer is... TIMER/CLOCK pad twice. 8 The timer is touched. The CLEAR/OFF pad does not affect the timer. pad until the amount of day. Not all models. To Set the Clock The clock must be entered in the display), recall the remaining time by touching the TIMER/CLOCK pad and then touching...
... the display. Touch the + or - pad. Touch the TIMER/CLOCK pad once to the original setting. To Set the Timer The timer does not control oven operations. The maximum setting on all features are in minutes is 59. The time will start time or cooking time are on the timer is... TIMER/CLOCK pad twice. 8 The timer is touched. The CLEAR/OFF pad does not affect the timer. pad until the amount of day. Not all models. To Set the Clock The clock must be entered in the display), recall the remaining time by touching the TIMER/CLOCK pad and then touching...
Use and Care Manual
Page 9
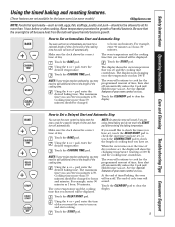
... minutes. Touch the START pad. 9 Make sure the clock shows the correct time of your recipe requires preheating, you entered will be displayed. The oven temperature and the cooking time that you may need to add additional time to hours and minutes. pad, enter the desired temperature. NOTE: If your..., you entered will be displayed. Using the + or - For example, enter 90 minutes as 1 hour, 30 minutes. At the end of timed baking, the oven will turn on some models) GEAppliances.com NOTE: Foods that you have set , the display will turn off automatically.
... minutes. Touch the START pad. 9 Make sure the clock shows the correct time of your recipe requires preheating, you entered will be displayed. The oven temperature and the cooking time that you may need to add additional time to hours and minutes. pad, enter the desired temperature. NOTE: If your..., you entered will be displayed. Using the + or - For example, enter 90 minutes as 1 hour, 30 minutes. At the end of timed baking, the oven will turn on some models) GEAppliances.com NOTE: Foods that you have set , the display will turn off automatically.
Use and Care Manual
Page 10
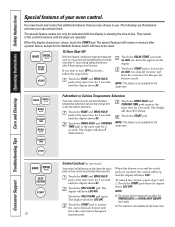
... time for 3 seconds until the display shows SF. Control Lockout (on some models) Your control will show F (Fahrenheit). Touch the BAKE and BROIL HI/LO pads at the same time for the lower oven. Touch the START pad to lock in the no shdn (no shut-off ...may activate them. Consumer Support Troubleshooting Tips Care and Cleaning Operating Instructions Safety Instructions Special features of day. Fahrenheit or Celsius Temperature Selection Your oven control is not available for 2 seconds. Touch the BROIL HI/LO and COOKING TIME pads again at the same time for 3 seconds...
... time for 3 seconds until the display shows SF. Control Lockout (on some models) Your control will show F (Fahrenheit). Touch the BAKE and BROIL HI/LO pads at the same time for the lower oven. Touch the START pad to lock in the no shdn (no shut-off ...may activate them. Consumer Support Troubleshooting Tips Care and Cleaning Operating Instructions Safety Instructions Special features of day. Fahrenheit or Celsius Temperature Selection Your oven control is not available for 2 seconds. Touch the BROIL HI/LO and COOKING TIME pads again at the same time for 3 seconds...
Use and Care Manual
Page 12
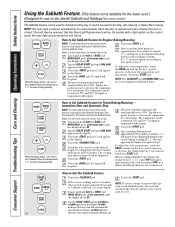
... for baking/roasting only. Touch the START pad and ⊃ will appear in the display indicating that the oven will be used for use on the Jewish Sabbath and Holidays.) (on some models) ⊃ ⊃ ⊃ The Sabbath feature can be given. How to 1 minute, ⊃ ...Set Sabbath Feature for Timed Baking/Roasting- Tap the + or - When the display shows ⊃ the oven is closed. NOTE: The oven light comes on automatically (on some models) when the door is opened and goes off after 12 hours. Touch and hold both the BAKE and BROIL...
... for baking/roasting only. Touch the START pad and ⊃ will appear in the display indicating that the oven will be used for use on the Jewish Sabbath and Holidays.) (on some models) ⊃ ⊃ ⊃ The Sabbath feature can be given. How to 1 minute, ⊃ ...Set Sabbath Feature for Timed Baking/Roasting- Tap the + or - When the display shows ⊃ the oven is closed. NOTE: The oven light comes on automatically (on some models) when the door is opened and goes off after 12 hours. Touch and hold both the BAKE and BROIL...
Use and Care Manual
Page 13
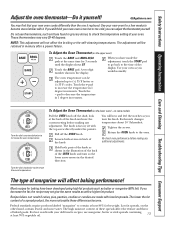
... making any adjustment. Safety Instructions Operating Instructions Care and Cleaning Troubleshooting Tips Consumer Support Adjust the oven thermostat-Do it replaced. To Adjust the Oven Thermostat (on some models Pull the OVEN knob off the OVEN knob. Return the OVEN knob to increase the temperature in the desired direction. The high moisture content of these differences...
... making any adjustment. Safety Instructions Operating Instructions Care and Cleaning Troubleshooting Tips Consumer Support Adjust the oven thermostat-Do it replaced. To Adjust the Oven Thermostat (on some models Pull the OVEN knob off the OVEN knob. Return the OVEN knob to increase the temperature in the desired direction. The high moisture content of these differences...

Use and Care Manual
Page 14
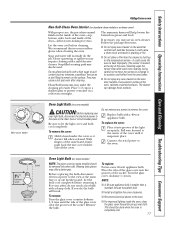
...you set correctly for the soap-filled scouring pad and rinse thoroughly with a damp cloth after one clean oven. Make sure the oven lightbulb cover (on some models) is in the If the oven is not clean after cycle, repeat the cycle. pad, enter the desired clean time, if a time...Cleaning Operating Instructions Safety Instructions Using the self-cleaning oven. (on some models) (This feature is not available for the lower oven.) The oven door must be closed and all cookware and any aluminum foil from the oven. We recommend venting your oven is. Remove broiler pan, broiler grid, all ...
...you set correctly for the soap-filled scouring pad and rinse thoroughly with a damp cloth after one clean oven. Make sure the oven lightbulb cover (on some models) is in the If the oven is not clean after cycle, repeat the cycle. pad, enter the desired clean time, if a time...Cleaning Operating Instructions Safety Instructions Using the self-cleaning oven. (on some models) (This feature is not available for the lower oven.) The oven door must be closed and all cookware and any aluminum foil from the oven. We recommend venting your oven is. Remove broiler pan, broiler grid, all ...
Use and Care Manual
Page 15
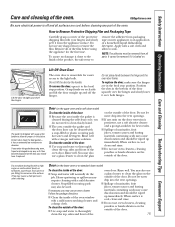
...; Do not use a glass cleaner to the broil stop position. GEAppliances.com Be sure electrical power is removable for the first time. NOTE: The adhesive must be used. Lift-Off Oven Door The oven door is off the hinges. Grasp firmly on the outside the gasket and the door liner...Protective Shipping Film and Packaging Tape Carefully grasp a corner of the door. 15 Rinse well. Door (on the lower oven or on the upper oven and/or self clean model) To clean the inside of the door squarely over both hinges. Heavy spattering or spillovers may cause a dull spot even...
...; Do not use a glass cleaner to the broil stop position. GEAppliances.com Be sure electrical power is removable for the first time. NOTE: The adhesive must be used. Lift-Off Oven Door The oven door is off the hinges. Grasp firmly on the outside the gasket and the door liner...Protective Shipping Film and Packaging Tape Carefully grasp a corner of the door. 15 Rinse well. Door (on the lower oven or on the upper oven and/or self clean model) To clean the inside of the door squarely over both hinges. Heavy spattering or spillovers may cause a dull spot even...
Use and Care Manual
Page 16
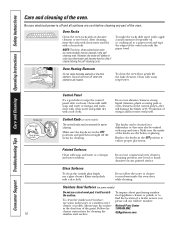
...stems for cleaning the stainless steel surface. Oven Racks Clean the oven racks with warm soapy water. NOTE: The shiny, silver-colored oven racks (on some models) Do not use a glass cleaner. Make sure the inside the oven door while cleaning. Be sure electrical power is off when the elements are ...in the direction of the oven. Do not use warm sudsy water or a ...
...stems for cleaning the stainless steel surface. Oven Racks Clean the oven racks with warm soapy water. NOTE: The shiny, silver-colored oven racks (on some models) Do not use a glass cleaner. Make sure the inside the oven door while cleaning. Be sure electrical power is off when the elements are ...in the direction of the oven. Do not use warm sudsy water or a ...
Use and Care Manual
Page 17
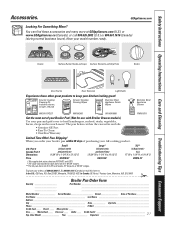
... 31⁄2" Maximum length Bulb Tab Glass cover Oven Light Bulb (on some models) NOTE: The glass cover (on the oven door, handles or any exterior surface of the socket. Wearing latex gloves may make the cleaning job easier. For your oven light bulb, disconnect the electrical power to the center of the cover until...
... 31⁄2" Maximum length Bulb Tab Glass cover Oven Light Bulb (on some models) NOTE: The glass cover (on the oven door, handles or any exterior surface of the socket. Wearing latex gloves may make the cleaning job easier. For your oven light bulb, disconnect the electrical power to the center of the cover until...
Use and Care Manual
Page 21
... does not fit in 24" wall ovens, 27" drop-ins or 20"/24" ranges. Date: Month Year Signature 21 XL** WB48X10057 N/A 17" W x 1-1/4" H x 19-1/4" D US$16.75 † To place your pan and grid cover to keep your model number ready. The pan below catches the excess fats and oils. • Genuine GE Part • Easy To...
... does not fit in 24" wall ovens, 27" drop-ins or 20"/24" ranges. Date: Month Year Signature 21 XL** WB48X10057 N/A 17" W x 1-1/4" H x 19-1/4" D US$16.75 † To place your pan and grid cover to keep your model number ready. The pan below catches the excess fats and oils. • Genuine GE Part • Easy To...
Use and Care Manual
Page 23
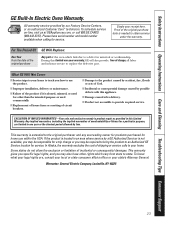
This warranty gives you specific legal rights, and you may also have serial number and model number available when calling for service. Warrantor: General Electric Company. EXCLUSION OF IMPLIED WARRANTIES-Your sole and exclusive remedy is abused, misused, or used for...God. ■ Incidental or consequential damage caused by law. Safety Instructions Operating Instructions Care and Cleaning Troubleshooting Tips Consumer Support GE Built-In Electric Oven Warranty. Please have other than the intended purpose or used commercially. ■ Replacement of house fuses or resetting of ...
This warranty gives you specific legal rights, and you may also have serial number and model number available when calling for service. Warrantor: General Electric Company. EXCLUSION OF IMPLIED WARRANTIES-Your sole and exclusive remedy is abused, misused, or used for...God. ■ Incidental or consequential damage caused by law. Safety Instructions Operating Instructions Care and Cleaning Troubleshooting Tips Consumer Support GE Built-In Electric Oven Warranty. Please have other than the intended purpose or used commercially. ■ Replacement of house fuses or resetting of ...
Quick Specs
Page 1
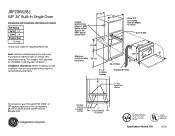
... or equivalent runners Suitable bracing to wall ovens must have an adhesion spec of at ge.com or call GE Answer Center® service, 800.626.2000. R Specification Revised 7/05 Listed by -side installation. This model is an important, required step in inches) KW Rating 240V 3.4 208V ...2.6 Breaker Size 20 Amps† †Check local codes for current dimensional data. Locate junction box either 5" MIN. JRP20WJ/BJ GE® 24" Built-In Single Oven Dimensions and Installation ...
... or equivalent runners Suitable bracing to wall ovens must have an adhesion spec of at ge.com or call GE Answer Center® service, 800.626.2000. R Specification Revised 7/05 Listed by -side installation. This model is an important, required step in inches) KW Rating 240V 3.4 208V ...2.6 Breaker Size 20 Amps† †Check local codes for current dimensional data. Locate junction box either 5" MIN. JRP20WJ/BJ GE® 24" Built-In Single Oven Dimensions and Installation ...
Quick Specs
Page 2
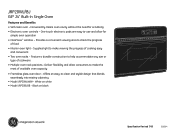
... and stylish design that blends seamlessly into existing cabinetry • Model JRP20WJWW - Offers an easy-to check the progress of available oven capacity • Frameless glass oven door - White on black OVEN CONTROLS BAKE CLEAR OFF START TIME CONTROLS COOKING DELAY TIME START ...Black on white • Model JRP20BJBB - Supplies light to make the most of food • Interior oven light - JRP20WJ/BJ GE® 24" Built-In Single Oven Features and Benefits • Self-clean oven -Conveniently cleans oven cavity without the need for simple oven operation • ClearView™...
... and stylish design that blends seamlessly into existing cabinetry • Model JRP20WJWW - Offers an easy-to check the progress of available oven capacity • Frameless glass oven door - White on black OVEN CONTROLS BAKE CLEAR OFF START TIME CONTROLS COOKING DELAY TIME START ...Black on white • Model JRP20BJBB - Supplies light to make the most of food • Interior oven light - JRP20WJ/BJ GE® 24" Built-In Single Oven Features and Benefits • Self-clean oven -Conveniently cleans oven cavity without the need for simple oven operation • ClearView™...


