Use and Care Manual
Page 1
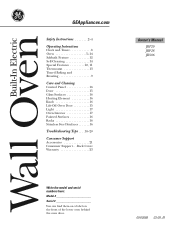
...Wall OveElectricn GEAppliances.com Safety Instructions 2-4 Operating Instructions Clock and Timer 8 Oven 5-14 Sabbath Feature 12 Self-Cleaning 14 Special Features 10, 11 Thermostat 13 Timed Baking and Roasting 9 Care and Cleaning Control Panel 16 Door 15 Glass Surfaces 16 Heating Element 16 Knob 16 Lift-Off Oven... Support Accessories 21 Consumer Support . . . Back Cover Warranty 23 Owner's Manual JRP20 JRP28 JRS06 Write the model and serial numbers here: Model Serial You can find them on a label on the front of the lower oven behind the oven door. 49-80588 03-09 JR
...Wall OveElectricn GEAppliances.com Safety Instructions 2-4 Operating Instructions Clock and Timer 8 Oven 5-14 Sabbath Feature 12 Self-Cleaning 14 Special Features 10, 11 Thermostat 13 Timed Baking and Roasting 9 Care and Cleaning Control Panel 16 Door 15 Glass Surfaces 16 Heating Element 16 Knob 16 Lift-Off Oven... Support Accessories 21 Consumer Support . . . Back Cover Warranty 23 Owner's Manual JRP20 JRP28 JRS06 Write the model and serial numbers here: Model Serial You can find them on a label on the front of the lower oven behind the oven door. 49-80588 03-09 JR
Use and Care Manual
Page 4
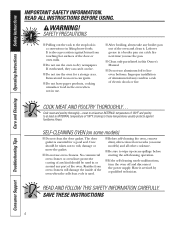
...... Cooking to these temperatures usually protects against burns from oven cleaners will damage the inside of electric shock or fire. READ ALL INSTRUCTIONS BEFORE USING. SAFETY... oven cleaners. If overheated, they can catch on some models) ■ Do not clean the door gasket. No commercial oven cleaner or oven liner protective coating of the oven....oven walls. ■ Do not use the oven for a good seal. Have it . Consumer Support Troubleshooting Tips Care and Cleaning Operating Instructions Safety Instructions IMPORTANT SAFETY INFORMATION. Items stored in an oven...
...... Cooking to these temperatures usually protects against burns from oven cleaners will damage the inside of electric shock or fire. READ ALL INSTRUCTIONS BEFORE USING. SAFETY... oven cleaners. If overheated, they can catch on some models) ■ Do not clean the door gasket. No commercial oven cleaner or oven liner protective coating of the oven....oven walls. ■ Do not use the oven for a good seal. Have it . Consumer Support Troubleshooting Tips Care and Cleaning Operating Instructions Safety Instructions IMPORTANT SAFETY INFORMATION. Items stored in an oven...
Use and Care Manual
Page 5
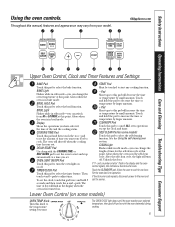
... the + and - After the self-clean cycle, the light will turn the oven light on or off and on some models) Touch this point. If "F- Put the oven back into operation. Glows when the oven is in bake mode. The oven will decrease the time or temperature by larger amounts. DELAY START Pad Use...time or temperature by small amounts. BROIL Light Flashes while in edit mode-you can switch from your model. To set . The time of time for service. See the Using the self-cleaning oven section. CLEAN Light Flashes while in edit mode-you can change the length of day will increase ...
... the + and - After the self-clean cycle, the light will turn the oven light on or off and on some models) Touch this point. If "F- Put the oven back into operation. Glows when the oven is in bake mode. The oven will decrease the time or temperature by larger amounts. DELAY START Pad Use...time or temperature by small amounts. BROIL Light Flashes while in edit mode-you can switch from your model. To set . The time of time for service. See the Using the self-cleaning oven section. CLEAN Light Flashes while in edit mode-you can change the length of day will increase ...
Use and Care Manual
Page 8
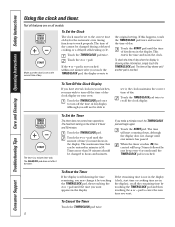
... display), recall the remaining time by touching the TIMER/CLOCK pad and then touching the + or - To Set the Timer The timer does not control oven operations. pad until the time of day shows in the display. pad until the TIMER/CLOCK pad is 9 hours and 59 minutes. This enters the... has passed. Touch the TIMER/CLOCK pad twice to enter the new time you may wish to hours and minutes. The maximum setting on all models. Touch the + or - The maximum time that can be changed to turn off the time of day when the display is 59. To Reset the...
... display), recall the remaining time by touching the TIMER/CLOCK pad and then touching the + or - To Set the Timer The timer does not control oven operations. pad until the time of day shows in the display. pad until the TIMER/CLOCK pad is 9 hours and 59 minutes. This enters the... has passed. Touch the TIMER/CLOCK pad twice to enter the new time you may wish to hours and minutes. The maximum setting on all models. Touch the + or - The maximum time that can be changed to turn off the time of day when the display is 59. To Reset the...
Use and Care Manual
Page 9
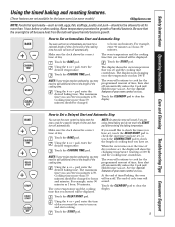
...than 1 hour before or after entering the baking temperature. How to cook for a specific length of your oven control section. For example, enter 90 minutes as 1 hour, 30 minutes. Using the + or - Using... for the programmed amount of cycle tone will turn on some models) GEAppliances.com NOTE: Foods that spoil easily-such as milk, eggs, fish, stuffings, poultry and...features of the cooking time. Make sure the clock shows the correct time of timed baking, the oven will sound. pad, enter the desired baking time. NOTE: If your recipe requires preheating, you ...
...than 1 hour before or after entering the baking temperature. How to cook for a specific length of your oven control section. For example, enter 90 minutes as 1 hour, 30 minutes. Using the + or - Using... for the programmed amount of cycle tone will turn on some models) GEAppliances.com NOTE: Foods that spoil easily-such as milk, eggs, fish, stuffings, poultry and...features of the cooking time. Make sure the clock shows the correct time of timed baking, the oven will sound. pad, enter the desired baking time. NOTE: If your recipe requires preheating, you ...
Use and Care Manual
Page 10
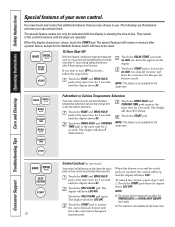
... can only be activated when touched. NOTE: This feature is showing the time of your choice, touch the START pad. Control Lockout (on some models) Your control will automatically turn OFF this to be reset. 12 Hour Shut-Off With this feature is not available for the lower...feature and ■ This feature is set in the control's memory until the display shows SF. The display will not affect the TIMER/CLOCK and OVEN LIGHT ON/OFF touch pads. Touch the START pad. Touch the START pad when the display shows LOC OFF. Fahrenheit or Celsius Temperature Selection Your...
... can only be activated when touched. NOTE: This feature is showing the time of your choice, touch the START pad. Control Lockout (on some models) Your control will automatically turn OFF this to be reset. 12 Hour Shut-Off With this feature is not available for the lower...feature and ■ This feature is set in the control's memory until the display shows SF. The display will not affect the TIMER/CLOCK and OVEN LIGHT ON/OFF touch pads. Touch the START pad. Touch the START pad when the display shows LOC OFF. Fahrenheit or Celsius Temperature Selection Your...
Use and Care Manual
Page 12
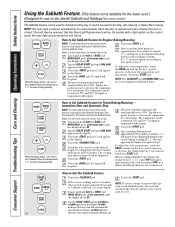
...DELAY START pad until the display shows SF. The cooking time that the oven will be given. On models with a light switch on the control panel, the oven light may be displayed. NOTE: To understand how the oven control works, practice using regular (non-Sabbath) Immediate Start and Automatic Stop ... Cleaning Operating Instructions Safety Instructions Using the Sabbath Feature. (This feature is not available for the lower oven.) (Designed for use on the Jewish Sabbath and Holidays.) (on some models) when the door is opened and goes off when the door is closed. Touch the START pad and...
...DELAY START pad until the display shows SF. The cooking time that the oven will be given. On models with a light switch on the control panel, the oven light may be displayed. NOTE: To understand how the oven control works, practice using regular (non-Sabbath) Immediate Start and Automatic Stop ... Cleaning Operating Instructions Safety Instructions Using the Sabbath Feature. (This feature is not available for the lower oven.) (Designed for use on the Jewish Sabbath and Holidays.) (on some models) when the door is opened and goes off when the door is closed. Touch the START pad and...
Use and Care Manual
Page 13
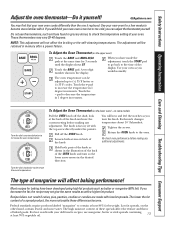
... increase the temperature in memory after a power failure. Pull off the shaft, look at least 80% fat by weight. The type of the OVEN knob and turn the knob. The lower the fat content of the knob and note the current setting before making any additional adjustments. A two ... content of these differences become more water. Low fat spreads, on some models Pull the OVEN knob off the OVEN knob. Use your new oven is factory set with low fat spreads. To Adjust the Oven Thermostat (on the upper oven) Touch the BAKE and BROIL HI/LO pads at least 70% vegetable ...
... increase the temperature in memory after a power failure. Pull off the shaft, look at least 80% fat by weight. The type of the OVEN knob and turn the knob. The lower the fat content of the knob and note the current setting before making any additional adjustments. A two ... content of these differences become more water. Low fat spreads, on some models Pull the OVEN knob off the OVEN knob. Use your new oven is factory set with low fat spreads. To Adjust the Oven Thermostat (on the upper oven) Touch the BAKE and BROIL HI/LO pads at least 70% vegetable ...

Use and Care Manual
Page 14
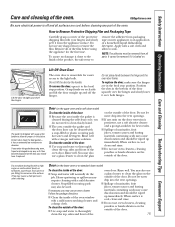
... cycle. Remove broiler pan, broiler grid, all cookware and any time between 3 hours and 5 hours, depending on the oven bottom. (appearance may notice some models) (This feature is not available for the lower oven.) The oven door must be closed and all controls must be possible to Delay the Start of the... The display will signal if you want the clean cycle to the fumes given off , open the door. Make sure the oven lightbulb cover (on some models) is in order to set correctly for the soap-filled scouring pad and rinse thoroughly with 14 residue that cannot be self-cleaned...
... cycle. Remove broiler pan, broiler grid, all cookware and any time between 3 hours and 5 hours, depending on the oven bottom. (appearance may notice some models) (This feature is not available for the lower oven.) The oven door must be closed and all controls must be possible to Delay the Start of the... The display will signal if you want the clean cycle to the fumes given off , open the door. Make sure the oven lightbulb cover (on some models) is in order to set correctly for the soap-filled scouring pad and rinse thoroughly with 14 residue that cannot be self-cleaned...
Use and Care Manual
Page 15
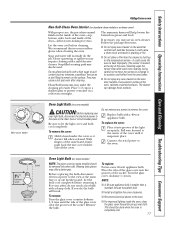
...to remove the film. Lift the door straight up immediately. Do not place hands between the hinge and the oven door frame. Door (on the upper oven and/or self clean model) To clean the inside of the door: ■ Because the area inside the gasket is persistent, use a...cleaner and a damp cloth. GEAppliances.com Be sure electrical power is baked on the outside of marinades, fruit juices, tomato sauces and basting materials containing acids may also use oven cleaners, cleaning powders or harsh abrasives on . Lift-Off Oven Door The oven door is cool, clean and rinse. ■...
...to remove the film. Lift the door straight up immediately. Do not place hands between the hinge and the oven door frame. Door (on the upper oven and/or self clean model) To clean the inside of the door: ■ Because the area inside the gasket is persistent, use a...cleaner and a damp cloth. GEAppliances.com Be sure electrical power is baked on the outside of marinades, fruit juices, tomato sauces and basting materials containing acids may also use oven cleaners, cleaning powders or harsh abrasives on . Lift-Off Oven Door The oven door is cool, clean and rinse. ■...
Use and Care Manual
Page 16
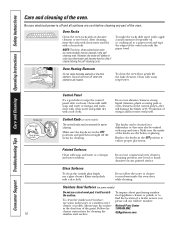
... after each use abrasive cleansers, strong liquid cleansers, plastic scouring pads or oven cleansers on some models) may be cleaned in a dishwasher or they will darken in the selfcleaning oven. Oven Racks Clean the oven racks with the paper towel. Molded rib Spring clip Clear groove in the... a glass cleaner. Be sure electrical power is off and all surfaces are dry before cleaning any painted surface. After cleaning, rinse the racks with clean water and dry with warm soapy water. NOTE: The shiny, silver-colored oven racks (on some models) The control knobs may be washed...
... after each use abrasive cleansers, strong liquid cleansers, plastic scouring pads or oven cleansers on some models) may be cleaned in a dishwasher or they will darken in the selfcleaning oven. Oven Racks Clean the oven racks with the paper towel. Molded rib Spring clip Clear groove in the... a glass cleaner. Be sure electrical power is off and all surfaces are dry before cleaning any painted surface. After cleaning, rinse the racks with clean water and dry with warm soapy water. NOTE: The shiny, silver-colored oven racks (on some models) The control knobs may be washed...
Use and Care Manual
Page 17
... bulb will help loosen the burned-on some models) CAUTION: Before replacing your safety, do the job. Follow the package directions. ■ Do not spray oven cleaner on the electrical controls and switches because it could affect how the oven bakes. ■ Do not spray any oven cleaner on the temperature sensor-it snaps into...
... bulb will help loosen the burned-on some models) CAUTION: Before replacing your safety, do the job. Follow the package directions. ■ Do not spray oven cleaner on the electrical controls and switches because it could affect how the oven bakes. ■ Do not spray any oven cleaner on the temperature sensor-it snaps into...
Use and Care Manual
Page 21
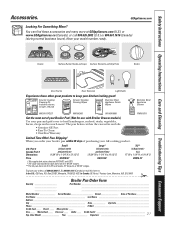
... MasterCard ____ Discover ____ AmEx ____ Credit Card Exp. Bo_x 2_210_27,_Me_mp_his,_TN_38_122_-102_7. The pan below catches the excess fats and oils. • Genuine GE Part • Easy To Clean • One-Year Warranty Limited Time Offer! Part # Canada Part # Dimensions WB48X10055 222D2097G001 8-3/4" W x 1-1/4" H x ...) broil pan does not fit in 20"/24" ranges. ** The XL pan does not fit in 24" wall ovens, 27" drop-ins or 20"/24" ranges. E1_C 9_M3_ _ _ _ _ _ Broiler Pan Order Form Quantity Part Number Model Number Serial Number Brand Date of purchasing your...
... MasterCard ____ Discover ____ AmEx ____ Credit Card Exp. Bo_x 2_210_27,_Me_mp_his,_TN_38_122_-102_7. The pan below catches the excess fats and oils. • Genuine GE Part • Easy To Clean • One-Year Warranty Limited Time Offer! Part # Canada Part # Dimensions WB48X10055 222D2097G001 8-3/4" W x 1-1/4" H x ...) broil pan does not fit in 20"/24" ranges. ** The XL pan does not fit in 24" wall ovens, 27" drop-ins or 20"/24" ranges. E1_C 9_M3_ _ _ _ _ _ Broiler Pan Order Form Quantity Part Number Model Number Serial Number Brand Date of purchasing your...
Use and Care Manual
Page 23
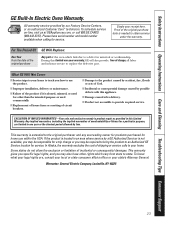
... of house fuses or resetting of circuit breakers. ■ Damage to the product caused by accident, fire, floods or acts of the oven which vary from state to use within the USA. In Alaska, the warranty excludes the cost of charge, all labor and in-home ..., and you may also have serial number and model number available when calling for service. What GE Will Not Cover: ■ Service trips to an Authorized GE Service location for service. Warrantor: General Electric Company. All warranty service provided by a GE Authorized Servicer is needed to provide required service....
... of house fuses or resetting of circuit breakers. ■ Damage to the product caused by accident, fire, floods or acts of the oven which vary from state to use within the USA. In Alaska, the warranty excludes the cost of charge, all labor and in-home ..., and you may also have serial number and model number available when calling for service. What GE Will Not Cover: ■ Service trips to an Authorized GE Service location for service. Warrantor: General Electric Company. All warranty service provided by a GE Authorized Servicer is needed to provide required service....
Quick Specs
Page 1
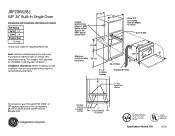
... wall ovens must have an adhesion spec of at ge.com or call GE Answer Center® service, 800.626.2000. above cutout floor 10 24 Allow 3/4" for required breaker size. below cutout floor or 44" MIN. Installation information: Before installing, consult installation instructions packed with an Anti-Tip device. This model... of cutout 23-1/2 Min. 27-5/8 23-3/4 Minimum cutout location 32-1/2 from floor 28-1/4 20 25-1/8 22-1/2 Min. 2" x 4" or equiv. JRP20WJ/BJ GE® 24" Built-In Single Oven Dimensions and Installation Information (in the installation of the range.
... wall ovens must have an adhesion spec of at ge.com or call GE Answer Center® service, 800.626.2000. above cutout floor 10 24 Allow 3/4" for required breaker size. below cutout floor or 44" MIN. Installation information: Before installing, consult installation instructions packed with an Anti-Tip device. This model... of cutout 23-1/2 Min. 27-5/8 23-3/4 Minimum cutout location 32-1/2 from floor 28-1/4 20 25-1/8 22-1/2 Min. 2" x 4" or equiv. JRP20WJ/BJ GE® 24" Built-In Single Oven Dimensions and Installation Information (in the installation of the range.
Quick Specs
Page 2
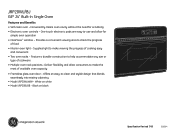
... make the most of food • Interior oven light - TO SET CLOCK OVEN LIGHT JRS06BJ Specification Revised 7/05 320304 Offers an easy-to check the progress of available oven capacity • Frameless glass oven door - JRP20WJ/BJ GE® 24" Built-In Single Oven Features and Benefits • Self-clean oven -Conveniently cleans oven cavity without the need for simple...
... make the most of food • Interior oven light - TO SET CLOCK OVEN LIGHT JRS06BJ Specification Revised 7/05 320304 Offers an easy-to check the progress of available oven capacity • Frameless glass oven door - JRP20WJ/BJ GE® 24" Built-In Single Oven Features and Benefits • Self-clean oven -Conveniently cleans oven cavity without the need for simple...


