Use and Care Manual
Page 1
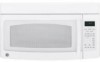
Para consultar una version en español de este manual de instrucciones, visite nuestro sitio de internet ge.com. DE68-02560A 49-40477 01-06 JR Owner's Manual JVM1850 JVM1851 JVM1870 JVM1871 JVM2050 JVM3670 HDM1853 EMO4000 Write the model and serial numbers here: Model ...Serial Find these numbers on a label inside the oven. Microwave Spacemaker Oven ge.com Safety Instructions . ...
Para consultar una version en español de este manual de instrucciones, visite nuestro sitio de internet ge.com. DE68-02560A 49-40477 01-06 JR Owner's Manual JVM1850 JVM1851 JVM1870 JVM1871 JVM2050 JVM3670 HDM1853 EMO4000 Write the model and serial numbers here: Model ...Serial Find these numbers on a label inside the oven. Microwave Spacemaker Oven ge.com Safety Instructions . ...

Use and Care Manual
Page 2
... of life. SAFETY PRECAUTIONS When using electrical appliances, basic safety precautions should be followed, including the following: s Read and follow the s Install or locate this manual must be adjusted or repaired by anyone except properly qualified service personnel. See the Grounding and gas ranges. Connect only and is no damage to...
... of life. SAFETY PRECAUTIONS When using electrical appliances, basic safety precautions should be followed, including the following: s Read and follow the s Install or locate this manual must be adjusted or repaired by anyone except properly qualified service personnel. See the Grounding and gas ranges. Connect only and is no damage to...

Use and Care Manual
Page 3
... microwave oven surface when the microwave oven is not intended for additional cooking time. Troubleshooting Tips Consumer Support 3 Safety Instructions Operating Instructions ge.com Use this appliance only for its intended use as described in similar locations. It may spread. - This microwave oven is specifically... for examination, repair or adjustment. If food is necessary when used by qualified service personnel. s Do not store this manual. Do not use . for example, in a wet basement, near a swimming pool, near water- Do not overcook food. s Use this Owner...
... microwave oven surface when the microwave oven is not intended for additional cooking time. Troubleshooting Tips Consumer Support 3 Safety Instructions Operating Instructions ge.com Use this appliance only for its intended use as described in similar locations. It may spread. - This microwave oven is specifically... for examination, repair or adjustment. If food is necessary when used by qualified service personnel. s Do not store this manual. Do not use . for example, in a wet basement, near a swimming pool, near water- Do not overcook food. s Use this Owner...

Use and Care Manual
Page 7
... designed for microwave cooking is very useful, but should be used carefully. Troubleshooting Tips Consumer Support 7 If they form a tight seal. Safety Instructions Operating Instructions ge.com s "Boilable" cooking pouches and tightly closed plastic bags should be slit, pierced or vented as are not, plastic could ignite. When using foil in...
... designed for microwave cooking is very useful, but should be used carefully. Troubleshooting Tips Consumer Support 7 If they form a tight seal. Safety Instructions Operating Instructions ge.com s "Boilable" cooking pouches and tightly closed plastic bags should be slit, pierced or vented as are not, plastic could ignite. When using foil in...

Use and Care Manual
Page 11
.... Pull to operate. The turntable may vary from your microwave oven. Food microwaves best when placed directly on some models). Cooktop Light. Shelf. ge.com Throughout this manual, features and appearance may be in the oven. Touch Control Panel Display. Removable Turntable. Oven vent(s) and oven light are located on the upper...
.... Pull to operate. The turntable may vary from your microwave oven. Food microwaves best when placed directly on some models). Cooktop Light. Shelf. ge.com Throughout this manual, features and appearance may be in the oven. Touch Control Panel Display. Removable Turntable. Oven vent(s) and oven light are located on the upper...
Use and Care Manual
Page 42
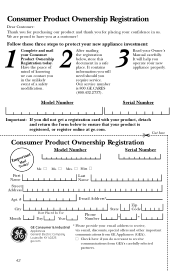
... your new appliance investment: 1 Complete and mail your e-mail address to receive communications from GE Appliances (GEA). It will need should you as a customer! Have the peace of mind... Date Placed In Use Day Year Phone Number State Zip Code GE Consumer & Industrial * Please provide your Consumer Product Ownership Registration today. Louisville, KY 40225 ge.com s Check here if you did not get a registration card...properly. We are proud to ensure that your product is 800.GE.CARES (800.432.2737). 3 Read your confidence in a safe place. Our service number is ...
... your new appliance investment: 1 Complete and mail your e-mail address to receive communications from GE Appliances (GEA). It will need should you as a customer! Have the peace of mind... Date Placed In Use Day Year Phone Number State Zip Code GE Consumer & Industrial * Please provide your Consumer Product Ownership Registration today. Louisville, KY 40225 ge.com s Check here if you did not get a registration card...properly. We are proud to ensure that your product is 800.GE.CARES (800.432.2737). 3 Read your confidence in a safe place. Our service number is ...
Use and Care Manual
Page 44
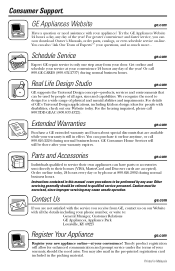
...For the hearing impaired, please call 800.626.2224 during normal business hours. Parts and Accessories ge.com Individuals qualified to service their own appliances can now download Owner's Manuals, order parts, catalogs, or even schedule service on -line-at 800.626.2002 during ...normal business hours. Schedule Service ge.com Expert GE repair service is still in this manual cover procedures to be referred to : General Manager, Customer Relations GE Appliances, Appliance Park Louisville, KY 40225 Register Your Appliance ge.com Register your new appliance on -line....
...For the hearing impaired, please call 800.626.2224 during normal business hours. Parts and Accessories ge.com Individuals qualified to service their own appliances can now download Owner's Manuals, order parts, catalogs, or even schedule service on -line-at 800.626.2002 during ...normal business hours. Schedule Service ge.com Expert GE repair service is still in this manual cover procedures to be referred to : General Manager, Customer Relations GE Appliances, Appliance Park Louisville, KY 40225 Register Your Appliance ge.com Register your new appliance on -line....
Installation Instructions
Page 1
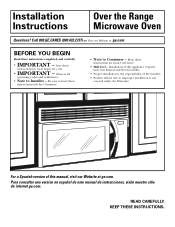
...with the Consumer. • Note to leave these instructions for future reference. • Skill level - Installation of this manual, visit our Website at : ge.com BEFORE YOU BEGIN Read these instructions for local inspector's use. • IMPORTANT - READ CAREFULLY. Be sure to ...Proper installation is not covered under the Warranty. Para consultar una version en español de este manual de instrucciones, visite nuestro sitio de internet ge.com. Keep these instructions completely and carefully. • IMPORTANT - Installation Instructions Over the Range Microwave ...
...with the Consumer. • Note to leave these instructions for future reference. • Skill level - Installation of this manual, visit our Website at : ge.com BEFORE YOU BEGIN Read these instructions for local inspector's use. • IMPORTANT - READ CAREFULLY. Be sure to ...Proper installation is not covered under the Warranty. Para consultar una version en español de este manual de instrucciones, visite nuestro sitio de internet ge.com. Keep these instructions completely and carefully. • IMPORTANT - Installation Instructions Over the Range Microwave ...

Installation Instructions
Page 7
... edge Carpenter square (optional) Tin snips (for top cabinet spacing (used to fill in the gap between the microwave oven and the cabinets. Your Owner's Manual contains the kit number for your model. • This microwave oven is greater than 30″, a Filler Panel Kit may be used on recessed bottom...
... edge Carpenter square (optional) Tin snips (for top cabinet spacing (used to fill in the gap between the microwave oven and the cabinets. Your Owner's Manual contains the kit number for your model. • This microwave oven is greater than 30″, a Filler Panel Kit may be used on recessed bottom...

Installation Instructions
Page 11
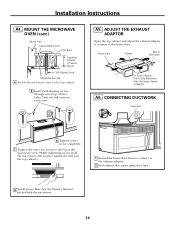
... for Outside Top Exhaust (except for the nonvented exhaust. (See your installation and proceed to the following three types of ventilation required for your Owner's Manual for the kit number.) Outside Top Exhaust (Vertical Duct) B.
... for Outside Top Exhaust (except for the nonvented exhaust. (See your installation and proceed to the following three types of ventilation required for your Owner's Manual for the kit number.) Outside Top Exhaust (Vertical Duct) B.
Installation Instructions
Page 14
... wall and the top cabinet.) 1 Extend the house duct down to connect to -Side Adjustment, Slide the Exhaust Adaptor as Needed A6. See the Owner's Manual packed with the microwave. 14 Installation Instructions A4.
... wall and the top cabinet.) 1 Extend the house duct down to connect to -Side Adjustment, Slide the Exhaust Adaptor as Needed A6. See the Owner's Manual packed with the microwave. 14 Installation Instructions A4.
Installation Instructions
Page 18
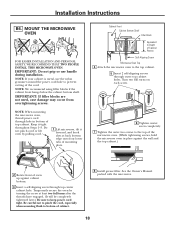
... full turns on each screw. 6 Tighten center screw completely. 7 Tighten the outer two screws to prevent cutting of cabinet. 8 Install grease filter. See the Owner's Manual packed with the microwave. 18 NOTE: If your cabinet is metal, use handle during installation. NOTE: We recommend using filler blocks if the cabinet front...
... full turns on each screw. 6 Tighten center screw completely. 7 Tighten the outer two screws to prevent cutting of cabinet. 8 Install grease filter. See the Owner's Manual packed with the microwave. 18 NOTE: If your cabinet is metal, use handle during installation. NOTE: We recommend using filler blocks if the cabinet front...

Installation Instructions
Page 22
See the Owner's Manual packed with the microwave. On 1400 and 1600 Series models, pull the grille straight off . Insert mesh-side up 22 C6. On 1800 Series models, ...
See the Owner's Manual packed with the microwave. On 1400 and 1600 Series models, pull the grille straight off . Insert mesh-side up 22 C6. On 1800 Series models, ...
Installation Instructions
Page 23
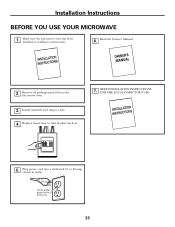
KEEP INSTALLATION INSTRUCTIONS FOR THE LOCAL INSPECTOR'S USE. 5. Ensure proper ground exists before use 23 Replace house fuse or turn breaker back on. 7. Read the Owner's Manual. 2. Install turntable and ring in cavity. 4. Plug power cord into a dedicated 15- Installation Instructions BEFORE YOU USE YOUR MICROWAVE 1. to instructions. 6. Remove all packing material from the microwave oven. 3. Make sure the microwave oven has been installed according to 20-amp electrical outlet.
KEEP INSTALLATION INSTRUCTIONS FOR THE LOCAL INSPECTOR'S USE. 5. Ensure proper ground exists before use 23 Replace house fuse or turn breaker back on. 7. Read the Owner's Manual. 2. Install turntable and ring in cavity. 4. Plug power cord into a dedicated 15- Installation Instructions BEFORE YOU USE YOUR MICROWAVE 1. to instructions. 6. Remove all packing material from the microwave oven. 3. Make sure the microwave oven has been installed according to 20-amp electrical outlet.


