
Use and Care Manual
Page 28
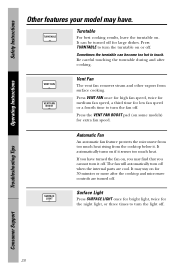
... turn the turntable on if it senses too much heat rising from surface cooking. It can become too hot to turn off when the internal parts are turned off for the night light, or three times to touch. Sometimes the turntable can be turned off . Troubleshooting Tips Consumer Support 28 Safety...
... turn the turntable on if it senses too much heat rising from surface cooking. It can become too hot to turn off when the internal parts are turned off for the night light, or three times to touch. Sometimes the turntable can be turned off . Troubleshooting Tips Consumer Support 28 Safety...
Use and Care Manual
Page 32
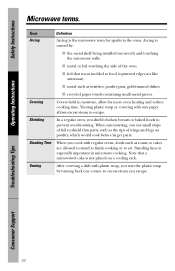
... strips of foil to escape. s foil that a microwaved cake is not placed on poultry, which would cook before larger parts. When microwaving, you cook with wax paper allows excess steam to shield thin parts, such as twist-ties, poultry pins, gold-rimmed dishes. Venting After covering a dish with plastic wrap, you shield...
... strips of foil to escape. s foil that a microwaved cake is not placed on poultry, which would cook before larger parts. When microwaving, you cook with wax paper allows excess steam to shield thin parts, such as twist-ties, poultry pins, gold-rimmed dishes. Venting After covering a dish with plastic wrap, you shield...

Use and Care Manual
Page 33
...in the dishwasher. Remember, do not place the turntable into water just after using. NOTE: Be certain the power is off before cleaning any part of this oven. Remove greasy spatters with mild soap and water or in place. Removable Turntable and Turntable Support To prevent breakage, do not ... dishwasher. The probe can be removed with a plastic scouring ball if necessary. then rinse with a solution of the microwave oven. Rinse and dry. ge.com Helpful Hints An occasional thorough wiping with a damp cloth. How to Clean the Inside Walls, Floor, Inside Window, Metal and Plastic...
...in the dishwasher. Remember, do not place the turntable into water just after using. NOTE: Be certain the power is off before cleaning any part of this oven. Remove greasy spatters with mild soap and water or in place. Removable Turntable and Turntable Support To prevent breakage, do not ... dishwasher. The probe can be removed with a plastic scouring ball if necessary. then rinse with a solution of the microwave oven. Rinse and dry. ge.com Helpful Hints An occasional thorough wiping with a damp cloth. How to Clean the Inside Walls, Floor, Inside Window, Metal and Plastic...

Use and Care Manual
Page 34
.... Do not use a common household cleaner, first apply the cleaner directly to a clean cloth, then wipe the soiled area. Refer to avoid the surrounding plastic parts. Do not use appliance wax, polish, bleach or products containing chlorine on the CleanSteel surfaces. Rinse well. Consumer Support Wipe the window clean with Stainless...
.... Do not use a common household cleaner, first apply the cleaner directly to a clean cloth, then wipe the soiled area. Refer to avoid the surrounding plastic parts. Do not use appliance wax, polish, bleach or products containing chlorine on the CleanSteel surfaces. Rinse well. Consumer Support Wipe the window clean with Stainless...

Use and Care Manual
Page 38
...replaced when it is not vented to the left (opening of the grille that helps remove smoke and odors. For JVM2000 Series models, order Part No. The charcoal filter should be recirculated through a disposable charcoal filter that hold it . Charcoal Filter (on top of the oven as ... tab. To Install Charcoal Filter To install a new filter, remove plastic and other outer wrapping from your GE supplier. For JVM1800 and JVM3600 Series models, order Part No. WB2X10956 from your GE supplier. Remove grille screws to 12 months, depending on 2 side support tabs and in front of the...
...replaced when it is not vented to the left (opening of the grille that helps remove smoke and odors. For JVM2000 Series models, order Part No. The charcoal filter should be recirculated through a disposable charcoal filter that hold it . Charcoal Filter (on top of the oven as ... tab. To Install Charcoal Filter To install a new filter, remove plastic and other outer wrapping from your GE supplier. For JVM1800 and JVM3600 Series models, order Part No. WB2X10956 from your GE supplier. Remove grille screws to 12 months, depending on 2 side support tabs and in front of the...

Use and Care Manual
Page 41
... spoilage protection is available. Box 32150 Louisville, KY 40232-2150 41 Benefits Include: • Backed by GE • All brands covered • Unlimited service calls • All parts and labor costs included • No out-of your confidence in the U.S. It's that all your ...appliances-No Matter What Brand! GE Service Protection Plus™ GE, a name recognized worldwide for quality and dependability, offers you ...
... spoilage protection is available. Box 32150 Louisville, KY 40232-2150 41 Benefits Include: • Backed by GE • All brands covered • Unlimited service calls • All parts and labor costs included • No out-of your confidence in the U.S. It's that all your ...appliances-No Matter What Brand! GE Service Protection Plus™ GE, a name recognized worldwide for quality and dependability, offers you ...

Use and Care Manual
Page 43
... Models: One Year From the date of the original purchase Any part of the microwave oven which vary from wire rack or metal/foil), or used commercially. For GE Profile Models ONLY: Five Years From the date of God. What GE Will Not Cover: s Service trips to your home. s Improper... warranties, including the implied warranties of the product or damage to replace the defective part. s Damage caused after delivery. To schedule service, on-line, 24 hours a day, visit us at ge.com, or call 800.GE.CARES (800.432.2737). All warranty service provided by possible defects with this Limited...
... Models: One Year From the date of the original purchase Any part of the microwave oven which vary from wire rack or metal/foil), or used commercially. For GE Profile Models ONLY: Five Years From the date of God. What GE Will Not Cover: s Service trips to your home. s Improper... warranties, including the implied warranties of the product or damage to replace the defective part. s Damage caused after delivery. To schedule service, on-line, 24 hours a day, visit us at ge.com, or call 800.GE.CARES (800.432.2737). All warranty service provided by possible defects with this Limited...
Use and Care Manual
Page 44
...abilities and impairments. For the hearing impaired, please call 800.GE.CARES (800.432.2737) during normal business hours. Extended Warranties ge.com Purchase a GE extended warranty and learn about special discounts that can have parts or accessories sent directly to service their homes (VISA, ...should the need arise. Printed in the packing material. We recognize the need assistance with all ages, sizes and capabilities. Parts and Accessories ge.com Individuals qualified to their own appliances can be there after your convenience! Or call 800.TDD.GEAC (800.833.4322)....
...abilities and impairments. For the hearing impaired, please call 800.GE.CARES (800.432.2737) during normal business hours. Extended Warranties ge.com Purchase a GE extended warranty and learn about special discounts that can have parts or accessories sent directly to service their homes (VISA, ...should the need arise. Printed in the packing material. We recognize the need assistance with all ages, sizes and capabilities. Parts and Accessories ge.com Individuals qualified to their own appliances can be there after your convenience! Or call 800.TDD.GEAC (800.833.4322)....

Installation Instructions
Page 2
Installation Instructions CONTENTS General information Important Safety Instructions 3 Electrical Requirements 3 Hood Exhaust 4, 5 Damage - Shipment/Installation 6 Parts Included 6 Tools You Will Need 7 Mounting Space 7 C Recirculating 19-22 Attach Mounting Plate to Wall 19 Preparation of Top Cabinet 19 Check Microwave Assembly 20 ...
Installation Instructions CONTENTS General information Important Safety Instructions 3 Electrical Requirements 3 Hood Exhaust 4, 5 Damage - Shipment/Installation 6 Parts Included 6 Tools You Will Need 7 Mounting Space 7 C Recirculating 19-22 Attach Mounting Plate to Wall 19 Preparation of Top Cabinet 19 Check Microwave Assembly 20 ...
Installation Instructions
Page 6
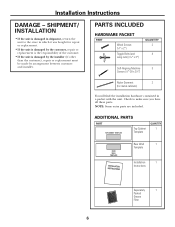
NOTE: Some extra parts are included. PARTS INCLUDED HARDWARE PACKET PART Wood Screws (1⁄4″ x 2″) Toggle Bolts (and wing nuts) (3⁄16″ x 3″) QUANTITY 2 4 Self-Aligning Machine 3 Screws (1⁄4″.../ INSTALLATION • If the unit is damaged in shipment, return the unit to make sure you have all these parts. Installation Instructions DAMAGE - Check to the store in a packet with the unit. ADDITIONAL PARTS PART Top Cabinet Template QUANTITY 1 Rear Wall 1 Template Installation 1 Instructions Separately 1 Packed Grease Filter 6
NOTE: Some extra parts are included. PARTS INCLUDED HARDWARE PACKET PART Wood Screws (1⁄4″ x 2″) Toggle Bolts (and wing nuts) (3⁄16″ x 3″) QUANTITY 2 4 Self-Aligning Machine 3 Screws (1⁄4″.../ INSTALLATION • If the unit is damaged in shipment, return the unit to make sure you have all these parts. Installation Instructions DAMAGE - Check to the store in a packet with the unit. ADDITIONAL PARTS PART Top Cabinet Template QUANTITY 1 Rear Wall 1 Template Installation 1 Instructions Separately 1 Packed Grease Filter 6


