
Quick Specs
Page 1
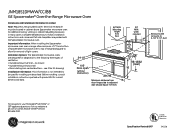
...; Outside exhaust (vertical - see Filter Kit drawing) Installation Information: This information is not intended to your Monogram,® GE Profile™ or GE® appliance questions, visit our website at ge.com or call GE Answer Center® service, 800.626.2000. No... data. 66" MIN. JNM1851DMWW/CC/BB GE Spacemaker® Over-the-Range MicrowavDOeivmeOer-vntheseino-nRsa(ningeinMchicerso)wave Oven Dimensions and Installation Information (in inches) Note: Requires 120V grounded outlet. Before installing, consult installation instructions packed with the Spacemaker microwave oven. ...
...; Outside exhaust (vertical - see Filter Kit drawing) Installation Information: This information is not intended to your Monogram,® GE Profile™ or GE® appliance questions, visit our website at ge.com or call GE Answer Center® service, 800.626.2000. No... data. 66" MIN. JNM1851DMWW/CC/BB GE Spacemaker® Over-the-Range MicrowavDOeivmeOer-vntheseino-nRsa(ningeinMchicerso)wave Oven Dimensions and Installation Information (in inches) Note: Requires 120V grounded outlet. Before installing, consult installation instructions packed with the Spacemaker microwave oven. ...
Quick Specs
Page 2
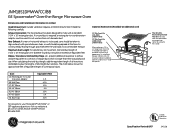
... . Elbows, Transitions, Wall and Roof Caps, etc., present additional resistance to airflow and are equivalent to a section of -cabinet installation. Listed by leaving enough space between cabinets only; Read the following carefully. Do not use less than their actual physical size.... JNM1851DMWW/CC/BB GE Spacemaker® Over-the-Range Microwave Oven Dimensions and Installation Information (in the additional width to your Monogram,® GE Profile™ or GE® appliance questions, visit our website at the time it...
... . Elbows, Transitions, Wall and Roof Caps, etc., present additional resistance to airflow and are equivalent to a section of -cabinet installation. Listed by leaving enough space between cabinets only; Read the following carefully. Do not use less than their actual physical size.... JNM1851DMWW/CC/BB GE Spacemaker® Over-the-Range Microwave Oven Dimensions and Installation Information (in the additional width to your Monogram,® GE Profile™ or GE® appliance questions, visit our website at the time it...

Use and Care Manual
Page 2
...fire or explosion, electric shock, or to operate this manual must be followed, including the following: s Read and follow the s Install or locate this specific precautions in appliance only in this oven with the safety interlocks. IMPORTANT SAFETY INFORMATION. Safety Instructions Operating Instructions ...s Do Not Place any object between the oven front face and the door or allow soil or cleaner residue to a properly grounded installation over electric outlet. s This microwave oven is UL listed for 2 marine use grounded. Energy section above. Connect only and is not...
...fire or explosion, electric shock, or to operate this manual must be followed, including the following: s Read and follow the s Install or locate this specific precautions in appliance only in this oven with the safety interlocks. IMPORTANT SAFETY INFORMATION. Safety Instructions Operating Instructions ...s Do Not Place any object between the oven front face and the door or allow soil or cleaner residue to a properly grounded installation over electric outlet. s This microwave oven is UL listed for 2 marine use grounded. Energy section above. Connect only and is not...

Use and Care Manual
Page 3
... corrosive chemicals or vapors in this appliance. If the door is damaged, it has been damaged or dropped. s This appliance should be installed over both gas and electric cooking equipment. - Troubleshooting Tips Consumer Support 3 s Use this appliance only for its intended purpose as described ...oven is not intended for laboratory or industrial use. Remove wire twist-ties and metal handles from heated surfaces. Safety Instructions Operating Instructions ge.com Use this appliance only for its intended use over a sink. It may spread. - If the power cord is opened,...
... corrosive chemicals or vapors in this appliance. If the door is damaged, it has been damaged or dropped. s This appliance should be installed over both gas and electric cooking equipment. - Troubleshooting Tips Consumer Support 3 s Use this appliance only for its intended purpose as described ...oven is not intended for laboratory or industrial use. Remove wire twist-ties and metal handles from heated surfaces. Safety Instructions Operating Instructions ge.com Use this appliance only for its intended use over a sink. It may spread. - If the power cord is opened,...

Use and Care Manual
Page 4
... in injury. s Do not boil eggs in the oven. Pressure will cause it touches the microwave wall. Troubleshooting Tips Consumer Support 4 s The metal shelf not installed correctly so it to escape during cooking. It increases the heat around the magnetron and can shorten the life of the oven. FOODS s Do not...
... in injury. s Do not boil eggs in the oven. Pressure will cause it touches the microwave wall. Troubleshooting Tips Consumer Support 4 s The metal shelf not installed correctly so it to escape during cooking. It increases the heat around the magnetron and can shorten the life of the oven. FOODS s Do not...

Use and Care Manual
Page 8
...This appliance must be grounded. The plug must be plugged into its own electrical outlet to have a qualified electrician or service technician install an outlet near the appliance. For best operation, plug this appliance into an outlet that is your personal responsibility and obligation to ... the grounding instructions are not completely understood, or if doubt exists as to whether the appliance is too short, have it is properly installed and grounded. Do not use an adapter plug with a properly grounded 3-prong wall outlet. This appliance is a standard 2-prong wall ...
...This appliance must be grounded. The plug must be plugged into its own electrical outlet to have a qualified electrician or service technician install an outlet near the appliance. For best operation, plug this appliance into an outlet that is your personal responsibility and obligation to ... the grounding instructions are not completely understood, or if doubt exists as to whether the appliance is too short, have it is properly installed and grounded. Do not use an adapter plug with a properly grounded 3-prong wall outlet. This appliance is a standard 2-prong wall ...

Use and Care Manual
Page 10
... fill in appearance. not for ordering by phone or at extra cost from your GE supplier. Filter Kits JX81B - See the back cover for end-of-cabinet installation. Operating Instructions Troubleshooting Tips Consumer Support 10 Each kit contains two 3″-wide filler... panels. Available at ge.com. Safety Instructions About optional kits. JX52 For installation between cabinets only; Recirculating Charcoal Filter Kit (1800 and 3600 Series models) JX81H - White JX52BL...
... fill in appearance. not for ordering by phone or at extra cost from your GE supplier. Filter Kits JX81B - See the back cover for end-of-cabinet installation. Operating Instructions Troubleshooting Tips Consumer Support 10 Each kit contains two 3″-wide filler... panels. Available at ge.com. Safety Instructions About optional kits. JX52 For installation between cabinets only; Recirculating Charcoal Filter Kit (1800 and 3600 Series models) JX81H - White JX52BL...
Use and Care Manual
Page 32
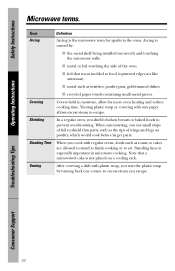
... cake is not placed on poultry, which would cook before larger parts. Standing Time When you vent the plastic wrap by : s the metal shelf being installed incorrectly and touching the microwave walls. Venting After covering a dish with wax paper allows excess steam to prevent over-browning. Covering Covers hold in microwave...
... cake is not placed on poultry, which would cook before larger parts. Standing Time When you vent the plastic wrap by : s the metal shelf being installed incorrectly and touching the microwave walls. Venting After covering a dish with wax paper allows excess steam to prevent over-browning. Covering Covers hold in microwave...

Use and Care Manual
Page 38
... the air will rest at the main fuse or circuit breaker panel or pull the plug. Troubleshooting Tips Consumer Support 38 WB2X10733 from your GE supplier. WB2X10956 from the new filter. See "Optional Kits", page 10, for more information. It will be replaced. For JVM2000 Series models... No. If the model is noticeably dirty or discolored (usually after 6 to remove the grille. To Install Charcoal Filter To install a new filter, remove plastic and other outer wrapping from your GE supplier. Charcoal Filter (on 2 side support tabs and in place and sliding the grille to the left...
... the air will rest at the main fuse or circuit breaker panel or pull the plug. Troubleshooting Tips Consumer Support 38 WB2X10733 from your GE supplier. WB2X10956 from the new filter. See "Optional Kits", page 10, for more information. It will be replaced. For JVM2000 Series models... No. If the model is noticeably dirty or discolored (usually after 6 to remove the grille. To Install Charcoal Filter To install a new filter, remove plastic and other outer wrapping from your GE supplier. Charcoal Filter (on 2 side support tabs and in place and sliding the grille to the left...

Use and Care Manual
Page 43
...Any implied warranties, including the implied warranties of the original purchase date is not available, you how to one -year warranty, GE will be responsible for any succeeding owner for products purchased for a particular purpose, are , consult your local or state consumer ...the date of God. s Product not accessible to a defect in materials or workmanship. s Improper installation, delivery or maintenance. s Damage to the product caused by a GE Authorized Servicer is needed to your receipt here. Troubleshooting Tips EXCLUSION OF IMPLIED WARRANTIES-Your sole and ...
...Any implied warranties, including the implied warranties of the original purchase date is not available, you how to one -year warranty, GE will be responsible for any succeeding owner for products purchased for a particular purpose, are , consult your local or state consumer ...the date of God. s Product not accessible to a defect in materials or workmanship. s Improper installation, delivery or maintenance. s Damage to the product caused by a GE Authorized Servicer is needed to your receipt here. Troubleshooting Tips EXCLUSION OF IMPLIED WARRANTIES-Your sole and ...
Installation Instructions
Page 1
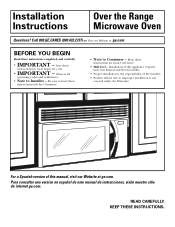
... Warranty. KEEP THESE INSTRUCTIONS. Save these instructions with the Consumer. • Note to Installer - For a Spanish version of this appliance requires basic mechanical and electrical skills. • Proper installation is the responsibility of this manual, visit our Website at : ge.com BEFORE YOU BEGIN Read these instructions for local inspector's use. • IMPORTANT...
... Warranty. KEEP THESE INSTRUCTIONS. Save these instructions with the Consumer. • Note to Installer - For a Spanish version of this appliance requires basic mechanical and electrical skills. • Proper installation is the responsibility of this manual, visit our Website at : ge.com BEFORE YOU BEGIN Read these instructions for local inspector's use. • IMPORTANT...

Installation Instructions
Page 2
...Microwave Assembly 20 Adapting Microwave Blower for Recirculation 20, 21 Mount the Microwave Oven ..........21, 22 Installing the Charcoal Filter 22 Before You Use Your Microwave 23 Step-by-step installation guide Placement of Mounting Plate 8-10 Removing the Mounting Plate 8 Finding the Wall Studs 8 Determining... Wall Plate Location 9 Aligning the Wall Plate 10 Installation Types 11-22 A Outside Top Exhaust 12-14 Attach Mounting Plate to Wall 12 Preparation of Top Cabinet 13 Checking for Proper...
...Microwave Assembly 20 Adapting Microwave Blower for Recirculation 20, 21 Mount the Microwave Oven ..........21, 22 Installing the Charcoal Filter 22 Before You Use Your Microwave 23 Step-by-step installation guide Placement of Mounting Plate 8-10 Removing the Mounting Plate 8 Finding the Wall Studs 8 Determining... Wall Plate Location 9 Aligning the Wall Plate 10 Installation Types 11-22 A Outside Top Exhaust 12-14 Attach Mounting Plate to Wall 12 Preparation of Top Cabinet 13 Checking for Proper...

Installation Instructions
Page 3
.... You should have it is equipped with a three-prong (grounding) plug which mates with a properly grounded three-prong wall receptacle, installed by a qualified electrician. ELECTRICAL REQUIREMENTS Product rating is properly grounded. This product must perform a ground continuity check on the power outlet ...of this 63-85 pound product, plus additional oven loads of the proper voltage and frequency. Ensure proper ground exists before beginning installation to 20- If not properly grounded, or if the outlet box does not meet electrical requirements noted (under ELECTRICAL REQUIREMENTS), a...
.... You should have it is equipped with a three-prong (grounding) plug which mates with a properly grounded three-prong wall receptacle, installed by a qualified electrician. ELECTRICAL REQUIREMENTS Product rating is properly grounded. This product must perform a ground continuity check on the power outlet ...of this 63-85 pound product, plus additional oven loads of the proper voltage and frequency. Ensure proper ground exists before beginning installation to 20- If not properly grounded, or if the outlet box does not meet electrical requirements noted (under ELECTRICAL REQUIREMENTS), a...
Installation Instructions
Page 4
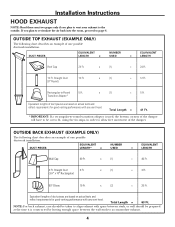
OUTSIDE TOP EXHAUST (EXAMPLE ONLY) The following chart describes an example of one possible ductwork installation. x (1) = 12 Ft. x (1) = 40 Ft. 3 Ft. Straight Duct 3 Ft. (31⁄4″ x 10″ Rectangular) x (1) = 3 Ft. 90° Elbow 10 Ft....exhaust. 4 Straight Duct (6″ Round) 12 Ft. OUTSIDE BACK EXHAUST (EXAMPLE ONLY) The following chart describes an example of one possible ductwork installation. Installation Instructions HOOD EXHAUST NOTE: Read these next two pages only if you plan to recirculate the air back into the room, proceed to -Round ...
OUTSIDE TOP EXHAUST (EXAMPLE ONLY) The following chart describes an example of one possible ductwork installation. x (1) = 12 Ft. x (1) = 40 Ft. 3 Ft. Straight Duct 3 Ft. (31⁄4″ x 10″ Rectangular) x (1) = 3 Ft. 90° Elbow 10 Ft....exhaust. 4 Straight Duct (6″ Round) 12 Ft. OUTSIDE BACK EXHAUST (EXAMPLE ONLY) The following chart describes an example of one possible ductwork installation. Installation Instructions HOOD EXHAUST NOTE: Read these next two pages only if you plan to recirculate the air back into the room, proceed to -Round ...

Installation Instructions
Page 5
...lengths of all transitions and adaptors plus the length of exhaust and helps prevent blockages. The chart below shows you need to install ducts, note that venting be installed using the most direct route and with as few elbows as possible. x ( ) = Ft. Equivalent lengths of duct pieces... and reflect requirements for good venting performance with a standard 31⁄4″ x 10″ rectangular duct. Roof Cap 24 Ft. Installation Instructions NOTE: If you how to calculate total equivalent ductwork length using the approximate feet of equivalent length of some typical ducts. Outside ...
...lengths of all transitions and adaptors plus the length of exhaust and helps prevent blockages. The chart below shows you need to install ducts, note that venting be installed using the most direct route and with as few elbows as possible. x ( ) = Ft. Equivalent lengths of duct pieces... and reflect requirements for good venting performance with a standard 31⁄4″ x 10″ rectangular duct. Roof Cap 24 Ft. Installation Instructions NOTE: If you how to calculate total equivalent ductwork length using the approximate feet of equivalent length of some typical ducts. Outside ...
Installation Instructions
Page 6
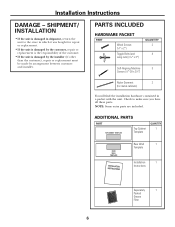
... customer, repair or replacement is the responsibility of the customer. • If the unit is damaged by the installer (if other than the customer), repair or replacement must be made by arrangement between customer and installer. NOTE: Some extra parts are included. ADDITIONAL PARTS PART Top Cabinet Template QUANTITY 1 Rear Wall 1 Template...
... customer, repair or replacement is the responsibility of the customer. • If the unit is damaged by the installer (if other than the customer), repair or replacement must be made by arrangement between customer and installer. NOTE: Some extra parts are included. ADDITIONAL PARTS PART Top Cabinet Template QUANTITY 1 Rear Wall 1 Template...

Installation Instructions
Page 7
...gap between the cabinets must be careful to follow the instructions on the top cabinet template for top cabinet spacing (used on recessed bottom cabinet installations only) Saw (saber, hole or keyhole) Stud finder or Hammer (optional) Safety goggles Level Duct and masking tape MOUNTING SPACE 161⁄2&#... between the microwave oven and the cabinets. Your Owner's Manual contains the kit number for your model. • This microwave oven is for installation over ranges up to 36″ wide. • If you are going to vent your microwave oven to the outside, see Hood Exhaust Section...
...gap between the cabinets must be careful to follow the instructions on the top cabinet template for top cabinet spacing (used on recessed bottom cabinet installations only) Saw (saber, hole or keyhole) Stud finder or Hammer (optional) Safety goggles Level Duct and masking tape MOUNTING SPACE 161⁄2&#... between the microwave oven and the cabinets. Your Owner's Manual contains the kit number for your model. • This microwave oven is for installation over ranges up to 36″ wide. • If you are going to vent your microwave oven to the outside, see Hood Exhaust Section...

Installation Instructions
Page 8
... and for mounting. Stud finder - This will be resting in the Styrofoam. REMOVING THE MICROWAVE OVEN FROM THE CARTON/ REMOVING THE MOUNTING PLATE 1 Remove the installation instructions, filters, glass tray and the small hardware bag. You may discard these screws. 8 Use a hammer to tap lightly across the mounting surface to find...
... and for mounting. Stud finder - This will be resting in the Styrofoam. REMOVING THE MICROWAVE OVEN FROM THE CARTON/ REMOVING THE MOUNTING PLATE 1 Remove the installation instructions, filters, glass tray and the small hardware bag. You may discard these screws. 8 Use a hammer to tap lightly across the mounting surface to find...

Installation Instructions
Page 9
beneath recessed bottom cabinet with front overhang Mounting Plate with the microwave installation. If the cabinets have decorative trim that interferes with Tabs Below Cabinet Bottom the Same Distance as the front overhang depth. DETERMINING WALL PLATE LOCATION ... CABINET Plate position - Use a level to Cooktop Your cabinets may have a front overhang only, with this type of installation with front overhang only, align the mounting tabs with no back or side frame, install the mounting plate down the same distance as the Front Overhang Depth 30″ to make it level...
beneath recessed bottom cabinet with front overhang Mounting Plate with the microwave installation. If the cabinets have decorative trim that interferes with Tabs Below Cabinet Bottom the Same Distance as the front overhang depth. DETERMINING WALL PLATE LOCATION ... CABINET Plate position - Use a level to Cooktop Your cabinets may have a front overhang only, with this type of installation with front overhang only, align the mounting tabs with no back or side frame, install the mounting plate down the same distance as the Front Overhang Depth 30″ to make it level...
Installation Instructions
Page 10
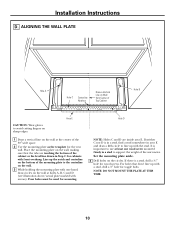
... wall, making sure that don't line up with a stud, drill a 5⁄8″ hole for the rear wall. Four holes must be used for wood screws. Installation Instructions D.
... wall, making sure that don't line up with a stud, drill a 5⁄8″ hole for the rear wall. Four holes must be used for wood screws. Installation Instructions D.


