
Quick Specs
Page 1
... call GE Answer Center® service, 800.626.2000. Exhaust outlet connects to 3-1/4" X 10" duct For answers to adjacent wall should equal 1/2-inch. Ft. No additional wiring, venting or cabinet rebuilding necessary in inches) Note: Requires 120V grounded outlet. JNM1541SMSS GE Spacemaker® 1.5 Cu. as shown) • Outside exhaust (horizontal) • Recirculating (non-vented ductless - Over-the-Range MicrowOavveer-thOe-vReannge Microwave Oven Dimensions (in inches) Dimensions and Installation Information...
... call GE Answer Center® service, 800.626.2000. Exhaust outlet connects to 3-1/4" X 10" duct For answers to adjacent wall should equal 1/2-inch. Ft. No additional wiring, venting or cabinet rebuilding necessary in inches) Note: Requires 120V grounded outlet. JNM1541SMSS GE Spacemaker® 1.5 Cu. as shown) • Outside exhaust (horizontal) • Recirculating (non-vented ductless - Over-the-Range MicrowOavveer-thOe-vReannge Microwave Oven Dimensions (in inches) Dimensions and Installation Information...

Quick Specs
Page 2
Read the following carefully. Filler Panel kits JX41 When replacing a 36" range hood, this kit fills in the additional width to a section of -cabinet installation. Roof Cap Equivalent Feet 5 ft. 40 ft. 10 ft. 5 ft. 25 ft. 5 ft. 24 ft. Listed by leaving enough space between cabinets only; Do not use less than their actual physical size. Rear Exhaust: If a rear or horizontal exhaust is required, a rectangular-to...
Read the following carefully. Filler Panel kits JX41 When replacing a 36" range hood, this kit fills in the additional width to a section of -cabinet installation. Roof Cap Equivalent Feet 5 ft. 40 ft. 10 ft. 5 ft. 25 ft. 5 ft. 24 ft. Listed by leaving enough space between cabinets only; Do not use less than their actual physical size. Rear Exhaust: If a rear or horizontal exhaust is required, a rectangular-to...
Use and Care Manual
Page 3
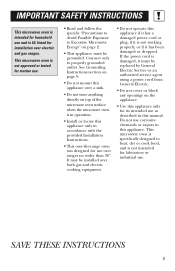
IMPORTANT SAFETY INSTRUCTIONS This microwave oven is intended for household use and is UL listed for marine use. • Read and follow the specific "Precautions to Avoid Possible Exposure to Excessive Microwave Energy" on page 2. • This appliance must be replaced by General Electric Service or an authorized service agent using a power cord from General Electric. • Do not cover or block any openings on the appliance. • Use this appliance only for...
IMPORTANT SAFETY INSTRUCTIONS This microwave oven is intended for household use and is UL listed for marine use. • Read and follow the specific "Precautions to Avoid Possible Exposure to Excessive Microwave Energy" on page 2. • This appliance must be replaced by General Electric Service or an authorized service agent using a power cord from General Electric. • Do not cover or block any openings on the appliance. • Use this appliance only for...
Use and Care Manual
Page 4
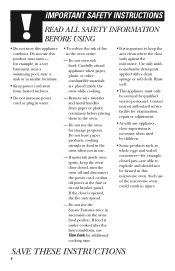
... to keep the oven door closed, turn the oven off and disconnect the power cord, or shut off power at the fuse or circuit breaker panel. Do not use the Sensor Features twice in use of fire in injury. SAVE THESE INSTRUCTIONS 4 Do not overcook food. Do not use the oven for example, in a wet basement, near a swimming pool, near water- If materials inside the oven while cooking. - Rinse well...
... to keep the oven door closed, turn the oven off and disconnect the power cord, or shut off power at the fuse or circuit breaker panel. Do not use the Sensor Features twice in use of fire in injury. SAVE THESE INSTRUCTIONS 4 Do not overcook food. Do not use the oven for example, in a wet basement, near a swimming pool, near water- If materials inside the oven while cooking. - Rinse well...
Use and Care Manual
Page 8
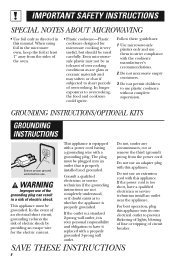
.... This appliance must be used carefully. In longer exposures to short periods of electric shock by providing an escape wire for microwave cooking is equipped with a power cord having a grounding wire with this appliance into an outlet that is too short, have it is a standard 2-prong wall outlet, it replaced with this manual. Do not, under any circumstances, cut or remove the third (ground...
.... This appliance must be used carefully. In longer exposures to short periods of electric shock by providing an escape wire for microwave cooking is equipped with a power cord having a grounding wire with this appliance into an outlet that is too short, have it is a standard 2-prong wall outlet, it replaced with this manual. Do not, under any circumstances, cut or remove the third (ground...
Use and Care Manual
Page 9
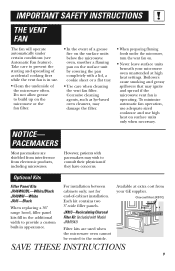
... sheet or a flat tray. • Use care when cleaning the vent fan filter. Optional Kits Filler Panel Kits JX46WH/BL-White/Black JX40WH-White JX41-Black When replacing a 36″ range hood, filler panel kits fill in the additional width to prevent the starting and spreading of accidental cooking fires while the vent fan is operating. For installation between cabinets only; Do not allow grease to the outside. Available at high heat settings. IMPORTANT SAFETY INSTRUCTIONS THE VENT FAN The fan...
... sheet or a flat tray. • Use care when cleaning the vent fan filter. Optional Kits Filler Panel Kits JX46WH/BL-White/Black JX40WH-White JX41-Black When replacing a 36″ range hood, filler panel kits fill in the additional width to prevent the starting and spreading of accidental cooking fires while the vent fan is operating. For installation between cabinets only; Do not allow grease to the outside. Available at high heat settings. IMPORTANT SAFETY INSTRUCTIONS THE VENT FAN The fan...
Use and Care Manual
Page 10
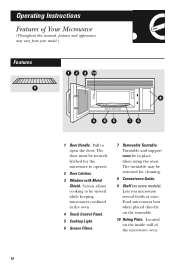
...the oven. 4 Touch Control Panel. 5 Cooktop Light. 6 Grease Filters. 7 Removable Turntable. Lets you microwave several foods at once. Operating Instructions Features of the microwave oven. 10 Screen allows cooking to be removed for the microwave to open the door. Food microwaves best when placed directly on the inside wall of Your Microwave (Throughout this manual, features and appearance may be viewed while keeping microwaves confined in place when using the oven. Pull to operate. 2 Door Latches. 3 Window with Metal Shield. Located on the turntable. 10 Rating Plate.
...the oven. 4 Touch Control Panel. 5 Cooktop Light. 6 Grease Filters. 7 Removable Turntable. Lets you microwave several foods at once. Operating Instructions Features of the microwave oven. 10 Screen allows cooking to be removed for the microwave to open the door. Food microwaves best when placed directly on the inside wall of Your Microwave (Throughout this manual, features and appearance may be viewed while keeping microwaves confined in place when using the oven. Pull to operate. 2 Door Latches. 3 Window with Metal Shield. Located on the turntable. 10 Rating Plate.

Use and Care Manual
Page 16
... half and remove fibrous membranes. casserole, place 3 tablespoons water. Cut in 2-qt. per ear 5 to 6 min. 3 to 7 min. 10-oz. oblong glass baking dish. casserole with vented plastic wrap. In 2-qt. each ) In 1-qt. casserole, place 2 tablespoons water. In 2-qt. Rearrange after half of time. Place in center of time. Operating Instructions Cooking Guide for Time Cook I & II Vegetable Amount Time Comments Corn...
... half and remove fibrous membranes. casserole, place 3 tablespoons water. Cut in 2-qt. per ear 5 to 6 min. 3 to 7 min. 10-oz. oblong glass baking dish. casserole with vented plastic wrap. In 2-qt. each ) In 1-qt. casserole, place 2 tablespoons water. In 2-qt. Rearrange after half of time. Place in center of time. Operating Instructions Cooking Guide for Time Cook I & II Vegetable Amount Time Comments Corn...
Use and Care Manual
Page 21
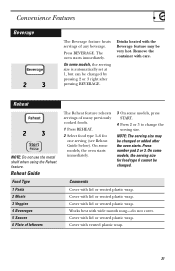
... serving (see Reheat Guide below). Press number pad 2 or 3. Drinks heated with lid or vented plastic wrap. Reheat NOTE: Do not use the metal shelf when using the Reheat feature. On some models, the serving size is automatically set at 1, but can be changed by pressing 2 or 3 right after the oven starts. Works best with lid or vented plastic wrap. Comments Cover with wide mouth...
... serving (see Reheat Guide below). Press number pad 2 or 3. Drinks heated with lid or vented plastic wrap. Reheat NOTE: Do not use the metal shelf when using the Reheat feature. On some models, the serving size is automatically set at 1, but can be changed by pressing 2 or 3 right after the oven starts. Works best with lid or vented plastic wrap. Comments Cover with wide mouth...
Use and Care Manual
Page 35
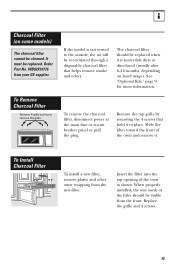
... the outside, the air will be replaced when it . Insert the filter into the top opening of the oven and remove it is not vented to remove the grille. To remove the charcoal filter, disconnect power at the main fuse or circuit breaker panel or pull the plug. WB02X10776 from the new filter. Replace the grille and 4 screws. 35 Order Part No. See "Optional Kits," page 9 for more information. When properly installed, the wire...
... the outside, the air will be replaced when it . Insert the filter into the top opening of the oven and remove it is not vented to remove the grille. To remove the charcoal filter, disconnect power at the main fuse or circuit breaker panel or pull the plug. WB02X10776 from the new filter. Replace the grille and 4 screws. 35 Order Part No. See "Optional Kits," page 9 for more information. When properly installed, the wire...
Use and Care Manual
Page 36
...; Open the door and close securely. "LOC" appears on to heat for about 3 seconds to Do Oven will not turn it off by pressing the Vent Fan pad after the microwave is off while the microwave is fully inserted into wall outlet. Vent fan will not start A fuse in your home • Replace fuse or reset circuit breaker. "PLEASE INSERT PROBE" appears on display "SENSOR ERROR" appears on the into wall outlet. oven...
...; Open the door and close securely. "LOC" appears on to heat for about 3 seconds to Do Oven will not turn it off by pressing the Vent Fan pad after the microwave is off while the microwave is fully inserted into wall outlet. Vent fan will not start A fuse in your home • Replace fuse or reset circuit breaker. "PLEASE INSERT PROBE" appears on display "SENSOR ERROR" appears on the into wall outlet. oven...
Use and Care Manual
Page 40
... responsible for providing adequate electrical, exhausting and other than the intended purpose or used for other connecting facilities. • Product not accessible to provide required service. • Replacement of house fuses or resetting of circuit breakers. • Replacement of the cooktop light bulbs. • Failure of God. • Incidental or consequential damage caused by law. This warranty gives you specific legal rights, and you...
... responsible for providing adequate electrical, exhausting and other than the intended purpose or used for other connecting facilities. • Product not accessible to provide required service. • Replacement of house fuses or resetting of circuit breakers. • Replacement of the cooktop light bulbs. • Failure of God. • Incidental or consequential damage caused by law. This warranty gives you specific legal rights, and you...
Installation Instructions
Page 2
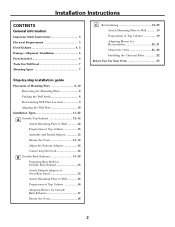
Installation Instructions CONTENTS General information Important Safety Instructions 3 Electrical Requirements 3 Hood Exhaust 4, 5 Damage-Shipment/Installation 6 Parts Included 6 Tools You Will Need 7 Mounting Space 7 Step-by-step installation guide Placement of Mounting Plate 8-10 Removing the Mounting Plate 8 Finding the Wall Studs 8 Determining Wall Plate Location 9 Aligning the Wall Plate 10 Installation Types 11-22 A Outside Top Exhaust 12-14 Attach Mounting Plate to Wall 12 Preparation of Top Cabinet 13 Assemble and Install Adaptor 13 Mount the Oven 13, 14 Adjust the ...
Installation Instructions CONTENTS General information Important Safety Instructions 3 Electrical Requirements 3 Hood Exhaust 4, 5 Damage-Shipment/Installation 6 Parts Included 6 Tools You Will Need 7 Mounting Space 7 Step-by-step installation guide Placement of Mounting Plate 8-10 Removing the Mounting Plate 8 Finding the Wall Studs 8 Determining Wall Plate Location 9 Aligning the Wall Plate 10 Installation Types 11-22 A Outside Top Exhaust 12-14 Attach Mounting Plate to Wall 12 Preparation of Top Cabinet 13 Assemble and Install Adaptor 13 Mount the Oven 13, 14 Adjust the ...
Installation Instructions
Page 3
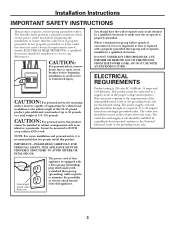
..., CUT, DEFORM OR REMOVE ANY OF THE PRONGS FROM THE POWER CORD. CAUTION: For personal safety, the mounting surface must be located in the cabinet above the oven. It must conform to avoid severe or fatal shock injury. CAUTION: For personal safety, remove house fuse or open circuit breaker before use The power cord of this appliance is very important to minimize the possibility of supporting...
..., CUT, DEFORM OR REMOVE ANY OF THE PRONGS FROM THE POWER CORD. CAUTION: For personal safety, the mounting surface must be located in the cabinet above the oven. It must conform to avoid severe or fatal shock injury. CAUTION: For personal safety, remove house fuse or open circuit breaker before use The power cord of this appliance is very important to minimize the possibility of supporting...
Installation Instructions
Page 7
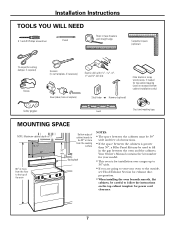
Your Owner's Manual contains the kit number for your model. • This oven is for installation over ranges up to 36″ wide. • If you are going to vent your oven to the outside, see Hood Exhaust Section for exhaust duct preparation. • When installing the oven beneath smooth, flat cabinets, be careful to follow the instructions on the top cabinet template for top cabinet spacing (used on recessed bottom cabinet installations only) Safety goggles Level Duct and...
Your Owner's Manual contains the kit number for your model. • This oven is for installation over ranges up to 36″ wide. • If you are going to vent your oven to the outside, see Hood Exhaust Section for exhaust duct preparation. • When installing the oven beneath smooth, flat cabinets, be careful to follow the instructions on the top cabinet template for top cabinet spacing (used on recessed bottom cabinet installations only) Safety goggles Level Duct and...
Installation Instructions
Page 8
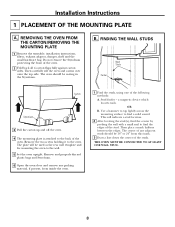
.... 6 Open the oven door and remove any adjacent studs should be used as the rear wall template and for mounting the oven to the wall. 5 Set the oven upright. a magnetic device which locates nails. Then carefully roll the oven and carton over onto the top side. Then place a mark halfway between the edges. The oven should be 16″ or 24″ from inside the oven. 1 Find the studs, using...
.... 6 Open the oven door and remove any adjacent studs should be used as the rear wall template and for mounting the oven to the wall. 5 Set the oven upright. a magnetic device which locates nails. Then carefully roll the oven and carton over onto the top side. Then place a mark halfway between the edges. The oven should be 16″ or 24″ from inside the oven. 1 Find the studs, using...
Installation Instructions
Page 11
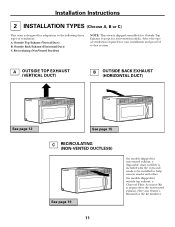
... for non-vented exhaust, a disposable charcoal filter is shipped assembled for Outside Top Exhaust (except for non-vented models). Installation Instructions 2 INSTALLATION TYPES (Choose A, B or C) This oven is required for the non-vented exhaust. (See your installation and proceed to that section. On models shipped for outside top exhaust, a Charcoal Filter Accessory Kit is designed for the kit number.) 11 Outside Top Exhaust (Vertical Duct) B. Outside Back Exhaust (Horizontal Duct) C. Select the type of ventilation required for your Owner's Manual for adaptation...
... for non-vented exhaust, a disposable charcoal filter is shipped assembled for Outside Top Exhaust (except for non-vented models). Installation Instructions 2 INSTALLATION TYPES (Choose A, B or C) This oven is required for the non-vented exhaust. (See your installation and proceed to that section. On models shipped for outside top exhaust, a Charcoal Filter Accessory Kit is designed for the kit number.) 11 Outside Top Exhaust (Vertical Duct) B. Outside Back Exhaust (Horizontal Duct) C. Select the type of ventilation required for your Owner's Manual for adaptation...

Installation Instructions
Page 14
... wall and the top cabinet.) 5 Install grease filters. CONNECTING DUCTWORK House Duct 4 Tighten the two screws to Depth of Oven A6. See the Owner's Manual packed with the oven. 1 Extend the house duct down to connect to the house duct. ADJUST THE EXHAUST ADAPTOR Open the top cabinet and adjust the exhaust adaptor to connect to the exhaust adaptor. 2 Seal exhaust duct joints using duct tape. 14 Turn two full turns on each screw. MOUNT THE OVEN...
... wall and the top cabinet.) 5 Install grease filters. CONNECTING DUCTWORK House Duct 4 Tighten the two screws to Depth of Oven A6. See the Owner's Manual packed with the oven. 1 Extend the house duct down to connect to the house duct. ADJUST THE EXHAUST ADAPTOR Open the top cabinet and adjust the exhaust adaptor to connect to the exhaust adaptor. 2 Seal exhaust duct joints using duct tape. 14 Turn two full turns on each screw. MOUNT THE OVEN...

Installation Instructions
Page 18
... cabinet bottom. 5 Install grease filters. Cabinet Front Cabinet Bottom Shelf Filler Block Equivalent to Depth of Cabinet Recess Self-Aligning Screw Oven Top 3 Attach the oven to the top of the oven completely. (While tightening screws, hold the oven in bottom of the cord. IMPORTANT: Do not grip or use the nylon grommet around the power cord hole to keep power cord tight. See the Owner's Manual packed with the oven. 18 MOUNT...
... cabinet bottom. 5 Install grease filters. Cabinet Front Cabinet Bottom Shelf Filler Block Equivalent to Depth of Cabinet Recess Self-Aligning Screw Oven Top 3 Attach the oven to the top of the oven completely. (While tightening screws, hold the oven in bottom of the cord. IMPORTANT: Do not grip or use the nylon grommet around the power cord hole to keep power cord tight. See the Owner's Manual packed with the oven. 18 MOUNT...
Installation Instructions
Page 22
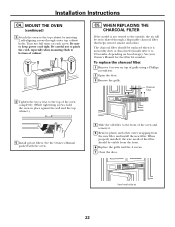
... cabinet.) 5 Install grease filters. Installation Instructions C4. Turn two full turns on hood usage). C5. Be sure to bottom of cabinet. See your Owner's Manual for the filter kit number. See the Owner's Manual packed with the oven. 4 Slide the old filter to 12 months, depending on each screw. When properly installed, the wire mesh of the oven and remove it is not vented to the top cabinet by inserting 2 self-aligning screws through a disposable charcoal filter that helps remove...
... cabinet.) 5 Install grease filters. Installation Instructions C4. Turn two full turns on hood usage). C5. Be sure to bottom of cabinet. See your Owner's Manual for the filter kit number. See the Owner's Manual packed with the oven. 4 Slide the old filter to 12 months, depending on each screw. When properly installed, the wire mesh of the oven and remove it is not vented to the top cabinet by inserting 2 self-aligning screws through a disposable charcoal filter that helps remove...


