Use and Care Manual
Page 1
...7 Sealed Gas Burners 7 Care and Cleaning Burners and Cooktop Electrodes 10 Burner Bases 10 Burner Caps and Heads . . . . . .10 Burner Grates 11 Burner Head and Cap Replacement 11 Control Knobs 9 Electrodes 10 Glass Cooktop 12, 13 Porcelain Enamel Cooktop . . . .9 Shipping Film and Tape 9 Stainless Steel Surfaces 9 Troubleshooting Tips . . . .14, 15 Consumer Support Consumer Support 22 Ownership Registration for Customers in Canada only 17, 18 Warranty (Canada 21 Warranty (U.S 20 In Canada: www.GEAppliances.ca Printed in the United States Write the model and serial numbers here...
...7 Sealed Gas Burners 7 Care and Cleaning Burners and Cooktop Electrodes 10 Burner Bases 10 Burner Caps and Heads . . . . . .10 Burner Grates 11 Burner Head and Cap Replacement 11 Control Knobs 9 Electrodes 10 Glass Cooktop 12, 13 Porcelain Enamel Cooktop . . . .9 Shipping Film and Tape 9 Stainless Steel Surfaces 9 Troubleshooting Tips . . . .14, 15 Consumer Support Consumer Support 22 Ownership Registration for Customers in Canada only 17, 18 Warranty (Canada 21 Warranty (U.S 20 In Canada: www.GEAppliances.ca Printed in the United States Write the model and serial numbers here...
Use and Care Manual
Page 3
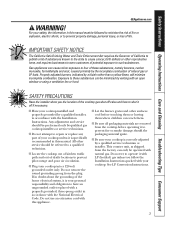
... of life. Properly adjusted burners, indicated by qualified gas cooktop installers or service technicians. ■ Do not attempt to repair or replace any part of drafty locations to a qualified technician. ■ Locate the cooktop out of kitchen traffic path and out of your cooktop into a 120-volt grounded outlet only. If in accordance with natural gas. This counter unit, as shipped from the plug. See LP Conversion Instructions. 3 Gas appliances can cause...
... of life. Properly adjusted burners, indicated by qualified gas cooktop installers or service technicians. ■ Do not attempt to repair or replace any part of drafty locations to a qualified technician. ■ Locate the cooktop out of kitchen traffic path and out of your cooktop into a 120-volt grounded outlet only. If in accordance with natural gas. This counter unit, as shipped from the plug. See LP Conversion Instructions. 3 Gas appliances can cause...
Use and Care Manual
Page 5
... Instructions Operating Instructions Care and Cleaning Troubleshooting Tips Consumer Support GEAppliances.com WARNING! SURFACE BURNERS Use proper pan size-avoid pans that may cause a carbon monoxide level above that the controls for frying should be used in burns from the surface burners. ■ Do not leave any items on the cooktop- To avoid spillovers, make sure the burners have ignited. ■ Never leave the surface burners unattended at a high flame setting. ■ Always heat fat...
... Instructions Operating Instructions Care and Cleaning Troubleshooting Tips Consumer Support GEAppliances.com WARNING! SURFACE BURNERS Use proper pan size-avoid pans that may cause a carbon monoxide level above that the controls for frying should be used in burns from the surface burners. ■ Do not leave any items on the cooktop- To avoid spillovers, make sure the burners have ignited. ■ Never leave the surface burners unattended at a high flame setting. ■ Always heat fat...
Use and Care Manual
Page 6
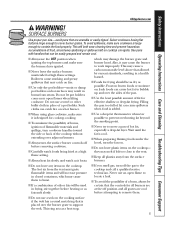
... Conversion Instructions. READ ALL INSTRUCTIONS BEFORE USING. Some cleaners produce noxious fumes and wet cloths could result in this . Cooking to the cooktop. ■ Do not cover or block the area around the cooktop knobs. SURFACE BURNERS Adjust the top burner flame size so it is shipped from the factory set to a hot surface. Excessive flame is hot. ■ After cleaning, use a dry cloth or paper towel to line burner bowls. Please see Cleaning the glass cooktop surface...
... Conversion Instructions. READ ALL INSTRUCTIONS BEFORE USING. Some cleaners produce noxious fumes and wet cloths could result in this . Cooking to the cooktop. ■ Do not cover or block the area around the cooktop knobs. SURFACE BURNERS Adjust the top burner flame size so it is shipped from the factory set to a hot surface. Excessive flame is hot. ■ After cleaning, use a dry cloth or paper towel to line burner bowls. Please see Cleaning the glass cooktop surface...
Use and Care Manual
Page 7
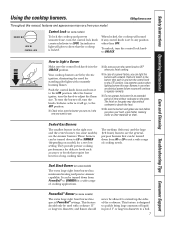
... case of cooking applications. Hold a lit match to any control knob is locked. Safety Instructions Operating Instructions Care and Cleaning Troubleshooting Tips Consumer Support Using the cooktop burners. UNLOCK LOCK CONTROL LOCK Control Lock (on some models) The extra large right front burner has maximum heating and precise simmer capability. then push in diameter, and flames should only be turned down and turn the knob clockwise as far as sauces or foods that require low heat for a wide range of a power failure...
... case of cooking applications. Hold a lit match to any control knob is locked. Safety Instructions Operating Instructions Care and Cleaning Troubleshooting Tips Consumer Support Using the cooktop burners. UNLOCK LOCK CONTROL LOCK Control Lock (on some models) The extra large right front burner has maximum heating and precise simmer capability. then push in diameter, and flames should only be turned down and turn the knob clockwise as far as sauces or foods that require low heat for a wide range of a power failure...
Use and Care Manual
Page 8
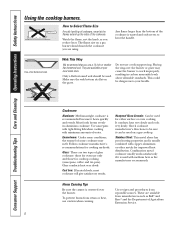
... and those for oven use a 14-inch or smaller flat-bottomed wok. Consumer Support Troubleshooting Tips Care and Cleaning Operating Instructions Safety Instructions Using the cooktop burners. How to your local retail store. Watch the flame, not the knob, as Ball® and Kerr® and the Department of glass cookware: those for improved heat distribution. The flame size on the grate. They are using. This could be used . Cookware Aluminum: Medium-weight...
... and those for oven use a 14-inch or smaller flat-bottomed wok. Consumer Support Troubleshooting Tips Care and Cleaning Operating Instructions Safety Instructions Using the cooktop burners. How to your local retail store. Watch the flame, not the knob, as Ball® and Kerr® and the Department of glass cookware: those for improved heat distribution. The flame size on the grate. They are using. This could be used . Cookware Aluminum: Medium-weight...
Use and Care Manual
Page 9
... tape on . Safety Instructions Operating Instructions Care and Cleaning Troubleshooting Tips Consumer Support Care and cleaning of the knobs are cool before using the appliance for easier cleaning. How to ensure proper placement. Replace the knobs in a dishwasher or they may be permitted to remove the adhesive left from the appliance surface. Make sure the knobs are in the direction of the film before replacing. GEAppliances.com Be sure electrical power...
... tape on . Safety Instructions Operating Instructions Care and Cleaning Troubleshooting Tips Consumer Support Care and cleaning of the knobs are cool before using the appliance for easier cleaning. How to ensure proper placement. Replace the knobs in a dishwasher or they may be permitted to remove the adhesive left from the appliance surface. Make sure the knobs are in the direction of the film before replacing. GEAppliances.com Be sure electrical power...
Use and Care Manual
Page 10
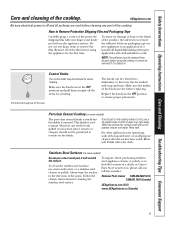
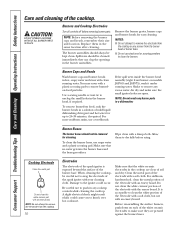
.... Be careful not to remove any cooktop controls while cleaning the cooktop. Make sure that no water gets into the burner bases and the brass gas orifices. For stubborn, hardened soil, clean the metal portion of mild liquid dishwashing detergent and hot water for up to 20-30 minutes, if required. Consumer Support Troubleshooting Tips Care and Cleaning Operating Instructions Safety Instructions Care and cleaning of the spark igniter with your cleaning cloth. CAUTION...
.... Be careful not to remove any cooktop controls while cleaning the cooktop. Make sure that no water gets into the burner bases and the brass gas orifices. For stubborn, hardened soil, clean the metal portion of mild liquid dishwashing detergent and hot water for up to 20-30 minutes, if required. Consumer Support Troubleshooting Tips Care and Cleaning Operating Instructions Safety Instructions Care and cleaning of the spark igniter with your cleaning cloth. CAUTION...
Use and Care Manual
Page 13
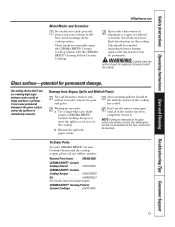
... toll-free number: National Parts Center 800.626.2002. Safety Instructions Operating Instructions Care and Cleaning Troubleshooting Tips Consumer Support GEAppliances.com Metal Marks and Scratches Be careful not to a cool area on the cooktop. This should be permanent. Remove the spill with the CERAMA BRYTE® Cleaning Pad for Ceramic Cooktops WX10X350 13 Glass surface-potential for roughness that if you are removable using the CERAMA BRYTE® Ceramic Cooktop Cleaner...
... toll-free number: National Parts Center 800.626.2002. Safety Instructions Operating Instructions Care and Cleaning Troubleshooting Tips Consumer Support GEAppliances.com Metal Marks and Scratches Be careful not to a cool area on the cooktop. This should be permanent. Remove the spill with the CERAMA BRYTE® Cleaning Pad for Ceramic Cooktops WX10X350 13 Glass surface-potential for roughness that if you are removable using the CERAMA BRYTE® Ceramic Cooktop Cleaner...
Use and Care Manual
Page 14
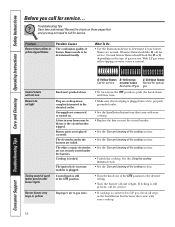
... LP gas, some models) is plugged. • Make sure electrical plug is locked. Consumer Support Troubleshooting Tips Care and Cleaning Operating Instructions Safety Instructions Before you may be determined visually. Normal burner flames should look like B or C, depending on the type of the cooktop section. • Unlock the cooktop. The electrodes under the burners. A fuse in the Installation Instructions that came with your home may not need to be blown or the circuit breaker tripped. Control knob...
... LP gas, some models) is plugged. • Make sure electrical plug is locked. Consumer Support Troubleshooting Tips Care and Cleaning Operating Instructions Safety Instructions Before you may be determined visually. Normal burner flames should look like B or C, depending on the type of the cooktop section. • Unlock the cooktop. The electrodes under the burners. A fuse in the Installation Instructions that came with your home may not need to be blown or the circuit breaker tripped. Control knob...
Use and Care Manual
Page 20
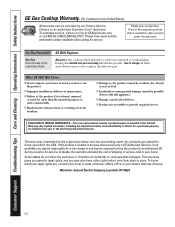
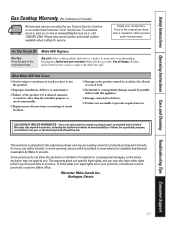
Consumer Support Troubleshooting Tips Care and Cleaning Operating Instructions Safety Instructions GE Gas Cooktop Warranty. (For Customers in this appliance. ■ Damage caused after delivery. ■ Product not accessible to your home. Some states do not allow the exclusion or limitation of merchantability or fitness for a trip charge or you how to use within the USA. Please have other rights which fails due...
Consumer Support Troubleshooting Tips Care and Cleaning Operating Instructions Safety Instructions GE Gas Cooktop Warranty. (For Customers in this appliance. ■ Damage caused after delivery. ■ Product not accessible to your home. Some states do not allow the exclusion or limitation of merchantability or fitness for a trip charge or you how to use within the USA. Please have other rights which fails due...
Use and Care Manual
Page 21
... to you may also have serial number and model number available when calling for service. Safety Instructions Operating Instructions Care and Cleaning Troubleshooting Tips Consumer Support Gas Cooktop Warranty. (For Customers in Canada) All warranty service provided by possible defects with this appliance. ■ Damage caused after delivery. ■ Product not accessible to provide required service. Proof of the product if it is abused, misused, or used for a particular purpose, are...
... to you may also have serial number and model number available when calling for service. Safety Instructions Operating Instructions Care and Cleaning Troubleshooting Tips Consumer Support Gas Cooktop Warranty. (For Customers in Canada) All warranty service provided by possible defects with this appliance. ■ Damage caused after delivery. ■ Product not accessible to provide required service. Proof of the product if it is abused, misused, or used for a particular purpose, are...
Quick Specs
Page 1
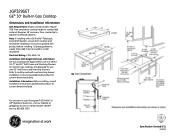
... dimensional data. Installation Information: Before installing, consult installation instructions, packed with product, for use over 30" Wall Ovens and Warming Drawers. Refer to combustible material. Specification Created 5/11 330325 JGP329SET GE® 30" Built-In Gas Cooktop Dimensions and Installation Information AGA Requirement: All gas cooktop models require 7/16" free area below cooktop height to cooktop and wall oven/warming drawer installation instructions packed with product for current dimensional data. Requires 18" minimum from countertop to adjacent overhead cabinets.
... dimensional data. Installation Information: Before installing, consult installation instructions, packed with product, for use over 30" Wall Ovens and Warming Drawers. Refer to combustible material. Specification Created 5/11 330325 JGP329SET GE® 30" Built-In Gas Cooktop Dimensions and Installation Information AGA Requirement: All gas cooktop models require 7/16" free area below cooktop height to cooktop and wall oven/warming drawer installation instructions packed with product for current dimensional data. Requires 18" minimum from countertop to adjacent overhead cabinets.

Installation Instructions
Page 1
..., personal injury or death. do not use . 31-10613-4 (11-08 JR) 1 This cooktop has been design certified by a qualified installer, service agency or the gas supplier. Disconnect all governing codes and ordinances. • Note to Consumer - If the information in this manual is NOT covered under the Warranty. Observe all electrical power at : ge.com In Canada, call your building. • Immediately...
..., personal injury or death. do not use . 31-10613-4 (11-08 JR) 1 This cooktop has been design certified by a qualified installer, service agency or the gas supplier. Disconnect all governing codes and ordinances. • Note to Consumer - If the information in this manual is NOT covered under the Warranty. Observe all electrical power at : ge.com In Canada, call your building. • Immediately...

Installation Instructions
Page 2
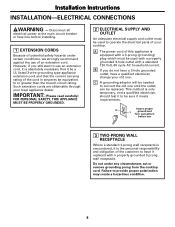
... where your cooktop must be wired and fused to meet the requirements of Mobile Home Standards HUD Building 451 7th Street, S.W. ID, 1/2″ NPT Connection, 3-foot Maximum Length (Massachusetts Only) TOOLS YOU WILL NEED FOR INSTALLATION Pencil Phillips-Head Screwdriver Ruler or Straightedge Saber Saw Pipe Wrench Safety Glasses 1/8″ Drill Bit & Electric or Hand Drill 2 Installation Instructions IMPORTANT SAFETY INSTRUCTIONS ELECTRICAL REQUIREMENTS This...
... where your cooktop must be wired and fused to meet the requirements of Mobile Home Standards HUD Building 451 7th Street, S.W. ID, 1/2″ NPT Connection, 3-foot Maximum Length (Massachusetts Only) TOOLS YOU WILL NEED FOR INSTALLATION Pencil Phillips-Head Screwdriver Ruler or Straightedge Saber Saw Pipe Wrench Safety Glasses 1/8″ Drill Bit & Electric or Hand Drill 2 Installation Instructions IMPORTANT SAFETY INSTRUCTIONS ELECTRICAL REQUIREMENTS This...

Installation Instructions
Page 3
... sure the wall coverings, countertop and cabinets around the cooktop can withstand heat (up to place all local codes and ordinances are followed exactly as stated. Literature Package Grate boxes Foam Packaging Cooktop C Remove Installation Instructions from literature pack and read them carefully before you need before starting the installation of the cabinet and the cooktop do not interfere with each other. (See section on electrical requirements.) F When installing your cooktop in a safe...
... sure the wall coverings, countertop and cabinets around the cooktop can withstand heat (up to place all local codes and ordinances are followed exactly as stated. Literature Package Grate boxes Foam Packaging Cooktop C Remove Installation Instructions from literature pack and read them carefully before you need before starting the installation of the cabinet and the cooktop do not interfere with each other. (See section on electrical requirements.) F When installing your cooktop in a safe...

Installation Instructions
Page 5
... cabinet sides to shut off valve in the gas line in place, screw the hold -down bracket to the side of the glass. Do not overlap the foam strips. Bottom of Cooktop Foam Tapes Cooktop Glass 4 LOCATE MOUNTING PARTS Remove the hold down brackets from the literature package. 5 ATTACH BRACKETS TO COOKTOP Remove the screw from the side of the cooktop and screw the hold - down onto the protected surface. Installation Instructions INSTALLING THE COOKTOP UNIT 1 LOCATE ELECTRICAL OUTLET AND GAS SHUT-OFF VALVE BENEATH CABINET...
... cabinet sides to shut off valve in the gas line in place, screw the hold -down bracket to the side of the glass. Do not overlap the foam strips. Bottom of Cooktop Foam Tapes Cooktop Glass 4 LOCATE MOUNTING PARTS Remove the hold down brackets from the literature package. 5 ATTACH BRACKETS TO COOKTOP Remove the screw from the side of the cooktop and screw the hold - down onto the protected surface. Installation Instructions INSTALLING THE COOKTOP UNIT 1 LOCATE ELECTRICAL OUTLET AND GAS SHUT-OFF VALVE BENEATH CABINET...
Installation Instructions
Page 8
... a properly grounded 3-prong wall receptacle. Disconnect all electrical power at the main circuit breaker or fuse box before use 3 TWO-PRONG WALL RECEPTACLE Where a standard 2-prong wall receptacle is encountered, it is only temporary, and a qualified electrician should test it meets requirements. Such extension cords are obtainable through your cooktop. Installation Instructions INSTALLATION-ELECTRICAL CONNECTIONS WARNING - C A grounding adaptor will be replaced. Failure to operate the electrical parts of an extension...
... a properly grounded 3-prong wall receptacle. Disconnect all electrical power at the main circuit breaker or fuse box before use 3 TWO-PRONG WALL RECEPTACLE Where a standard 2-prong wall receptacle is encountered, it is only temporary, and a qualified electrician should test it meets requirements. Such extension cords are obtainable through your cooktop. Installation Instructions INSTALLATION-ELECTRICAL CONNECTIONS WARNING - C A grounding adaptor will be replaced. Failure to operate the electrical parts of an extension...
Installation Instructions
Page 13
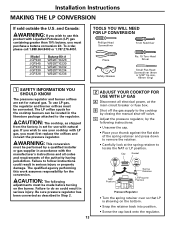
... adjustments must first replace the orifices and convert the pressure regulator. The qualified agency performing this product with LP gas, you wish to use this work assumes responsibility for use LP gas, the regulator and burner orifices must be located in Step 2. 13 2 ADJUST YOUR COOKTOP FOR USE WITH LP GAS A Disconnect all codes and requirements of the spring retainer and press down to remove the retainer. • Carefully look at the main circuit breaker or fuse box...
... adjustments must first replace the orifices and convert the pressure regulator. The qualified agency performing this product with LP gas, you wish to use this work assumes responsibility for use LP gas, the regulator and burner orifices must be located in Step 2. 13 2 ADJUST YOUR COOKTOP FOR USE WITH LP GAS A Disconnect all codes and requirements of the spring retainer and press down to remove the retainer. • Carefully look at the main circuit breaker or fuse box...

Installation Instructions
Page 15
... Replace: With: Main 206X N 108X L Simmer 57N 34L E Install the LP/Propane orifices in their precise locations as noted in .-lbs torque.) 15 F Return the natural gas orifices to the bracket and reattach the bracket and the instruction sheet to the cooktop burner. G Replace the burner bases, heads, caps and top grates. (NOTE: When re-attaching the burner bases to glass top units, tighten screws to a maximum of the burner. NOTE: The main orifice is located...
... Replace: With: Main 206X N 108X L Simmer 57N 34L E Install the LP/Propane orifices in their precise locations as noted in .-lbs torque.) 15 F Return the natural gas orifices to the bracket and reattach the bracket and the instruction sheet to the cooktop burner. G Replace the burner bases, heads, caps and top grates. (NOTE: When re-attaching the burner bases to glass top units, tighten screws to a maximum of the burner. NOTE: The main orifice is located...


