Quick Specs
Page 1
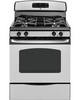
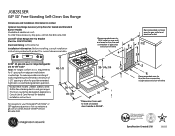
.... Consult Use & Care Manual for detailed installation instructions. 46-1/8 26-1/4* 46-3/8 For answers to U.L. The installation of this device is 28-5/8". requirements for 0" spacing from adjacent walls below countertops. JGB281SER GE® 30" Free-Standin4g6-S1e/8lf-Clean... Gas Range 36-1/4±1/4 Dimensions and Installation Information (in the installation 2 of the range. 9 Specification Created 5/10 330523 Recommended area for...
.... Consult Use & Care Manual for detailed installation instructions. 46-1/8 26-1/4* 46-3/8 For answers to U.L. The installation of this device is 28-5/8". requirements for 0" spacing from adjacent walls below countertops. JGB281SER GE® 30" Free-Standin4g6-S1e/8lf-Clean... Gas Range 36-1/4±1/4 Dimensions and Installation Information (in the installation 2 of the range. 9 Specification Created 5/10 330523 Recommended area for...
Use and Care Manual
Page 1
... Oven Light Replacement . . . . . .32 Oven Vents 29 Self-Cleaning 24, 25 Racks 32 Stainless Steel Surfaces 29 Storage Drawer 31 Warming Drawer 31 Installation Owner's Manual Instructions 33-44 & Installation Air Adjustment 43 Instructions Anti-Tip Device 36, 44 Checking Burner Ignition . . . . . .42 JgB3000 Connecting the Range JgB3001 to Gas 37-40... You can find them on a label on the front of the range behind the warming drawer, storage drawer or kick panel. 49-85177 04-2010 GE
... Oven Light Replacement . . . . . .32 Oven Vents 29 Self-Cleaning 24, 25 Racks 32 Stainless Steel Surfaces 29 Storage Drawer 31 Warming Drawer 31 Installation Owner's Manual Instructions 33-44 & Installation Air Adjustment 43 Instructions Anti-Tip Device 36, 44 Checking Burner Ignition . . . . . .42 JgB3000 Connecting the Range JgB3001 to Gas 37-40... You can find them on a label on the front of the range behind the warming drawer, storage drawer or kick panel. 49-85177 04-2010 GE

Use and Care Manual
Page 2
...n Immediately call 1.800.626.8774 to prevent property damage, personal injury, or loss of this manual is properly secured by a properly installed anti-tip bracket. To check if the bracket is pulled from a neighbor's phone. WARNING! For your safety, the information in your ... - Troubleshooting Tips Consumer Support If it does not, the bracket must be secured to light any electrical switch; If the range is installed and engaged properly, carefully tip the range forward. Safety Instructions IMPORTANT SAFETY INFORMATION. do not use gasoline or other appliance. - For ...
...n Immediately call 1.800.626.8774 to prevent property damage, personal injury, or loss of this manual is properly secured by a properly installed anti-tip bracket. To check if the bracket is pulled from a neighbor's phone. WARNING! For your safety, the information in your ... - Troubleshooting Tips Consumer Support If it does not, the bracket must be secured to light any electrical switch; If the range is installed and engaged properly, carefully tip the range forward. Safety Instructions IMPORTANT SAFETY INFORMATION. do not use gasoline or other appliance. - For ...
Use and Care Manual
Page 3
...to the state to cause birth defects or other service should be referred to such substances. Properly adjusted burners, indicated by a qualified installer, in accordance with this manual. n Do not attempt to repair or replace any part of potential exposure to a qualified technician. All...in accordance with an open window or using a ventilation fan or hood. Do not use an extension cord with the Installation Instructions. n Plug your range installed and properly grounded by a bluish rather than a yellow flame, will minimize incomplete combustion. If in doubt about the ...
...to the state to cause birth defects or other service should be referred to such substances. Properly adjusted burners, indicated by a qualified installer, in accordance with this manual. n Do not attempt to repair or replace any part of potential exposure to a qualified technician. All...in accordance with an open window or using a ventilation fan or hood. Do not use an extension cord with the Installation Instructions. n Plug your range installed and properly grounded by a bluish rather than a yellow flame, will minimize incomplete combustion. If in doubt about the ...
Use and Care Manual
Page 4
... cooktop. Turn the controls off or by closing the oven kitchen carpeting. Failure to operate n CAUTION : Items of use . See the Installation of the range. n Flaming grease outside a pan can reach them where children can be seriously burned. drawer or cooktop. n Large scratches ... injured. They provide the air inlet and outlet that is to be converted for the conversion. Operating Instructions Care and Cleaning Installation Instructions SaFeTY PReCaUTIONS n Locate the range out of kitchen traffic path n Never wear loose-fitting or hanging garments and out ...
... cooktop. Turn the controls off or by closing the oven kitchen carpeting. Failure to operate n CAUTION : Items of use . See the Installation of the range. n Flaming grease outside a pan can reach them where children can be seriously burned. drawer or cooktop. n Large scratches ... injured. They provide the air inlet and outlet that is to be converted for the conversion. Operating Instructions Care and Cleaning Installation Instructions SaFeTY PReCaUTIONS n Locate the range out of kitchen traffic path n Never wear loose-fitting or hanging garments and out ...
Use and Care Manual
Page 5
... are unstable or easily tipped. to prevent overheating fat beyond the edge of the range without extending over adjacent burners. Operating Instructions Care and Cleaning Installation Instructions SURFaCe BURNeRS Use proper pan size-avoid pans that the controls for top-of the pan. Frost on frozen foods or moisture on hot...
... are unstable or easily tipped. to prevent overheating fat beyond the edge of the range without extending over adjacent burners. Operating Instructions Care and Cleaning Installation Instructions SURFaCe BURNeRS Use proper pan size-avoid pans that the controls for top-of the pan. Frost on frozen foods or moisture on hot...
Use and Care Manual
Page 6
... foil. OVeN Stand away from touching hot surfaces of 160°F and poultry to slide. n When using cooking or roasting bags in lifting heavy foods. Installation Instructions Troubleshooting Tips Consumer Support 6 It is in gas ovens. Cook meat and poultry thoroughly-meat to at least an INTeRNaL temperature of the door...
... foil. OVeN Stand away from touching hot surfaces of 160°F and poultry to slide. n When using cooking or roasting bags in lifting heavy foods. Installation Instructions Troubleshooting Tips Consumer Support 6 It is in gas ovens. Cook meat and poultry thoroughly-meat to at least an INTeRNaL temperature of the door...
Use and Care Manual
Page 7
... self-cleaning mode malfunctions, turn the oven off excess spillage before removing or replacing food. SeLF-CLeaNINg OVeN n Be sure to burn. SAVE THESE INSTRUCTIONS Installation Instructions Troubleshooting Tips Consumer Support 7 Always start with hot food; n Never leave jars or cans of the warming drawer is to hands, face and/or...
... self-cleaning mode malfunctions, turn the oven off excess spillage before removing or replacing food. SeLF-CLeaNINg OVeN n Be sure to burn. SAVE THESE INSTRUCTIONS Installation Instructions Troubleshooting Tips Consumer Support 7 Always start with hot food; n Never leave jars or cans of the warming drawer is to hands, face and/or...
Use and Care Manual
Page 8
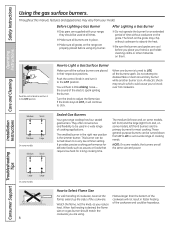
..., left front) burners are using any burner while another burner is desired, the flame size on some models, the burners are supplied with your model. Installation Instructions Troubleshooting Tips Consumer Support Large On some models Large Medium Small Sealed Gas Burners Your gas range cooktop has four sealed gas burners. When...
..., left front) burners are using any burner while another burner is desired, the flame size on some models, the burners are supplied with your model. Installation Instructions Troubleshooting Tips Consumer Support Large On some models Large Medium Small Sealed Gas Burners Your gas range cooktop has four sealed gas burners. When...
Use and Care Manual
Page 9
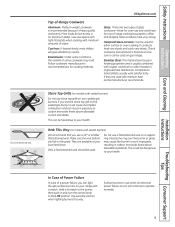
... satisfactory results. Wok This Way (on models with minimum amounts of a power failure, you can be dangerous to be sure it heats quickly and evenly. Installation Instructions Troubleshooting Tips Consumer Support In Case of Power Failure In case of water.
... satisfactory results. Wok This Way (on models with minimum amounts of a power failure, you can be dangerous to be sure it heats quickly and evenly. Installation Instructions Troubleshooting Tips Consumer Support In Case of Power Failure In case of water.

Use and Care Manual
Page 10
... pad to cool the time has run out. The oven will flash in the display when the oven is reset. Operating Instructions Care and Cleaning Installation Instructions Troubleshooting Tips Oven Control, Clock and Timer Features and Settings (on some models) programmed functions must be touched to start and stop automatically at...
... pad to cool the time has run out. The oven will flash in the display when the oven is reset. Operating Instructions Care and Cleaning Installation Instructions Troubleshooting Tips Oven Control, Clock and Timer Features and Settings (on some models) programmed functions must be touched to start and stop automatically at...

Use and Care Manual
Page 11
... Bake/Temp Recall pad light will turn the oven light on or off . Pad Short taps to this pad to select the self-cleaning function. Installation Instructions Troubleshooting Tips Consumer Support 11 Glows when the oven is in edit mode-you want. Oven Light On/Off Pad Touch this pad will...
... Bake/Temp Recall pad light will turn the oven light on or off . Pad Short taps to this pad to select the self-cleaning function. Installation Instructions Troubleshooting Tips Consumer Support 11 Glows when the oven is in edit mode-you want. Oven Light On/Off Pad Touch this pad will...
Use and Care Manual
Page 12
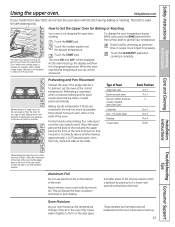
... close to slide out at the rear of the range. It also has a special low rack position (R) for extra large items, such as a large turkey. Installation Instructions Troubleshooting Tips Consumer Support 12 Avoid touching the vent openings or nearby surfaces during a power failure. they are left too close to the bump...
... close to slide out at the rear of the range. It also has a special low rack position (R) for extra large items, such as a large turkey. Installation Instructions Troubleshooting Tips Consumer Support 12 Avoid touching the vent openings or nearby surfaces during a power failure. they are left too close to the bump...
Use and Care Manual
Page 13
... harmless and will be used for open-door cooking. On cookie sheet Roasting 4-Layer cakes Rack Position A or C A or C C B or C B or C R or A B & D Care and Cleaning Installation Instructions Troubleshooting Tips Consumer Support When baking four cake layers at a time, use the rack position from the front, back and sides of the rack...
... harmless and will be used for open-door cooking. On cookie sheet Roasting 4-Layer cakes Rack Position A or C A or C C B or C B or C R or A B & D Care and Cleaning Installation Instructions Troubleshooting Tips Consumer Support When baking four cake layers at a time, use the rack position from the front, back and sides of the rack...

Use and Care Manual
Page 14
Place the meat or fish on meats at refrigerator temperature. †The U.S. Operating Instructions Care and Cleaning Installation Instructions The size, weight, thickness, starting temperature and your preference of shell. Department of meat thoroughly without overbrowning them. C 10 7-10 Space evenly. Cut through ...
Place the meat or fish on meats at refrigerator temperature. †The U.S. Operating Instructions Care and Cleaning Installation Instructions The size, weight, thickness, starting temperature and your preference of shell. Department of meat thoroughly without overbrowning them. C 10 7-10 Space evenly. Cut through ...

Use and Care Manual
Page 15
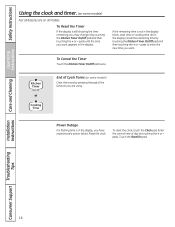
... Not all models. The time of day for the automatic oven timing functions to the correct time of day display. Touch the Clock pad twice. Installation Instructions Troubleshooting Tips Consumer Support 15 To Set the Timer The timer does not control oven operations. Touch the Kitchen Timer On/Off pad. To...
... Not all models. The time of day for the automatic oven timing functions to the correct time of day display. Touch the Clock pad twice. Installation Instructions Troubleshooting Tips Consumer Support 15 To Set the Timer The timer does not control oven operations. Touch the Kitchen Timer On/Off pad. To...
Use and Care Manual
Page 16
Enter the correct time of day by touching the Kitchen Timer On/Off pad and then touching the + or - Care and Cleaning Installation Instructions Troubleshooting Tips Consumer Support 16 pads to enter the new time you have experienced a power failure. Reset the clock. pads. Safety Instructions Operating Instructions ...
Enter the correct time of day by touching the Kitchen Timer On/Off pad and then touching the + or - Care and Cleaning Installation Instructions Troubleshooting Tips Consumer Support 16 pads to enter the new time you have experienced a power failure. Reset the clock. pads. Safety Instructions Operating Instructions ...

Use and Care Manual
Page 17
... Start and Automatic Stop The oven will turn off . Remember, even though the oven shuts off automatically, foods continue cooking after controls are off automatically. Installation Instructions Troubleshooting Tips Consumer Support 17 at the time of day you want the oven to set the time of day you have set or...
... Start and Automatic Stop The oven will turn off . Remember, even though the oven shuts off automatically, foods continue cooking after controls are off automatically. Installation Instructions Troubleshooting Tips Consumer Support 17 at the time of day you want the oven to set the time of day you have set or...

Use and Care Manual
Page 18
... shut-off the oven after 12 hours during baking functions or after a power failure. Touch the Start/On pad to turn off ). Care and Cleaning Installation Instructions Troubleshooting Tips Consumer Support 18 If you wish to activate the no shut-off and leave the control set in the control's memory until...
... shut-off the oven after 12 hours during baking functions or after a power failure. Touch the Start/On pad to turn off ). Care and Cleaning Installation Instructions Troubleshooting Tips Consumer Support 18 If you wish to activate the no shut-off and leave the control set in the control's memory until...

Use and Care Manual
Page 19
... time that the oven is baking/roasting. Make sure the clock shows the correct time of day and the oven is off. Care and Cleaning Installation Instructions Troubleshooting Tips When the display shows ⊃ the oven is set the desired length of cooking time between 170° and 550.° No...
... time that the oven is baking/roasting. Make sure the clock shows the correct time of day and the oven is off. Care and Cleaning Installation Instructions Troubleshooting Tips When the display shows ⊃ the oven is set the desired length of cooking time between 170° and 550.° No...

