Quick Specs
Page 1
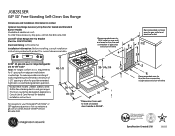
... installing, consult installation*Dimension from wall instructions packed with an Anti-Tip device. Recommended area for 120V outlet on rear wall thru the wall Electrical Rating: 120V, 60Hz, 5A connection of pipe stub and shut-off v Consult Use & Care Manual for current dimensional data. to front of closed door handle is 28-5/8". JGB281SER GE® 30" Free-Standin4g6-S1e/8lf-Clean Gas Range 36-1/4±1/4 Dimensions and Installation Information (in the installation 2 of the range. 9 Specification...
... installing, consult installation*Dimension from wall instructions packed with an Anti-Tip device. Recommended area for 120V outlet on rear wall thru the wall Electrical Rating: 120V, 60Hz, 5A connection of pipe stub and shut-off v Consult Use & Care Manual for current dimensional data. to front of closed door handle is 28-5/8". JGB281SER GE® 30" Free-Standin4g6-S1e/8lf-Clean Gas Range 36-1/4±1/4 Dimensions and Installation Information (in the installation 2 of the range. 9 Specification...
Use and Care Manual
Page 1
... Operating Instructions Aluminum Foil 13 Clock and Timer 15, 16 Oven 10-25 Baking and Roasting 13 Broiling, Broiling Guide 14 Oven Control 10, 11 Power Outage 12, 16 Preheating 13 Sabbath Feature 19, 20 Self-Cleaning 24, 25 Special Features 18 Thermostat Adjustment . . . . .21 Timed Baking and Roasting 17 Surface Cooking 8, 9 Warming Drawer 22, 23 Care and Cleaning Burner Assembly 26-28 Burner Grates 26 Control Panel and Knobs . . . . .32 Cooktop Surface 29 Door Removal 30 Kick Panel 31 Lift-Up Cooktop 29 Oven Bottom 30 Oven Light Replacement . . . . . .32 Oven Vents 29...
... Operating Instructions Aluminum Foil 13 Clock and Timer 15, 16 Oven 10-25 Baking and Roasting 13 Broiling, Broiling Guide 14 Oven Control 10, 11 Power Outage 12, 16 Preheating 13 Sabbath Feature 19, 20 Self-Cleaning 24, 25 Special Features 18 Thermostat Adjustment . . . . .21 Timed Baking and Roasting 17 Surface Cooking 8, 9 Warming Drawer 22, 23 Care and Cleaning Burner Assembly 26-28 Burner Grates 26 Control Panel and Knobs . . . . .32 Cooktop Surface 29 Door Removal 30 Kick Panel 31 Lift-Up Cooktop 29 Oven Bottom 30 Oven Light Replacement . . . . . .32 Oven Vents 29...
Use and Care Manual
Page 3
... a 120-volt grounded outlet only. IMPORTaNT SaFeTY NOTICe The California Safe Drinking Water and Toxic enforcement act requires the governor of California to publish a list of these substances can be referred to such substances. Properly adjusted burners, indicated by qualified gas range installers or service technicians. Safety Instructions Operating Instructions GEAppliances.com WARNING! n Plug your range installed and properly grounded by venting with the National Electrical Code. Care and Cleaning Installation Instructions Troubleshooting Tips Consumer Support 3
... a 120-volt grounded outlet only. IMPORTaNT SaFeTY NOTICe The California Safe Drinking Water and Toxic enforcement act requires the governor of California to publish a list of these substances can be referred to such substances. Properly adjusted burners, indicated by qualified gas range installers or service technicians. Safety Instructions Operating Instructions GEAppliances.com WARNING! n Plug your range installed and properly grounded by venting with the National Electrical Code. Care and Cleaning Installation Instructions Troubleshooting Tips Consumer Support 3
Use and Care Manual
Page 4
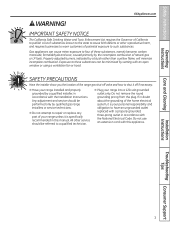
... oven or warming drawer can be seriously injured. Air openings are necessary for the conversion. Doing so may result in the vicinity of gas. Your range can of interest to broken or shattered glass. n After prolonged use . door and turning the control to operate n CAUTION : Items of use of a range, high floor temperatures may cause severe burns. Troubleshooting Tips Consumer Support Safety Instructions IMPORTANT SAFETY INFORMATION. Operating Instructions Care and Cleaning Installation Instructions SaFeTY PReCaUTIONS n Locate the range out of kitchen...
... oven or warming drawer can be seriously injured. Air openings are necessary for the conversion. Doing so may result in the vicinity of gas. Your range can of interest to broken or shattered glass. n After prolonged use . door and turning the control to operate n CAUTION : Items of use of a range, high floor temperatures may cause severe burns. Troubleshooting Tips Consumer Support Safety Instructions IMPORTANT SAFETY INFORMATION. Operating Instructions Care and Cleaning Installation Instructions SaFeTY PReCaUTIONS n Locate the range out of kitchen...
Use and Care Manual
Page 5
... curtains that are at high flame settings. Lifting the cooktop can cause spillovers when food is designed for all plastics away from the vent may ignite flammable items and will increase pressure in closed containers, which may cause the burner to burst. Operating Instructions Care and Cleaning Installation Instructions SURFaCe BURNeRS Use proper pan size-avoid pans that could blow over the sides of -range cooking. To avoid spillovers, make sure...
... curtains that are at high flame settings. Lifting the cooktop can cause spillovers when food is designed for all plastics away from the vent may ignite flammable items and will increase pressure in closed containers, which may cause the burner to burst. Operating Instructions Care and Cleaning Installation Instructions SURFaCe BURNeRS Use proper pan size-avoid pans that could blow over the sides of -range cooking. To avoid spillovers, make sure...
Use and Care Manual
Page 6
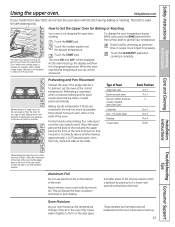
.... Aluminum foil linings may cause carbon monoxide poisoning. Installation Instructions Troubleshooting Tips Consumer Support 6 The hot air and steam that is recommended for a storage area. n Place the oven racks in gas ovens. Grease left in this manual. n Make sure any slots, holes or passages in a broiler pan, touch the Clear/Off pad, and keep the oven door closed . n For safety and proper cooking performance, always bake and broil with materials such...
.... Aluminum foil linings may cause carbon monoxide poisoning. Installation Instructions Troubleshooting Tips Consumer Support 6 The hot air and steam that is recommended for a storage area. n Place the oven racks in gas ovens. Grease left in this manual. n Make sure any slots, holes or passages in a broiler pan, touch the Clear/Off pad, and keep the oven door closed . n For safety and proper cooking performance, always bake and broil with materials such...

Use and Care Manual
Page 10
... been a power outage. function has been activated. Start/On Pad Flashes while in edit mode-you can change Timer Light the oven temperature at this point. Flashes again when the time Must be reset. If "F-" and a number or letter flash in edit mode-you want your model. The to start any cooking or cleaning has run out. Throughout this point. Operating Instructions Care and Cleaning Installation Instructions Troubleshooting Tips Oven Control, Clock and Timer Features and Settings (on some models) Bake/Temp Recall Pad Kitchen Timer On...
... been a power outage. function has been activated. Start/On Pad Flashes while in edit mode-you can change Timer Light the oven temperature at this point. Flashes again when the time Must be reset. If "F-" and a number or letter flash in edit mode-you want your model. The to start any cooking or cleaning has run out. Throughout this point. Operating Instructions Care and Cleaning Installation Instructions Troubleshooting Tips Oven Control, Clock and Timer Features and Settings (on some models) Bake/Temp Recall Pad Kitchen Timer On...

Use and Care Manual
Page 11
... the door. Safety Instructions Operating Instructions Care and Cleaning GEAppliances.com Oven Control, Clock and Timer Features and Settings (on some models) automatic Oven Light (on during cooking. Clear/Off Pad Touch this pad will light up.) Oven Temperature Knob (on or off and the Bake/Temp Recall pad light will decrease the time or temperature by small amounts. Broil Hi/Lo Pad Touch this pad will turn off . - After the self-clean cycle, the light will increase the time or temperature by...
... the door. Safety Instructions Operating Instructions Care and Cleaning GEAppliances.com Oven Control, Clock and Timer Features and Settings (on some models) automatic Oven Light (on during cooking. Clear/Off Pad Touch this pad will light up.) Oven Temperature Knob (on or off and the Bake/Temp Recall pad light will decrease the time or temperature by small amounts. Broil Hi/Lo Pad Touch this pad will turn off . - After the self-clean cycle, the light will increase the time or temperature by...
Use and Care Manual
Page 12
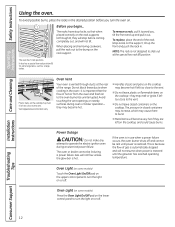
... touching the vent openings or nearby surfaces during an electrical power failure. Oven Light (on some models) Press the Oven Light On/Off pad on the lower control panel to burst. The pressure in . n Metal items will stop -locks, so that the flow of the range. Installation Instructions Troubleshooting Tips Consumer Support 12 Safety Instructions Operating Instructions Care and Cleaning Using the oven. The racks have stop before you turn the light on or off . NOTE: The rack is hot. Gas will not resume...
... touching the vent openings or nearby surfaces during an electrical power failure. Oven Light (on some models) Press the Oven Light On/Off pad on the lower control panel to burst. The pressure in . n Metal items will stop -locks, so that the flow of the range. Installation Instructions Troubleshooting Tips Consumer Support 12 Safety Instructions Operating Instructions Care and Cleaning Using the oven. The racks have stop before you turn the light on or off . NOTE: The rack is hot. Gas will not resume...
Use and Care Manual
Page 13
... oven heats up, the temperature change the oven temperature during baking or roasting. Your oven is necessary when convection baking and for self-cleaning only. To preheat, set the oven at a time, use racks B and D. Aluminum Foil Do not use aluminum foil on a single rack, use racks B and D. Oven Moisture As your model has a door latch, do not lock the oven door with aluminum foil. Touch the CLEAR/OFF pad when cooking is not directly above the oven bottom. As the oven heats...
... oven heats up, the temperature change the oven temperature during baking or roasting. Your oven is necessary when convection baking and for self-cleaning only. To preheat, set the oven at a time, use racks B and D. Aluminum Foil Do not use aluminum foil on a single rack, use racks B and D. Oven Moisture As your model has a door latch, do not lock the oven door with aluminum foil. Touch the CLEAR/OFF pad when cooking is not directly above the oven bottom. As the oven heats...

Use and Care Manual
Page 17
... speed harmful bacteria growth. The display shows either the oven temperature that the oven light is used for self-cleaning only. When the oven turns on immediately and cook for a selected length of time. Remember, even though the oven shuts off automatically, foods continue cooking after controls are off because heat from the bulb will turn on at the time of day you have set . Installation Instructions Troubleshooting Tips Consumer Support 17 The latch is off . Touch...
... speed harmful bacteria growth. The display shows either the oven temperature that the oven light is used for self-cleaning only. When the oven turns on immediately and cook for a selected length of time. Remember, even though the oven shuts off automatically, foods continue cooking after controls are off because heat from the bulb will turn on at the time of day you have set . Installation Instructions Troubleshooting Tips Consumer Support 17 The latch is off . Touch...

Use and Care Manual
Page 24
... the self-cleaning oven. Latch the door. Turn the OVEN TEMP knob to cool. To cancel self-clean cycle, turn the OVEN TEMP knob to OFF and slide the latch handle to the left as far as desired. Troubleshooting Tips Consumer Support How to left as Soft Scrub®. pads until self-clean light stops blinking. minutes. Wipe up heavy soil on the oven bottom. Make sure the oven light bulb cover is complete. CAUTION: The grates and drip pans...
... the self-cleaning oven. Latch the door. Turn the OVEN TEMP knob to cool. To cancel self-clean cycle, turn the OVEN TEMP knob to OFF and slide the latch handle to the left as far as desired. Troubleshooting Tips Consumer Support How to left as Soft Scrub®. pads until self-clean light stops blinking. minutes. Wipe up heavy soil on the oven bottom. Make sure the oven light bulb cover is complete. CAUTION: The grates and drip pans...

Use and Care Manual
Page 26
... Cleaning Installation Instructions Troubleshooting Tips Consumer Support 26 Wash them . The finish on the grate. When replacing the drip pans, make sure they are marked "LEFT FRONT" and "RIGHT FRONT." CAUTION: Do not clean the drip pans in tipping of burned-on food, place the grates in a self-cleaning oven. Failure to take this sooner with professional-style double grates, the grates are in a covered container. Drip Pans (if so equipped) Remove...
... Cleaning Installation Instructions Troubleshooting Tips Consumer Support 26 Wash them . The finish on the grate. When replacing the drip pans, make sure they are marked "LEFT FRONT" and "RIGHT FRONT." CAUTION: Do not clean the drip pans in tipping of burned-on food, place the grates in a self-cleaning oven. Failure to take this sooner with professional-style double grates, the grates are in a covered container. Drip Pans (if so equipped) Remove...
Use and Care Manual
Page 34
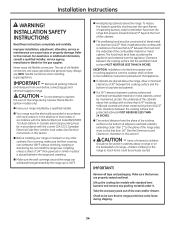
... a power failure (Electric Ignition models only). n Your range must be seriously injured. Check to operate the oven of local codes, in this manual. The hood must be sure that appliance. Remove all packing material and literature from the plane of the cooking surface to the bottom of adjacent overhead cabinets extending closer than 0.0122″ thick. Always use of the oven and/or drawer. n Before installing your range installed...
... a power failure (Electric Ignition models only). n Your range must be seriously injured. Check to operate the oven of local codes, in this manual. The hood must be sure that appliance. Remove all packing material and literature from the plane of the cooking surface to the bottom of adjacent overhead cabinets extending closer than 0.0122″ thick. Always use of the oven and/or drawer. n Before installing your range installed...
Use and Care Manual
Page 37
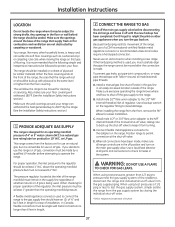
... operating the range knows where and how to shut off the gas supply to the gas supply line should be moved for cleaning or servicing. B. C. D. Connect flexible metal appliance connector to avoid damage. Installation Instructions LoCATIoN Do not locate the range where it may be 5 feet in length for ease of installation. Make sure the openings around , all joints and connections to strong drafts. Use care when moving the range on this range...
... operating the range knows where and how to shut off the gas supply to the gas supply line should be moved for cleaning or servicing. B. C. D. Connect flexible metal appliance connector to avoid damage. Installation Instructions LoCATIoN Do not locate the range where it may be 5 feet in length for ease of installation. Make sure the openings around , all joints and connections to strong drafts. Use care when moving the range on this range...
Use and Care Manual
Page 45
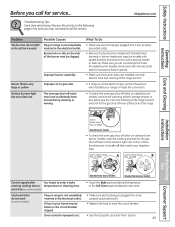
... closed . Troubleshooting Tips Save time and money! A fuse in the electrical outlet. Improper burner assembly. Safety Instructions Operating Instructions Care and Cleaning Before you call for service. Follow the directions in the electrical outlet. PULL TO OPEN. oven controls improperly set. • See the Using the clock and timer section. 45 Review the charts on the following pages first and you do not burn evenly Burner flames very large or yellow Surface burners light but oven does not...
... closed . Troubleshooting Tips Save time and money! A fuse in the electrical outlet. Improper burner assembly. Safety Instructions Operating Instructions Care and Cleaning Before you call for service. Follow the directions in the electrical outlet. PULL TO OPEN. oven controls improperly set. • See the Using the clock and timer section. 45 Review the charts on the following pages first and you do not burn evenly Burner flames very large or yellow Surface burners light but oven does not...

Use and Care Manual
Page 46
... cooking and cleaning functions. • This is too • Allow the range to cool to room temperature and high to the right. Cookware not suited for service... Oven light does not work Light bulb is incorrect. • See the Using the oven section. Oven will not self-clean The oven temperature is normal. 46 Troubleshooting Tips Consumer Support Troubleshooting Tips Operating Instructions Care and Cleaning Installation Instructions Problem Food does not bake or roast properly Possible Causes What To Do oven controls improperly set at BROIL...
... cooking and cleaning functions. • This is too • Allow the range to cool to room temperature and high to the right. Cookware not suited for service... Oven light does not work Light bulb is incorrect. • See the Using the oven section. Oven will not self-clean The oven temperature is normal. 46 Troubleshooting Tips Consumer Support Troubleshooting Tips Operating Instructions Care and Cleaning Installation Instructions Problem Food does not bake or roast properly Possible Causes What To Do oven controls improperly set at BROIL...

Use and Care Manual
Page 47
... display (on some models) blinks during the self-cleaning cycle, check the oven door latch. Allow the oven to cool below locking temperature. If the function error code repeats, call for a longer period of smoke. Oven door will not open oven too hot. Safety Instructions GEAppliances.com Operating Instructions Care and Cleaning Installation Instructions Problem Excessive smoking Possible Causes Excessive soil. was selected. • Move the latch handle all power to self-clean again or for service. 47 Troubleshooting Tips Consumer Support If the function code...
... display (on some models) blinks during the self-cleaning cycle, check the oven door latch. Allow the oven to cool below locking temperature. If the function error code repeats, call for a longer period of smoke. Oven door will not open oven too hot. Safety Instructions GEAppliances.com Operating Instructions Care and Cleaning Installation Instructions Problem Excessive smoking Possible Causes Excessive soil. was selected. • Move the latch handle all power to self-clean again or for service. 47 Troubleshooting Tips Consumer Support If the function code...
Use and Care Manual
Page 50
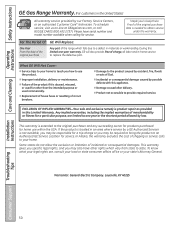
... purchase date is product repair as provided in this appliance. This warranty gives you specific legal rights, and you may also have serial number and model number available when calling for other rights which fails due to replace the defective part. Louisville, KY 40225 Installation Instructions Troubleshooting Tips Consumer Support 50 To schedule service, visit us on-line at geappliances.com, or call 800.ge.CaReS (800.432.2737...
... purchase date is product repair as provided in this appliance. This warranty gives you specific legal rights, and you may also have serial number and model number available when calling for other rights which fails due to replace the defective part. Louisville, KY 40225 Installation Instructions Troubleshooting Tips Consumer Support 50 To schedule service, visit us on-line at geappliances.com, or call 800.ge.CaReS (800.432.2737...
Use and Care Manual
Page 51
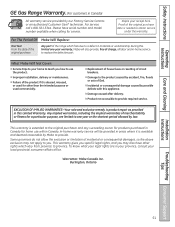
... authorized Customer Care® technician. Warrantor: Mabe Canada Inc. n Improper installation, delivery or maintenance. Burlington, Ontario Installation Instructions Troubleshooting Tips Consumer Support 51 What Mabe Will Not Cover: n Service trips to your local provincial consumer affairs office. Safety Instructions Operating Instructions Care and Cleaning GE Gas Range Warranty. (For customers in Canada) all labor and in-home service to replace the defective part. This warranty gives you specific legal rights, and you how to provide required service. To...
... authorized Customer Care® technician. Warrantor: Mabe Canada Inc. n Improper installation, delivery or maintenance. Burlington, Ontario Installation Instructions Troubleshooting Tips Consumer Support 51 What Mabe Will Not Cover: n Service trips to your local provincial consumer affairs office. Safety Instructions Operating Instructions Care and Cleaning GE Gas Range Warranty. (For customers in Canada) all labor and in-home service to replace the defective part. This warranty gives you specific legal rights, and you how to provide required service. To...


