
Owners Manual
Page 15
... power switch. (The LED will now light.) 2 Turn on the power of the scanner as follows: LED light Green Green (flashing) Orange Orange (flashing) Red Status Ready to scan or scanning Sleep mode Ready to scan or scanning with warning *1 Initializing Sleeping with User Utility. 15 See which warning occurs with warning *1 An error occurred *1: The rollers need to be cleaned...
... power switch. (The LED will now light.) 2 Turn on the power of the scanner as follows: LED light Green Green (flashing) Orange Orange (flashing) Red Status Ready to scan or scanning Sleep mode Ready to scan or scanning with warning *1 Initializing Sleeping with User Utility. 15 See which warning occurs with warning *1 An error occurred *1: The rollers need to be cleaned...
Owners Manual
Page 19
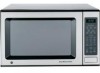
...guide. This may cause the rollers to swell up. ≥ The amount of documents, paper jamming or multiple-sheet... feeding may occur. ≥ Scanning paper such as carbon paper ≥ Damaged or wrinkled documents ≥ Irregularly shaped documents ≥ Photographs 19 Paper size: 50.8 k 70 mm (2.0 k 2.8 in.) to 216 k 356 mm (8.5 k 14 in the direction of the documents. 6 Adjust the document guides to the size of the arrow until they stop...remove the document from the exit tray after it is recommended to make a copy and use...(2.36 to 5.9 mils) Paper weight: Single paper feed: 40 to...
...guide. This may cause the rollers to swell up. ≥ The amount of documents, paper jamming or multiple-sheet... feeding may occur. ≥ Scanning paper such as carbon paper ≥ Damaged or wrinkled documents ≥ Irregularly shaped documents ≥ Photographs 19 Paper size: 50.8 k 70 mm (2.0 k 2.8 in.) to 216 k 356 mm (8.5 k 14 in the direction of the documents. 6 Adjust the document guides to the size of the arrow until they stop...remove the document from the exit tray after it is recommended to make a copy and use...(2.36 to 5.9 mils) Paper weight: Single paper feed: 40 to...
Owners Manual
Page 22
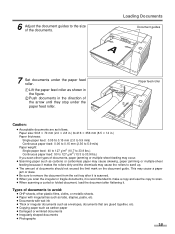
Radiation vent ∫ Inside the scanner ≥ Clean the unit at least once a month. 1 Turn the power off. 2 Clean the cover with a soft cloth. 3 Remove dirt and dust from the radiation vent with a brush. To maintain proper scanning, clean the scanner components frequently. 22 Cleaning the Unit ∫ Outside of the scanner Clean the unit at least once a week or when 20,000 sheets have...
Radiation vent ∫ Inside the scanner ≥ Clean the unit at least once a month. 1 Turn the power off. 2 Clean the cover with a soft cloth. 3 Remove dirt and dust from the radiation vent with a brush. To maintain proper scanning, clean the scanner components frequently. 22 Cleaning the Unit ∫ Outside of the scanner Clean the unit at least once a week or when 20,000 sheets have...
Owners Manual
Page 23
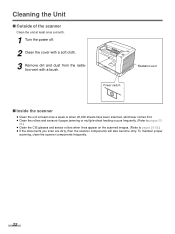
... open the ADF door. 23 For supplies and accessories: Call 1-800-346-4768 (U.S.A. ∫ Cleaning the rollers and sensors Roller cleaning paper: Open the bag on the dotted line and take out the roller cleaning paper. ≥ If the roller cleaning paper bag is available from the dealer where you purchased your dealer. 1 Turn the power off. Please use the roller cleaning...
... open the ADF door. 23 For supplies and accessories: Call 1-800-346-4768 (U.S.A. ∫ Cleaning the rollers and sensors Roller cleaning paper: Open the bag on the dotted line and take out the roller cleaning paper. ≥ If the roller cleaning paper bag is available from the dealer where you purchased your dealer. 1 Turn the power off. Please use the roller cleaning...

Owners Manual
Page 24
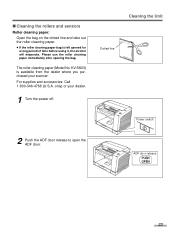
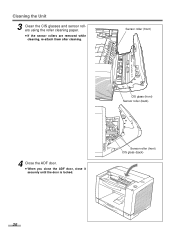
...Retard roller Reflector sheets Drive rollers Waiting sensor Drive rollers Paper feed roller Separation roller Free rollers 4 Clean the reflector sheet for ending sensor Cotton swab 24 Free rollers Starting position sensor Reflector sheet for the ending sensor. ≥ Remove dust on the reflector sheet of the ending sensor with a ... the right. Also, remove dust on the paper sensors and reflector sheets with a cotton swab. ≥ The reflector sheet is behind the shaft. Cleaning the Unit 3 Use the roller cleaning paper (KV-SS03) to the other in the directions of the retard roller,...
...Retard roller Reflector sheets Drive rollers Waiting sensor Drive rollers Paper feed roller Separation roller Free rollers 4 Clean the reflector sheet for ending sensor Cotton swab 24 Free rollers Starting position sensor Reflector sheet for the ending sensor. ≥ Remove dust on the reflector sheet of the ending sensor with a ... the right. Also, remove dust on the paper sensors and reflector sheets with a cotton swab. ≥ The reflector sheet is behind the shaft. Cleaning the Unit 3 Use the roller cleaning paper (KV-SS03) to the other in the directions of the retard roller,...
Owners Manual
Page 25
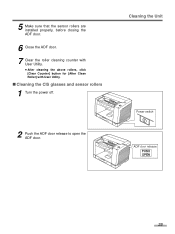
5 Make sure that the sensor rollers are installed properly, before closing the ADF door. 6 Close the ADF door. 7 Clear the roller cleaning counter with User Utility. ≥ After cleaning the above rollers, click [Clear Counter] button for [After Clean Roller] with User Utility. ∫ Cleaning the CIS glasses and sensor rollers 1 Turn the power off. Cleaning the Unit 2 Push the ADF door release to open the ADF door. 25
5 Make sure that the sensor rollers are installed properly, before closing the ADF door. 6 Close the ADF door. 7 Clear the roller cleaning counter with User Utility. ≥ After cleaning the above rollers, click [Clear Counter] button for [After Clean Roller] with User Utility. ∫ Cleaning the CIS glasses and sensor rollers 1 Turn the power off. Cleaning the Unit 2 Push the ADF door release to open the ADF door. 25
Owners Manual
Page 26
Sensor roller (front) CIS glass (front) Sensor roller (back) 4 Close the ADF door. ≥ When you close the ADF door, close it securely until the door is locked. Sensor roller (front) CIS glass (back) 26 Cleaning the Unit 3 Clean the CIS glasses and sensor rollers using the roller cleaning paper. ≥ If the sensor rollers are removed while cleaning, re-attach them after cleaning.
Sensor roller (front) CIS glass (front) Sensor roller (back) 4 Close the ADF door. ≥ When you close the ADF door, close it securely until the door is locked. Sensor roller (front) CIS glass (back) 26 Cleaning the Unit 3 Clean the CIS glasses and sensor rollers using the roller cleaning paper. ≥ If the sensor rollers are removed while cleaning, re-attach them after cleaning.

Owners Manual
Page 27
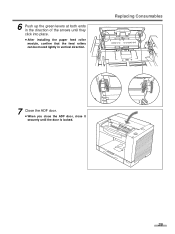
Replacing Consumables ∫ Replacing the paper feed roller module 1 Turn the power off. 2 Push the ADF door release to open the ADF door. 3 Push the two green levers down at both ends of the paper feed roller module to unlock the paper feed rollers. ≥ When moving the green levers, do not apply pressure in any other direction other than in the direction shown by the arrows. Otherwise the levers may break. 27
Replacing Consumables ∫ Replacing the paper feed roller module 1 Turn the power off. 2 Push the ADF door release to open the ADF door. 3 Push the two green levers down at both ends of the paper feed roller module to unlock the paper feed rollers. ≥ When moving the green levers, do not apply pressure in any other direction other than in the direction shown by the arrows. Otherwise the levers may break. 27

Owners Manual
Page 28
Replacing Consumables 4 Remove the paper feed roller module straightly, holding up the paper feed Claw case along the groove of the feed cover. 3 Attach the bearings at both ends of the paper feed roller module. 2 While slightly lifting the paper feed roller module, pass the claw along the groove of the feed cover ...to pull out the claw out of the chassis in the scanner. . Chassis Bearings Green levers 28 Groove Paper feed case 5 Install the new paper feed roller module with its gear on the right. 1 Hang...
Replacing Consumables 4 Remove the paper feed roller module straightly, holding up the paper feed Claw case along the groove of the feed cover. 3 Attach the bearings at both ends of the paper feed roller module. 2 While slightly lifting the paper feed roller module, pass the claw along the groove of the feed cover ...to pull out the claw out of the chassis in the scanner. . Chassis Bearings Green levers 28 Groove Paper feed case 5 Install the new paper feed roller module with its gear on the right. 1 Hang...
Owners Manual
Page 29
Replacing Consumables 7 Close the ADF door. ≥ When you close the ADF door, close it securely until they click into place. ≥ After installing the paper feed roller module, confirm that the feed rollers can be moved lightly in the direction of the arrows until the door is locked. 29 6 Push up the green levers at both ends in vertical direction.
Replacing Consumables 7 Close the ADF door. ≥ When you close the ADF door, close it securely until they click into place. ≥ After installing the paper feed roller module, confirm that the feed rollers can be moved lightly in the direction of the arrows until the door is locked. 29 6 Push up the green levers at both ends in vertical direction.
Owners Manual
Page 30
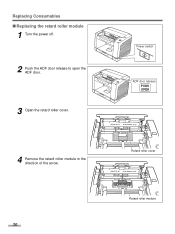
Replacing Consumables ∫ Replacing the retard roller module 1 Turn the power off. 2 Push the ADF door release to open the ADF door. 3 Open the retard roller cover. 4 Remove the retard roller module in the direction of the arrow. 30 Retard roller cover Retard roller module
Replacing Consumables ∫ Replacing the retard roller module 1 Turn the power off. 2 Push the ADF door release to open the ADF door. 3 Open the retard roller cover. 4 Remove the retard roller module in the direction of the arrow. 30 Retard roller cover Retard roller module

Owners Manual
Page 31
Replacing Consumables Wider groove 6 Close the retard roller cover. 5 Install the new retard roller module by matching the groove of its shaft with User Utility. 31 Make sure that both ends of the shaft reach the springs of the metal holder. Metal holder 7 Close the ADF door. ≥ When you close the ADF door, close it securely until the door is locked. 8 Clear the roller replacing counter with User Utility. ≥ Click [Clear Counter] button for [After Replace Roller] with the groove of the holder.
Replacing Consumables Wider groove 6 Close the retard roller cover. 5 Install the new retard roller module by matching the groove of its shaft with User Utility. 31 Make sure that both ends of the shaft reach the springs of the metal holder. Metal holder 7 Close the ADF door. ≥ When you close the ADF door, close it securely until the door is locked. 8 Clear the roller replacing counter with User Utility. ≥ Click [Clear Counter] button for [After Replace Roller] with the groove of the holder.
Owners Manual
Page 33
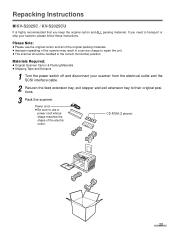
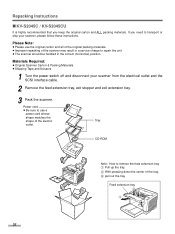
... extension tray to use the original carton and all of the original packing materials. ≥ Improper repacking of the electric outlet. Power cord ≥ Be sure to their original positions. 3 Pack the scanner. Repacking Instructions ∫ KV-S2025C / KV-S2025CU It is highly recommended that you need to repair the unit. ≥ The scanner should be handled in a service charge...
... extension tray to use the original carton and all of the original packing materials. ≥ Improper repacking of the electric outlet. Power cord ≥ Be sure to their original positions. 3 Pack the scanner. Repacking Instructions ∫ KV-S2025C / KV-S2025CU It is highly recommended that you need to repair the unit. ≥ The scanner should be handled in a service charge...
Owners Manual
Page 34
... Tape and Scissors 1 Turn the power switch off and disconnect your scanner, please follow these instructions. Feed extension tray 22 3 1 34 Power cord ≥ Be sure to use the original carton and all of the original packing materials. ≥ Improper repacking of the scanner may result in a service charge to remove the feed extension tray 1 Pull up the tray. 2 With pressing down...
... Tape and Scissors 1 Turn the power switch off and disconnect your scanner, please follow these instructions. Feed extension tray 22 3 1 34 Power cord ≥ Be sure to use the original carton and all of the original packing materials. ≥ Improper repacking of the scanner may result in a service charge to remove the feed extension tray 1 Pull up the tray. 2 With pressing down...
Owners Manual
Page 35
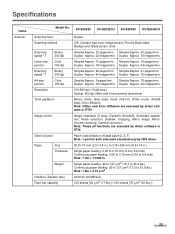
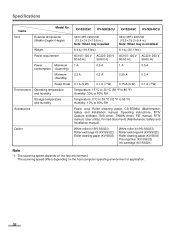
... driver software or RTIV. Specifications Items Scanner Model No. KV-S2025C KV-S2025CU KV-S2045C KV-S2045CU Scanning face Scanning method Scanning speed *1 Letter size portrait Scanning speed *1 A4 size portrait Resolution Binary 200 dpi Color 150 dpi Binary 200 dpi Color 150 dpi Tonal gradation Image control Other function Paper Size Thickness Weight Interface (Transfer rate) Feed tray...
... driver software or RTIV. Specifications Items Scanner Model No. KV-S2025C KV-S2025CU KV-S2045C KV-S2045CU Scanning face Scanning method Scanning speed *1 Letter size portrait Scanning speed *1 A4 size portrait Resolution Binary 200 dpi Color 150 dpi Binary 200 dpi Color 150 dpi Tonal gradation Image control Other function Paper Size Thickness Weight Interface (Transfer rate) Feed tray...
Owners Manual
Page 36
...% to 80% RH Accessories Power cord, Roller cleaning paper, CD-ROM(s) (Maintenance, Safety and Installation manual, Operating instructions, RTIV Capture software, ISIS driver, TWAIN driver, PIE manual, RTIV manual, User utility), Printed documents (Maintenance, Safety and Installation manual) Option White roller kit (KV-SS023) Roller exchange kit (KV-SS022) Roller cleaning paper (KV-SS03) White roller kit (KV-SS023) Roller exchange kit (KV-SS022) Roller cleaning paper (KV-SS03) Pre...
...% to 80% RH Accessories Power cord, Roller cleaning paper, CD-ROM(s) (Maintenance, Safety and Installation manual, Operating instructions, RTIV Capture software, ISIS driver, TWAIN driver, PIE manual, RTIV manual, User utility), Printed documents (Maintenance, Safety and Installation manual) Option White roller kit (KV-SS023) Roller exchange kit (KV-SS022) Roller cleaning paper (KV-SS03) White roller kit (KV-SS023) Roller exchange kit (KV-SS022) Roller cleaning paper (KV-SS03) Pre...
Owners Manual
Page 37
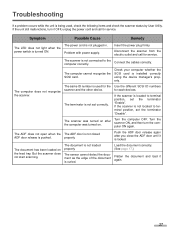
... correctly. Troubleshooting If a problem occurs while the unit is pushed. The ADF does not open when the The ADF door is not closed ADF door release is being used for service. Insert the power plug firmly. The same ID number is not located to terminal position, set the terminator "Enable". Turn the scanner ON, and then turn it OFF, unplug the power cord and call...
... correctly. Troubleshooting If a problem occurs while the unit is pushed. The ADF does not open when the The ADF door is not closed ADF door release is being used for service. Insert the power plug firmly. The same ID number is not located to terminal position, set the terminator "Enable". Turn the scanner ON, and then turn it OFF, unplug the power cord and call...
Owners Manual
Page 38
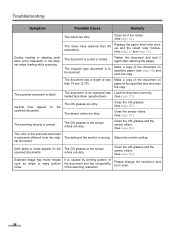
... congeniality of the document on the The CIS glasses or the sensor scanned documents. Adjust the monitor setting. It is uneven. Replace the paper feed roller module and the retard roller module. (See page 27 and page 30.) Double feeding or skewing problems occur frequently or the scanner stops loading while scanning. The document is curled...
... congeniality of the document on the The CIS glasses or the sensor scanned documents. Adjust the monitor setting. It is uneven. Replace the paper feed roller module and the retard roller module. (See page 27 and page 30.) Double feeding or skewing problems occur frequently or the scanner stops loading while scanning. The document is curled...
Owners Manual
Page 39
... Paper feed roller module 27 Paper jams 20 Power consumption 36 Power cord 13, 14 Power requirement 36 Power switch 13, 14 Precautions 10 R Radiation vent 13, 14, 22 Reflector sheets 24 Repacking 33 Replacing consumables 27 Replacing the retard roller module. . . . . . 30 Resolution 35 Retard roller 24 Retard roller cover 30 Retard roller module 30 Roller cleaning paper 8, 23, 26 39
... Paper feed roller module 27 Paper jams 20 Power consumption 36 Power cord 13, 14 Power requirement 36 Power switch 13, 14 Precautions 10 R Radiation vent 13, 14, 22 Reflector sheets 24 Repacking 33 Replacing consumables 27 Replacing the retard roller module. . . . . . 30 Resolution 35 Retard roller 24 Retard roller cover 30 Retard roller module 30 Roller cleaning paper 8, 23, 26 39

Owners Manual
Page 40
Page S Scanning face 35 Scanning method 35 Scanning speed 35 SCSI connectors 13, 14 SCSI setting 16 SCSI terminator 16 Sensor rollers 21, 26, 32 Separation roller 24 Specifications 35 Starting position sensor 24 STOP/START button 13, 14 Storage temperature and humidity 36 System requirements 2 T Tonal gradation 35 Troubleshooting 37 U User Utility 25, 31 W Waiting sensor 24 Weight 36 40
Page S Scanning face 35 Scanning method 35 Scanning speed 35 SCSI connectors 13, 14 SCSI setting 16 SCSI terminator 16 Sensor rollers 21, 26, 32 Separation roller 24 Specifications 35 Starting position sensor 24 STOP/START button 13, 14 Storage temperature and humidity 36 System requirements 2 T Tonal gradation 35 Troubleshooting 37 U User Utility 25, 31 W Waiting sensor 24 Weight 36 40


