Owners Manual
Page 1
Microwave Oven with Dual Element Browner ge.com Safety Information 2-6 Operating Instructions Browning Features 16, 17 Convenience Features . . . . .14, 15 Grilling Features 18, 19 Microwave Terms 22 Other Features 20, 21 Oven Features 7, 8 Power Levels 9 Timed Features 10-13 Care and ...Cleaning 23 Troubleshooting Tips 24 Things That Are Normal . . . . . .24 Consumer Support Consumer Support . . .Back Cover Product Registration . . . . . .25, 26 Warranty 27 Owner's Manual...
Microwave Oven with Dual Element Browner ge.com Safety Information 2-6 Operating Instructions Browning Features 16, 17 Convenience Features . . . . .14, 15 Grilling Features 18, 19 Microwave Terms 22 Other Features 20, 21 Oven Features 7, 8 Power Levels 9 Timed Features 10-13 Care and ...Cleaning 23 Troubleshooting Tips 24 Things That Are Normal . . . . . .24 Consumer Support Consumer Support . . .Back Cover Product Registration . . . . . .25, 26 Warranty 27 Owner's Manual...
Owners Manual
Page 2
...to minimize the risk of table or counter. s Do not mount this manual. s Do not mount the microwave oven over edge of fire or explosion, electric shock, or to heat, dry...combustible materials are placed inside the oven ignite, keep the oven door closed, turn the oven off and disconnect the power cord, or shut off power at least 3 ft. s See door surface cleaning ... s Keep power cord away from the countertop edge to the: (1) door (bent), (2) hinges and latches (broken or loosened), (3) door seals and sealing surfaces. (d) The Oven Should Not be replaced by qualified service ...
...to minimize the risk of table or counter. s Do not mount this manual. s Do not mount the microwave oven over edge of fire or explosion, electric shock, or to heat, dry...combustible materials are placed inside the oven ignite, keep the oven door closed, turn the oven off and disconnect the power cord, or shut off power at least 3 ft. s See door surface cleaning ... s Keep power cord away from the countertop edge to the: (1) door (bent), (2) hinges and latches (broken or loosened), (3) door seals and sealing surfaces. (d) The Oven Should Not be replaced by qualified service ...
Owners Manual
Page 7
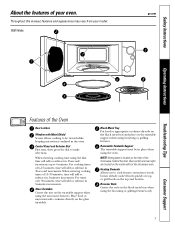
... add or subtract in 30-second increments. Oven vent(s) and oven light are located on the front of the microwave oven. NOTE: Rating plate is located on the inside walls of the microwave, behind the door. Throughout this manual, features and appearance may vary from your model. 1000 Watts ge.com Operating Instructions Troubleshooting Tips Features of...
... add or subtract in 30-second increments. Oven vent(s) and oven light are located on the front of the microwave oven. NOTE: Rating plate is located on the inside walls of the microwave, behind the door. Throughout this manual, features and appearance may vary from your model. 1000 Watts ge.com Operating Instructions Troubleshooting Tips Features of...
Owners Manual
Page 17
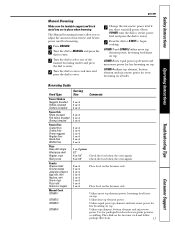
...oven signals. 2 or 4 1 or 4 1 or 4 1 or 4 1 or 4 1 or 4 1 or 4 1 or 4 Place food on the browner rack and follow package directions. 17 Consumer Support Safety Instructions ge.com Manual Browning Make sure the turntable support and black metal tray are in place when browning. COMBI 3 uses equal parts top element and microwave... power for even browning on top. Utilizes top element, bottom element and microwave power....
...oven signals. 2 or 4 1 or 4 1 or 4 1 or 4 1 or 4 1 or 4 1 or 4 1 or 4 Place food on the browner rack and follow package directions. 17 Consumer Support Safety Instructions ge.com Manual Browning Make sure the turntable support and black metal tray are in place when browning. COMBI 3 uses equal parts top element and microwave... power for even browning on top. Utilizes top element, bottom element and microwave power....


