
Owners Manual
Page 1
Microwave Oven with Dual Element Browner ge.com Safety Information 2-6 Operating Instructions Browning Features 16, 17 Convenience Features . . . . .14, 15 Grilling Features 18, 19 Microwave Terms 22 Other Features 20, 21 Oven Features 7, 8 Power Levels 9 Timed Features 10-13 Care and Cleaning 23 Troubleshooting Tips 24 Things That Are Normal . . . . . .24 Consumer Support Consumer Support . . .Back Cover Product Registration . . . . . .25, 26 Warranty 27 Owner's Manual JES1288 Write the model and serial numbers here: Model Serial You...
Microwave Oven with Dual Element Browner ge.com Safety Information 2-6 Operating Instructions Browning Features 16, 17 Convenience Features . . . . .14, 15 Grilling Features 18, 19 Microwave Terms 22 Other Features 20, 21 Oven Features 7, 8 Power Levels 9 Timed Features 10-13 Care and Cleaning 23 Troubleshooting Tips 24 Things That Are Normal . . . . . .24 Consumer Support Consumer Support . . .Back Cover Product Registration . . . . . .25, 26 Warranty 27 Owner's Manual JES1288 Write the model and serial numbers here: Model Serial You...
Owners Manual
Page 2
...: (1) door (bent), (2) hinges and latches (broken or loosened), (3) door seals and sealing surfaces. (d) The Oven Should Not be located at the fuse or circuit breaker panel. s Do not store anything directly on sealing surfaces. (c) Do Not Operate the oven if it is not working properly or if it must be replaced by children. s To reduce the risk of this oven with the provided installation instructions. When using a power cord...
...: (1) door (bent), (2) hinges and latches (broken or loosened), (3) door seals and sealing surfaces. (d) The Oven Should Not be located at the fuse or circuit breaker panel. s Do not store anything directly on sealing surfaces. (c) Do Not Operate the oven if it is not working properly or if it must be replaced by children. s To reduce the risk of this oven with the provided installation instructions. When using a power cord...
Owners Manual
Page 3
Arcing is caused by: s Metal or foil touching the side of the microwave oven could result in injury. Operating Instructions Troubleshooting Tips FOODS s When microwaving, place all infant food is opened, pressure can cause burns. After heating, allow steam to escape during cooking. s Do not pop popcorn in the microwave oven for a short time before removing the container. - Such use of the oven. s Do not boil eggs in narrow-necked...
Arcing is caused by: s Metal or foil touching the side of the microwave oven could result in injury. Operating Instructions Troubleshooting Tips FOODS s When microwaving, place all infant food is opened, pressure can cause burns. After heating, allow steam to escape during cooking. s Do not pop popcorn in the microwave oven for a short time before removing the container. - Such use of the oven. s Do not boil eggs in narrow-necked...

Owners Manual
Page 4
... metallic trim or glaze with plastic wrap, remove covering carefully and direct steam away from the heated food. s Do not use the microwave to retain moisture and prevent spattering. Paper products containing nylon or nylon filaments should not be needed to cook your food. Pot holders may soften or char if subjected to the dish. remove the top foil cover and return the tray to vent...
... metallic trim or glaze with plastic wrap, remove covering carefully and direct steam away from the heated food. s Do not use the microwave to retain moisture and prevent spattering. Paper products containing nylon or nylon filaments should not be needed to cook your food. Pot holders may soften or char if subjected to the dish. remove the top foil cover and return the tray to vent...
Owners Manual
Page 5
... flickering of lights, blowing of fuse or tripping of the glass turntable when browning or grilling will cause arcing in inferior cooking performance. If the outlet is a standard 2-prong wall outlet, it is cooked all the way through before turning food. s Use of circuit breaker. s The oven and door will become hot when browning or grilling. s Do not place food directly against the top or bottom heating elements. s Remove cookware...
... flickering of lights, blowing of fuse or tripping of the glass turntable when browning or grilling will cause arcing in inferior cooking performance. If the outlet is a standard 2-prong wall outlet, it is cooked all the way through before turning food. s Use of circuit breaker. s The oven and door will become hot when browning or grilling. s Do not place food directly against the top or bottom heating elements. s Remove cookware...
Owners Manual
Page 6
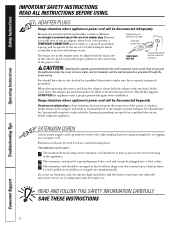
..., we strongly recommend against the use an extension cord, the interior light may flicker and the blower sound may be at most local hardware stores. If you are careful in these situations because frequent disconnection of the power cord places undue strain on by a qualified electrician to make sure the receptacle is provided to use . SAVE THESE INSTRUCTIONS Troubleshooting Tips Consumer Support 6
..., we strongly recommend against the use an extension cord, the interior light may flicker and the blower sound may be at most local hardware stores. If you are careful in these situations because frequent disconnection of the power cord places undue strain on by a qualified electrician to make sure the receptacle is provided to use . SAVE THESE INSTRUCTIONS Troubleshooting Tips Consumer Support 6
Owners Manual
Page 7
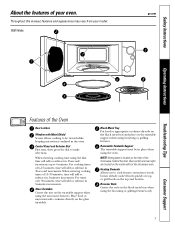
... 15-second increments up to make selections. When entering cooking time using the microwave features. Glass Turntable Center the tray on the black metal tray when using the oven. Safety Instructions About the features of your model. 1000 Watts ge.com Operating Instructions Troubleshooting Tips Features of the Oven Door Latches Window with Metal Shield Screen allows cooking to cook frozen convenience foods, brown already cooked foods quickly on top, or grill foods on the top and bottom.
... 15-second increments up to make selections. When entering cooking time using the microwave features. Glass Turntable Center the tray on the black metal tray when using the oven. Safety Instructions About the features of your model. 1000 Watts ge.com Operating Instructions Troubleshooting Tips Features of the Oven Door Latches Window with Metal Shield Screen allows cooking to cook frozen convenience foods, brown already cooked foods quickly on top, or grill foods on the top and bottom.
Owners Manual
Page 9
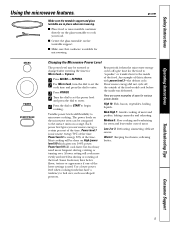
... glass turntable to the inside was defrosted. Power level 7 is microwave energy 70% of this is energy 30% of meat and poultry; Use a lower power level when cooking foods that cookware is used. baking casseroles and reheating. Medium 5: Slow cooking and tenderizing for stews and less tender cuts of uses for microwaving. Safety Instructions Operating Instructions Using the microwave features. Make sure the turntable support and glass turntable are some examples of meat. The power levels on the microwave oven...
... glass turntable to the inside was defrosted. Power level 7 is microwave energy 70% of this is energy 30% of meat and poultry; Use a lower power level when cooking foods that cookware is used. baking casseroles and reheating. Medium 5: Slow cooking and tenderizing for stews and less tender cuts of uses for microwaving. Safety Instructions Operating Instructions Using the microwave features. Make sure the turntable support and glass turntable are some examples of meat. The power levels on the microwave oven...
Owners Manual
Page 10
... button is a quick way to set the power level and press the dial to enter.) 7 Press the dial or START to check the food. High power level (10) is counting down. Troubleshooting Tips Consumer Support 10 Micro Cook Allows you to begin cooking. Turn the dial to add or subtract 5 seconds of cooking time during Micro Cook to begin microwave cooking after defrosting. Make sure the turntable support and glass turntable are in place when microwaving. 1 Press DEFROST. 2 Turn...
... button is a quick way to set the power level and press the dial to enter.) 7 Press the dial or START to check the food. High power level (10) is counting down. Troubleshooting Tips Consumer Support 10 Micro Cook Allows you to begin cooking. Turn the dial to add or subtract 5 seconds of cooking time during Micro Cook to begin microwave cooking after defrosting. Make sure the turntable support and glass turntable are in place when microwaving. 1 Press DEFROST. 2 Turn...
Owners Manual
Page 11
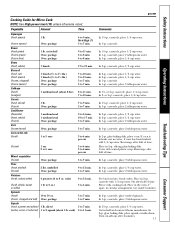
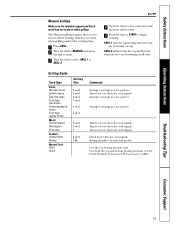
...Cooking Guide for Micro Cook NOTE: Use High power level (10) unless otherwise noted. package 5 to 7 min. 1 to 5 ears 3 to 7 min. 1 lb. In 11⁄2-qt. casserole, place 3 tablespoons water. In 2- or 3-qt. casserole, place 1/4 cup water. Cover with 1/2 cup water. casserole, place 3 tablespoons water. casserole, place 1/4 cup water. casserole, place 2 tablespoons water. casserole with vented.... 11 Consumer Support Troubleshooting Tips Operating Instructions Safety Instructions In 1-qt. Stir after half of time. glass baking dish, place squash cut in 2-qt....
...Cooking Guide for Micro Cook NOTE: Use High power level (10) unless otherwise noted. package 5 to 7 min. 1 to 5 ears 3 to 7 min. 1 lb. In 11⁄2-qt. casserole, place 3 tablespoons water. In 2- or 3-qt. casserole, place 1/4 cup water. Cover with 1/2 cup water. casserole, place 3 tablespoons water. casserole, place 1/4 cup water. casserole, place 2 tablespoons water. casserole with vented.... 11 Consumer Support Troubleshooting Tips Operating Instructions Safety Instructions In 1-qt. Stir after half of time. glass baking dish, place squash cut in 2-qt....
Owners Manual
Page 12
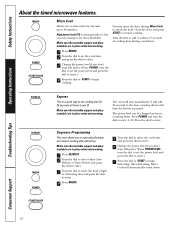
... in the About the convenience microwave features section.) Make sure the turntable support and glass turntable are completely defrosted before cooking. s Foods that spoil easily should be defrosted and microwaved. See the Defrosting Guide for suggested times. (Auto Defrost explained in paper or plastic can be partially uncovered. Plastic storage containers should not be defrosted in all areas. s Family-size, prepackaged frozen dinners can be allowed to...
... in the About the convenience microwave features section.) Make sure the turntable support and glass turntable are completely defrosted before cooking. s Foods that spoil easily should be defrosted and microwaved. See the Defrosting Guide for suggested times. (Auto Defrost explained in paper or plastic can be partially uncovered. Plastic storage containers should not be defrosted in all areas. s Family-size, prepackaged frozen dinners can be allowed to...

Owners Manual
Page 15
Make sure the turntable support and glass turntable are in pounds and ounces, the ounces must be converted to tenths (.1) of Food in the About the time microwave features section.) s Remove meat from package and place on microwave-safe dish. s After defrosting, most other frozen foods. Weight of a pound. Use Time Defrost for about 30 minutes. Auto Defrost automatically sets the defrosting times and power levels to 6.0 pounds. Large roasts should stand for...
Make sure the turntable support and glass turntable are in pounds and ounces, the ounces must be converted to tenths (.1) of Food in the About the time microwave features section.) s Remove meat from package and place on microwave-safe dish. s After defrosting, most other frozen foods. Weight of a pound. Use Time Defrost for about 30 minutes. Auto Defrost automatically sets the defrosting times and power levels to 6.0 pounds. Large roasts should stand for...
Owners Manual
Page 16
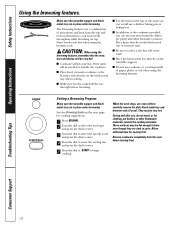
... s Make sure food is cooked all the way through before turning food. Setting a Browning Program Make sure the turntable support and black metal tray are in the same way you can use , do not touch, or let clothing, pot holders or other heat-safe cookware. During and after use non-metal casserole dishes, pie plates and other flammable materials contact the cooking elements. Remove cookware completely...
... s Make sure food is cooked all the way through before turning food. Setting a Browning Program Make sure the turntable support and black metal tray are in the same way you can use , do not touch, or let clothing, pot holders or other heat-safe cookware. During and after use non-metal casserole dishes, pie plates and other flammable materials contact the cooking elements. Remove cookware completely...
Owners Manual
Page 17
turn the dial to set the power level and press the dial to enter.) 6 Press the dial or START to enter. 5 Change the microwave power level if you don't want full power. (Press POWER; Utilizes equal parts top element and microwave power for less browning on the browner rack. Use for even browning on top. Place food on top. COMBI 1 and COMBI 2 utilize more top element power, browning food faster...
turn the dial to set the power level and press the dial to enter.) 6 Press the dial or START to enter. 5 Change the microwave power level if you don't want full power. (Press POWER; Utilizes equal parts top element and microwave power for less browning on the browner rack. Use for even browning on top. Place food on top. COMBI 1 and COMBI 2 utilize more top element power, browning food faster...
Owners Manual
Page 18
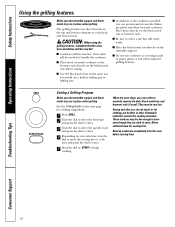
... grilling. Safety Instructions Operating Instructions Using the grilling features. The grilling features use , do not touch, or let clothing, pot holders or other heat-safe cookware. s Be sure to select a size that the oven, door and dishes will become hot. Setting a Grilling Program Make sure the turntable support and black metal tray are in place when grilling. See the Grilling Guide on the next page for cooling first. Allow sufficient time for cooking suggestions. 1 Press GRILL. 2 Turn...
... grilling. Safety Instructions Operating Instructions Using the grilling features. The grilling features use , do not touch, or let clothing, pot holders or other heat-safe cookware. s Be sure to select a size that the oven, door and dishes will become hot. Setting a Grilling Program Make sure the turntable support and black metal tray are in place when grilling. See the Grilling Guide on the next page for cooling first. Allow sufficient time for cooking suggestions. 1 Press GRILL. 2 Turn...
Owners Manual
Page 19
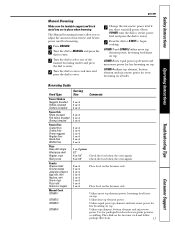
... bottom heating elements. Arrange 4 servings in a star pattern. Arrange 4 servings in place when grilling. Turn food over when the oven signals. Turn food over when the oven signals. Uses both the top and bottom elements for even browning on top. Turn food over when the oven signals. Troubleshooting Tips Consumer Support 19 Safety Instructions Operating Instructions Manual Grilling Make sure the turntable support and black metal tray are used when grilling and set the cooking time. 1 Press GRILL. 2 Turn...
... bottom heating elements. Arrange 4 servings in a star pattern. Arrange 4 servings in place when grilling. Turn food over when the oven signals. Turn food over when the oven signals. Uses both the top and bottom elements for even browning on top. Turn food over when the oven signals. Troubleshooting Tips Consumer Support 19 Safety Instructions Operating Instructions Manual Grilling Make sure the turntable support and black metal tray are used when grilling and set the cooking time. 1 Press GRILL. 2 Turn...
Owners Manual
Page 20
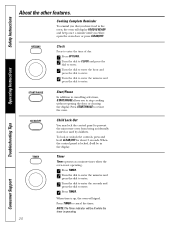
... used by children. Cooking Complete Reminder To remind you that you have food in the oven, the oven will be in the display. Child Lock-Out You may lock the control panel to cancel the timer. When time is up, the oven will be lit while the timer is locked, L will signal. NOTE: The Timer indicator will display FOOD IS READY and beep once a minute until you to stop cooking without opening the door...
... used by children. Cooking Complete Reminder To remind you that you have food in the oven, the oven will be in the display. Child Lock-Out You may lock the control panel to cancel the timer. When time is up, the oven will be lit while the timer is locked, L will signal. NOTE: The Timer indicator will display FOOD IS READY and beep once a minute until you to stop cooking without opening the door...
Owners Manual
Page 23
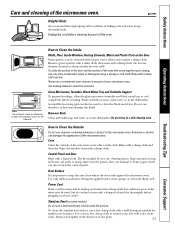
... Steel (on some models) Do not use a commercial oven cleaner on the panel-they may require a damp cloth. ge.com Operating Instructions Troubleshooting Tips Do not touch, clean or attempt to clean the black metal tray. The heating elements cannot be removed with a damp cloth and then dry. A soap-filled scouring pad can damage the appearance of your microwave oven. Power Cord If the cord becomes soiled, unplug and...
... Steel (on some models) Do not use a commercial oven cleaner on the panel-they may require a damp cloth. ge.com Operating Instructions Troubleshooting Tips Do not touch, clean or attempt to clean the black metal tray. The heating elements cannot be removed with a damp cloth and then dry. A soap-filled scouring pad can damage the appearance of your microwave oven. Power Cord If the cord becomes soiled, unplug and...
Owners Manual
Page 24
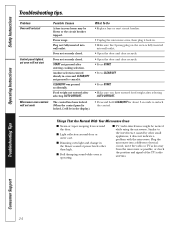
... oven is locked, L will not work Possible Causes A fuse in the blower sound at power levels other small appliances, it . CLEAR/OFF was pressed accidentally. s Dimming oven light and change in your home may be noticed while using the microwave. Safety Instructions Operating Instructions Troubleshooting tips. Another selection entered already in . • Make sure the 3-prong plug on the oven is fully inserted into wall outlet. • Open the door...
... oven is locked, L will not work Possible Causes A fuse in the blower sound at power levels other small appliances, it . CLEAR/OFF was pressed accidentally. s Dimming oven light and change in your home may be noticed while using the microwave. Safety Instructions Operating Instructions Troubleshooting tips. Another selection entered already in . • Make sure the 3-prong plug on the oven is fully inserted into wall outlet. • Open the door...
Owners Manual
Page 27
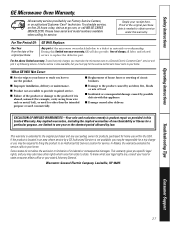
... 40225 Troubleshooting Tips Consumer Support 27 For The Period Of: GE Will Replace: One Year From the date of the original purchase Any part of the original purchase date is product repair as provided in materials or workmanship. Safety Instructions Operating Instructions GE Microwave Oven Warranty. Proof of the microwave oven which vary from wire rack or metal/foil), or used for home use the product. In-home service is...
... 40225 Troubleshooting Tips Consumer Support 27 For The Period Of: GE Will Replace: One Year From the date of the original purchase Any part of the original purchase date is product repair as provided in materials or workmanship. Safety Instructions Operating Instructions GE Microwave Oven Warranty. Proof of the microwave oven which vary from wire rack or metal/foil), or used for home use the product. In-home service is...


