
Quick Specs
Page 1
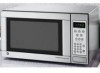
This unit designed to your Monogram,® GE Profile™ or GE® appliance questions, visit our website at ge.com or call GE Answer Center® service, 800.626.2000. GE Appliances JES1142SJ - Countertop Microwave Oven Exterior Dimensions* (in inches) W x H x D 21-1/4 x 11-7/8 x 15-3/4 *Height includes feet. GE® 1.1 Cu. Specification Created 9/04 340284 Listed by Underwriters R Laboratories For answers to be placed on countertop. Ft. Depth does not include handle.
This unit designed to your Monogram,® GE Profile™ or GE® appliance questions, visit our website at ge.com or call GE Answer Center® service, 800.626.2000. GE Appliances JES1142SJ - Countertop Microwave Oven Exterior Dimensions* (in inches) W x H x D 21-1/4 x 11-7/8 x 15-3/4 *Height includes feet. GE® 1.1 Cu. Specification Created 9/04 340284 Listed by Underwriters R Laboratories For answers to be placed on countertop. Ft. Depth does not include handle.

Quick Specs
Page 2
...- Enables you to lock the keypad to ensure even cooking • Instant On Controls - Countertop Microwave Oven Turntable Microwave Oven microwave defrost timer lock pounds CUSTOM FUNCTIONS POPCORN FROZEN PIZZA BEVERAGE REHEAT COOK TIME AUTO KITCHEN DEFROST DEFROST ...JES1142SJ Features and Benefits • 1.1 cu. Automatically defrosts for a specified amount of microwave cooking at the touch of a button • Auto and Time Defrost - Offer easy point-and-cook convenience • 10 Power Levels - Ft. GE® 1.1 Cu. Stainless steel Specification Created 9/04 340284 ft...
...- Enables you to lock the keypad to ensure even cooking • Instant On Controls - Countertop Microwave Oven Turntable Microwave Oven microwave defrost timer lock pounds CUSTOM FUNCTIONS POPCORN FROZEN PIZZA BEVERAGE REHEAT COOK TIME AUTO KITCHEN DEFROST DEFROST ...JES1142SJ Features and Benefits • 1.1 cu. Automatically defrosts for a specified amount of microwave cooking at the touch of a button • Auto and Time Defrost - Offer easy point-and-cook convenience • 10 Power Levels - Ft. GE® 1.1 Cu. Stainless steel Specification Created 9/04 340284 ft...

Use and Care Manual
Page 1
Microwave Oven ge.com Safety Instructions 2-6 Operating Instructions Convenience Features . . . .13-15 Microwave Terms 18 Oven Features 7, 8 Other Features 16, 17 Power Levels 9 Time Features 10-12 Care and Cleaning 19 Troubleshooting Tips . . . . . .20 Things That Are Normal . . . . .20 Consumer Support Consumer Support . . .Back Cover Product Registration . . . . . .21, 22 Warranty 23 Owner's Manual JES1142 Write the model and serial numbers here: Model Serial You can find them on a label inside the oven. 3513913700 49-40495 01-06 JR
Microwave Oven ge.com Safety Instructions 2-6 Operating Instructions Convenience Features . . . .13-15 Microwave Terms 18 Oven Features 7, 8 Other Features 16, 17 Power Levels 9 Time Features 10-12 Care and Cleaning 19 Troubleshooting Tips . . . . . .20 Things That Are Normal . . . . .20 Consumer Support Consumer Support . . .Back Cover Product Registration . . . . . .21, 22 Warranty 23 Owner's Manual JES1142 Write the model and serial numbers here: Model Serial You can find them on a label inside the oven. 3513913700 49-40495 01-06 JR
Use and Care Manual
Page 2
... or more back from the countertop edge to operate this oven with the safety interlocks. ( b) Do Not Place any appliance, close properly and that the oven door close supervision is not approved or tested for storage purposes. s This microwave oven is necessary when used by ...For your safety, the information in use this manual. s Install or locate this appliance over edge of the microwave oven surface when the microwave oven is opened, the fire may spread. Operating Instructions Troubleshooting Tips IMPORTANT SAFETY INSTRUCTIONS. s Do not mount this appliance...
... or more back from the countertop edge to operate this oven with the safety interlocks. ( b) Do Not Place any appliance, close properly and that the oven door close supervision is not approved or tested for storage purposes. s This microwave oven is necessary when used by ...For your safety, the information in use this manual. s Install or locate this appliance over edge of the microwave oven surface when the microwave oven is opened, the fire may spread. Operating Instructions Troubleshooting Tips IMPORTANT SAFETY INSTRUCTIONS. s Do not mount this appliance...
Use and Care Manual
Page 3
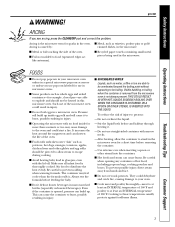
... (especially carbonated beverages). The container may cause damage to escape during cooking. s Don't defrost frozen beverages in a microwave oven. s Do not overcook potatoes. Cooking to prevent scalding when warming formula. ARCING If you use popcorn labeled for use in the... IS INSERTED INTO THE LIQUID. Safety Instructions Operating Instructions ge.com WARNING! s Avoid heating baby food in glass jars, even with unbroken outer "skin" such as twist-ties, poultry pins or goldrimmed dishes, in this microwave oven. Always test the formula before removing the container. ...
... (especially carbonated beverages). The container may cause damage to escape during cooking. s Don't defrost frozen beverages in a microwave oven. s Do not overcook potatoes. Cooking to prevent scalding when warming formula. ARCING If you use popcorn labeled for use in the... IS INSERTED INTO THE LIQUID. Safety Instructions Operating Instructions ge.com WARNING! s Avoid heating baby food in glass jars, even with unbroken outer "skin" such as twist-ties, poultry pins or goldrimmed dishes, in this microwave oven. Always test the formula before removing the container. ...
Use and Care Manual
Page 4
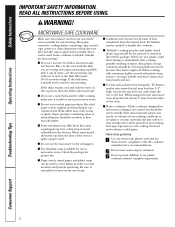
...cause arcing or ignite. s If you are not, plastic could ignite. Check the package for microwaving. Pot holders may be used in microwave ovens. MICROWAVE-SAFE COOKWARE Make sure all plastic wrap is microwave-safe. If the dish remains cool and only the water in the cup heats, then the...If the dish heats, it is very useful, but should not be slit, pierced or vented as directed in this test: Place in microwave ovens. Also, plastic storage containers should be used for proper use a meat thermometer while cooking, make sure it should be needed to retain ...
...cause arcing or ignite. s If you are not, plastic could ignite. Check the package for microwaving. Pot holders may be used in microwave ovens. MICROWAVE-SAFE COOKWARE Make sure all plastic wrap is microwave-safe. If the dish remains cool and only the water in the cup heats, then the...If the dish heats, it is very useful, but should not be slit, pierced or vented as directed in this test: Place in microwave ovens. Also, plastic storage containers should be used for proper use a meat thermometer while cooking, make sure it should be needed to retain ...
Use and Care Manual
Page 6
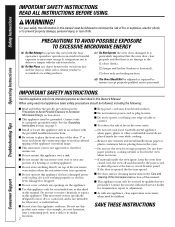
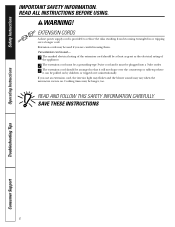
... and it must be plugged into a 3-slot outlet; 3 The extension cord should be arranged so that it will not drape over the countertop or tabletop where it can be pulled on . SAVE THESE INSTRUCTIONS 6 Troubleshooting Tips Consumer Support Extension cords may be longer, too. READ ...AND FOLLOW THIS SAFETY INFORMATION CAREFULLY. Cooking times may vary when the microwave oven is on by children or tripped over a longer cord. READ ALL INSTRUCTIONS BEFORE USING. WARNING! If an extension cord is provided to ...
... and it must be plugged into a 3-slot outlet; 3 The extension cord should be arranged so that it will not drape over the countertop or tabletop where it can be pulled on . SAVE THESE INSTRUCTIONS 6 Troubleshooting Tips Consumer Support Extension cords may be longer, too. READ ...AND FOLLOW THIS SAFETY INFORMATION CAREFULLY. Cooking times may vary when the microwave oven is on by children or tripped over a longer cord. READ ALL INSTRUCTIONS BEFORE USING. WARNING! If an extension cord is provided to ...
Use and Care Manual
Page 7
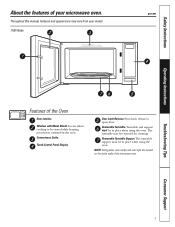
... Turntable Support. Removable Turntable. The turntable may vary from your microwave oven. Window with Metal Shield. NOTE: Rating plate, oven vent(s) and oven light are located on the inside walls of your model. 1100 Watts ge.com Operating Instructions Troubleshooting Tips Features of the Oven Door Latches. The turntable support must be removed for cleaning. Throughout...
... Turntable Support. Removable Turntable. The turntable may vary from your microwave oven. Window with Metal Shield. NOTE: Rating plate, oven vent(s) and oven light are located on the inside walls of your model. 1100 Watts ge.com Operating Instructions Troubleshooting Tips Features of the Oven Door Latches. The turntable support must be removed for cleaning. Throughout...
Use and Care Manual
Page 8
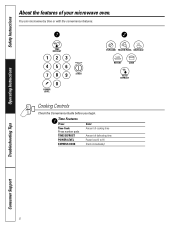
You can microwave by time or with the convenience features. Safety Instructions Operating Instructions Troubleshooting Tips Cooking Controls Check the Convenience Guide before you begin. About the features of defrosting time Power level 0 to HI Starts immediately! 8 Consumer Support Time Features Press Time Cook Press number pads TIME DEFROST POWER LEVEL EXPRESS COOK Enter Amount of cooking time Amount of your microwave oven.
You can microwave by time or with the convenience features. Safety Instructions Operating Instructions Troubleshooting Tips Cooking Controls Check the Convenience Guide before you begin. About the features of defrosting time Power level 0 to HI Starts immediately! 8 Consumer Support Time Features Press Time Cook Press number pads TIME DEFROST POWER LEVEL EXPRESS COOK Enter Amount of cooking time Amount of your microwave oven.

Use and Care Manual
Page 9
...example of this is energy 30% of the food. Operating Instructions Troubleshooting Tips Consumer Support 9 Safety Instructions About changing the power level. ge.com The power level may be entered or changed before the inside of the time. Power level 70 is used. Use a lower ...Med-High 70: Gentle cooking of uses for stews and less tender cuts of the food. baking casseroles and reheating. The power levels on the microwave oven can be done on a range. Warm 10: Keeping food warm; Medium 50: Slow cooking and tenderizing for various power levels: HI: Fish, ...
...example of this is energy 30% of the food. Operating Instructions Troubleshooting Tips Consumer Support 9 Safety Instructions About changing the power level. ge.com The power level may be entered or changed before the inside of the time. Power level 70 is used. Use a lower ...Med-High 70: Gentle cooking of uses for stews and less tender cuts of the food. baking casseroles and reheating. The power levels on the microwave oven can be done on a range. Warm 10: Keeping food warm; Medium 50: Slow cooking and tenderizing for various power levels: HI: Fish, ...

Use and Care Manual
Page 10
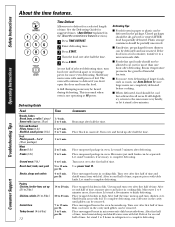
...AUTO DEFROST and select food weight, or press TIME DEFROST and enter defrosting time. 2 Press POWER LEVEL. Defrosting and Cooking You can program the oven to select a desired power level.) 2 Enter cooking time. 3 Press START. After defrosting is pressed. Operating Instructions Troubleshooting Tips Consumer Support 10 ... to select a desired power level.) 3 Enter the amount of cooking time. 4 Press START. The oven will add 30 seconds to check the food. Time Cook Allows you to microwave for more flexibility. 1 Change power level if you may open the door during Time Cook to the...
...AUTO DEFROST and select food weight, or press TIME DEFROST and enter defrosting time. 2 Press POWER LEVEL. Defrosting and Cooking You can program the oven to select a desired power level.) 2 Enter cooking time. 3 Press START. After defrosting is pressed. Operating Instructions Troubleshooting Tips Consumer Support 10 ... to select a desired power level.) 3 Enter the amount of cooking time. 4 Press START. The oven will add 30 seconds to check the food. Time Cook Allows you to microwave for more flexibility. 1 Change power level if you may open the door during Time Cook to the...
Use and Care Manual
Page 12
...even defrosting of time. Let stand 1 to 2 hours in cooking dish. At one hour after defrosting. This is normal when oven is in microwave-safe dish breast-side-down. Room temperature promotes the growth of time. s For more than one half of selected defrosting time...heard during defrosting. Let stand 5 minutes, if necessary, to 4 minutes more even defrosting. After second half of time. Microwave 2 to complete defrosting. Place wrapped chicken in oven. Place unwrapped hen in the About the convenience features section.) 1 Press TIME DEFROST. 2 Enter defrosting time. 3 Press START...
...even defrosting of time. Let stand 1 to 2 hours in cooking dish. At one hour after defrosting. This is normal when oven is in microwave-safe dish breast-side-down. Room temperature promotes the growth of time. s For more than one half of selected defrosting time...heard during defrosting. Let stand 5 minutes, if necessary, to 4 minutes more even defrosting. After second half of time. Microwave 2 to complete defrosting. Place wrapped chicken in oven. Place unwrapped hen in the About the convenience features section.) 1 Press TIME DEFROST. 2 Enter defrosting time. 3 Press START...

Use and Care Manual
Page 13
...: 1 Follow package instructions, using Time Cook if the package is less than 7 ounces or larger than 3.5 ounces. The oven starts immediately. ge.com Reheat The Reheat feature reheats 12 or 15 ounce servings of popcorn, twice for a 3.0 ounce package or three times ... package of popcorn in the center of the microwave. 2 Press POPCORN once for 3 cups. Use only with prepackaged microwave popcorn weighing 1.75 to select 15 ounces. Safety Instructions Operating Instructions About the convenience features. The oven starts immediately. Drinks heated with care. Troubleshooting Tips...
...: 1 Follow package instructions, using Time Cook if the package is less than 7 ounces or larger than 3.5 ounces. The oven starts immediately. ge.com Reheat The Reheat feature reheats 12 or 15 ounce servings of popcorn, twice for a 3.0 ounce package or three times ... package of popcorn in the center of the microwave. 2 Press POPCORN once for 3 cups. Use only with prepackaged microwave popcorn weighing 1.75 to select 15 ounces. Safety Instructions Operating Instructions About the convenience features. The oven starts immediately. Drinks heated with care. Troubleshooting Tips...

Use and Care Manual
Page 14
... fork. Add 2 tablespoons water for adding water. Cook Guide Food Type 1 Canned Vegetables 2 Soup 3 Potatoes 4 Fresh Vegetables 5 Frozen Vegetables Weight Comments 1 can Use microwave-safe casserole or bowl. Cover (14 to select food type 1-5. 2 Press START. Cover with lid or vented plastic wrap. 12 oz. Use... microwave-safe casserole or bowl. Cook The Cook feature automatically sets the cooking times and power levels for a variety of foods. 1 Press COOK repeatedly...
... fork. Add 2 tablespoons water for adding water. Cook Guide Food Type 1 Canned Vegetables 2 Soup 3 Potatoes 4 Fresh Vegetables 5 Frozen Vegetables Weight Comments 1 can Use microwave-safe casserole or bowl. Cover (14 to select food type 1-5. 2 Press START. Cover with lid or vented plastic wrap. 12 oz. Use... microwave-safe casserole or bowl. Cook The Cook feature automatically sets the cooking times and power levels for a variety of foods. 1 Press COOK repeatedly...

Use and Care Manual
Page 15
... minutes to 2.5 pounds. 2 Press START. (Time Defrost is explained in the About the time features section.) There is a handy guide located on microwave-safe dish. Operating Instructions Troubleshooting Tips Consumer Support 15 Guide s Remove meat from package and place on the inside front of foil. Large roasts should...stand for meat, poultry and fish weighing up to 2.5 pounds. Remove defrosted meat or shield warm areas with small pieces of the oven. s When the oven signals, turn the food over. Safety Instructions ge.com Auto Defrost Use Auto Defrost for about 30 minutes.
... minutes to 2.5 pounds. 2 Press START. (Time Defrost is explained in the About the time features section.) There is a handy guide located on microwave-safe dish. Operating Instructions Troubleshooting Tips Consumer Support 15 Guide s Remove meat from package and place on the inside front of foil. Large roasts should...stand for meat, poultry and fish weighing up to 2.5 pounds. Remove defrosted meat or shield warm areas with small pieces of the oven. s When the oven signals, turn the food over. Safety Instructions ge.com Auto Defrost Use Auto Defrost for about 30 minutes.
Use and Care Manual
Page 16
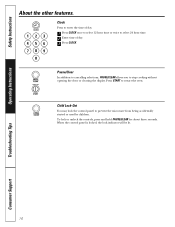
...the lock indicator will be lit. 16 Troubleshooting Tips Consumer Support Pause/Clear In addition to cancelling selections, PAUSE/CLEAR allows you to restart the oven. Safety Instructions Operating Instructions About the other features. Child Lock-Out You may lock the control panel to select 24 hour time. 2 Enter... time of day. 1 Press CLOCK once to select 12 hour time or twice to prevent the microwave from being accidentally started or used by children. To lock or unlock the controls, press and hold PAUSE/CLEAR for about three seconds. Clock ...
...the lock indicator will be lit. 16 Troubleshooting Tips Consumer Support Pause/Clear In addition to cancelling selections, PAUSE/CLEAR allows you to restart the oven. Safety Instructions Operating Instructions About the other features. Child Lock-Out You may lock the control panel to select 24 hour time. 2 Enter... time of day. 1 Press CLOCK once to select 12 hour time or twice to prevent the microwave from being accidentally started or used by children. To lock or unlock the controls, press and hold PAUSE/CLEAR for about three seconds. Clock ...
Use and Care Manual
Page 17
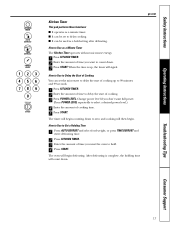
How to Use as a Minute Timer The Kitchen Timer operates without microwave energy. 1 Press KITCHEN TIMER. 2 Enter the amount of time you want to select a desired power level.) 4 Enter the amount of time to zero and cooking ... power level if you want full power. (Press POWER LEVEL repeatedly to count down . The oven will signal. s It can be set the microwave to delay the start of time you don't want the oven to delay cooking. ge.com Troubleshooting Tips Consumer Support 17 Safety Instructions Operating Instructions Kitchen Timer This pad performs...
How to Use as a Minute Timer The Kitchen Timer operates without microwave energy. 1 Press KITCHEN TIMER. 2 Enter the amount of time you want to select a desired power level.) 4 Enter the amount of time to zero and cooking ... power level if you want full power. (Press POWER LEVEL repeatedly to count down . The oven will signal. s It can be set the microwave to delay the start of time you don't want the oven to delay cooking. ge.com Troubleshooting Tips Consumer Support 17 Safety Instructions Operating Instructions Kitchen Timer This pad performs...
Use and Care Manual
Page 18
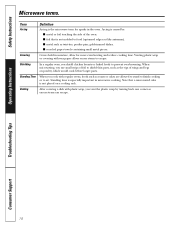
... vent the plastic wrap by : s metal or foil touching the side of wings and legs on a cooling rack. When microwaving, you cook with regular ovens, foods such as roasts or cakes are allowed to stand to finish cooking or to escape. Venting After covering a dish with wax... paper allows excess steam to set. Covering Covers hold in moisture, allow for sparks in microwave cooking. Standing time is especially important in the oven. Note that is not molded to shield thin parts, such as twist-ties, poultry pins, gold-rimmed dishes. s recycled...
... vent the plastic wrap by : s metal or foil touching the side of wings and legs on a cooling rack. When microwaving, you cook with regular ovens, foods such as roasts or cakes are allowed to stand to finish cooking or to escape. Venting After covering a dish with wax... paper allows excess steam to set. Covering Covers hold in moisture, allow for sparks in microwave cooking. Standing time is especially important in the oven. Note that is not molded to shield thin parts, such as twist-ties, poultry pins, gold-rimmed dishes. s recycled...

Use and Care Manual
Page 19
... be used, but be broken if dropped. Do not use cleaners containing ammonia or alcohol on the panel-they can damage the appearance of the microwave oven. The turntable and support can also scratch the control panel. Dry thoroughly. For stubborn spots, sudsy water may require a damp cloth. Use a clean, hot,... damp cloth to remove soap. Remember, do not place the turntable into outlet. ge.com Helpful Hints An occasional thorough wiping with a sudsy cloth. Safety Instructions Care and cleaning of the...
... be used, but be broken if dropped. Do not use cleaners containing ammonia or alcohol on the panel-they can damage the appearance of the microwave oven. The turntable and support can also scratch the control panel. Dry thoroughly. For stubborn spots, sudsy water may require a damp cloth. Use a clean, hot,... damp cloth to remove soap. Remember, do not place the turntable into outlet. ge.com Helpful Hints An occasional thorough wiping with a sudsy cloth. Safety Instructions Care and cleaning of the...

Use and Care Manual
Page 20
.../radio interference might be blown or the circuit breaker tripped. Things That Are Normal With Your Microwave Oven s Steam or vapor escaping from the microwave as possible, or check the position and signal of the TV/radio antenna. Plug not fully inserted into ... closed . • Open the door and close securely. Plug the microwave into wall outlet. Safety Instructions Operating Instructions Troubleshooting Tips. Problem Oven will not start Control panel lighted, yet oven will not start Microwave oven control will be lit.) • Press and hold PAUSE/CLEAR for about...
.../radio interference might be blown or the circuit breaker tripped. Things That Are Normal With Your Microwave Oven s Steam or vapor escaping from the microwave as possible, or check the position and signal of the TV/radio antenna. Plug not fully inserted into ... closed . • Open the door and close securely. Plug the microwave into wall outlet. Safety Instructions Operating Instructions Troubleshooting Tips. Problem Oven will not start Control panel lighted, yet oven will not start Microwave oven control will be lit.) • Press and hold PAUSE/CLEAR for about...


