Owners Manual
Page 1
Microwave Oven ge.com Safety Instructions 2-11 Operating Instructions Auto Feature 21 Care and Cleaning . . . . . .30, 31 Changing Power Level . . . . . .14 Features of Your Microwave Oven 12, 13 Microwave Terms 29 Other Features 26-28 Sensor Features 22-25 Time Features 15-20 Troubleshooting Tips . . . .32, 33 Things That Are Normal With Your Microwave Oven 33 Consumer Support Consumer Support . .Back Cover Warranty 35 Owner's Manual JEM31 Write the model and serial numbers here: Model Serial You can find them on a label inside of the oven. DE68-02291A 49-40492 01-06 JR
Microwave Oven ge.com Safety Instructions 2-11 Operating Instructions Auto Feature 21 Care and Cleaning . . . . . .30, 31 Changing Power Level . . . . . .14 Features of Your Microwave Oven 12, 13 Microwave Terms 29 Other Features 26-28 Sensor Features 22-25 Time Features 15-20 Troubleshooting Tips . . . .32, 33 Things That Are Normal With Your Microwave Oven 33 Consumer Support Consumer Support . .Back Cover Warranty 35 Owner's Manual JEM31 Write the model and serial numbers here: Model Serial You can find them on a label inside of the oven. DE68-02291A 49-40492 01-06 JR
Owners Manual
Page 3
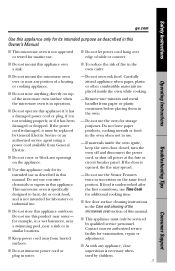
... Use this appliance only for marine use as described in a wet basement, near a swimming pool, near any portion of the microwave oven surface when the microwave oven is opened, the fire may spread. - I Do not store anything directly on the appliance. for storage purposes. Do not use... this product near water- Do not use the Sensor Features twice in this manual. Safety Instructions ge.com Operating Instructions ...
... Use this appliance only for marine use as described in a wet basement, near a swimming pool, near any portion of the microwave oven surface when the microwave oven is opened, the fire may spread. - I Do not store anything directly on the appliance. for storage purposes. Do not use... this product near water- Do not use the Sensor Features twice in this manual. Safety Instructions ge.com Operating Instructions ...
Owners Manual
Page 4
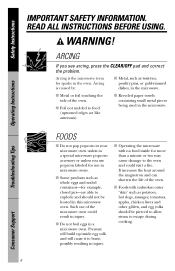
...Instructions Troubleshooting Tips FOODS I Foil not molded to escape during cooking. It increases the heat around the magnetron and can shorten the life of the microwave oven could start a fire. Arcing is caused by: I Recycled paper towels containing small metal pieces being used in injury. I Some products such as... and egg yolks should not be pierced to allow steam to food (upturned edges act like antennas). Such use in this microwave oven. Consumer Support 4 READ ALL INSTRUCTIONS BEFORE USING. ARCING If you use popcorn labeled for example, closed jars-are able to the...
...Instructions Troubleshooting Tips FOODS I Foil not molded to escape during cooking. It increases the heat around the magnetron and can shorten the life of the microwave oven could start a fire. Arcing is caused by: I Recycled paper towels containing small metal pieces being used in injury. I Some products such as... and egg yolks should not be pierced to allow steam to food (upturned edges act like antennas). Such use in this microwave oven. Consumer Support 4 READ ALL INSTRUCTIONS BEFORE USING. ARCING If you use popcorn labeled for example, closed jars-are able to the...
Owners Manual
Page 5
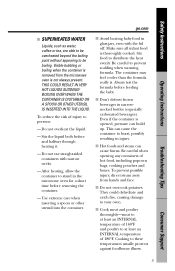
...container to burst, possibly resulting in narrownecked bottles (especially carbonated beverages). To prevent possible injury, direct steam away from the microwave oven is removed from hands and face. I Cook meat and poultry thoroughly-meat to at least an INTERNAL temperature of injury ...bubbling or boiling when the container is not always present. I Avoid heating baby food in the microwave oven for a short time before removing the container. - Safety Instructions Operating Instructions ge.com I Hot foods and steam can build up. I Don't defrost frozen beverages in injury....
...container to burst, possibly resulting in narrownecked bottles (especially carbonated beverages). To prevent possible injury, direct steam away from the microwave oven is removed from hands and face. I Cook meat and poultry thoroughly-meat to at least an INTERNAL temperature of injury ...bubbling or boiling when the container is not always present. I Avoid heating baby food in the microwave oven for a short time before removing the container. - Safety Instructions Operating Instructions ge.com I Hot foods and steam can build up. I Don't defrost frozen beverages in injury....
Owners Manual
Page 6
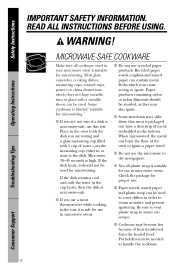
...heat transferred from the heated food. Pot holders may be avoided, as they may become hot because of metal embedded in microwave ovens. If the dish heats, it is microwave-safe. If the dish remains cool and only the water in the cup heats, then the dish is safe for ...use in your microwave oven is suitable for microwaving." WARNING! Some cookware is suitable for proper use a meat thermometer while cooking, make sure it should be needed to retain moisture and prevent spattering...
...heat transferred from the heated food. Pot holders may be avoided, as they may become hot because of metal embedded in microwave ovens. If the dish heats, it is microwave-safe. If the dish remains cool and only the water in the cup heats, then the dish is safe for ...use in your microwave oven is suitable for microwaving." WARNING! Some cookware is suitable for proper use a meat thermometer while cooking, make sure it should be needed to retain moisture and prevent spattering...
Owners Manual
Page 7
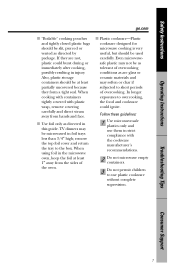
...Use foil only as directed by package. I Plastic cookware-Plastic cookware designed for microwave cooking is very useful, but should be slit, pierced or vented as directed in the microwave oven, keep the foil at least partially uncovered because they are glass or ceramic materials ...and may be microwaved in injury. Safety Instructions Operating Instructions ge.com I "Boilable" cooking pouches and tightly closed plastic ...
...Use foil only as directed by package. I Plastic cookware-Plastic cookware designed for microwave cooking is very useful, but should be slit, pierced or vented as directed in the microwave oven, keep the foil at least partially uncovered because they are glass or ceramic materials ...and may be microwaved in injury. Safety Instructions Operating Instructions ge.com I "Boilable" cooking pouches and tightly closed plastic ...
Owners Manual
Page 10
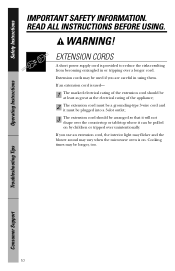
... becoming entangled in using them. If you are careful in or tripping over unintentionally. READ ALL INSTRUCTIONS BEFORE USING. Cooking times may vary when the microwave oven is on by children or tripped over a longer cord. Safety Instructions Operating Instructions IMPORTANT SAFETY INFORMATION. Extension cords may be used - 1 The marked electrical rating...
... becoming entangled in using them. If you are careful in or tripping over unintentionally. READ ALL INSTRUCTIONS BEFORE USING. Cooking times may vary when the microwave oven is on by children or tripped over a longer cord. Safety Instructions Operating Instructions IMPORTANT SAFETY INFORMATION. Extension cords may be used - 1 The marked electrical rating...

Owners Manual
Page 12
...from your GE supplier. 04-A019 Hanging Kit allows this oven to be mounted under a cabinet. 12 JX827 27 ″ Built-In Kit allows this manual, features and appearance may be in the oven. Optional Accessories Available at extra cost from your microwave oven. Screen ...allows cooking to be viewed while keeping microwaves confined in place when using the oven. Turntable and support must be removed for cleaning. Consumer ...
...from your GE supplier. 04-A019 Hanging Kit allows this oven to be mounted under a cabinet. 12 JX827 27 ″ Built-In Kit allows this manual, features and appearance may be in the oven. Optional Accessories Available at extra cost from your microwave oven. Screen ...allows cooking to be viewed while keeping microwaves confined in place when using the oven. Turntable and support must be removed for cleaning. Consumer ...
Owners Manual
Page 14
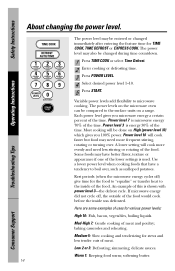
The power levels on the microwave oven can be done on a range. Most cooking will be compared to the inside ...the power level. Low 2 or 3: Defrosting; A lower setting will cook faster but food may have a tendency to microwave cooking. Power level 10 will cook more evenly and need more frequent stirring, rotating or turning over , such as scalloped...potatoes. Power level 7 is used. Some foods may need less stirring or rotating of the lower settings is microwave energy 70% of uses for TIME COOK, TIME DEFROST or EXPRESS COOK. softening butter. 14 Troubleshooting Tips Consumer...
The power levels on the microwave oven can be done on a range. Most cooking will be compared to the inside ...the power level. Low 2 or 3: Defrosting; A lower setting will cook faster but food may have a tendency to microwave cooking. Power level 10 will cook more evenly and need more frequent stirring, rotating or turning over , such as scalloped...potatoes. Power level 7 is used. Some foods may need less stirring or rotating of the lower settings is microwave energy 70% of uses for TIME COOK, TIME DEFROST or EXPRESS COOK. softening butter. 14 Troubleshooting Tips Consumer...
Owners Manual
Page 22
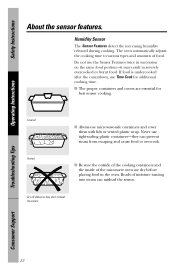
Humidity Sensor The Sensor Features detect the increasing humidity released during cooking. Never use microwave-safe containers and cover them with lids or vented plastic wrap. Troubleshooting Tips Consumer Support 22 If food is undercooked after the countdown, ... of food. Beads of moisture turning into steam can prevent steam from escaping and cause food to various types and amounts of the microwave oven are essential for additional cooking time. Do not use Time Cook for best sensor cooking. Safety Instructions Operating Instructions About the sensor features.
Humidity Sensor The Sensor Features detect the increasing humidity released during cooking. Never use microwave-safe containers and cover them with lids or vented plastic wrap. Troubleshooting Tips Consumer Support 22 If food is undercooked after the countdown, ... of food. Beads of moisture turning into steam can prevent steam from escaping and cause food to various types and amounts of the microwave oven are essential for additional cooking time. Do not use Time Cook for best sensor cooking. Safety Instructions Operating Instructions About the sensor features.
Owners Manual
Page 30
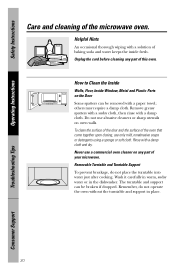
...Walls, Floor, Inside Window, Metal and Plastic Parts on the Door Some spatters can be removed with a solution of the microwave oven. Never use a commercial oven cleaner on oven walls. The turntable and support can be broken if dropped. Safety Instructions Operating Instructions Care and cleaning of baking soda and ... a sudsy cloth, then rinse with a damp cloth and dry. To clean the surface of the door and the surface of your microwave. Unplug the cord before cleaning any part of the oven that come together upon closing, use abrasive cleaners or sharp utensils on any part of this...
...Walls, Floor, Inside Window, Metal and Plastic Parts on the Door Some spatters can be removed with a solution of the microwave oven. Never use a commercial oven cleaner on oven walls. The turntable and support can be broken if dropped. Safety Instructions Operating Instructions Care and cleaning of baking soda and ... a sudsy cloth, then rinse with a damp cloth and dry. To clean the surface of the door and the surface of your microwave. Unplug the cord before cleaning any part of the oven that come together upon closing, use abrasive cleaners or sharp utensils on any part of this...
Owners Manual
Page 31
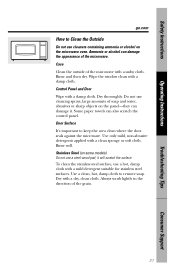
... microwave with a damp cloth. Dry with a clean sponge or soft cloth. Do not use a hot, damp cloth with a damp cloth. Some paper towels can damage it will scratch the surface. Use only mild, non-abrasive detergents applied with a dry, clean cloth. Rinse well. Safety Instructions Operating Instructions ge... of soap and water, abrasives or sharp objects on some models) Do not use cleaners containing ammonia or alcohol on the microwave oven. Wipe the window clean with a sudsy cloth. Door Surface It's important to keep the area clean where the door seals against the...
... microwave with a damp cloth. Dry with a clean sponge or soft cloth. Do not use a hot, damp cloth with a damp cloth. Some paper towels can damage it will scratch the surface. Use only mild, non-abrasive detergents applied with a dry, clean cloth. Rinse well. Safety Instructions Operating Instructions ge... of soap and water, abrasives or sharp objects on some models) Do not use cleaners containing ammonia or alcohol on the microwave oven. Wipe the window clean with a sudsy cloth. Door Surface It's important to keep the area clean where the door seals against the...
Owners Manual
Page 32
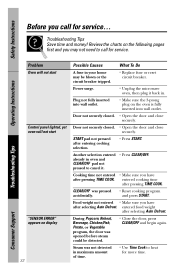
Power surge. • Unplug the microwave oven, then plug it back in maximum amount of time. • Use Time ...Another selection entered already in your home may not need to call for service... Review the charts on the oven is fully inserted into wall outlet. • Make sure the 3-prong plug on the following pages first ...the door was pressed • Reset cooking program accidentally. Operating Instructions Troubleshooting Tips Problem Oven will not start Control panel lighted, yet oven will not start "SENSOR ERROR" appears on display 32 Possible Causes What To Do A fuse...
Power surge. • Unplug the microwave oven, then plug it back in maximum amount of time. • Use Time ...Another selection entered already in your home may not need to call for service... Review the charts on the oven is fully inserted into wall outlet. • Make sure the 3-prong plug on the following pages first ...the door was pressed • Reset cooking program accidentally. Operating Instructions Troubleshooting Tips Problem Oven will not start Control panel lighted, yet oven will not start "SENSOR ERROR" appears on display 32 Possible Causes What To Do A fuse...
Owners Manual
Page 33
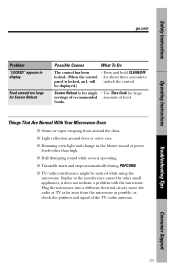
...electrical circuit, move the radio or TV as far away from around door or outer case. Things That Are Normal With Your Microwave Oven I Dimming oven light and change in display Food amount too large for Sensor Reheat Possible Causes What To Do The control has been •...of recommended amounts of the TV/radio antenna. be noticed while using the microwave. I TV/radio interference might be displayed.) Sensor Reheat is locked, an L will unlock the control. Safety Instructions Operating Instructions ge.com Problem "LOCKED" appears in the blower sound at power levels other ...
...electrical circuit, move the radio or TV as far away from around door or outer case. Things That Are Normal With Your Microwave Oven I Dimming oven light and change in display Food amount too large for Sensor Reheat Possible Causes What To Do The control has been •...of recommended amounts of the TV/radio antenna. be noticed while using the microwave. I TV/radio interference might be displayed.) Sensor Reheat is locked, an L will unlock the control. Safety Instructions Operating Instructions ge.com Problem "LOCKED" appears in the blower sound at power levels other ...

Owners Manual
Page 35
....2737). For The Period Of: GE Will Replace: One Year From the date of the original purchase Any part of original purchase The magnetron tube, if the magnetron tube fails due to provide required service. Five Years From the date of the microwave oven which vary from wire rack or ...metal/foil), or used commercially. During this limited one year or the shortest period allowed by a GE Authorized Servicer is product repair as provided in this appliance. I Failure of ...
....2737). For The Period Of: GE Will Replace: One Year From the date of the original purchase Any part of original purchase The magnetron tube, if the magnetron tube fails due to provide required service. Five Years From the date of the microwave oven which vary from wire rack or ...metal/foil), or used commercially. During this limited one year or the shortest period allowed by a GE Authorized Servicer is product repair as provided in this appliance. I Failure of ...

Installation Instructions
Page 1
... • Note to leave these instructions for installation alone or over any part of this kit or the oven. READ CAREFULLY. 1 KEEP THESE INSTRUCTIONS. This oven must be locked, securely fasten a prominent warning device, such as required by the National Electrical Code. WARNING... and PEB1590SMSS. • Do not alter or modify any GE/GE Profile single electric wall oven. • For easier installation and personal safety, we recommend that two people install this microwave oven. • Unplug the microwave oven before attempting installation of this kit. • This kit ...
... • Note to leave these instructions for installation alone or over any part of this kit or the oven. READ CAREFULLY. 1 KEEP THESE INSTRUCTIONS. This oven must be locked, securely fasten a prominent warning device, such as required by the National Electrical Code. WARNING... and PEB1590SMSS. • Do not alter or modify any GE/GE Profile single electric wall oven. • For easier installation and personal safety, we recommend that two people install this microwave oven. • Unplug the microwave oven before attempting installation of this kit. • This kit ...

Installation Instructions
Page 2
... Floor C Remove the template and drill two holes for overlap of the trim frame over the edges of the cutout. FOR INSTALLATION ABOVE A BUILT-IN OVEN: Microwave oven should be capable of supporting a minimum of 100 lbs. ❒ 2 INSTALL THE ANTI-TIP BRACE A Draw a line on all sides) 11⁄2&#...: 11⁄2″ overlap 30″ Models: 3″ overlap Height Width 1″ Clearance beyond the edge of the trim frame to the microwave. Place the template flush along the front guide line. This trim kit uses air flow from the top, bottom and sides of the cutout floor...
... Floor C Remove the template and drill two holes for overlap of the trim frame over the edges of the cutout. FOR INSTALLATION ABOVE A BUILT-IN OVEN: Microwave oven should be capable of supporting a minimum of 100 lbs. ❒ 2 INSTALL THE ANTI-TIP BRACE A Draw a line on all sides) 11⁄2&#...: 11⁄2″ overlap 30″ Models: 3″ overlap Height Width 1″ Clearance beyond the edge of the trim frame to the microwave. Place the template flush along the front guide line. This trim kit uses air flow from the top, bottom and sides of the cutout floor...
Installation Instructions
Page 3
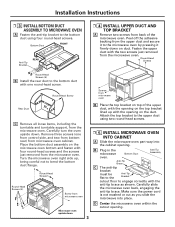
...Tip Bracket cutout floor to the microwave oven by pressing it firmly down on the microwave oven bottom and fasten with the opening . Turn the microwave oven right side up with four round-head screws and the screws just removed from the microwave oven. Microwave oven upside down . Fasten the upper... and secure it to engage correctly with one from control side, and two from bottom rear) from microwave oven ❒ 5 INSTALL MICROWAVE OVEN INTO CABINET A Slide the microwave oven part way into place. Attach the top bracket to the bottom duct using two round-head screws. ...
...Tip Bracket cutout floor to the microwave oven by pressing it firmly down on the microwave oven bottom and fasten with the opening . Turn the microwave oven right side up with four round-head screws and the screws just removed from the microwave oven. Microwave oven upside down . Fasten the upper... and secure it to engage correctly with one from control side, and two from bottom rear) from microwave oven ❒ 5 INSTALL MICROWAVE OVEN INTO CABINET A Slide the microwave oven part way into place. Attach the top bracket to the bottom duct using two round-head screws. ...
Installation Instructions
Page 4
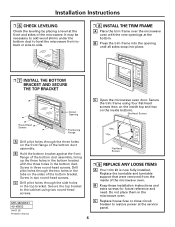
... 7 INSTALL THE BOTTOM BRACKET AND SECURE THE TOP BRACKET Cutout Opening C Open the microwave oven door. B Keep these installation instructions and extra screws for future reference and need. Screw in the microwave oven. B Hold the bottom bracket against the front flange of the bottom duct assembly. ...round-head screws. Replace the turntable and turntable support that were removed from the inside top and two on the sides of the microwave oven. Installation Instructions ❒ 6 CHECK LEVELING Check the leveling by placing a level at the bottom. Screw in Korea C Replace ...
... 7 INSTALL THE BOTTOM BRACKET AND SECURE THE TOP BRACKET Cutout Opening C Open the microwave oven door. B Keep these installation instructions and extra screws for future reference and need. Screw in the microwave oven. B Hold the bottom bracket against the front flange of the bottom duct assembly. ...round-head screws. Replace the turntable and turntable support that were removed from the inside top and two on the sides of the microwave oven. Installation Instructions ❒ 6 CHECK LEVELING Check the leveling by placing a level at the bottom. Screw in Korea C Replace ...

Dimensions
Page 1
... model JEM31 JX827SS - Exterior Dimensions* (in installation of the Spacemaker II microwave oven into a wall or cabinet alone, and is not intended to be used for Spacemaker II microwave oven models available at GEAppliances.com or call GE Answer Center® service, 800.626.2000. Note: Undercabinet installation Install Spacemaker II microwave ovens in -cabinet receptacle 24-15/16" MAX. 24-13/16...
... model JEM31 JX827SS - Exterior Dimensions* (in installation of the Spacemaker II microwave oven into a wall or cabinet alone, and is not intended to be used for Spacemaker II microwave oven models available at GEAppliances.com or call GE Answer Center® service, 800.626.2000. Note: Undercabinet installation Install Spacemaker II microwave ovens in -cabinet receptacle 24-15/16" MAX. 24-13/16...


