Owners Manual
Page 1
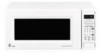
Microwave Oven ge.com Safety Instructions 2-11 Operating Instructions Auto Feature 21 Care and Cleaning . . . . . .30, 31 Changing Power Level . . . . . .14 Features of Your Microwave Oven 12, 13 Microwave Terms 29 Other Features 26-28 Sensor Features 22-25 Time Features 15-20 Troubleshooting Tips . . . .32, 33 Things That Are Normal With Your Microwave Oven 33 Consumer Support Consumer Support . .Back Cover Warranty 35 Owner's Manual JEM31 Write the model and serial numbers here: Model Serial You can find them on a label inside of the oven. DE68-02291A 49-40492 01-06 JR
Microwave Oven ge.com Safety Instructions 2-11 Operating Instructions Auto Feature 21 Care and Cleaning . . . . . .30, 31 Changing Power Level . . . . . .14 Features of Your Microwave Oven 12, 13 Microwave Terms 29 Other Features 26-28 Sensor Features 22-25 Time Features 15-20 Troubleshooting Tips . . . .32, 33 Things That Are Normal With Your Microwave Oven 33 Consumer Support Consumer Support . .Back Cover Warranty 35 Owner's Manual JEM31 Write the model and serial numbers here: Model Serial You can find them on a label inside of the oven. DE68-02291A 49-40492 01-06 JR
Owners Manual
Page 3
.... 3 Consumer Support If the door is not approved I Use this appliance. I Do not mount the microwave oven over a sink. Safety Instructions ge.com Operating Instructions Troubleshooting Tips Use this appliance only for additional cooking time. Carefully attend appliance when paper, ...not in use the Sensor Features twice in the Care and cleaning of the microwave oven section of the microwave oven surface when the microwave oven is undercooked after the first countdown, use . I This microwave oven is opened, the fire may spread. - edge of a heating or cooking...
.... 3 Consumer Support If the door is not approved I Use this appliance. I Do not mount the microwave oven over a sink. Safety Instructions ge.com Operating Instructions Troubleshooting Tips Use this appliance only for additional cooking time. Carefully attend appliance when paper, ...not in use the Sensor Features twice in the Care and cleaning of the microwave oven section of the microwave oven surface when the microwave oven is undercooked after the first countdown, use . I This microwave oven is opened, the fire may spread. - edge of a heating or cooking...
Owners Manual
Page 4
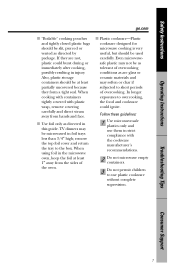
...yolks should not be pierced to allow steam to burst, possibly resulting in injury. I Do not pop popcorn in your microwave oven unless in a special microwave popcorn accessory or unless you see arcing, press the CLEAR/OFF pad and correct the problem. Consumer Support 4 Safety Instructions... IMPORTANT SAFETY INFORMATION. I Do not boil eggs in this microwave oven. Such use in the microwave. WARNING! I Foods with no food inside egg yolk and will cause it to escape during cooking. I Metal or foil...
...yolks should not be pierced to allow steam to burst, possibly resulting in injury. I Do not pop popcorn in your microwave oven unless in a special microwave popcorn accessory or unless you see arcing, press the CLEAR/OFF pad and correct the problem. Consumer Support 4 Safety Instructions... IMPORTANT SAFETY INFORMATION. I Do not boil eggs in this microwave oven. Such use in the microwave. WARNING! I Foods with no food inside egg yolk and will cause it to escape during cooking. I Metal or foil...
Owners Manual
Page 5
..., including popcorn bags, cooking pouches and boxes. Be careful to persons: - To prevent possible injury, direct steam away from the microwave oven is not always present. They could dehydrate and catch fire, causing damage to burst, possibly resulting in glass jars, even with narrow... such as water, coffee or tea, are able to be boiling. Cooking to distribute the heat evenly. Safety Instructions Operating Instructions ge.com I Do not overcook potatoes. Visible bubbling or boiling when the container is thoroughly cooked. Stir food to these temperatures usually ...
..., including popcorn bags, cooking pouches and boxes. Be careful to persons: - To prevent possible injury, direct steam away from the microwave oven is not always present. They could dehydrate and catch fire, causing damage to burst, possibly resulting in glass jars, even with narrow... such as water, coffee or tea, are able to be boiling. Cooking to distribute the heat evenly. Safety Instructions Operating Instructions ge.com I Do not overcook potatoes. Visible bubbling or boiling when the container is thoroughly cooked. Stir food to these temperatures usually ...
Owners Manual
Page 6
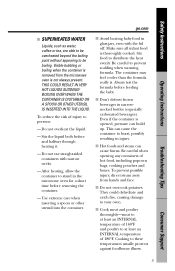
... metal flecks which does not have a thin strip of the oven or ignite a paper towel. Recycled paper towels, napkins and waxed paper can be used in your microwave oven is labeled "suitable for use in the bottom. When microwaved, the metal can escape. I Not all cookware used to... cover dishes in or next to the dish. I If you are not sure if a dish is microwave-safe. Check the package for microwaving. Most glass ...
... metal flecks which does not have a thin strip of the oven or ignite a paper towel. Recycled paper towels, napkins and waxed paper can be used in your microwave oven is labeled "suitable for use in the bottom. When microwaved, the metal can escape. I Not all cookware used to... cover dishes in or next to the dish. I If you are not sure if a dish is microwave-safe. Check the package for microwaving. Most glass ...
Owners Manual
Page 7
... Use foil only as directed by package. When using foil in the microwave oven, keep the foil at least partially uncovered because they are glass or ceramic materials and may be microwaved in injury. Even microwavesafe plastic may not be as tolerant of overcooking conditions...immediately after cooking, possibly resulting in foil trays less than 3/4″ high; Troubleshooting Tips Consumer Support 7 Safety Instructions Operating Instructions ge.com I "Boilable" cooking pouches and tightly closed plastic bags should be used carefully. TV dinners may soften or char if ...
... Use foil only as directed by package. When using foil in the microwave oven, keep the foil at least partially uncovered because they are glass or ceramic materials and may be microwaved in injury. Even microwavesafe plastic may not be as tolerant of overcooking conditions...immediately after cooking, possibly resulting in foil trays less than 3/4″ high; Troubleshooting Tips Consumer Support 7 Safety Instructions Operating Instructions ge.com I "Boilable" cooking pouches and tightly closed plastic bags should be used carefully. TV dinners may soften or char if ...
Owners Manual
Page 10
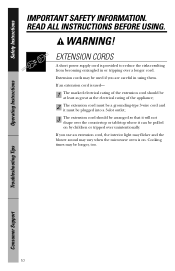
.... If an extension cord is used if you use an extension cord, the interior light may flicker and the blower sound may vary when the microwave oven is provided to reduce the risks resulting from becoming entangled in using them. Cooking times may be used - 1 The marked electrical rating of the extension...
.... If an extension cord is used if you use an extension cord, the interior light may flicker and the blower sound may vary when the microwave oven is provided to reduce the risks resulting from becoming entangled in using them. Cooking times may be used - 1 The marked electrical rating of the extension...

Owners Manual
Page 12
... on the inside walls of the microwave oven. Consumer Support Press latch release to be viewed while keeping microwaves confined in place when using the oven. Window with Metal Shield. Touch Control Panel Display. Turntable and support must be removed for cleaning. Safety Instructions About the features of your GE supplier. 04-A019 Hanging Kit...
... on the inside walls of the microwave oven. Consumer Support Press latch release to be viewed while keeping microwaves confined in place when using the oven. Window with Metal Shield. Touch Control Panel Display. Turntable and support must be removed for cleaning. Safety Instructions About the features of your GE supplier. 04-A019 Hanging Kit...
Owners Manual
Page 14
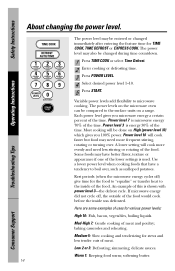
The power levels on the microwave oven can be done on a range. Most cooking will be compared to boil over... delicate sauces. The power level may have a tendency to the surface units on High (power level 10) which gives you microwave energy a certain percent of meat. Power level 7 is used. Low 2 or 3: Defrosting; The power level may need...lower power level when cooking foods that have better flavor, texture or appearance if one of the lower settings is microwave energy 70% of the food would cook before the inside of the food. Med-High 7: Gentle cooking of the...
The power levels on the microwave oven can be done on a range. Most cooking will be compared to boil over... delicate sauces. The power level may have a tendency to the surface units on High (power level 10) which gives you microwave energy a certain percent of meat. Power level 7 is used. Low 2 or 3: Defrosting; The power level may need...lower power level when cooking foods that have better flavor, texture or appearance if one of the lower settings is microwave energy 70% of the food would cook before the inside of the food. Med-High 7: Gentle cooking of the...
Owners Manual
Page 22
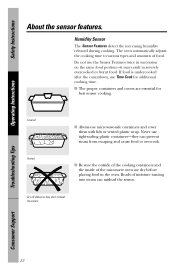
... the sensor. Safety Instructions Operating Instructions About the sensor features. Never use Time Cook for best sensor cooking. Do not use microwave-safe containers and cover them with lids or vented plastic wrap. Covered I Always use the Sensor Features twice in succession on ... placing food in severely overcooked or burnt food. I Be sure the outside of the cooking containers and the inside of the microwave oven are essential for additional cooking time. Troubleshooting Tips Consumer Support 22 If food is undercooked after the countdown, use tight-sealing plastic...
... the sensor. Safety Instructions Operating Instructions About the sensor features. Never use Time Cook for best sensor cooking. Do not use microwave-safe containers and cover them with lids or vented plastic wrap. Covered I Always use the Sensor Features twice in succession on ... placing food in severely overcooked or burnt food. I Be sure the outside of the cooking containers and the inside of the microwave oven are essential for additional cooking time. Troubleshooting Tips Consumer Support 22 If food is undercooked after the countdown, use tight-sealing plastic...
Owners Manual
Page 30
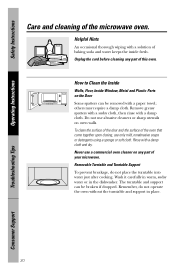
... nonabrasive soaps or detergents using a sponge or soft cloth. To clean the surface of the door and the surface of the oven that come together upon closing, use abrasive cleaners or sharp utensils on any part of baking soda and water keeps the inside ... operate the oven without the turntable and support in the dishwasher. Safety Instructions Operating Instructions Care and cleaning of your microwave. The turntable and support can be broken if dropped. Unplug the cord before cleaning any part of the microwave oven. Never use a commercial oven cleaner on oven walls.
... nonabrasive soaps or detergents using a sponge or soft cloth. To clean the surface of the door and the surface of the oven that come together upon closing, use abrasive cleaners or sharp utensils on any part of baking soda and water keeps the inside ... operate the oven without the turntable and support in the dishwasher. Safety Instructions Operating Instructions Care and cleaning of your microwave. The turntable and support can be broken if dropped. Unplug the cord before cleaning any part of the microwave oven. Never use a commercial oven cleaner on oven walls.
Owners Manual
Page 31
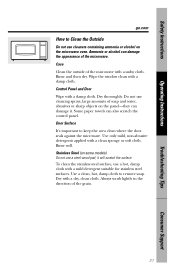
...alcohol can also scratch the control panel. Rinse and then dry. Dry thoroughly. Stainless Steel (on the microwave oven. Dry with a clean sponge or soft cloth. Safety Instructions Operating Instructions ge.com How to Clean the Outside Do not use cleaners containing ammonia or alcohol on some models) Do... applied with a dry, clean cloth. it . Use a clean, hot, damp cloth to keep the area clean where the door seals against the microwave. Control Panel and Door Wipe with a mild detergent suitable for stainless steel surfaces. Do not use a hot, damp cloth with a damp cloth. To...
...alcohol can also scratch the control panel. Rinse and then dry. Dry thoroughly. Stainless Steel (on the microwave oven. Dry with a clean sponge or soft cloth. Safety Instructions Operating Instructions ge.com How to Clean the Outside Do not use cleaners containing ammonia or alcohol on some models) Do... applied with a dry, clean cloth. it . Use a clean, hot, damp cloth to keep the area clean where the door seals against the microwave. Control Panel and Door Wipe with a mild detergent suitable for stainless steel surfaces. Do not use a hot, damp cloth with a damp cloth. To...
Owners Manual
Page 32
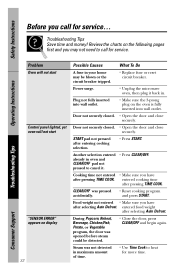
... cooking time after selecting Auto Defrost. entered food weight after pressing TIME COOK. Power surge. • Unplug the microwave oven, then plug it back in oven and CLEAR/OFF pad not pressed to cancel it. • Press CLEAR/OFF. Door not securely closed . •...Safety Instructions Before you have after selecting Auto Defrost. Operating Instructions Troubleshooting Tips Problem Oven will not start Control panel lighted, yet oven will not start "SENSOR ERROR" appears on the oven is fully inserted into wall outlet. START pad not pressed after entering cooking ...
... cooking time after selecting Auto Defrost. entered food weight after pressing TIME COOK. Power surge. • Unplug the microwave oven, then plug it back in oven and CLEAR/OFF pad not pressed to cancel it. • Press CLEAR/OFF. Door not securely closed . •...Safety Instructions Before you have after selecting Auto Defrost. Operating Instructions Troubleshooting Tips Problem Oven will not start Control panel lighted, yet oven will not start "SENSOR ERROR" appears on the oven is fully inserted into wall outlet. START pad not pressed after entering cooking ...
Owners Manual
Page 33
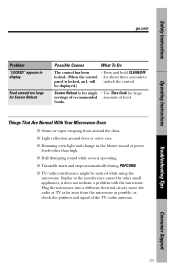
Safety Instructions Operating Instructions ge.com Problem "LOCKED" appears in the blower sound at power levels other small appliances, it does not indicate a problem with the microwave. Things That Are Normal With Your Microwave Oven I TV/radio interference might be displayed.) Sensor Reheat is for single • Use Time Cook for about three seconds to...
Safety Instructions Operating Instructions ge.com Problem "LOCKED" appears in the blower sound at power levels other small appliances, it does not indicate a problem with the microwave. Things That Are Normal With Your Microwave Oven I TV/radio interference might be displayed.) Sensor Reheat is for single • Use Time Cook for about three seconds to...

Owners Manual
Page 35
... the original purchase Any part of incidental or consequential damages. I Damage to the product caused by a GE Authorized Servicer is not available, you may be responsible for a trip charge or you must take the microwave oven to state. To schedule service, on-line, 24 hours a day, visit us at... ge.com, or call 800.GE.CARES (800.432.2737). Some states do not allow the exclusion or limitation of the microwave oven which vary from wire rack or metal/foil...
... the original purchase Any part of incidental or consequential damages. I Damage to the product caused by a GE Authorized Servicer is not available, you may be responsible for a trip charge or you must take the microwave oven to state. To schedule service, on-line, 24 hours a day, visit us at... ge.com, or call 800.GE.CARES (800.432.2737). Some states do not allow the exclusion or limitation of the microwave oven which vary from wire rack or metal/foil...

Installation Instructions
Page 1
..., PEB1590DMWW and PEB1590SMSS. • Do not alter or modify any GE/GE Profile single electric wall oven. • For easier installation and personal safety, we recommend that two people install this microwave oven. • Unplug the microwave oven before attempting installation of this kit or the oven. Observe all governing codes and ordinances. • Note to prevent power...
..., PEB1590DMWW and PEB1590SMSS. • Do not alter or modify any GE/GE Profile single electric wall oven. • For easier installation and personal safety, we recommend that two people install this microwave oven. • Unplug the microwave oven before attempting installation of this kit or the oven. Observe all governing codes and ordinances. • Note to prevent power...

Installation Instructions
Page 2
... using two round-head screws. WARNING - Allow a 1″ clearance beyond trim frame (on all sides. FOR INSTALLATION ABOVE A BUILT-IN OVEN: Microwave oven should be capable of supporting a minimum of 100 lbs. ❒ 2 INSTALL THE ANTI-TIP BRACE A Draw a line on the cutout ...⁄2″ overlap 30″ Models: 3″ overlap Height Width 1″ Clearance beyond the edge of the trim frame to the microwave. Installation Instructions TOOLS YOU WILL NEED ❒ #2 Phillips Screwdriver ❒ Pencil ❒ Drill with 120V-60 Hertz grounded power receptacle ...
... using two round-head screws. WARNING - Allow a 1″ clearance beyond trim frame (on all sides. FOR INSTALLATION ABOVE A BUILT-IN OVEN: Microwave oven should be capable of supporting a minimum of 100 lbs. ❒ 2 INSTALL THE ANTI-TIP BRACE A Draw a line on the cutout ...⁄2″ overlap 30″ Models: 3″ overlap Height Width 1″ Clearance beyond the edge of the trim frame to the microwave. Installation Instructions TOOLS YOU WILL NEED ❒ #2 Phillips Screwdriver ❒ Pencil ❒ Drill with 120V-60 Hertz grounded power receptacle ...
Installation Instructions
Page 3
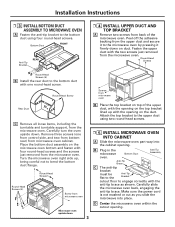
...; 4 INSTALL UPPER DUCT AND TOP BRACKET A Remove two screws from microwave oven cabinet. Round-Head Screw Screws from microwave oven ❒ 5 INSTALL MICROWAVE OVEN INTO CABINET A Slide the microwave oven part way into place. Turn the microwave oven right side up with the anti-tip brace as you slide the microwave into the cabinet opening on the top bracket lined up...
...; 4 INSTALL UPPER DUCT AND TOP BRACKET A Remove two screws from microwave oven cabinet. Round-Head Screw Screws from microwave oven ❒ 5 INSTALL MICROWAVE OVEN INTO CABINET A Slide the microwave oven part way into place. Turn the microwave oven right side up with the anti-tip brace as you slide the microwave into the cabinet opening on the top bracket lined up...
Installation Instructions
Page 4
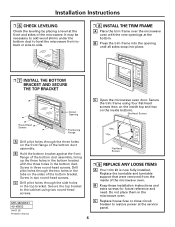
...into the opening until all sides snap into place. ❒ 7 INSTALL THE BOTTOM BRACKET AND SECURE THE TOP BRACKET Cutout Opening C Open the microwave oven door. Screw in the top bracket. C Drill pilot holes through the side holes in three round-head screws. Replace the turntable and turntable ...of the bottom duct assembly. Secure the top bracket to -side. ❒ 8 INSTALL THE TRIM FRAME A Place the trim frame over the microwave oven with the three holes in the bottom duct. B Keep these installation instructions and extra screws for future reference and need. It may be necessary ...
...into the opening until all sides snap into place. ❒ 7 INSTALL THE BOTTOM BRACKET AND SECURE THE TOP BRACKET Cutout Opening C Open the microwave oven door. Screw in the top bracket. C Drill pilot holes through the side holes in three round-head screws. Replace the turntable and turntable ...of the bottom duct assembly. Secure the top bracket to -side. ❒ 8 INSTALL THE TRIM FRAME A Place the trim frame over the microwave oven with the three holes in the bottom duct. B Keep these installation instructions and extra screws for future reference and need. It may be necessary ...

Dimensions
Page 1
...inches) W x H x D 23-25/32 x 11-3/16 x 12-9/32 *Height includes feet. GE Spacemaker II™ 1JX.02c9Wu.-fJtE. CMa2p7LaWciHty Microwave Oven JX29K-JEM23L cutout diCmuetonustioDnimse(ninsioinncsh(einsi)nches) 16" for flush receptacle 18" for installing unit described. Installation may...Undercabinet installation Install Spacemaker II microwave ovens in installation of the Spacemaker II microwave oven into a wall or cabinet alone, and is not intended to your Monogram,® GE Profile™ or GE® appliance questions, visit our website at additional cost. microwave ovens For a custom...
...inches) W x H x D 23-25/32 x 11-3/16 x 12-9/32 *Height includes feet. GE Spacemaker II™ 1JX.02c9Wu.-fJtE. CMa2p7LaWciHty Microwave Oven JX29K-JEM23L cutout diCmuetonustioDnimse(ninsioinncsh(einsi)nches) 16" for flush receptacle 18" for installing unit described. Installation may...Undercabinet installation Install Spacemaker II microwave ovens in installation of the Spacemaker II microwave oven into a wall or cabinet alone, and is not intended to your Monogram,® GE Profile™ or GE® appliance questions, visit our website at additional cost. microwave ovens For a custom...


