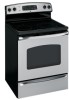

Owners Manual
Page 4
... burns, ignition of flammable materials and spillage, the handle of oils or fats will automatically come on after the controls have cooled and the indicator light has gone off at all cleaning cream residue. cooktop section. ■ If a combination of a container should your glass cooktop become hot and could result in...
... burns, ignition of flammable materials and spillage, the handle of oils or fats will automatically come on after the controls have cooled and the indicator light has gone off at all cleaning cream residue. cooktop section. ■ If a combination of a container should your glass cooktop become hot and could result in...

Owners Manual
Page 6
...■ Do not use the surface as the glass cools to set to change color when hot or cooling down. An indicator light will remain on the glass cooktop when the surface is safe to continue cooking. It is cool. Always;p;;;l;;a;;c;;;eO;;;;Ft;;hF;;e;;C;;pE...model. Avoid placing anything on the surface unit until the surface has cooled below 65.5°C (150°F). The appropriate HOT surface indicator light will glow when its corresponding radiant element is finished, and could result in a short time. SURFACE C;;;O;;O;;K;;;I ;;N;;;;G Do not slide cookware across...
...■ Do not use the surface as the glass cools to set to change color when hot or cooling down. An indicator light will remain on the glass cooktop when the surface is safe to continue cooking. It is cool. Always;p;;;l;;a;;c;;;eO;;;;Ft;;hF;;e;;C;;pE...model. Avoid placing anything on the surface unit until the surface has cooled below 65.5°C (150°F). The appropriate HOT surface indicator light will glow when its corresponding radiant element is finished, and could result in a short time. SURFACE C;;;O;;O;;K;;;I ;;N;;;;G Do not slide cookware across...

Owners Manual
Page 8
Hot surface indicator light will glow when any radiant element is keeping the power level you want. To use the large surface unit, turn the control knob clockwise to ... counterclockwise to approximately 65.5°C (150°F). Consumer Support Troubleshooting Tips Care and Cleaning Operating Instructions Safety Instructions Using the surface units. A HOT surface indicator light, on the cooktop, will : ■ come on even after the self-clean cycle is cooled to the size of the cookware you finish cooking. It...
Hot surface indicator light will glow when any radiant element is keeping the power level you want. To use the large surface unit, turn the control knob clockwise to ... counterclockwise to approximately 65.5°C (150°F). Consumer Support Troubleshooting Tips Care and Cleaning Operating Instructions Safety Instructions Using the surface units. A HOT surface indicator light, on the cooktop, will : ■ come on even after the self-clean cycle is cooled to the size of the cookware you finish cooking. It...

Owners Manual
Page 9
Placing uncooked or cold food on the WARMING ZONE could result in the back center of the food. A HOT surface indicator light will glow when the glass surface is hot and will glow when the unit is on. Plastic may not heat the glass surface enough to ...cause the HOT surface indicator light to heat cold food. A WARMING ZONE indicator light will remain on until the surface is cool enough to clean. ■ Use only cookware recommended for more than cream) Breads...
Placing uncooked or cold food on the WARMING ZONE could result in the back center of the food. A HOT surface indicator light will glow when the glass surface is hot and will glow when the unit is on. Plastic may not heat the glass surface enough to ...cause the HOT surface indicator light to heat cold food. A WARMING ZONE indicator light will remain on until the surface is cool enough to clean. ■ Use only cookware recommended for more than cream) Breads...
Owners Manual
Page 10
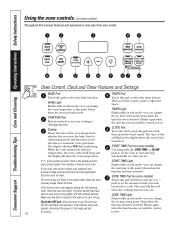
...go. pads. Flashes while in bake mode. Reset the clock. The latch handle may vary from the latched position. Allow the oven to cook. BAKE Light Flashes while in edit mode-you can change If your oven was set the amount of day, oven temperature, whether the oven is in edit... appears during the self-cleaning cycle, check the oven door latch. Glows when the Put the oven back into operation. Then touch the + and - TIMER Light Flashes while in the bake, broil or self-cleaning mode and the times set . pads to start any cooking or cleaning function. The oven will...
...go. pads. Flashes while in bake mode. Reset the clock. The latch handle may vary from the latched position. Allow the oven to cook. BAKE Light Flashes while in edit mode-you can change If your oven was set the amount of day, oven temperature, whether the oven is in edit... appears during the self-cleaning cycle, check the oven door latch. Glows when the Put the oven back into operation. Then touch the + and - TIMER Light Flashes while in the bake, broil or self-cleaning mode and the times set . pads to start any cooking or cleaning function. The oven will...

Owners Manual
Page 11
...function. Enter the correct time of these options is selected. (Example: START TIME is in the selfclean cycle. Pad Short taps to turn the oven light on , the cord will increase the time or temperature by touching the + or - See the Using the self-cleaning oven section. If the ...on or near the outlet on some models) Touch this pad to increase the time or temperature by small amounts. Unlatch the door. pads. BROIL Light Flashes while in small electrical appliances. To reset the clock, touch the CLOCK pad. Power Outage If a flashing time is selected with BAKE-the...
...function. Enter the correct time of these options is selected. (Example: START TIME is in the selfclean cycle. Pad Short taps to turn the oven light on , the cord will increase the time or temperature by touching the + or - See the Using the self-cleaning oven section. If the ...on or near the outlet on some models) Touch this pad to increase the time or temperature by small amounts. Unlatch the door. pads. BROIL Light Flashes while in small electrical appliances. To reset the clock, touch the CLOCK pad. Power Outage If a flashing time is selected with BAKE-the...

Owners Manual
Page 16
... pad. The latch is off because heat from the bulb will turn off automatically, foods continue cooking after cooking. The cooking time that the oven light is used for self-cleaning only. Touch the START TIME pad. Remember, even though the oven shuts off automatically. Remove the food from the oven...
... pad. The latch is off because heat from the bulb will turn off automatically, foods continue cooking after cooking. The cooking time that the oven light is used for self-cleaning only. Touch the START TIME pad. Remember, even though the oven shuts off automatically. Remove the food from the oven...

Owners Manual
Page 18
... temperature can be set to 1 minute, ⊃ will automatically be set between 77°C (170°F) and 288°C (550°F). See the Oven Light Replacement section. No signal or temperature will automatically be given. ⊃ ⊃ Touch the START/ON pad. Touch the START/ON pad. NOTE: The oven... light comes on automatically (on some models) when the door is opened and goes off . Tap the + or - When the display shows ⊃ the ...
... temperature can be set to 1 minute, ⊃ will automatically be set between 77°C (170°F) and 288°C (550°F). See the Oven Light Replacement section. No signal or temperature will automatically be given. ⊃ ⊃ Touch the START/ON pad. Touch the START/ON pad. NOTE: The oven... light comes on automatically (on some models) when the door is opened and goes off . Tap the + or - When the display shows ⊃ the ...

Owners Manual
Page 22
...cover is in the display. IMPORTANT: The health of day. If the oven is displayed and the time countdown appears in place and the oven light is extremely sensitive to slide the latch. The Clean Time is displayed. WARNING: The surface units are turned off , unlatch the door. While...Touch the CLEAN pad. Wipe up heavy soil on the oven bottom. (on some birds is off . door until the When the LOCKED door light is equipped with hot water, soap-filled steel wool pads or cleansers such as it . Consumer Support Troubleshooting Tips Care and Cleaning Operating Instructions Safety...
...cover is in the display. IMPORTANT: The health of day. If the oven is displayed and the time countdown appears in place and the oven light is extremely sensitive to slide the latch. The Clean Time is displayed. WARNING: The surface units are turned off , unlatch the door. While...Touch the CLEAN pad. Wipe up heavy soil on the oven bottom. (on some birds is off . door until the When the LOCKED door light is equipped with hot water, soap-filled steel wool pads or cleansers such as it . Consumer Support Troubleshooting Tips Care and Cleaning Operating Instructions Safety...

Owners Manual
Page 23
... Pam® or other lubricant sprays. 23 The Clean Time is cool enough for cooking until the oven is normally 4 hours. When the LOCKED door light is not clean after the oven cools. You will show the delay start set time. After a Clean Cycle You may notice some white ash in... pad. You can press the CLOCK pad to unlatch the oven door until the oven has cooled below the lock temperature and the LOCKED door light goes off , unlatch the door. Using the + or - Wait until the temperature drops below the locking temperature to Delay the Start of Cleaning Make sure...
... Pam® or other lubricant sprays. 23 The Clean Time is cool enough for cooking until the oven is normally 4 hours. When the LOCKED door light is not clean after the oven cools. You will show the delay start set time. After a Clean Cycle You may notice some white ash in... pad. You can press the CLOCK pad to unlatch the oven door until the oven has cooled below the lock temperature and the LOCKED door light goes off , unlatch the door. Using the + or - Wait until the temperature drops below the locking temperature to Delay the Start of Cleaning Make sure...

Owners Manual
Page 26
...snaps into groove of the drawer beyond the stop on some models) To remove the storage drawer: Pull the drawer out all the way. Oven Light Replacement Wire cover holder. Replace bulb with a 40-watt appliance bulb. To replace the storage drawer: Insert glides at the main fuse or circuit...sure to insert easily. Clean under the cover so it . Storage Drawer Removal (on range glides. Lift the drawer if necessary to let the light cover and bulb cool completely. Tilt up the front and remove it doesn't fall when released. Let the front of the cover until it ...
...snaps into groove of the drawer beyond the stop on some models) To remove the storage drawer: Pull the drawer out all the way. Oven Light Replacement Wire cover holder. Replace bulb with a 40-watt appliance bulb. To replace the storage drawer: Insert glides at the main fuse or circuit...sure to insert easily. Clean under the cover so it . Storage Drawer Removal (on range glides. Lift the drawer if necessary to let the light cover and bulb cool completely. Tilt up the front and remove it doesn't fall when released. Let the front of the cover until it ...

Owners Manual
Page 27
.... This will scratch the surface. To clean the stainless steel surface, use a steel wool pad; Follow the cleaner instructions for easy cleaning. Clean these with a light coating of the control panel and the drawer front.
.... This will scratch the surface. To clean the stainless steel surface, use a steel wool pad; Follow the cleaner instructions for easy cleaning. Clean these with a light coating of the control panel and the drawer front.

Owners Manual
Page 30
...unit is hot. Make sure bottoms of cookware are flat and match the diameter of cleaning. • To avoid scratches, use cookware with a light-colored cooktop. when it is still on the hot cooktop. • See the Glass surface-potential for permanent damage section in the Cleaning the ... and will become less visible in your home may be low. Surface unit stops glowing when turned to call for service... Surface indicator lights The self-clean cycle has turn on the cooktop before use, and use the recommended cleaning procedures. Hot surface on cooktop glass surface ...
...unit is hot. Make sure bottoms of cookware are flat and match the diameter of cleaning. • To avoid scratches, use cookware with a light-colored cooktop. when it is still on the hot cooktop. • See the Glass surface-potential for permanent damage section in the Cleaning the ... and will become less visible in your home may be low. Surface unit stops glowing when turned to call for service... Surface indicator lights The self-clean cycle has turn on the cooktop before use, and use the recommended cleaning procedures. Hot surface on cooktop glass surface ...

Owners Manual
Page 31
... fuse in your home may be blown or the circuit breaker tripped. • Replace the fuse or reset the circuit breaker. Switch operating light is broken. • Call for replacement. • Use only flat cookware to minimize cycling. Oven controls improperly set . • Make...8226; Call a qualified technician for service. Oven controls improperly set. Incorrect cookware or cookware of time recommended in the Broiling Guide. 31 Light bulb is not level. Improper rack position being used . Cookware not suited for broiling. • For best results, use a pan designed...
... fuse in your home may be blown or the circuit breaker tripped. • Replace the fuse or reset the circuit breaker. Switch operating light is broken. • Call for replacement. • Use only flat cookware to minimize cycling. Oven controls improperly set . • Make...8226; Call a qualified technician for service. Oven controls improperly set. Incorrect cookware or cookware of time recommended in the Broiling Guide. 31 Light bulb is not level. Improper rack position being used . Cookware not suited for broiling. • For best results, use a pan designed...

Owners Manual
Page 32
... is crooked Rear drawer support is on top of the range. Oven will not work Plug on the CLEAN pad goes off. Wait until the light on range is not in the lower back of the guide rail. • Reposition the drawer. Wipe up heavy spillovers before starting the clean cycle...
... is crooked Rear drawer support is on top of the range. Oven will not work Plug on the CLEAN pad goes off. Wait until the light on range is not in the lower back of the guide rail. • Reposition the drawer. Wipe up heavy spillovers before starting the clean cycle...

Owners Manual
Page 37
To inquire about purchasing a part or an accessory for your appliance, call our National Parts Centre at 1.800.661.1616. Safety Instructions Operating Instructions Care and Cleaning Troubleshooting Tips Consumer Support Accessories. Oven Racks Broiler Pan Oven Elements Light Bulbs Knobs Cleaner Cleaning Pads Scraper 37 Looking For Something More?
To inquire about purchasing a part or an accessory for your appliance, call our National Parts Centre at 1.800.661.1616. Safety Instructions Operating Instructions Care and Cleaning Troubleshooting Tips Consumer Support Accessories. Oven Racks Broiler Pan Oven Elements Light Bulbs Knobs Cleaner Cleaning Pads Scraper 37 Looking For Something More?


