Owners Manual
Page 1
... serial numbers here: Model Serial You can find them on a label behind the storage drawer on the front of the range frame. 49-80463 04-07 JR Self-Cleaning RangRadiantes ge.com Safety Instructions 2-6 Operating Instructions Clock and Timer 15 Oven 10-22 Power Outage 11 Sabbath Feature 18, 19 Self-Cleaning 21, 22 Special Features 17 Thermostat 20 Timed Baking & Roasting . . . . .16 Surface Units 7-9 Care and Cleaning Control Knobs 23 Glass Cooktop 26, 27 Lift-Off Oven Door 24 Light 25 Shelves 25 Troubleshooting Tips...
... serial numbers here: Model Serial You can find them on a label behind the storage drawer on the front of the range frame. 49-80463 04-07 JR Self-Cleaning RangRadiantes ge.com Safety Instructions 2-6 Operating Instructions Clock and Timer 15 Oven 10-22 Power Outage 11 Sabbath Feature 18, 19 Self-Cleaning 21, 22 Special Features 17 Thermostat 20 Timed Baking & Roasting . . . . .16 Surface Units 7-9 Care and Cleaning Control Knobs 23 Glass Cooktop 26, 27 Lift-Off Oven Door 24 Light 25 Shelves 25 Troubleshooting Tips...
Owners Manual
Page 3
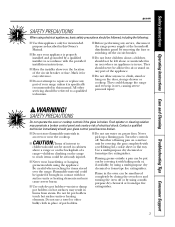
... servicing should never be allowed to a qualified technician. Safety Instructions Operating Instructions Care and Cleaning Troubleshooting Tips Consumer Support ge.com SAFETY PRECAUTIONS When using electrical appliances, basic safety precautions should not be stored in cabinets above a range or on the backsplash of a range-children climbing on the range to climb, stand or hang on the door, storage drawer or cooktop. SAFETY PRECAUTIONS Do not operate the oven or cooktop controls if the glass...
... servicing should never be allowed to a qualified technician. Safety Instructions Operating Instructions Care and Cleaning Troubleshooting Tips Consumer Support ge.com SAFETY PRECAUTIONS When using electrical appliances, basic safety precautions should not be stored in cabinets above a range or on the backsplash of a range-children climbing on the range to climb, stand or hang on the door, storage drawer or cooktop. SAFETY PRECAUTIONS Do not operate the oven or cooktop controls if the glass...

Owners Manual
Page 4
... even though they are suitable for warming or heating the room. s Potentially hot surfaces include the cooktop, areas facing the cooktop, oven vent opening , crevices around the oven door. Cooking to cover the surface unit heating element. The use your range. Boilovers cause smoking and greasy spillovers that may break because of the sudden change in color. others may catch on . 4 Consumer Support Troubleshooting Tips Care and Cleaning Operating Instructions Safety Instructions IMPORTANT SAFETY INFORMATION. SAFETY PRECAUTIONS s For...
... even though they are suitable for warming or heating the room. s Potentially hot surfaces include the cooktop, areas facing the cooktop, oven vent opening , crevices around the oven door. Cooking to cover the surface unit heating element. The use your range. Boilovers cause smoking and greasy spillovers that may break because of the sudden change in color. others may catch on . 4 Consumer Support Troubleshooting Tips Care and Cleaning Operating Instructions Safety Instructions IMPORTANT SAFETY INFORMATION. SAFETY PRECAUTIONS s For...
Owners Manual
Page 6
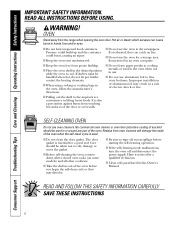
... INFORMATION CAREFULLY. s Take the shelves out of aluminum foil may discolor. s Clean only parts listed in or around any kind should be taken not to line oven bottoms. Improper installation of the oven before starting the self-cleaning operation. Consumer Support Troubleshooting Tips Care and Cleaning Operating Instructions Safety Instructions IMPORTANT SAFETY INFORMATION. WARNING! OVEN Stand away from grease buildup. s Keep the oven vent unobstructed. It is used in this Owner's Manual. s Before self-cleaning the oven, remove shiny, silver-colored oven racks...
... INFORMATION CAREFULLY. s Take the shelves out of aluminum foil may discolor. s Clean only parts listed in or around any kind should be taken not to line oven bottoms. Improper installation of the oven before starting the self-cleaning operation. Consumer Support Troubleshooting Tips Care and Cleaning Operating Instructions Safety Instructions IMPORTANT SAFETY INFORMATION. WARNING! OVEN Stand away from grease buildup. s Keep the oven vent unobstructed. It is used in this Owner's Manual. s Before self-cleaning the oven, remove shiny, silver-colored oven racks...
Owners Manual
Page 7
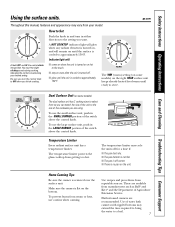
... you turn in the SMALL BURNER portion of the switch above the control knob. s stay on even after the unit is flat on the unit. Dual Surface Unit (on the right REAR surface unit keeps already heated food warm until ready to approximately 150°F. Temperature Limiter Every radiant surface unit has a temperature limiter. Make sure the canner is turned off. Safety Instructions Operating Instructions Care and Cleaning Troubleshooting Tips Consumer Support Using the surface units...
... you turn in the SMALL BURNER portion of the switch above the control knob. s stay on even after the unit is flat on the unit. Dual Surface Unit (on the right REAR surface unit keeps already heated food warm until ready to approximately 150°F. Temperature Limiter Every radiant surface unit has a temperature limiter. Make sure the canner is turned off. Safety Instructions Operating Instructions Care and Cleaning Troubleshooting Tips Consumer Support Using the surface units...
Owners Manual
Page 10
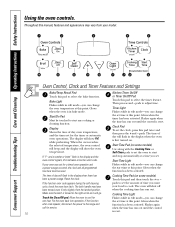
... Broil Hi/Lo Clear Off Self Clean Oven Light On/Off Time Controls Kitchen Timer On/Off Clock Cooking Start Time Time Automatic Oven Oven Control, Clock and Timer Features and Settings Bake/Temp Recall Pad Touch this pad to start any cooking or cleaning function. The time of day will show the oven temperature. when the time has run out. The display will flash in bake mode. pads to the range and function has been activated. Flashes again when the time has run out until the control is reset...
... Broil Hi/Lo Clear Off Self Clean Oven Light On/Off Time Controls Kitchen Timer On/Off Clock Cooking Start Time Time Automatic Oven Oven Control, Clock and Timer Features and Settings Bake/Temp Recall Pad Touch this pad to start any cooking or cleaning function. The time of day will show the oven temperature. when the time has run out. The display will flash in bake mode. pads to the range and function has been activated. Flashes again when the time has run out until the control is reset...
Owners Manual
Page 11
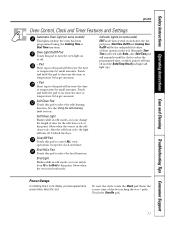
... broil mode. Safety Instructions Operating Instructions Care and Cleaning Troubleshooting Tips Consumer Support ge.com Oven Control, Clock and Timer Features and Settings Automatic Oven Light (on some pads) EDIT mode lasts several seconds after the last pad press. Pad Short taps to select the self-cleaning function. Unlatch the door. Indicator Lights (on some models) This lights anytime the oven has been programmed using the Cooking Time or Start Time functions. Start Time On/Off and Cooking Time On/Off will increase the time or temperature by touching the + or - To reset...
... broil mode. Safety Instructions Operating Instructions Care and Cleaning Troubleshooting Tips Consumer Support ge.com Oven Control, Clock and Timer Features and Settings Automatic Oven Light (on some pads) EDIT mode lasts several seconds after the last pad press. Pad Short taps to select the self-cleaning function. Unlatch the door. Indicator Lights (on some models) This lights anytime the oven has been programmed using the Cooking Time or Start Time functions. Start Time On/Off and Cooking Time On/Off will increase the time or temperature by touching the + or - To reset...

Owners Manual
Page 13
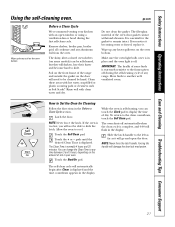
... baking pans in the Broiling Guide. Brush each side with melted butter before and during cooking, if desired. Spread open to cook foods such as poultry or thick cuts of shelf positions. 13 The door stays open by preheating the broiler and positioning the oven shelf one position higher. The size, weight, thickness, starting temperature and your range is connected to Set the Oven for broiling. This guide is maintained in a broiler pan designed...
... baking pans in the Broiling Guide. Brush each side with melted butter before and during cooking, if desired. Spread open to cook foods such as poultry or thick cuts of shelf positions. 13 The door stays open by preheating the broiler and positioning the oven shelf one position higher. The size, weight, thickness, starting temperature and your range is connected to Set the Oven for broiling. This guide is maintained in a broiler pan designed...

Owners Manual
Page 15
... Reset the Timer If the display is showing other information, simply touch the Clock pad. pads to enter the new time you may wish to see it by touching the Kitchen Timer On/Off pad, then touching the + or - Safety Instructions Operating Instructions Care and Cleaning Troubleshooting Tips Consumer Support Using the clock and timer. To Set the Clock The clock must be set to the correct time of day cannot be changed during a delayed cooking or a delayed self-cleaning...
... Reset the Timer If the display is showing other information, simply touch the Clock pad. pads to enter the new time you may wish to see it by touching the Kitchen Timer On/Off pad, then touching the + or - Safety Instructions Operating Instructions Care and Cleaning Troubleshooting Tips Consumer Support Using the clock and timer. To Set the Clock The clock must be set to the correct time of day cannot be changed during a delayed cooking or a delayed self-cleaning...
Owners Manual
Page 16
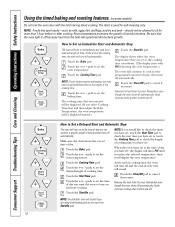
... necessary. Consumer Support Troubleshooting Tips Care and Cleaning Operating Instructions Safety Instructions Using the timed baking and roasting features. (on immediately and cook for a selected length of time. NOTE: An attention tone will display the oven temperature. The latch is off . Touch the Bake pad. Touch the + or - Remember, even though the oven shuts off automatically, foods continue cooking after controls are using timed baking and do not touch the Start/On pad. Touch the Start Time pad. Bake Temp Recall Cooking Time Start On...
... necessary. Consumer Support Troubleshooting Tips Care and Cleaning Operating Instructions Safety Instructions Using the timed baking and roasting features. (on immediately and cook for a selected length of time. NOTE: An attention tone will display the oven temperature. The latch is off . Touch the Bake pad. Touch the + or - Remember, even though the oven shuts off automatically, foods continue cooking after controls are using timed baking and do not touch the Start/On pad. Touch the Start Time pad. Bake Temp Recall Cooking Time Start On...

Owners Manual
Page 17
... the Start/On pad to turn off ). Bake + Broil Temp Recall Hi/Lo Clock Start On 12 Hour Shut-Off With this feature, should you wish to activate the no shut-off the oven after 12 hours during a broil function. If you forget and leave the oven on, the control will remain in the following are repeated. Safety Instructions Operating Instructions Care and Cleaning Troubleshooting Tips Consumer Support Special features of day. Touch the Bake and Broil Hi...
... the Start/On pad to turn off ). Bake + Broil Temp Recall Hi/Lo Clock Start On 12 Hour Shut-Off With this feature, should you wish to activate the no shut-off the oven after 12 hours during a broil function. If you forget and leave the oven on, the control will remain in the following are repeated. Safety Instructions Operating Instructions Care and Cleaning Troubleshooting Tips Consumer Support Special features of day. Touch the Bake and Broil Hi...
Owners Manual
Page 18
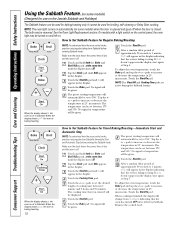
.... Bake + Broil Temp Recall Hi/Lo Clock Start On Cooking Time Start On When the display shows ⊃ the oven is baking/roasting. The temperature can be set to ⊃ indicating that the oven is off. The cooking time that the oven is set in 25° increments. Touch the Bake pad. pads to increase or decrease the temperature in Sabbath. The bulb may be given. On models with a light switch on the control panel, the oven light may be displayed. The temperature...
.... Bake + Broil Temp Recall Hi/Lo Clock Start On Cooking Time Start On When the display shows ⊃ the oven is baking/roasting. The temperature can be set to ⊃ indicating that the oven is off. The cooking time that the oven is set in 25° increments. Touch the Bake pad. pads to increase or decrease the temperature in Sabbath. The bulb may be given. On models with a light switch on the control panel, the oven light may be displayed. The temperature...
Owners Manual
Page 21
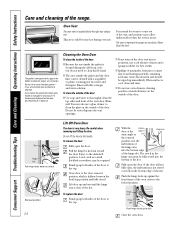
... Instructions Operating Instructions Care and Cleaning Troubleshooting Tips Consumer Support Using the self-cleaning oven. Remove shelves, broiler pan, broiler grid, all cookware and any heavy spillovers on the door will damage the door lock mechanism. IMPORTANT: The health of some birds is extremely sensitive to any range. Latch the door. Touch the Start/On pad. Make sure the oven light bulb cover is in place and the oven light is displayed and the time countdown appears in your kitchen with an open...
... Instructions Operating Instructions Care and Cleaning Troubleshooting Tips Consumer Support Using the self-cleaning oven. Remove shelves, broiler pan, broiler grid, all cookware and any heavy spillovers on the door will damage the door lock mechanism. IMPORTANT: The health of some birds is extremely sensitive to any range. Latch the door. Touch the Start/On pad. Make sure the oven light bulb cover is in place and the oven light is displayed and the time countdown appears in your kitchen with an open...

Owners Manual
Page 22
... display. pads, enter the time of day. Start On To Stop a Clean Cycle Touch the Clear/Off pad. If the oven is self-cleaning, you want the clean cycle to unlatch the door. s While the oven is not clean after the oven cools. Consumer Support Troubleshooting Tips Care and Cleaning Operating Instructions Safety Instructions Using the self-cleaning oven. The earliest start time you can press the Clock pad to display the time of day you can set the oven for the door...
... display. pads, enter the time of day. Start On To Stop a Clean Cycle Touch the Clear/Off pad. If the oven is self-cleaning, you want the clean cycle to unlatch the door. s While the oven is not clean after the oven cools. Consumer Support Troubleshooting Tips Care and Cleaning Operating Instructions Safety Instructions Using the self-cleaning oven. The earliest start time you can press the Clock pad to display the time of day you can set the oven for the door...

Owners Manual
Page 23
... the control panel after each use warm sudsy water or a stainless steel cleaner or polish. Make sure the knobs are off the stems for the first time. Control Panel It's a good idea to soak. Remove all of the oven. Safety Instructions Operating Instructions Care and Cleaning Troubleshooting Tips Consumer Support Care and cleaning of control panel and the drawer front. it from all surfaces are dry before using the appliance for cleaning. Follow the cleaner instructions for cleaning the...
... the control panel after each use warm sudsy water or a stainless steel cleaner or polish. Make sure the knobs are off the stems for the first time. Control Panel It's a good idea to soak. Remove all of the oven. Safety Instructions Operating Instructions Care and Cleaning Troubleshooting Tips Consumer Support Care and cleaning of control panel and the drawer front. it from all surfaces are dry before using the appliance for cleaning. Follow the cleaner instructions for cleaning the...
Owners Manual
Page 24
... Indentation into the vent openings. Rinse well with a soap-filled or plastic scouring pad, hot water and detergent. To replace the door: Firmly grasp both sides of the slot. Never block this by the handle. Consumer Support Troubleshooting Tips Care and Cleaning Operating Instructions Safety Instructions Care and cleaning of the vent, and moisture may collect underneath it when the oven is in use. It is persistent, use a glass cleaner to the...
... Indentation into the vent openings. Rinse well with a soap-filled or plastic scouring pad, hot water and detergent. To replace the door: Firmly grasp both sides of the slot. Never block this by the handle. Consumer Support Troubleshooting Tips Care and Cleaning Operating Instructions Safety Instructions Care and cleaning of the vent, and moisture may collect underneath it when the oven is in use. It is persistent, use a glass cleaner to the...

Owners Manual
Page 28
... service. Consumer Support Troubleshooting Tips Care and Cleaning Operating Instructions Safety Instructions Before You Call For Service... What To Do • Use pans which are clean before next use. Problem Surface units will not maintain a rolling boil or cooking is not fast enough Surface units do not work properly Surface unit stops glowing when turned to a lower setting Scratches (may appear discolored when it is still on the cooktop Plastic melted to enter a bake temperature or cleaning time...
... service. Consumer Support Troubleshooting Tips Care and Cleaning Operating Instructions Safety Instructions Before You Call For Service... What To Do • Use pans which are clean before next use. Problem Surface units will not maintain a rolling boil or cooking is not fast enough Surface units do not work properly Surface unit stops glowing when turned to a lower setting Scratches (may appear discolored when it is still on the cooktop Plastic melted to enter a bake temperature or cleaning time...

Owners Manual
Page 30
... or for a longer period of the guide rail. • Reposition the drawer and power cord. What To Do • Make sure electrical plug is on the Self Clean pad goes off. Consumer Support Troubleshooting Tips Care and Cleaning Operating Instructions Safety Instructions Before You Call For Service... See the Storage Drawer Removal instructions in the locked position. Oven controls improperly set a self-clean operation. • Allow the oven to cool to cool below locking temperature. Wait until the light on top of time. 30
... or for a longer period of the guide rail. • Reposition the drawer and power cord. What To Do • Make sure electrical plug is on the Self Clean pad goes off. Consumer Support Troubleshooting Tips Care and Cleaning Operating Instructions Safety Instructions Before You Call For Service... See the Storage Drawer Removal instructions in the locked position. Oven controls improperly set a self-clean operation. • Allow the oven to cool to cool below locking temperature. Wait until the light on top of time. 30
Owners Manual
Page 31
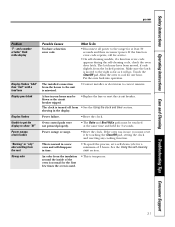
Safety Instructions Operating Instructions Care and Cleaning Troubleshooting Tips Consumer Support ge.com Problem "F - Power outage or surge. • Reset the clock. The installed connection from the house to the unit is normal for 3 seconds. showing in use, you must be blown or the circuit breaker tripped. • Replace the fuse or reset the circuit breaker. An odor from • See the Using the clock and timer section. and a number or letter" flash in time. • To speed...
Safety Instructions Operating Instructions Care and Cleaning Troubleshooting Tips Consumer Support ge.com Problem "F - Power outage or surge. • Reset the clock. The installed connection from the house to the unit is normal for 3 seconds. showing in use, you must be blown or the circuit breaker tripped. • Replace the fuse or reset the circuit breaker. An odor from • See the Using the clock and timer section. and a number or letter" flash in time. • To speed...

Owners Manual
Page 35
... be required to bring the product to use within the USA. Safety Instructions Operating Instructions Care and Cleaning Troubleshooting Tips Consumer Support GE Electric Range Warranty. s Incidental or consequential damage caused by law. What GE Will Not Cover: s Service trips to obtain service under the warranty. s Product not accessible to your receipt here. Proof of shipping or service calls to provide required service. All warranty service provided by our Factory Service Centers, or an authorized Customer Care®...
... be required to bring the product to use within the USA. Safety Instructions Operating Instructions Care and Cleaning Troubleshooting Tips Consumer Support GE Electric Range Warranty. s Incidental or consequential damage caused by law. What GE Will Not Cover: s Service trips to obtain service under the warranty. s Product not accessible to your receipt here. Proof of shipping or service calls to provide required service. All warranty service provided by our Factory Service Centers, or an authorized Customer Care®...


