
Owners Manual
Page 1
... Warming Feature 26 Care and Cleaning 33-39 Troubleshooting Tips 40-44 Accessories 50 Consumer Support Consumer Support Back Cover Product Registration 45, 46 Warranty 51 Write the model and serial numbers here: Model Serial You can find them on a label behind the storage drawer on the range frame. Radiant Ra Self-CleaningngConvectiones ge.com Safety Instructions 2-5 Operating Instructions Clock, Timer and Control Lockout 18, 19 Convection Oven 21-25 Roasting Guide 25 Timed Features 23, 24 Cookware 7 Lower Oven Drawer 20 Oven 14, 15 Broiling Guide...
... Warming Feature 26 Care and Cleaning 33-39 Troubleshooting Tips 40-44 Accessories 50 Consumer Support Consumer Support Back Cover Product Registration 45, 46 Warranty 51 Write the model and serial numbers here: Model Serial You can find them on a label behind the storage drawer on the range frame. Radiant Ra Self-CleaningngConvectiones ge.com Safety Instructions 2-5 Operating Instructions Clock, Timer and Control Lockout 18, 19 Convection Oven 21-25 Roasting Guide 25 Timed Features 23, 24 Cookware 7 Lower Oven Drawer 20 Oven 14, 15 Broiling Guide...

Owners Manual
Page 2
... properly, remove the storage drawer and inspect the rear leveling leg. The fiberglass insulation in tipping of the circuit breaker or fuse. Exposure can tip and injury could result. They could result in self-clean ovens gives off the circuit breaker. Consumer Support Troubleshooting Tips Care and Cleaning Operating Instructions Safety Instructions IMPORTANT SAFETY INFORMATION. All other reproductive harm, and requires businesses to climb, stand or hang on any service, disconnect the range power supply at...
... properly, remove the storage drawer and inspect the rear leveling leg. The fiberglass insulation in tipping of the circuit breaker or fuse. Exposure can tip and injury could result. They could result in self-clean ovens gives off the circuit breaker. Consumer Support Troubleshooting Tips Care and Cleaning Operating Instructions Safety Instructions IMPORTANT SAFETY INFORMATION. All other reproductive harm, and requires businesses to climb, stand or hang on any service, disconnect the range power supply at...

Owners Manual
Page 3
Safety Instructions Operating Instructions Care and Cleaning Troubleshooting Tips Consumer Support ge.com WARNING! Be careful when reaching for cooling first. s Flame in the oven can be put out by covering it with the controls or any other flammable materials contact the surface units, areas nearby the surface units or any other appliance. s Do not touch the surface units, the heating elements or the interior surface of the range. allow sufficient time for items...
Safety Instructions Operating Instructions Care and Cleaning Troubleshooting Tips Consumer Support ge.com WARNING! Be careful when reaching for cooling first. s Flame in the oven can be put out by covering it with the controls or any other flammable materials contact the surface units, areas nearby the surface units or any other appliance. s Do not touch the surface units, the heating elements or the interior surface of the range. allow sufficient time for items...

Owners Manual
Page 4
... . Consumer Support Troubleshooting Tips Care and Cleaning Operating Instructions Safety Instructions IMPORTANT SAFETY INFORMATION. RADIANT SURFACE UNITS Use proper pan size-select cookware having flat bottoms large enough to broken or shattered glass. Proper relationship of the cooktop will also improve efficiency. others may melt onto the surface and be used to wipe spills on the cleaning cream labels. s Always turn the fan on fresh foods can lead to cover the surface...
... . Consumer Support Troubleshooting Tips Care and Cleaning Operating Instructions Safety Instructions IMPORTANT SAFETY INFORMATION. RADIANT SURFACE UNITS Use proper pan size-select cookware having flat bottoms large enough to broken or shattered glass. Proper relationship of the cooktop will also improve efficiency. others may melt onto the surface and be used to wipe spills on the cleaning cream labels. s Always turn the fan on fresh foods can lead to cover the surface...

Owners Manual
Page 5
... paper products, cooking utensils or food in the oven when not in lifting heavy foods. Open the drawer a crack and let hot air or steam escape before starting the self-cleaning operation. Hot air or steam which escapes can catch on fire. s Pulling out the rack to hands, face and/or eyes. Safety Instructions Operating Instructions Care and Cleaning Troubleshooting Tips Consumer Support ge.com WARNING! s Do not use or self-clean the lower oven drawer pan in a risk...
... paper products, cooking utensils or food in the oven when not in lifting heavy foods. Open the drawer a crack and let hot air or steam escape before starting the self-cleaning operation. Hot air or steam which escapes can catch on fire. s Pulling out the rack to hands, face and/or eyes. Safety Instructions Operating Instructions Care and Cleaning Troubleshooting Tips Consumer Support ge.com WARNING! s Do not use or self-clean the lower oven drawer pan in a risk...
Owners Manual
Page 10
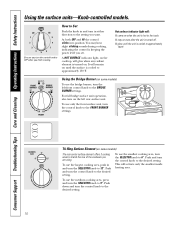
... the power level you want. To use the largest cooking area, push in and turn in and turn the SELECTOR knob to approximately 150°F. This will glow when any radiant element is turned off. s stay on even after the unit is turned on the left front control knob to the FRONT BURNER settings. Consumer Support Troubleshooting Tips Care and Cleaning Operating Instructions Safety Instructions Using the surface units-Knob-controlled models. How to Set Push the knob in either direction...
... the power level you want. To use the largest cooking area, push in and turn in and turn the SELECTOR knob to approximately 150°F. This will glow when any radiant element is turned off. s stay on even after the unit is turned on the left front control knob to the FRONT BURNER settings. Consumer Support Troubleshooting Tips Care and Cleaning Operating Instructions Safety Instructions Using the surface units-Knob-controlled models. How to Set Push the knob in either direction...
Owners Manual
Page 12
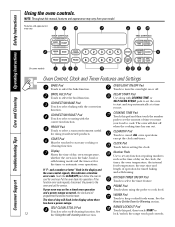
Consumer Support Troubleshooting Tips Care and Cleaning Operating Instructions Safety Instructions Using the oven controls. BROIL HI/LO Pad DELAY START Pad Touch to start any function requiring numbers such as the time of day on or off PROOF Pad when the cooking time has run out. Must be reset. length of time you set for a timed oven operation and a power outage occurred, the clock and all programmed functions must be touched to select the broil function. WARM Pad Touch to 12 the Using the self-cleaning oven section...
Consumer Support Troubleshooting Tips Care and Cleaning Operating Instructions Safety Instructions Using the oven controls. BROIL HI/LO Pad DELAY START Pad Touch to start any function requiring numbers such as the time of day on or off PROOF Pad when the cooking time has run out. Must be reset. length of time you set for a timed oven operation and a power outage occurred, the clock and all programmed functions must be touched to select the broil function. WARM Pad Touch to 12 the Using the self-cleaning oven section...

Owners Manual
Page 13
... Touch to keep cooked foods warm. SELF CLEAN STD/LO Pad Touch to select the broil function. Number Pads Use to Set the Oven for timed baking and self-cleaning. See the How to set any cooking or cleaning function. Display Shows the time of time you want your oven was set for the timer or automatic oven operations. Allow the oven to select a warm environment useful for one hour. See the Using the self-cleaning oven section. Safety Instructions Operating Instructions Care and Cleaning Troubleshooting Tips Consumer Support Features and appearance may...
... Touch to keep cooked foods warm. SELF CLEAN STD/LO Pad Touch to select the broil function. Number Pads Use to Set the Oven for timed baking and self-cleaning. See the How to set any cooking or cleaning function. Display Shows the time of time you want your oven was set for the timer or automatic oven operations. Allow the oven to select a warm environment useful for one hour. See the Using the self-cleaning oven section. Safety Instructions Operating Instructions Care and Cleaning Troubleshooting Tips Consumer Support Features and appearance may...
Owners Manual
Page 14
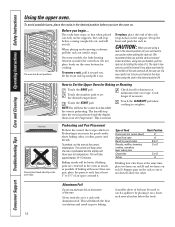
... bottom of the rack (stop after the oven is not directly above the other. Cook longer if necessary. Before you are centered in the desired position before coming completely out, and will need to catch a spillover by holding the sides of the rack and pull all the way out. Consumer Support Troubleshooting Tips Care and Cleaning Operating Instructions Safety Instructions Using the upper oven. Preheating is normal. CAUTION...
... bottom of the rack (stop after the oven is not directly above the other. Cook longer if necessary. Before you are centered in the desired position before coming completely out, and will need to catch a spillover by holding the sides of the rack and pull all the way out. Consumer Support Troubleshooting Tips Care and Cleaning Operating Instructions Safety Instructions Using the upper oven. Preheating is normal. CAUTION...
Owners Manual
Page 16
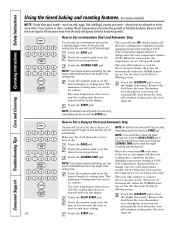
... of cooking time you set the desired length of cooking time. COOKING TIME pad to Set a Delayed Start and Automatic Stop The oven will turn ON, and the display will sound. The The oven will continue to check the start cooking. Touch the CLEAR/OFF pad to cook for a specific length of time and then turn off timed baking and do not touch the START pad. Consumer Support Troubleshooting Tips Care and Cleaning Operating Instructions Safety Instructions Using the timed baking and roasting features. (on some models...
... of cooking time you set the desired length of cooking time. COOKING TIME pad to Set a Delayed Start and Automatic Stop The oven will turn ON, and the display will sound. The The oven will continue to check the start cooking. Touch the CLEAR/OFF pad to cook for a specific length of time and then turn off timed baking and do not touch the START pad. Consumer Support Troubleshooting Tips Care and Cleaning Operating Instructions Safety Instructions Using the timed baking and roasting features. (on some models...
Owners Manual
Page 17
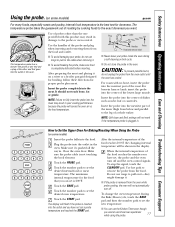
... the temperature probe is not touching the broil element. Plug Cable Handles Probe Read and remove label s Never leave your probe, do not unplug the probe from the oven outlet until the oven has cooled. Plug the probe into the center of roasting by cooking foods to the exact doneness you cannot use tongs to set a probe temperature and touched the START pad. Safety Instructions Operating Instructions Care and Cleaning Troubleshooting Tips Consumer Support Using the probe. (on some models) Insert the probe...
... the temperature probe is not touching the broil element. Plug Cable Handles Probe Read and remove label s Never leave your probe, do not unplug the probe from the oven outlet until the oven has cooled. Plug the probe into the center of roasting by cooking foods to the exact doneness you cannot use tongs to set a probe temperature and touched the START pad. Safety Instructions Operating Instructions Care and Cleaning Troubleshooting Tips Consumer Support Using the probe. (on some models) Insert the probe...
Owners Manual
Page 18
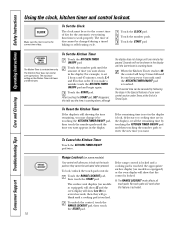
Consumer Support Troubleshooting Tips Care and Cleaning Operating Instructions Safety Instructions Using the clock, kitchen timer and control lockout. When the Kitchen Timer reaches :00, the control will beep 3 times followed by touching the KITCHEN TIMER ON/OFF pad and then touching the number pads to enter the new time you to the correct time of day cannot be changed during a timed baking or self-cleaning cycle. To lock/unlock the touch pad controls: Touch the RANGE LOCKOUT pad, then touch the START pad...
Consumer Support Troubleshooting Tips Care and Cleaning Operating Instructions Safety Instructions Using the clock, kitchen timer and control lockout. When the Kitchen Timer reaches :00, the control will beep 3 times followed by touching the KITCHEN TIMER ON/OFF pad and then touching the number pads to enter the new time you to the correct time of day cannot be changed during a timed baking or self-cleaning cycle. To lock/unlock the touch pad controls: Touch the RANGE LOCKOUT pad, then touch the START pad...

Owners Manual
Page 22
.... Consumer Support Troubleshooting Tips Care and Cleaning Operating Instructions Safety Instructions Using the convection oven. (on some models) Convection Roast s Good for large tender cuts of cookware will work in your cookware leaves room for air circulation in the oven. This is used to heat, the changing temperature, starting at the same time, creating a rich golden brown exterior. s Darkened or matte-finished pans will sound. s Glass or ceramic pans cook more information. For recipes like oven-baked chicken, use in the Special Features...
.... Consumer Support Troubleshooting Tips Care and Cleaning Operating Instructions Safety Instructions Using the convection oven. (on some models) Convection Roast s Good for large tender cuts of cookware will work in your cookware leaves room for air circulation in the oven. This is used to heat, the changing temperature, starting at the same time, creating a rich golden brown exterior. s Darkened or matte-finished pans will sound. s Glass or ceramic pans cook more information. For recipes like oven-baked chicken, use in the Special Features...

Owners Manual
Page 32
..., ⊃ will appear in the display, start again at the same time. Remove the cooked food. + 32 How to 1 minute, until 12 shdn or no shdn, indicating that the oven has turned OFF but is set in the display. Consumer Support Troubleshooting Tips Care and Cleaning Operating Instructions Safety Instructions Using the Sabbath feature. (Designed for use on the Jewish Sabbath and Holidays) (on some models) when the door is opened and goes off after 12 hours...
..., ⊃ will appear in the display, start again at the same time. Remove the cooked food. + 32 How to 1 minute, until 12 shdn or no shdn, indicating that the oven has turned OFF but is set in the display. Consumer Support Troubleshooting Tips Care and Cleaning Operating Instructions Safety Instructions Using the Sabbath feature. (Designed for use on the Jewish Sabbath and Holidays) (on some models) when the door is opened and goes off after 12 hours...

Owners Manual
Page 34
... into the vent openings. Consumer Support Troubleshooting Tips Care and Cleaning Operating Instructions Safety Instructions Care and cleaning of the slot. Do not rub or clean the door gasket- s The area outside of the oven door. Removal position Lift-Off Oven Door The door is cleaned during the self-clean cycle, you should be cleaned with a vinegar and water solution. Lift door up immediately. With the Bottom door at the bottom to lock. Push the hinge locks up to...
... into the vent openings. Consumer Support Troubleshooting Tips Care and Cleaning Operating Instructions Safety Instructions Care and cleaning of the slot. Do not rub or clean the door gasket- s The area outside of the oven door. Removal position Lift-Off Oven Door The door is cleaned during the self-clean cycle, you should be cleaned with a vinegar and water solution. Lift door up immediately. With the Bottom door at the bottom to lock. Push the hinge locks up to...

Owners Manual
Page 36
... clean the broil element. On some models) To remove the drawer: To replace the drawer: Pull the drawer out until it stops. Connect electrical power to remove the cover. To replace the cover: Place it snaps into groove of the drawer and push back until it doesn't fall when released. Do not remove any screws to the range. Consumer Support Troubleshooting Tips Care and Cleaning Operating Instructions Safety Instructions Care and cleaning of the drawer until the stops clear the guides. Pull wire...
... clean the broil element. On some models) To remove the drawer: To replace the drawer: Pull the drawer out until it stops. Connect electrical power to remove the cover. To replace the cover: Place it snaps into groove of the drawer and push back until it doesn't fall when released. Do not remove any screws to the range. Consumer Support Troubleshooting Tips Care and Cleaning Operating Instructions Safety Instructions Care and cleaning of the drawer until the stops clear the guides. Pull wire...

Owners Manual
Page 40
Troubleshooting Tips Save time and money! Incorrect cleaning methods being used . The surface may be low. Light bulb is normal. Plug on range is not completely • Make sure electrical plug is set for service... grounded outlet. Consumer Support Troubleshooting Tips Care and Cleaning Operating Instructions Safety Instructions Before you call for replacement. What To Do • Use pans which are using. Cookware with plastic placed on the cooktop. • Call a qualified technician for service. before use, and use . Improper cookware being...
Troubleshooting Tips Save time and money! Incorrect cleaning methods being used . The surface may be low. Light bulb is normal. Plug on range is not completely • Make sure electrical plug is set for service... grounded outlet. Consumer Support Troubleshooting Tips Care and Cleaning Operating Instructions Safety Instructions Before you call for replacement. What To Do • Use pans which are using. Cookware with plastic placed on the cooktop. • Call a qualified technician for service. before use, and use . Improper cookware being...

Owners Manual
Page 41
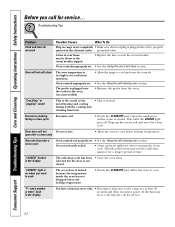
... • Preheat the broil element for 10 minutes. • Broil for broiling. Improper rack position being used . Rear drawer support is crooked Storage drawer won't close Possible Causes Oven controls improperly set . Incorrect cookware or cookware of improper size being used . Oven controls improperly set . section. The probe is properly seated if removed. Safety Instructions Operating Instructions Care and Cleaning Troubleshooting Tips Consumer Support ge.com Problem Food does not bake or roast properly Food does not broil properly Oven temperature too hot or...
... • Preheat the broil element for 10 minutes. • Broil for broiling. Improper rack position being used . Rear drawer support is crooked Storage drawer won't close Possible Causes Oven controls improperly set . Incorrect cookware or cookware of improper size being used . Oven controls improperly set . section. The probe is properly seated if removed. Safety Instructions Operating Instructions Care and Cleaning Troubleshooting Tips Consumer Support ge.com Problem Food does not bake or roast properly Food does not broil properly Oven temperature too hot or...
Owners Manual
Page 42
Troubleshooting Tips Problem Clock and timer do not work Possible Causes What To Do Plug on range is not completely • Make sure electrical plug is plugged into the outlet in the electrical outlet. grounded outlet. The probe is plugged into a live, properly inserted in the oven. (on when you call for at least 30 seconds and then reconnect power. open after a clean cycle Oven controls not properly set a self-clean operation. "LOCKED" light is on some models) •...
Troubleshooting Tips Problem Clock and timer do not work Possible Causes What To Do Plug on range is not completely • Make sure electrical plug is plugged into the outlet in the electrical outlet. grounded outlet. The probe is plugged into a live, properly inserted in the oven. (on when you call for at least 30 seconds and then reconnect power. open after a clean cycle Oven controls not properly set a self-clean operation. "LOCKED" light is on some models) •...
Owners Manual
Page 51
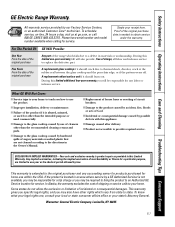
... how to use of the product if it should crack due to replace the defective part. Louisville, KY 40225 51 During this limited one year or the shortest period allowed by possible defects with this Limited Warranty. s Incidental or consequential damage caused by law. A replacement radiant surface unit if it is needed to provide required service. Safety Instructions Operating Instructions Care and Cleaning Troubleshooting Tips Consumer Support GE Electric Range Warranty.
... how to use of the product if it should crack due to replace the defective part. Louisville, KY 40225 51 During this limited one year or the shortest period allowed by possible defects with this Limited Warranty. s Incidental or consequential damage caused by law. A replacement radiant surface unit if it is needed to provide required service. Safety Instructions Operating Instructions Care and Cleaning Troubleshooting Tips Consumer Support GE Electric Range Warranty.


