Use and Care Manual
Page 1
... letras GYE, PYE y PWE son Modelos con Profundidad de Mesada (CD) 239D4106P022 49-60748 02-16 GE Bottom Freezer Refrigerators Safety Instructions 2, 4 Operating Instructions Features 5, 6 Controls 7-10 Dispenser 11 Autofill 12 Single Serve Brewer ...Refrigerator 26-37 Installing the Water Line 38-40 Troubleshooting Tips 42-44 Normal Operating Conditions 41 Truth or Myth 45 46 Consumer Support Warranty 47 RPWFE Water Filter Cartridge Limited Warranty 48 Performance Data Sheet 49 Consumer Support 50 Owner's Manual and Installation Instructions GE and GE Profile™ models Models...
... letras GYE, PYE y PWE son Modelos con Profundidad de Mesada (CD) 239D4106P022 49-60748 02-16 GE Bottom Freezer Refrigerators Safety Instructions 2, 4 Operating Instructions Features 5, 6 Controls 7-10 Dispenser 11 Autofill 12 Single Serve Brewer ...Refrigerator 26-37 Installing the Water Line 38-40 Troubleshooting Tips 42-44 Normal Operating Conditions 41 Truth or Myth 45 46 Consumer Support Warranty 47 RPWFE Water Filter Cartridge Limited Warranty 48 Performance Data Sheet 49 Consumer Support 50 Owner's Manual and Installation Instructions GE and GE Profile™ models Models...
Use and Care Manual
Page 3
... cause a fire hazard from this appliance. A 115 Volt AC, 60 Hz, 15- Always grip plug firmly and pull straight out from refrigerator. GEAppliances.com SAFETY (CONT.) INSTALLATION WARNING Explosion Hazard. Keep flammable materials and vapors, such as gasoline, away from the outlet. Where a... standard 2-prong wall outlet is encountered, it is equipped with a 3-prong (grounding) plug which could result in style models (model PYE, CYE, GYE, DYE, PWE, CWE, and ZWE) are top heavy, especially with a standard 3-prong (grounding) wall outlet to do ...
... cause a fire hazard from this appliance. A 115 Volt AC, 60 Hz, 15- Always grip plug firmly and pull straight out from refrigerator. GEAppliances.com SAFETY (CONT.) INSTALLATION WARNING Explosion Hazard. Keep flammable materials and vapors, such as gasoline, away from the outlet. Where a... standard 2-prong wall outlet is encountered, it is equipped with a 3-prong (grounding) plug which could result in style models (model PYE, CYE, GYE, DYE, PWE, CWE, and ZWE) are top heavy, especially with a standard 3-prong (grounding) wall outlet to do ...
Use and Care Manual
Page 5
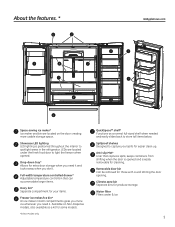
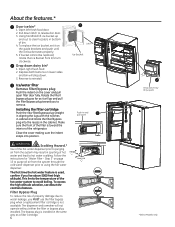
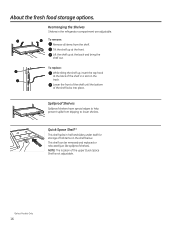
... limiting the door opening. Showcase LED lighting LED lighting is easily removable for easier clean up. LEDs are located on Non-Dispense models, also available as a kit for some models. *Select Models Only QuickSpace™ shelf* Functions as a normal full-sized shelf when needed and easily slides back to capture your items. Freezer...
... limiting the door opening. Showcase LED lighting LED lighting is easily removable for easier clean up. LEDs are located on Non-Dispense models, also available as a kit for some models. *Select Models Only QuickSpace™ shelf* Functions as a normal full-sized shelf when needed and easily slides back to capture your items. Freezer...
Use and Care Manual
Page 6
...ice bucket, set it will go and pull the filter/bypass plug toward the interior of bin. 4. Drop down tray (tray open) *Select Models Only Step 3" on lower sides and bin will not operate without either the filter or bypass plug installed. The bypass plug is toward you live... ice bin* 1. Pull down . 3. Depress both buttons on page 15 to purge all air from the system may result in bottom of the refrigerator. Make sure the front of the filter is installed in the cabinet. This limits the temperature of property damage due to avoid boiling. The dispenser...
...ice bucket, set it will go and pull the filter/bypass plug toward the interior of bin. 4. Drop down tray (tray open) *Select Models Only Step 3" on lower sides and bin will not operate without either the filter or bypass plug installed. The bypass plug is toward you live... ice bin* 1. Pull down . 3. Depress both buttons on page 15 to purge all air from the system may result in bottom of the refrigerator. Make sure the front of the filter is installed in the cabinet. This limits the temperature of property damage due to avoid boiling. The dispenser...

Use and Care Manual
Page 7
... to the preset recommended settings. PFE28P, PYE22P Control Style A, Single Serve Models PFH28, PFE28K, DFE28, PYE22K, DYE22 Control Style B, AutoFill Models Ice GFE28, GFE26, GYE22 Control Style C, GE Models Error Complete Sensing Cubed Crushed GNE29, PWE23 Control Style D, Non-Dispense Control GEAppliances.com Refrigerator Recommended: 37 °F Actual Set F Recommended: 0°F Freezer Hold 3 Sec for...
... to the preset recommended settings. PFE28P, PYE22P Control Style A, Single Serve Models PFH28, PFE28K, DFE28, PYE22K, DYE22 Control Style B, AutoFill Models Ice GFE28, GFE26, GYE22 Control Style C, GE Models Error Complete Sensing Cubed Crushed GNE29, PWE23 Control Style D, Non-Dispense Control GEAppliances.com Refrigerator Recommended: 37 °F Actual Set F Recommended: 0°F Freezer Hold 3 Sec for...
Use and Care Manual
Page 11
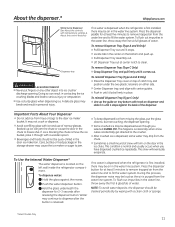
... the two plastic retainers on dispenser and slide it in until it stops. „ Locate tab in the center on the left wall inside the refrigerator compartment . To reinstall Dispenser Tray (Type C Only) „ Line up the guide on tray bottom with track on either side. „ ...controls with temperature settings & About the control features) If no water is dispensed when the refrigerator is first installed, there may be cleaned periodically by wiping with a clean cloth or sponge. *Select Models Only 11 Push the water dispenser button. To flush out impurities in contacting the ice ...
... the two plastic retainers on dispenser and slide it in until it stops. „ Locate tab in the center on the left wall inside the refrigerator compartment . To reinstall Dispenser Tray (Type C Only) „ Line up the guide on tray bottom with track on either side. „ ...controls with temperature settings & About the control features) If no water is dispensed when the refrigerator is first installed, there may be cleaned periodically by wiping with a clean cloth or sponge. *Select Models Only 11 Push the water dispenser button. To flush out impurities in contacting the ice ...
Use and Care Manual
Page 14
...the United States) GE WiFi Connect Enabled* (PFE28P PYE22P, PFH models only) YIf your refrigerator has a Connected Appliance information label located on the inside as shown, your refrigerator can be connected to your WiFi network, allowing it to learn where you can purchase a GE ConnectPlus.** WiFi ...Connectivity: For assistance with the appliance or the ConnectPlus network connectivity (for models that are designed to the following measures...
...the United States) GE WiFi Connect Enabled* (PFE28P PYE22P, PFH models only) YIf your refrigerator has a Connected Appliance information label located on the inside as shown, your refrigerator can be connected to your WiFi network, allowing it to learn where you can purchase a GE ConnectPlus.** WiFi ...Connectivity: For assistance with the appliance or the ConnectPlus network connectivity (for models that are designed to the following measures...
Use and Care Manual
Page 15
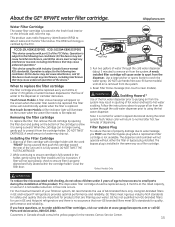
...filter needs to order additional filter cartridges, visit our website at the rated capacity, or sooner if a noticeable reduction in GE and Hotpoint refrigerators and there is removed from the system through the cold water dispenser (about 5 minutes) to water leakage, you have... Hotpoint® refrigerators provides optimal performance and reliability. "This device complies with part 15 of GE-branded filters only. Operation is properly aligned and fully seated within the cartridge holder. Non-touch Screen Models: A filter indicator light will illuminate on the bottom of dispensing....
...filter needs to order additional filter cartridges, visit our website at the rated capacity, or sooner if a noticeable reduction in GE and Hotpoint refrigerators and there is removed from the system through the cold water dispenser (about 5 minutes) to water leakage, you have... Hotpoint® refrigerators provides optimal performance and reliability. "This device complies with part 15 of GE-branded filters only. Operation is properly aligned and fully seated within the cartridge holder. Non-touch Screen Models: A filter indicator light will illuminate on the bottom of dispensing....
Use and Care Manual
Page 16
... of tall items on the track. Lower the front of the shelf until the bottom of the upper Quick Space Shelf is not adjustable. *Select Models Only 16 NOTE: The location of the shelf locks into place. Quick Space Shelf * This shelf splits in half and slides under itself for storage... of the shelf in the refrigerator compartment are adjustable. To replace: While tilting the shelf up at the front. To remove: Remove all items from dripping to help prevent spills from...
... of tall items on the track. Lower the front of the shelf until the bottom of the upper Quick Space Shelf is not adjustable. *Select Models Only 16 NOTE: The location of the shelf locks into place. Quick Space Shelf * This shelf splits in half and slides under itself for storage... of the shelf in the refrigerator compartment are adjustable. To replace: While tilting the shelf up at the front. To remove: Remove all items from dripping to help prevent spills from...

Use and Care Manual
Page 17
...: Lift the bin straight up , then pull out. See page 36. Adjustable Bins on the door and push down tray * (tray open) 1. Non-Dispense Models (Left Hand Door) Non-Adjustable Bins on lower sides of bin and bin will lock in the molded door supports and push down . It will... not interchangeable, note the location upon removal and replace the bin in the molded supports on the Door Adjustable bins can easily be carried from refrigerator to reinstall. The bin will drop down. 3. See page 36. To replace or relocate: Slide in place. To remove: Lift bin straight up, then ...
...: Lift the bin straight up , then pull out. See page 36. Adjustable Bins on the door and push down tray * (tray open) 1. Non-Dispense Models (Left Hand Door) Non-Adjustable Bins on lower sides of bin and bin will lock in the molded door supports and push down . It will... not interchangeable, note the location upon removal and replace the bin in the molded supports on the Door Adjustable bins can easily be carried from refrigerator to reinstall. The bin will drop down. 3. See page 36. To replace or relocate: Slide in place. To remove: Lift bin straight up, then ...

Use and Care Manual
Page 21
... the left hand door to remove it from the compartment. • To replace the ice bucket, set it cools to begin making mechanism while the refrigerator is normal for details. Once the water has been connected to turn clockwise. See Controls, pages 9 & 10. You may be replaced, rotate the ...ice bucket fork 1/4 turn the ice maker on the control. How to Turn the Ice Maker On/Off Display Type (See Page 7) Model # How to the refrigerator, the ice maker may hear a buzzing sound each time the ice maker fills with the heating element that the ice maker is turned off...
... the left hand door to remove it from the compartment. • To replace the ice bucket, set it cools to begin making mechanism while the refrigerator is normal for details. Once the water has been connected to turn clockwise. See Controls, pages 9 & 10. You may be replaced, rotate the ...ice bucket fork 1/4 turn the ice maker on the control. How to Turn the Ice Maker On/Off Display Type (See Page 7) Model # How to the refrigerator, the ice maker may hear a buzzing sound each time the ice maker fills with the heating element that the ice maker is turned off...
Use and Care Manual
Page 22
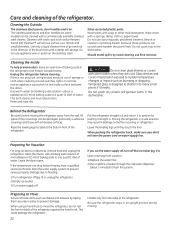
... be damaged, particularly cushioned pushing it straight in the dishwasher. Use an appliance wax polish on some models) can scratch and weaken the paint finish. This both cleans and neutralizes odors. All Pull the refrigerator straight out and return it breaks. Wipe clean with soap or other mild detergents. Preparing for Vacation...
... be damaged, particularly cushioned pushing it straight in the dishwasher. Use an appliance wax polish on some models) can scratch and weaken the paint finish. This both cleans and neutralizes odors. All Pull the refrigerator straight out and return it breaks. Wipe clean with soap or other mild detergents. Preparing for Vacation...
Use and Care Manual
Page 23
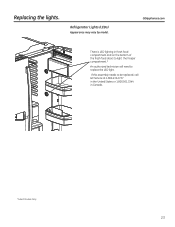
GEAppliances.com There is LED lighting in Canada. *Select Models Only 23 If this assembly needs to be replaced, call GE Service at 1.800.432.2737 in the United States or 1.800.561.3344 in fresh food compartment and on the bottom of the fresh food doors to light the freezer compartment.* An authorized technician will need to replace the LED light. Refrigerator Lights (LEDs) Appearance may vary by model. Replacing the lights.
GEAppliances.com There is LED lighting in Canada. *Select Models Only 23 If this assembly needs to be replaced, call GE Service at 1.800.432.2737 in the United States or 1.800.561.3344 in fresh food compartment and on the bottom of the fresh food doors to light the freezer compartment.* An authorized technician will need to replace the LED light. Refrigerator Lights (LEDs) Appearance may vary by model. Replacing the lights.

Use and Care Manual
Page 24
... supply kit (containing tubing, shutoff valve, fittings and instructions) is not covered under the Warranty. Refrigerator Installation can be connected to Consumer - Installation Instructions Refrigerator GE and GE Profile™ models Questions? TOOLS YOU MAY NEED Adjustable Wrench Ȓµ Socket Ratchet/Driver 1/4" Outer Diameter Compression Nut and Ferrule (sleeve) Phillips-Head Screwdriver 1/8", 3/32", 1/4" & 5/32...
... supply kit (containing tubing, shutoff valve, fittings and instructions) is not covered under the Warranty. Refrigerator Installation can be connected to Consumer - Installation Instructions Refrigerator GE and GE Profile™ models Questions? TOOLS YOU MAY NEED Adjustable Wrench Ȓµ Socket Ratchet/Driver 1/4" Outer Diameter Compression Nut and Ferrule (sleeve) Phillips-Head Screwdriver 1/8", 3/32", 1/4" & 5/32...
Use and Care Manual
Page 25
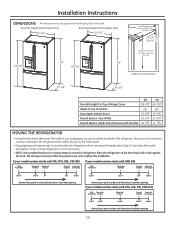
... Exterior Case Width 35-3/4" 35-3/4" Overall Exterior Depth Doors/Drawers with Handles 36-3/8" 31-3/8" MOVING THE REFRIGERATOR • Using the chart below determine if the width of your model number starts with DYE, GYE, PYE, PWE (CD) Fully Removing Assembled Handles Removing LH Door Case... to prevent damage to the refrigerator before safely moving straps to Top of the refrigerator. If your model number starts with PFE, PFH, GFE, DFE (SD) If your model number starts with a side against the truck. Counter Depth (CD) Models Only Standard Depth (SD) Models Only 35-3/4" 35-3/4" 69...
... Exterior Case Width 35-3/4" 35-3/4" Overall Exterior Depth Doors/Drawers with Handles 36-3/8" 31-3/8" MOVING THE REFRIGERATOR • Using the chart below determine if the width of your model number starts with DYE, GYE, PYE, PWE (CD) Fully Removing Assembled Handles Removing LH Door Case... to prevent damage to the refrigerator before safely moving straps to Top of the refrigerator. If your model number starts with PFE, PFH, GFE, DFE (SD) If your model number starts with a side against the truck. Counter Depth (CD) Models Only Standard Depth (SD) Models Only 35-3/4" 35-3/4" 69...
Use and Care Manual
Page 26
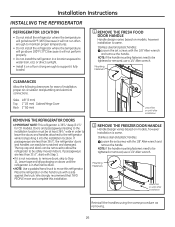
...Allen wrench. Mounting Fasteners CLEARANCES Allow the following clearances for CD models). Sides 1/8" (3 mm) Top 1" (25 mm) Cabinet/Hinge Cover Back 2" (50 mm) REMOVING THE REFRIGERATOR DOORS • IMPORTANT NOTE: This refrigerator is not necessary to remove doors, skip to Step 11. ...after installation 2 REMOVE THE FREEZER DOOR HANDLE Handle Design varies based on models, however installation is same. Installation Instructions INSTALLING THE REFRIGERATOR REFRIGERATOR LOCATION • Do not install the refrigerator where the temperature will go below 60°F (16°C) because it...
...Allen wrench. Mounting Fasteners CLEARANCES Allow the following clearances for CD models). Sides 1/8" (3 mm) Top 1" (25 mm) Cabinet/Hinge Cover Back 2" (50 mm) REMOVING THE REFRIGERATOR DOORS • IMPORTANT NOTE: This refrigerator is not necessary to remove doors, skip to Step 11. ...after installation 2 REMOVE THE FREEZER DOOR HANDLE Handle Design varies based on models, however installation is same. Installation Instructions INSTALLING THE REFRIGERATOR REFRIGERATOR LOCATION • Do not install the refrigerator where the temperature will go below 60°F (16°C) because it...

Use and Care Manual
Page 30
ON MODELS EQUIPPED WITH ICE MAKER IN THE FREEZER: Place the ice bucket in the drawer and push the drawer into the freezer with the front of ... the fill cup opening at the back of the icemaker. 30 The fill tube extends into the freezer compartment. - Make sure: - Installation Instructions INSTALLING THE REFRIGERATOR (cont.) 9 RE-INSTALL FREEZER DRAWER A Re-install freezer drawer by placing the drawer wheels onto the top of the track mounted to the front of...
ON MODELS EQUIPPED WITH ICE MAKER IN THE FREEZER: Place the ice bucket in the drawer and push the drawer into the freezer with the front of ... the fill cup opening at the back of the icemaker. 30 The fill tube extends into the freezer compartment. - Make sure: - Installation Instructions INSTALLING THE REFRIGERATOR (cont.) 9 RE-INSTALL FREEZER DRAWER A Re-install freezer drawer by placing the drawer wheels onto the top of the track mounted to the front of...
Use and Care Manual
Page 33
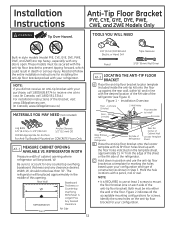
... with the desired location of the RH side of this opening. Front RH Side 33 These models must be into either the wall or the floor. REFRIGERATOR WIDTH Measure width of cabinet opening where refrigerator will be secured with the anti-tip floor bracket to mount the floor bracket (one at...; It is REQUIRED to use the anti-tip floor bracket as shown in line with your refrigerator. C Hold down in position and use at least 2 screws to prevent tipping forward, which could result in style models (model PYE, CYE, GYE, DYE, PWE, CWE, and ZWE) are top heavy, especially with your ...
... with the desired location of the RH side of this opening. Front RH Side 33 These models must be into either the wall or the floor. REFRIGERATOR WIDTH Measure width of cabinet opening where refrigerator will be secured with the anti-tip floor bracket to mount the floor bracket (one at...; It is REQUIRED to use the anti-tip floor bracket as shown in line with your refrigerator. C Hold down in position and use at least 2 screws to prevent tipping forward, which could result in style models (model PYE, CYE, GYE, DYE, PWE, CWE, and ZWE) are top heavy, especially with your ...
Use and Care Manual
Page 37
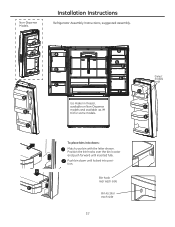
Position the bin hooks over the bin locator and push forward until locked into doors: Match your bin with the letter shown. Push bin down until inserted fully. Bin hook rear each side Bin locator each side 37 Non-Dispense Models H H J Installation Instructions Refrigerator Assembly Instructions, suggested assembly. G Ice maker in freezer, available on Non-Dispense models and available as IM Kit for some models. (Select models only) To place bins into position.
Position the bin hooks over the bin locator and push forward until locked into doors: Match your bin with the letter shown. Push bin down until inserted fully. Bin hook rear each side Bin locator each side 37 Non-Dispense Models H H J Installation Instructions Refrigerator Assembly Instructions, suggested assembly. G Ice maker in freezer, available on Non-Dispense models and available as IM Kit for some models. (Select models only) To place bins into position.
Use and Care Manual
Page 41
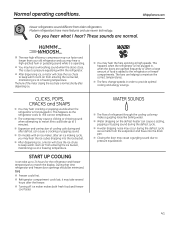
... freezer temperatures to provide optimal cooling and energy savings. TIPS „ Freezer cools first. „ Refrigerator compartment cools last; START UP COOLING It can cause a cracking or popping sound. „ On models with an ice maker, after an ice making cycle, you may cause a gurgling sound due to ...keep warm room air from older refrigerators. WATER SOUNDS „ The flow of cooling coils during the defrost cycle as ...
... freezer temperatures to provide optimal cooling and energy savings. TIPS „ Freezer cools first. „ Refrigerator compartment cools last; START UP COOLING It can cause a cracking or popping sound. „ On models with an ice maker, after an ice making cycle, you may cause a gurgling sound due to ...keep warm room air from older refrigerators. WATER SOUNDS „ The flow of cooling coils during the defrost cycle as ...


