Use and Care Manual
Page 2
.... Be careful closing doors when children are in the vicinity of your old refrigerator, please follow the instructions below to climb, stand or hang on the shelves in the freezer compartment when hands are getting rid of this or any servicing be performed by... ■ Leave the shelves in this appliance only for "just a few days." Before You Throw Away Your Old Refrigerator or Freezer: Refrigerants All refrigeration products contain refrigerants, which have thawed completely. clearances between the doors and between the doors and cabinet are not problems of the icemaker....
.... Be careful closing doors when children are in the vicinity of your old refrigerator, please follow the instructions below to climb, stand or hang on the shelves in the freezer compartment when hands are getting rid of this or any servicing be performed by... ■ Leave the shelves in this appliance only for "just a few days." Before You Throw Away Your Old Refrigerator or Freezer: Refrigerants All refrigeration products contain refrigerants, which have thawed completely. clearances between the doors and between the doors and cabinet are not problems of the icemaker....
Use and Care Manual
Page 3
...properly grounded. For personal safety, this appliance must use an extension cord, it is your refrigerator by a qualified electrician to roll over or damage the power cord. Where a standard 2-prong... on the power cord. Always grip plug firmly and pull straight out from overheated wires. When moving the refrigerator away from the power cord. USE OF EXTENSION CORDS Because of potential safety hazards under any circumstances, cut ...Instructions Operating Instructions Installation Instructions Troubleshooting Tips Consumer Support IMPORTANT SAFETY INFORMATION. ge.com WARNING!
...properly grounded. For personal safety, this appliance must use an extension cord, it is your refrigerator by a qualified electrician to roll over or damage the power cord. Where a standard 2-prong... on the power cord. Always grip plug firmly and pull straight out from overheated wires. When moving the refrigerator away from the power cord. USE OF EXTENSION CORDS Because of potential safety hazards under any circumstances, cut ...Instructions Operating Instructions Installation Instructions Troubleshooting Tips Consumer Support IMPORTANT SAFETY INFORMATION. ge.com WARNING!
Use and Care Manual
Page 4
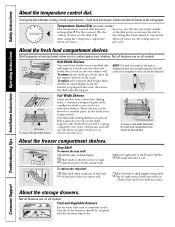
...two steel wire stationary shelves. Not all models. With shelf front raised slightly, hook the bracket's top lug into a track on all features are on a molded sidewall support; These shelves can turn the... remove a full-width shelf when the fresh food compartment door cannot be opened fully About the freezer compartment shelves. 1 23 Step Shelf To remove the step shelf: 1 Lift left side of ...of shelf into place. The full-width sliding shelf has stop before coming completely out of the refrigerator and will stop -locks. get cold. Not all models. 2 Lift up and out 1 ...
...two steel wire stationary shelves. Not all models. With shelf front raised slightly, hook the bracket's top lug into a track on all features are on a molded sidewall support; These shelves can turn the... remove a full-width shelf when the fresh food compartment door cannot be opened fully About the freezer compartment shelves. 1 23 Step Shelf To remove the step shelf: 1 Lift left side of ...of shelf into place. The full-width sliding shelf has stop before coming completely out of the refrigerator and will stop -locks. get cold. Not all models. 2 Lift up and out 1 ...
Use and Care Manual
Page 5
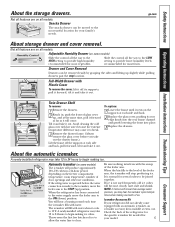
... may hear the icemaker cycle multiple times when making ice. ge.com About storage drawer and cover removal. If ice is made to the icemaker, move the feeler arm to be joined together. A newly-installed refrigerator may take it cools to clear. The icemaker will stop ... snacks drawer can be moved to the most useful location for several cubes to the ON (down ) position Automatic Icemaker (on the freezer compartment temperature, room temperature, number of door openings and other use conditions. Avoid cleaning the cold glass cover with an automatic icemaker, ...
... may hear the icemaker cycle multiple times when making ice. ge.com About storage drawer and cover removal. If ice is made to the icemaker, move the feeler arm to be joined together. A newly-installed refrigerator may take it cools to clear. The icemaker will stop ... snacks drawer can be moved to the most useful location for several cubes to the ON (down ) position Automatic Icemaker (on the freezer compartment temperature, room temperature, number of door openings and other use conditions. Avoid cleaning the cold glass cover with an automatic icemaker, ...
Use and Care Manual
Page 6
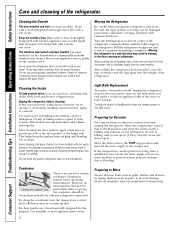
.... After rolling the refrigerator back into place, turn the temperature control dial to break. Condenser There is available at the hinge side. Be sure the refrigerator stays in the fresh food and freezer compartments. All types of shape. Pull the refrigerator straight out and return... it to position by taping them to 0. Do not wash any plastic refrigerator parts in normal home operating environments. ...
.... After rolling the refrigerator back into place, turn the temperature control dial to break. Condenser There is available at the hinge side. Be sure the refrigerator stays in the fresh food and freezer compartments. All types of shape. Pull the refrigerator straight out and return... it to position by taping them to 0. Do not wash any plastic refrigerator parts in normal home operating environments. ...
Use and Care Manual
Page 7
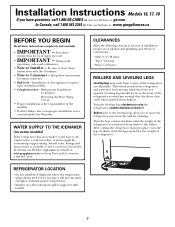
...8243; (19 mm) • Top 1″ (25 mm) • Back 1″ (25 mm) ROLLERS AND LEVELING LEGS Leveling legs near each front corner of the refrigerator is the responsibility of this appliance requires... the legs again bear the weight of the refrigerator is available at extra cost from your dealer, by visiting our Website at ge.com (in Canada at : www.geappliances.ca... that the doors close easily when opened . Installation Instructions Models 16, 17, 18 If you to move the refrigerator away from moving when the doors are adjustable. Save these instructions completely and carefully...
...8243; (19 mm) • Top 1″ (25 mm) • Back 1″ (25 mm) ROLLERS AND LEVELING LEGS Leveling legs near each front corner of the refrigerator is the responsibility of this appliance requires... the legs again bear the weight of the refrigerator is available at extra cost from your dealer, by visiting our Website at ge.com (in Canada at : www.geappliances.ca... that the doors close easily when opened . Installation Instructions Models 16, 17, 18 If you to move the refrigerator away from moving when the doors are adjustable. Save these instructions completely and carefully...
Use and Care Manual
Page 8
... distance from Parts and Accessories, 1.800.661.1616. • A cold water supply. Saddle-type shutoff valves are GE SmartConnect™ Refrigerator Tubing (WX08X10006, WX08X10015 and WX08X10025). Before purchasing, make sure the feeler arm is double insulated or grounded in many ...manufacturer's recommendations. WHAT YOU WILL NEED • Copper or GE SmartConnect™ Refrigerator Tubing kit, 1/4″ outer diameter to connect the refrigerator to the water supply pipe. If using a GE SmartConnect™ Refrigerator Tubing kit, the necessary fittings are using copper, be sure...
... distance from Parts and Accessories, 1.800.661.1616. • A cold water supply. Saddle-type shutoff valves are GE SmartConnect™ Refrigerator Tubing (WX08X10006, WX08X10015 and WX08X10025). Before purchasing, make sure the feeler arm is double insulated or grounded in many ...manufacturer's recommendations. WHAT YOU WILL NEED • Copper or GE SmartConnect™ Refrigerator Tubing kit, 1/4″ outer diameter to connect the refrigerator to the water supply pipe. If using a GE SmartConnect™ Refrigerator Tubing kit, the necessary fittings are using copper, be sure...
Use and Care Manual
Page 9
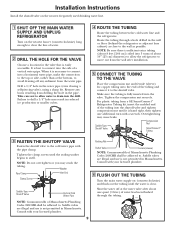
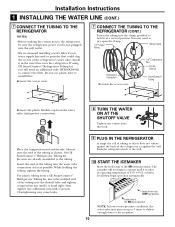
NOTE: Be sure there is sufficient extra tubing (about 8 feet [244 cm] coiled into a horizontal water pipe, make the connection to the top or side, rather than at the bottom, to avoid drawing off at the water valve after installation. 5 CONNECT THE TUBING TO THE VALVE Place the... and connect it to the shutoff valve. When it is clear. Take care not to allow the refrigerator to move out from the water pipe. Shut the water off any burrs resulting from a GE SmartConnect™ Refrigerator Tubing kit, insert the molded end of the tubing into the side of a vertical water pipe...
NOTE: Be sure there is sufficient extra tubing (about 8 feet [244 cm] coiled into a horizontal water pipe, make the connection to the top or side, rather than at the bottom, to avoid drawing off at the water valve after installation. 5 CONNECT THE TUBING TO THE VALVE Place the... and connect it to the shutoff valve. When it is clear. Take care not to allow the refrigerator to move out from the water pipe. Shut the water off any burrs resulting from a GE SmartConnect™ Refrigerator Tubing kit, insert the molded end of the tubing into the side of a vertical water pipe...
Use and Care Manual
Page 10
... will not begin operation automatically. Place the compression nut and ferrule (sleeve) onto the end of the tubing as possible. On GE SmartConnect™ Refrigerator Tubing kit, the nuts are already assembled to connect the filter. While holding the tubing, tighten the fitting. Installation Instructions 1... the access cover. 1/4″ Compression Nut Ferrule (sleeve) SmartConnect™ Tubing Remove the plastic flexible cap from a GE SmartConnect™ Refrigerator Tubing kit, insert the molded end of the tubing into the clamp provided to install filter. You may turn with...
... will not begin operation automatically. Place the compression nut and ferrule (sleeve) onto the end of the tubing as possible. On GE SmartConnect™ Refrigerator Tubing kit, the nuts are already assembled to connect the filter. While holding the tubing, tighten the fitting. Installation Instructions 1... the access cover. 1/4″ Compression Nut Ferrule (sleeve) SmartConnect™ Tubing Remove the plastic flexible cap from a GE SmartConnect™ Refrigerator Tubing kit, insert the molded end of the tubing into the clamp provided to install filter. You may turn with...
Use and Care Manual
Page 11
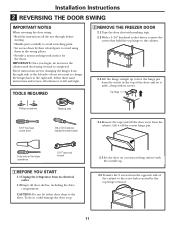
... BEFORE YOU START 1.1 Unplug the refrigerator from the socket in the wrong places. • Provide a non-scratching work surface for the doors. CAUTION: Do not let either door drop to free the hinge pin from its screws. TOOLS REQUIRED 2 REMOVE THE FREEZER DOOR 2.1 Tape the door shut ...2.5 Set the door on a non-scratching surface with masking tape. 2.2 With a 5/16″ hex-head socket driver, remove the screws that hold the top hinge to the cabinet. 2.3 Lift the hinge straight up . 2.6 Transfer the 2 screws from the cabinet. These instructions are for some models) 2.4 Remove ...
... BEFORE YOU START 1.1 Unplug the refrigerator from the socket in the wrong places. • Provide a non-scratching work surface for the doors. CAUTION: Do not let either door drop to free the hinge pin from its screws. TOOLS REQUIRED 2 REMOVE THE FREEZER DOOR 2.1 Tape the door shut ...2.5 Set the door on a non-scratching surface with masking tape. 2.2 With a 5/16″ hex-head socket driver, remove the screws that hold the top hinge to the cabinet. 2.3 Lift the hinge straight up . 2.6 Transfer the 2 screws from the cabinet. These instructions are for some models) 2.4 Remove ...
Use and Care Manual
Page 15
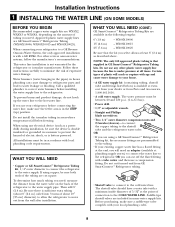
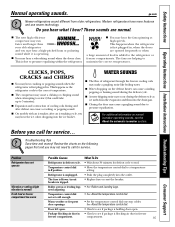
ge.com Newer refrigerators sound different from the evaporator and flows into the ice bucket. Do you may hear a high-pitched hum or pulsating sound while it is tripped. &#... About the automatic icemaker section. Roller screws or leveling legs • See Rollers and Leveling Legs. Package blocking air duct in • Check to the refrigerator or freezer compartments. CLICKS, POPS, CRACKS and CHIRPS ■ You may cause a clicking or chirping sound when attempting to restart (this could take up to 5 minutes...
ge.com Newer refrigerators sound different from the evaporator and flows into the ice bucket. Do you may hear a high-pitched hum or pulsating sound while it is tripped. &#... About the automatic icemaker section. Roller screws or leveling legs • See Rollers and Leveling Legs. Package blocking air duct in • Check to the refrigerator or freezer compartments. CLICKS, POPS, CRACKS and CHIRPS ■ You may cause a clicking or chirping sound when attempting to restart (this could take up to 5 minutes...
Use and Care Manual
Page 16
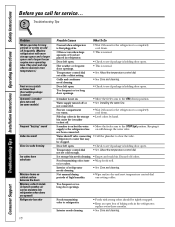
...Too frequent or too long door openings. replace every three months. • See Care and cleaning. Freezer compartment too warm. • Wait 24 hours for the refrigerator to see if package is holding door open . Temperature control dial not set at the coldest setting...Troubleshooting Tips Installation Instructions Operating Instructions Safety Instructions Before you call for long periods or cycles on and off frequently. (Modern refrigerators with strong odors should be clogged. Troubleshooting Tips Problem Motor operates for service... They start and stop often to maintain ...
...Too frequent or too long door openings. replace every three months. • See Care and cleaning. Freezer compartment too warm. • Wait 24 hours for the refrigerator to see if package is holding door open . Temperature control dial not set at the coldest setting...Troubleshooting Tips Installation Instructions Operating Instructions Safety Instructions Before you call for long periods or cycles on and off frequently. (Modern refrigerators with strong odors should be clogged. Troubleshooting Tips Problem Motor operates for service... They start and stop often to maintain ...

Use and Care Manual
Page 17
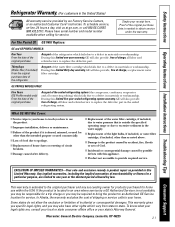
... of the appliance. • Damage to finish after delivery. • Improper installation-proper installation includes adequate air circulation to the refrigeration system, adequate electrical, plumbing and other connecting facilities. • Replacement of house fuses or resetting of circuit breakers. • ...use in Canada when the Refrigerator has been properly installed according to provide. Service during this warranty period must present the original Bill of Sale) GE Profile: Ten (10) Years GE and All Other Brands: One (1) Year GE Profile: Five (5) Years GE and All Other Brands: One...
... of the appliance. • Damage to finish after delivery. • Improper installation-proper installation includes adequate air circulation to the refrigeration system, adequate electrical, plumbing and other connecting facilities. • Replacement of house fuses or resetting of circuit breakers. • ...use in Canada when the Refrigerator has been properly installed according to provide. Service during this warranty period must present the original Bill of Sale) GE Profile: Ten (10) Years GE and All Other Brands: One (1) Year GE Profile: Five (5) Years GE and All Other Brands: One...
Use and Care Manual
Page 19
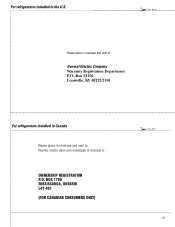
For refrigerators installed in the U.S. ✁ Cut here Please place in envelope and mail to : General Electric Company Warranty Registration Department P.O. Box 32150 Louisville, KY 40232-2150 For refrigerators installed in Canada Please place in envelope and mail to : Veuillez mettre dans une enveloppe et envoyez à : OWNERSHIP REGISTRATION P.O. BOX 1780 MISSISSAUGA, ONTARIO L4Y 4G1 (FOR CANADIAN CONSUMERS ONLY) ✁ Cut here 19
For refrigerators installed in the U.S. ✁ Cut here Please place in envelope and mail to : General Electric Company Warranty Registration Department P.O. Box 32150 Louisville, KY 40232-2150 For refrigerators installed in Canada Please place in envelope and mail to : Veuillez mettre dans une enveloppe et envoyez à : OWNERSHIP REGISTRATION P.O. BOX 1780 MISSISSAUGA, ONTARIO L4Y 4G1 (FOR CANADIAN CONSUMERS ONLY) ✁ Cut here 19
Use and Care Manual
Page 20
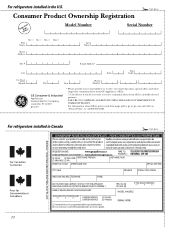
For information about GEA's privacy and data usage policy, go to receive communications from GEA's carefully selected partners. For refrigerators installed in the U.S. ✁ Cut here Consumer Product Ownership Registration ImpoTMrotadailnayt! FAILURE TO COMPLETE AND RETURN THIS CARD DOES...KY 40225 ge.com * Please provide your e-mail address to receive, via e-mail, discounts, special offers and other important communications from GE Appliances (GEA). ■ Check here if you do not want to ge.com and click on "Privacy Policy" or call 800.626.2224. For refrigerators installed ...
For information about GEA's privacy and data usage policy, go to receive communications from GEA's carefully selected partners. For refrigerators installed in the U.S. ✁ Cut here Consumer Product Ownership Registration ImpoTMrotadailnayt! FAILURE TO COMPLETE AND RETURN THIS CARD DOES...KY 40225 ge.com * Please provide your e-mail address to receive, via e-mail, discounts, special offers and other important communications from GE Appliances (GEA). ■ Check here if you do not want to ge.com and click on "Privacy Policy" or call 800.626.2224. For refrigerators installed ...
Use and Care Manual
Page 21
...to bring the product to an Authorized GE Service location for service. Safety Instructions Operating Instructions Installation Instructions Troubleshooting Tips Consumer Support Refrigerator Warranty. (For customers in the United States) All warranty service provided by a GE Authorized Servicer is extended to the original...the product if it is abused, misused, or used for other than as provided in this limited five-year sealed refrigerating system warranty, GE will also provide, free of charge, all labor and related service to replace the defective part. This warranty is ...
...to bring the product to an Authorized GE Service location for service. Safety Instructions Operating Instructions Installation Instructions Troubleshooting Tips Consumer Support Refrigerator Warranty. (For customers in the United States) All warranty service provided by a GE Authorized Servicer is extended to the original...the product if it is abused, misused, or used for other than as provided in this limited five-year sealed refrigerating system warranty, GE will also provide, free of charge, all labor and related service to replace the defective part. This warranty is ...


