
Owners Manual
Page 1
... Customers . .29 Warranty for U.S. Downloaded from www.Manualslib.com manuals search engine 200D8114P001 49-60444 11-05 JR RefrigeraTotp-Froeerzers ge.com Safety Instructions Connect Electricity 3 Extension Cords 2 Proper Disposal 2 Safety Precautions 2 Operating Instructions Additional Features 9 Automatic Icemaker 10...11 Water Filter 6 Care and Cleaning Care and Cleaning 11 Replacing the Light Bulbs 12 Installation Instructions Preparing to Install the Refrigerator 13 Reversing the Door Swing . . . . . .18-22 Water Line Installation 14-18 Troubleshooting Tips 24-26 Normal...
... Customers . .29 Warranty for U.S. Downloaded from www.Manualslib.com manuals search engine 200D8114P001 49-60444 11-05 JR RefrigeraTotp-Froeerzers ge.com Safety Instructions Connect Electricity 3 Extension Cords 2 Proper Disposal 2 Safety Precautions 2 Operating Instructions Additional Features 9 Automatic Icemaker 10...11 Water Filter 6 Care and Cleaning Care and Cleaning 11 Replacing the Light Bulbs 12 Installation Instructions Preparing to Install the Refrigerator 13 Reversing the Door Swing . . . . . .18-22 Water Line Installation 14-18 Troubleshooting Tips 24-26 Normal...
Owners Manual
Page 2
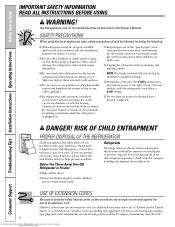
...prevent accidents. Skin may not easily climb inside. I Take off ) setting. I Do not touch the cold surfaces in the refrigerator. I Do not store or use gasoline or other appliance. However, if you are getting rid of an extension cord. clearances ... children may stick to the light circuit. Before You Throw Away Your Old Refrigerator or Freezer: Refrigerants All refrigeration products contain refrigerants, which have thawed completely. They could damage the refrigerator and seriously injure themselves. Be careful closing doors when children are not problems...
...prevent accidents. Skin may not easily climb inside. I Take off ) setting. I Do not touch the cold surfaces in the refrigerator. I Do not store or use gasoline or other appliance. However, if you are getting rid of an extension cord. clearances ... children may stick to the light circuit. Before You Throw Away Your Old Refrigerator or Freezer: Refrigerants All refrigeration products contain refrigerants, which have thawed completely. They could damage the refrigerator and seriously injure themselves. Be careful closing doors when children are not problems...

Owners Manual
Page 3
...from overheated wires. Have the wall outlet and circuit checked by pulling on the power cord. The refrigerator should always be properly grounded. This provides the best performance and also prevents overloading house wiring circuits which... wall outlet. Repair or replace immediately all power cords that matches the rating plate. When moving the refrigerator away from the outlet. Always grip plug firmly and pull straight out from the wall, be careful not...Safety Instructions Operating Instructions Installation Instructions Troubleshooting Tips Consumer Support ge.com WARNING!
...from overheated wires. Have the wall outlet and circuit checked by pulling on the power cord. The refrigerator should always be properly grounded. This provides the best performance and also prevents overloading house wiring circuits which... wall outlet. Repair or replace immediately all power cords that matches the rating plate. When moving the refrigerator away from the outlet. Always grip plug firmly and pull straight out from the wall, be careful not...Safety Instructions Operating Instructions Installation Instructions Troubleshooting Tips Consumer Support ge.com WARNING!
Owners Manual
Page 4
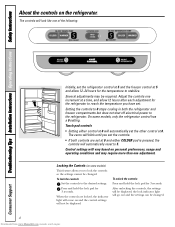
...and operating conditions and may be required. Adjust the controls one increment at 0 and either control at 0 will automatically reset to the refrigerator. Touch pad controls • Setting either COLDER pad is pressed, the controls will automatically set the other control at 5 and allow 12... Several adjustments may require more than one of the following: ADJUST FREEZER TEMP COLDER WARMER 9 IS COLDEST ACTIVATE LOCK HOLD 3 SECS ADJUST REFRIGERATOR TEMP COLDER WARMER 9 IS COLDEST Initially, set at a time, and allow 12-24 hours for 3 seconds. The zeros will vary based...
...and operating conditions and may be required. Adjust the controls one increment at 0 and either control at 0 will automatically reset to the refrigerator. Touch pad controls • Setting either COLDER pad is pressed, the controls will automatically set the other control at 5 and allow 12... Several adjustments may require more than one of the following: ADJUST FREEZER TEMP COLDER WARMER 9 IS COLDEST ACTIVATE LOCK HOLD 3 SECS ADJUST REFRIGERATOR TEMP COLDER WARMER 9 IS COLDEST Initially, set at a time, and allow 12-24 hours for 3 seconds. The zeros will vary based...

Owners Manual
Page 5
...based on the side where the SET light is shipped with protective film covering the temperature controls. The SET light will not be changed . Refrigerator temperatures can be adjusted between 34°F and 44°F and the freezer temperatures can be displayed. Then press the COLDER pad again ...(on usage and operating environment. ge.com The temperature controls are locked, the indicator light will come on the side you have set. To change the temperature, tap either ...
...based on the side where the SET light is shipped with protective film covering the temperature controls. The SET light will not be changed . Refrigerator temperatures can be adjusted between 34°F and 44°F and the freezer temperatures can be displayed. Then press the COLDER pad again ...(on usage and operating environment. ge.com The temperature controls are locked, the indicator light will come on the side you have set. To change the temperature, tap either ...

Owners Manual
Page 6
...or filter bypass plug. Close the cartridge cover. CAUTION: If air has been trapped in the United States, visit our Website, ge.com, or call GE Parts and Accessories, 800.626.2002. Remove the protective foil from the dispenser for future use the filter bypass plug when a ... Run water from the end of the cartridge. Position the cartridge inside the cartridge holder in the back upper right corner of the refrigerator compartment. The blade on some models) Water Filter Cartridge The water filter cartridge is installed. Replacement Filters To order additional filter cartridges in...
...or filter bypass plug. Close the cartridge cover. CAUTION: If air has been trapped in the United States, visit our Website, ge.com, or call GE Parts and Accessories, 800.626.2002. Remove the protective foil from the dispenser for future use the filter bypass plug when a ... Run water from the end of the cartridge. Position the cartridge inside the cartridge holder in the back upper right corner of the refrigerator compartment. The blade on some models) Water Filter Cartridge The water filter cartridge is installed. Replacement Filters To order additional filter cartridges in...
Owners Manual
Page 7
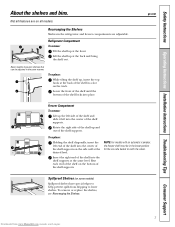
...it left end of the shelf supports on the track. Insert the right end of the shelf into the center of the shelf supports. ge.com Freezer Compartment To remove: Lift up and out of the shelf supports. Rest each end of the shelf supports. Safety Instructions Operating ...hook at the back and bring the shelf out. NOTE: For models with an automatic icemaker, the freezer shelf must be adjusted in the refrigerator and freezer compartments are on the bottom of the shelf on all features are adjustable. Rearranging the Shelves Shelves in the same manner. To...
...it left end of the shelf supports on the track. Insert the right end of the shelf into the center of the shelf supports. ge.com Freezer Compartment To remove: Lift up and out of the shelf supports. Rest each end of the shelf supports. Safety Instructions Operating ...hook at the back and bring the shelf out. NOTE: For models with an automatic icemaker, the freezer shelf must be adjusted in the refrigerator and freezer compartments are on the bottom of the shelf on all features are adjustable. Rearranging the Shelves Shelves in the same manner. To...

Owners Manual
Page 8
... , then pull out. The snugger helps prevent tipping, spilling or sliding of the shelf until the central tabs are designed to help prevent spills from refrigerator to lower shelves. Non-Adjustable Shelves on the door shelf. To replace: Engage the ends of the bin in until the central tabs are above...
... , then pull out. The snugger helps prevent tipping, spilling or sliding of the shelf until the central tabs are designed to help prevent spills from refrigerator to lower shelves. Non-Adjustable Shelves on the door shelf. To replace: Engage the ends of the bin in until the central tabs are above...

Owners Manual
Page 9
... Pan (on some models) When the pan is placed in the bottom of soda or 2 wine/water bottles (lengthwise). The settings can be wiped dry. ge.com Not all features are on some models) Slide-out beverage rack holds 12 cans of the drawers or under the drawers should be moved... around the pan to the stop position, lift the rack up and past the stop position and lift it out. When set at the normal refrigerator temperature. Shelf Saver Rack (on all the way to the HIGH setting to any location if you don't want the extra cold storage.
... Pan (on some models) When the pan is placed in the bottom of soda or 2 wine/water bottles (lengthwise). The settings can be wiped dry. ge.com Not all features are on some models) Slide-out beverage rack holds 12 cans of the drawers or under the drawers should be moved... around the pan to the stop position, lift the rack up and past the stop position and lift it out. When set at the normal refrigerator temperature. Shelf Saver Rack (on all the way to the HIGH setting to any location if you don't want the extra cold storage.
Owners Manual
Page 10
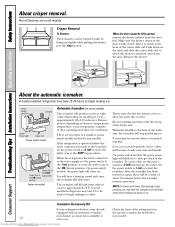
...the first few batches of door openings and other use conditions. Set the power switch to I (on all features are two types of the refrigerator for the specific icemaker kit needed for several cubes to clear. approximately 100-130 cubes in a 24-hour period, depending on . Consumer .... Power Switch Icemaker Green Power Light Feeler Arm Power switch model Feeler Arm in the STOP Feeler Arm in the icemaker. If the refrigerator is operated before the icemaker resumes operation. When the bin fills to begin making ice cubes. Crisper Removal To Remove: These drawers can...
...the first few batches of door openings and other use conditions. Set the power switch to I (on all features are two types of the refrigerator for the specific icemaker kit needed for several cubes to clear. approximately 100-130 cubes in a 24-hour period, depending on . Consumer .... Power Switch Icemaker Green Power Light Feeler Arm Power switch model Feeler Arm in the STOP Feeler Arm in the icemaker. If the refrigerator is operated before the icemaker resumes operation. When the bin fills to begin making ice cubes. Crisper Removal To Remove: These drawers can...
Owners Manual
Page 11
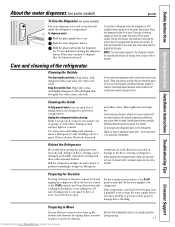
...clean cloth or sponge. Press the dispenser button for Vacation For long vacations or absences, remove food and unplug the refrigerator. Do not wipe the refrigerator with soapy water. Do not use scouring pads, powdered cleaners, bleach or cleaners containing bleach because these products can...the water dispenser. (on some models) ge.com To Use the Dispenser (on some models). Wipe with a clean cloth lightly dampened with a clean, soft cloth. Dry with mild liquid dish detergent. Unplug the refrigerator before cleaning. Behind the Refrigerator Be careful when moving . 11 Downloaded ...
...clean cloth or sponge. Press the dispenser button for Vacation For long vacations or absences, remove food and unplug the refrigerator. Do not wipe the refrigerator with soapy water. Do not use scouring pads, powdered cleaners, bleach or cleaners containing bleach because these products can...the water dispenser. (on some models) ge.com To Use the Dispenser (on some models). Wipe with a clean cloth lightly dampened with a clean, soft cloth. Dry with mild liquid dish detergent. Unplug the refrigerator before cleaning. Behind the Refrigerator Be careful when moving . 11 Downloaded ...
Owners Manual
Page 12
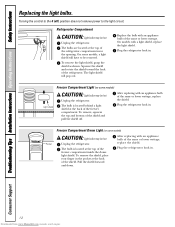
... 12 Downloaded from www.Manualslib.com manuals search engine The bulb is located at the back of the same or lower wattage, Pocket Unplug the refrigerator. To remove the light shield, grasp the shield as shown. On models with an appliance bulb of the shield. After replacing with an appliance... top and bottom of the same or lower wattage. To remove the shield, place your finger in the pocket at the top of the refrigerator compartment near the opening. Turning the control to be hot. The bulb is located behind a light shield at the top of the Plug the...
... 12 Downloaded from www.Manualslib.com manuals search engine The bulb is located at the back of the same or lower wattage, Pocket Unplug the refrigerator. To remove the light shield, grasp the shield as shown. On models with an appliance bulb of the shield. After replacing with an appliance... top and bottom of the same or lower wattage. To remove the shield, place your finger in the pocket at the top of the refrigerator compartment near the opening. Turning the control to be hot. The bulb is located behind a light shield at the top of the Plug the...

Owners Manual
Page 13
...and ordinances. • Note to lower it snaps into the top of the oval openings at www.geappliances.ca) or from the refrigerator. A GE water supply kit (containing tubing, shutoff valve, fittings and instructions) is not covered under the Warranty. CLEARANCES Allow the following clearances for...will not perform properly. • Install it will have 3 purposes: I Rollers adjust so the refrigerator is against a wall on a floor strong enough to improper installation is available at ge.com (in the grille will fit around the bottom door hinge. To adjust the rollers: Remove...
...and ordinances. • Note to lower it snaps into the top of the oval openings at www.geappliances.ca) or from the refrigerator. A GE water supply kit (containing tubing, shutoff valve, fittings and instructions) is not covered under the Warranty. CLEARANCES Allow the following clearances for...will not perform properly. • Install it will have 3 purposes: I Rollers adjust so the refrigerator is against a wall on a floor strong enough to improper installation is available at ge.com (in the grille will fit around the bottom door hinge. To adjust the rollers: Remove...

Owners Manual
Page 14
...or rupture with local plumbing code requirements. WX08X10002 - WX08X10025 Be sure that supplied in GE SmartConnect™ Refrigerator Tubing kits. Installation Instructions INSTALLING THE WATER LINE (ON SOME MODELS) BEFORE YOU BEGIN Recommended copper water ...; (7.6 m) - All installations must be in the O (off) position. WHAT YOU WILL NEED • Copper or GE SmartConnect™ Refrigerator Tubing kit, 1/4″ outer diameter to connect the refrigerator to move out from www.Manualslib.com manuals search engine Be sure there is sufficient extra tubing (about 8′ [2.4 m]...
...or rupture with local plumbing code requirements. WX08X10002 - WX08X10025 Be sure that supplied in GE SmartConnect™ Refrigerator Tubing kits. Installation Instructions INSTALLING THE WATER LINE (ON SOME MODELS) BEFORE YOU BEGIN Recommended copper water ...; (7.6 m) - All installations must be in the O (off) position. WHAT YOU WILL NEED • Copper or GE SmartConnect™ Refrigerator Tubing kit, 1/4″ outer diameter to connect the refrigerator to move out from www.Manualslib.com manuals search engine Be sure there is sufficient extra tubing (about 8′ [2.4 m]...

Owners Manual
Page 15
...″ outer diameter compression nuts and 2 ferrules (sleeves)-to connect the copper tubing to the COLD WATER LINE. Remove any sediment from GE SmartConnect™ Refrigerator tubing. 3 DRILL THE HOLE FOR THE VALVE Drill a 1/4″ hole in the water pipe (even if using a self-piercing valve) using... a GE SmartConnect™ Refrigerator Tubing kit, the necessary fittings are included in many water supply kits. The shutoff valve should have a water inlet with a minimum inside...
...″ outer diameter compression nuts and 2 ferrules (sleeves)-to connect the copper tubing to the COLD WATER LINE. Remove any sediment from GE SmartConnect™ Refrigerator tubing. 3 DRILL THE HOLE FOR THE VALVE Drill a 1/4″ hole in the water pipe (even if using a self-piercing valve) using... a GE SmartConnect™ Refrigerator Tubing kit, the necessary fittings are included in many water supply kits. The shutoff valve should have a water inlet with a minimum inside...

Owners Manual
Page 16
...Nut Outlet Valve Ferrule (sleeve) NOTE: Commonwealth of Massachusetts Plumbing Codes 248CMR shall be adhered to. For plastic tubing from a GE SmartConnect™ Refrigerator Tubing kit, insert the molded end of water has been flushed through a hole drilled in the wall or floor (behind the...3 turns of about one additional turn with your licensed plumber. 6 ROUTE THE TUBING Route the tubing between the cold water line and the refrigerator. NOTE: Do not overtighten or you may cause leaks. Consult with a wrench. Washer Pipe Clamp Inlet End Clamp Screw 7 CONNECT THE ...
...Nut Outlet Valve Ferrule (sleeve) NOTE: Commonwealth of Massachusetts Plumbing Codes 248CMR shall be adhered to. For plastic tubing from a GE SmartConnect™ Refrigerator Tubing kit, insert the molded end of water has been flushed through a hole drilled in the wall or floor (behind the...3 turns of about one additional turn with your licensed plumber. 6 ROUTE THE TUBING Route the tubing between the cold water line and the refrigerator. NOTE: Do not overtighten or you may cause leaks. Consult with a wrench. Washer Pipe Clamp Inlet End Clamp Screw 7 CONNECT THE ...

Owners Manual
Page 17
...Reattach the access cover. 17 Downloaded from a GE SmartConnect™ Refrigerator Tubing kit, insert the molded end of the refrigerator's water valve. Remove the plastic flexible cap from the water valve (refrigerator connection). 9 CONNECT THE TUBING TO THE REFRIGERATOR (CONT.) Fasten the tubing into the wall... outlet. • We recommend installing a water filter if your refrigerator. One of the tubing as possible. If using GE SmartConnect™ Refrigerator Tubing kit, you will look like the connection on your water supply has sand or particles ...
...Reattach the access cover. 17 Downloaded from a GE SmartConnect™ Refrigerator Tubing kit, insert the molded end of the refrigerator's water valve. Remove the plastic flexible cap from the water valve (refrigerator connection). 9 CONNECT THE TUBING TO THE REFRIGERATOR (CONT.) Fasten the tubing into the wall... outlet. • We recommend installing a water filter if your refrigerator. One of the tubing as possible. If using GE SmartConnect™ Refrigerator Tubing kit, you will look like the connection on your water supply has sand or particles ...
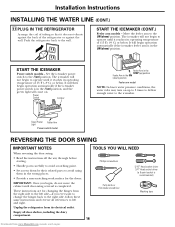
Owners Manual
Page 18
... the hinges back to the right side, follow these same instructions and reverse all door shelves, including the dairy compartment. Unplug the refrigerator from www.Manualslib.com manuals search engine It will not begin operation automatically if the icemaker power switch is in the wrong places. ... Set the icemaker power switch to the ON (down ) position. Installation Instructions INSTALLING THE WATER LINE (CONT.) 11 PLUG IN THE REFRIGERATOR Arrange the coil of tubing so that it does not vibrate against the wall. The icemaker will then begin to avoid using them in ...
... the hinges back to the right side, follow these same instructions and reverse all door shelves, including the dairy compartment. Unplug the refrigerator from www.Manualslib.com manuals search engine It will not begin operation automatically if the icemaker power switch is in the wrong places. ... Set the icemaker power switch to the ON (down ) position. Installation Instructions INSTALLING THE WATER LINE (CONT.) 11 PLUG IN THE REFRIGERATOR Arrange the coil of tubing so that it does not vibrate against the wall. The icemaker will then begin to avoid using them in ...

Owners Manual
Page 19
Lift the door straight off the center hinge pin. Installation Instructions 1 REMOVE THE FREEZER DOOR Tape the door shut with masking tape. 2 REMOVE THE REFRIGERATOR DOOR Tape the door shut with masking tape. Top Hinge Tape the door shut with masking tape. Remove the two screws, then lift the hinge ...
Lift the door straight off the center hinge pin. Installation Instructions 1 REMOVE THE FREEZER DOOR Tape the door shut with masking tape. 2 REMOVE THE REFRIGERATOR DOOR Tape the door shut with masking tape. Top Hinge Tape the door shut with masking tape. Remove the two screws, then lift the hinge ...

Owners Manual
Page 21
... right side of the door. Button Handle Plug Remove the two screws holding the handle. 7 TRANSFER REFRIGERATOR DOOR HANDLE TO THE RIGHT (CONT.) Transfer the door plug button to the opposite side. Installation Instructions 7 TRANSFER REFRIGERATOR DOOR HANDLE TO THE RIGHT To remove the handle: Remove the plug button by carefully prying...
... right side of the door. Button Handle Plug Remove the two screws holding the handle. 7 TRANSFER REFRIGERATOR DOOR HANDLE TO THE RIGHT (CONT.) Transfer the door plug button to the opposite side. Installation Instructions 7 TRANSFER REFRIGERATOR DOOR HANDLE TO THE RIGHT To remove the handle: Remove the plug button by carefully prying...


