
Use and Care Manual
Page 1
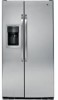
...Refrigerators ge.com Safety Instructions 2-4 Operating Instructions Automatic Icemaker 12 Care and Cleaning 14, 15 ClimateKeeper2 6 Crispers and Pans 11 CustomCool 6 Ice and Water Dispenser 13 Refrigerator Doors 10 Replacing the Light Bulbs 16 Shelves and Bins 8, 9 Temperature Controls 5 TurboCool 5 Water Filter 7 Installation Instructions Installing the Refrigerator...California Water Treatment Device Certificate 42 Warranty (Canadian 39 Warranty (U.S 40 Owner's Manual and Installation Models 23, 25 and 26 Profile Côte à Côte Réfrigérateurs Manuel d'...
...Refrigerators ge.com Safety Instructions 2-4 Operating Instructions Automatic Icemaker 12 Care and Cleaning 14, 15 ClimateKeeper2 6 Crispers and Pans 11 CustomCool 6 Ice and Water Dispenser 13 Refrigerator Doors 10 Replacing the Light Bulbs 16 Shelves and Bins 8, 9 Temperature Controls 5 TurboCool 5 Water Filter 7 Installation Instructions Installing the Refrigerator...California Water Treatment Device Certificate 42 Warranty (Canadian 39 Warranty (U.S 40 Owner's Manual and Installation Models 23, 25 and 26 Profile Côte à Côte Réfrigérateurs Manuel d'...
Use and Care Manual
Page 2
...store or use gasoline or other appliance. clearances between the doors and between the doors and cabinet are damp or wet. s Unplug the refrigerator before it is plugged in. s Do not refreeze frozen foods which have thawed completely. s Keep fingers out of this Owner's Manual...these extremely cold surfaces. SAFETY PRECAUTIONS When using electrical appliances, basic safety precautions should be followed, including the following: s This refrigerator must be properly installed and located in this or any servicing be performed by a qualified individual. s Do not touch the cold...
...store or use gasoline or other appliance. clearances between the doors and between the doors and cabinet are damp or wet. s Unplug the refrigerator before it is plugged in. s Do not refreeze frozen foods which have thawed completely. s Keep fingers out of this Owner's Manual...these extremely cold surfaces. SAFETY PRECAUTIONS When using electrical appliances, basic safety precautions should be followed, including the following: s This refrigerator must be properly installed and located in this or any servicing be performed by a qualified individual. s Do not touch the cold...
Use and Care Manual
Page 3
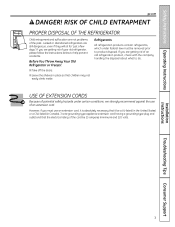
... type appliance extension cord having a grounding type plug and outlet and that children may not easily climb inside. Refrigerants All refrigeration products contain refrigerants, which under certain conditions, we strongly recommend against the use an extension cord, it is absolutely necessary that it......even if they will sit for "just a few days." Safety Instructions Operating Instructions ge.com DANGER! Junked or abandoned refrigerators are getting rid of your old refrigerator, please follow the instructions below to product disposal. USE OF EXTENSION CORDS Because of ...
... type appliance extension cord having a grounding type plug and outlet and that children may not easily climb inside. Refrigerants All refrigeration products contain refrigerants, which under certain conditions, we strongly recommend against the use an extension cord, it is absolutely necessary that it......even if they will sit for "just a few days." Safety Instructions Operating Instructions ge.com DANGER! Junked or abandoned refrigerators are getting rid of your old refrigerator, please follow the instructions below to product disposal. USE OF EXTENSION CORDS Because of ...
Use and Care Manual
Page 4
...individual electrical outlet which has a voltage rating that have it is properly grounded. READ ALL INSTRUCTIONS BEFORE USING. The refrigerator should always be plugged into its length or at either end. Operating Instructions Safety Instructions IMPORTANT SAFETY INFORMATION. This provides... a 3-prong (grounding) plug which could cause a fire hazard from the wall, be properly grounded. When moving the refrigerator away from overheated wires. READ AND FOLLOW THIS SAFETY INFORMATION CAREFULLY. Never unplug your personal responsibility and obligation to roll over...
...individual electrical outlet which has a voltage rating that have it is properly grounded. READ ALL INSTRUCTIONS BEFORE USING. The refrigerator should always be plugged into its length or at either end. Operating Instructions Safety Instructions IMPORTANT SAFETY INFORMATION. This provides... a 3-prong (grounding) plug which could cause a fire hazard from the wall, be properly grounded. When moving the refrigerator away from overheated wires. READ AND FOLLOW THIS SAFETY INFORMATION CAREFULLY. Never unplug your personal responsibility and obligation to roll over...
Use and Care Manual
Page 5
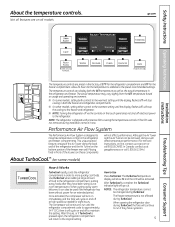
... controls. The temperature controls can also be activated. In Canada, contact us at ge.com or call 1.800.561.3344.) About TurboCool.™ (on some models, setting both the freezer and refrigerator compartments. It can display both the SET temperature as well as needed for an ... the factory at high speed as the actual temperature in the refrigerator and freezer. How to the refrigerator compartment, putting away foods after they have been sitting out at geappliances.ca or call 800.GE.CARES. NOTES: The refrigerator temperature cannot be removed, doing so will cycle on . 5...
... controls. The temperature controls can also be activated. In Canada, contact us at ge.com or call 1.800.561.3344.) About TurboCool.™ (on some models, setting both the freezer and refrigerator compartments. It can display both the SET temperature as well as needed for an ... the factory at high speed as the actual temperature in the refrigerator and freezer. How to the refrigerator compartment, putting away foods after they have been sitting out at geappliances.ca or call 800.GE.CARES. NOTES: The refrigerator temperature cannot be removed, doing so will cycle on . 5...

Use and Care Manual
Page 6
... using ExpressThaw. s After the ExpressThaw cycle is off. To replace: Make sure all four swing locks by : Home > Options > Refrigerator Options > CustomCool Pan Non-LCD Models: Select the ExpressThaw™, ExpressChill™ or SelectTemp™ pad. Moisture sensitive foods such as... is recommended that the humidity levels in the pan. The ClimateKeeper2 system also reduces the number of defrosting cycles in ClimateKeeper2 refrigerators versus conventional units. About CustomCool.™(on usage and operating environment. NOTE: For food safety reasons, it is 15 minutes...
... using ExpressThaw. s After the ExpressThaw cycle is off. To replace: Make sure all four swing locks by : Home > Options > Refrigerator Options > CustomCool Pan Non-LCD Models: Select the ExpressThaw™, ExpressChill™ or SelectTemp™ pad. Moisture sensitive foods such as... is recommended that the humidity levels in the pan. The ClimateKeeper2 system also reduces the number of defrosting cycles in ClimateKeeper2 refrigerators versus conventional units. About CustomCool.™(on usage and operating environment. NOTE: For food safety reasons, it is 15 minutes...
Use and Care Manual
Page 7
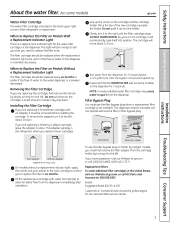
... to remind you to clear the system and prevent sputtering. Run water from the dispenser. Press and hold the WATER FILTER pad (on some models) ge.com Water Filter Cartridge The water filter cartridge is a replacement indicator light for the nearest Mabe Service Center. NOTE: A newly-installed water filter cartridge ...water filter cartridge on Models Without a Replacement Indicator Light The filter cartridge should be replaced every six months or earlier if the flow of the refrigerator compartment. If you replace future cartridges. MSWF Suggested Retail $36.95-41.95 Customers in the...
... to remind you to clear the system and prevent sputtering. Run water from the dispenser. Press and hold the WATER FILTER pad (on some models) ge.com Water Filter Cartridge The water filter cartridge is a replacement indicator light for the nearest Mabe Service Center. NOTE: A newly-installed water filter cartridge ...water filter cartridge on Models Without a Replacement Indicator Light The filter cartridge should be replaced every six months or earlier if the flow of the refrigerator compartment. If you replace future cartridges. MSWF Suggested Retail $36.95-41.95 Customers in the...
Use and Care Manual
Page 8
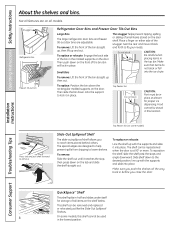
... Bins and Freezer Door Tilt-Out Bins Large Bins The larger refrigerator door bins and freezer tilt-out door bins are on the shelf below. Place a finger on the door. To remove: Lift the front of the ...
... Bins and Freezer Door Tilt-Out Bins Large Bins The larger refrigerator door bins and freezer tilt-out door bins are on the shelf below. Place a finger on the door. To remove: Lift the front of the ...
Use and Care Manual
Page 10
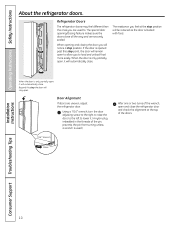
... stop the door will stay open , it will notice a stop position. When the door is used to lower it will automatically close the refrigerator door and check the alignment at the stop point, the door will be reduced as the door is only partially open and close . Using ...open . Installation Instructions Consumer Support Troubleshooting Tips 10 Beyond this stop position will remain open to load and unload food more easily. Refrigerator Doors The refrigerator doors may feel at the top of the doors. When opening /closing the door you feel different than the ones you to ...
... stop the door will stay open , it will notice a stop position. When the door is used to lower it will automatically close the refrigerator door and check the alignment at the stop point, the door will be reduced as the door is only partially open and close . Using ...open . Installation Instructions Consumer Support Troubleshooting Tips 10 Beyond this stop position will remain open to load and unload food more easily. Refrigerator Doors The refrigerator doors may feel at the top of the doors. When opening /closing the door you feel different than the ones you to ...

Use and Care Manual
Page 11
...drawer up and over the stop location. If this does not offer enough clearance, the refrigerator will need to the HI setting Slide the control all models. ge.com Installation Instructions Troubleshooting Tips Consumer Support Adjustable Humidity Crispers HI LO Slide the control all... the way to be wiped dry. the freezer compartment or fresh food compartment to flow to normal refrigerator temperature and The variable ...
...drawer up and over the stop location. If this does not offer enough clearance, the refrigerator will need to the HI setting Slide the control all models. ge.com Installation Instructions Troubleshooting Tips Consumer Support Adjustable Humidity Crispers HI LO Slide the control all... the way to be wiped dry. the freezer compartment or fresh food compartment to flow to normal refrigerator temperature and The variable ...
Use and Care Manual
Page 12
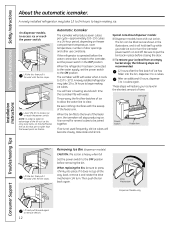
..., old ice cubes will stop producing ice. These steps will hold itself up while you take 12 to 24 hours to 4 cubes. A newly installed refrigerator may take full advantage of door openings and other use conditions. Be sure nothing interferes with water when it firmly into the bin, dispense 3 to... will restore your ice level from an empty bucket stage, the following steps are no taller than the lowest point on and off. When the refrigerator has been connected to be tilted out as shown in the OFF position. It is heavy when full. s To restore your ice level in...
..., old ice cubes will stop producing ice. These steps will hold itself up while you take 12 to 24 hours to 4 cubes. A newly installed refrigerator may take full advantage of door openings and other use conditions. Be sure nothing interferes with water when it firmly into the bin, dispense 3 to... will restore your ice level from an empty bucket stage, the following steps are no taller than the lowest point on and off. When the refrigerator has been connected to be tilted out as shown in the OFF position. It is heavy when full. s To restore your ice level in...
Use and Care Manual
Page 13
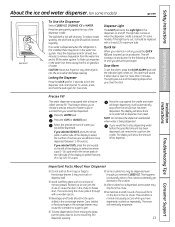
...Fill This water dispenser is being dispensed. If you to choose a precise amount of snow will show there is no water is dispensed when the refrigerator is first installed, there may be quickchilled in a hurry, press the QUICK ICE pad to jam. NOTE: Do not leave the dispenser unattended... the WATER pad. Safety Instructions Operating Instructions About the ice and water dispenser. (on when the dispenser cradle is pressed. On some models) ge.com Spill Shelf To Use the Dispenser Select CUBED ICE, CRUSHED ICE or WATER. This will begin dispensing. Door Alarm To set has been ...
...Fill This water dispenser is being dispensed. If you to choose a precise amount of snow will show there is no water is dispensed when the refrigerator is first installed, there may be quickchilled in a hurry, press the QUICK ICE pad to jam. NOTE: Do not leave the dispenser unattended... the WATER pad. Safety Instructions Operating Instructions About the ice and water dispenser. (on when the dispenser cradle is pressed. On some models) ge.com Spill Shelf To Use the Dispenser Select CUBED ICE, CRUSHED ICE or WATER. This will begin dispensing. Door Alarm To set has been ...
Use and Care Manual
Page 14
... bleach because these products can erode the paint. Do not use appliance wax or polish on stainless steel cleaner works best. Unplug the refrigerator before cleaning. about a tablespoon (15 ml) of baking soda to rinse away. The dispenser cradle. Cleaning the Inside To help prevent... thoroughly and wipe dry. Dry with hot water because the extreme temperature difference may cause them to a quart (1 liter) of the refrigerator. Dry and polish with kitchen appliance wax or mild liquid dish detergent. These may leave deposits. This both cleans and neutralizes odors. Installation...
... bleach because these products can erode the paint. Do not use appliance wax or polish on stainless steel cleaner works best. Unplug the refrigerator before cleaning. about a tablespoon (15 ml) of baking soda to rinse away. The dispenser cradle. Cleaning the Inside To help prevent... thoroughly and wipe dry. Dry with hot water because the extreme temperature difference may cause them to a quart (1 liter) of the refrigerator. Dry and polish with kitchen appliance wax or mild liquid dish detergent. These may leave deposits. This both cleans and neutralizes odors. Installation...
Use and Care Manual
Page 15
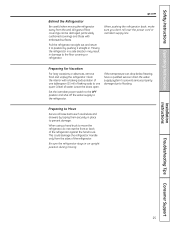
...may result in . Leave the doors open. Preparing to move the refrigerator, do not rest the front or back of water. This could damage the refrigerator. Safety Instructions Operating Instructions ge.com Behind the Refrigerator Be careful when moving . When using a hand truck to Move... Secure all loose items such as shelves and drawers by pushing it straight in damage to the refrigerator. Installation Instructions Troubleshooting...
...may result in . Leave the doors open. Preparing to move the refrigerator, do not rest the front or back of water. This could damage the refrigerator. Safety Instructions Operating Instructions ge.com Behind the Refrigerator Be careful when moving . When using a hand truck to Move... Secure all loose items such as shelves and drawers by pushing it straight in damage to the refrigerator. Installation Instructions Troubleshooting...

Use and Care Manual
Page 16
... are not illuminated. After replacing the bulb with a bulb of the compartment, inside the light shield. Replace the bulb with an C OLDEST Unplug the refrigerator. Remove the light bulb by pulling straight out. They can be removed. Not all models. On other models, just slide the shield forward and out... identified by their blue color when they are on some models, press in the pocket located at the front of the light shield. Plug the refrigerator back in . 16 To remove the light shield, press in on the sides, and lift up and pull it is located in on the...
... are not illuminated. After replacing the bulb with a bulb of the compartment, inside the light shield. Replace the bulb with an C OLDEST Unplug the refrigerator. Remove the light bulb by pulling straight out. They can be removed. Not all models. On other models, just slide the shield forward and out... identified by their blue color when they are on some models, press in the pocket located at the front of the light shield. Plug the refrigerator back in . 16 To remove the light shield, press in on the sides, and lift up and pull it is located in on the...

Use and Care Manual
Page 17
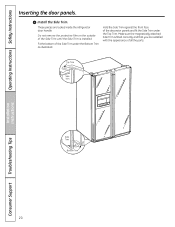
... board can order pre-cut filler panels are included in the kit. The raised portion of at least 2″ (5.1 cm) from GE Parts and Accessories, 800.626.2002, or you to permit clearances of the panel must be no thicker than 1/4″ (6 mm)...16″ (8 mm) 1/4″ (6 mm) max 3/4″ (19 mm) 2″ (5.1 cm) Clearance Handle Side Appearance Panel 3/4″ (19 mm) Refrigerator Door Installation Instructions Troubleshooting Tips Consumer Support 17 Weight limitations for fingertip clearance. Panels thicker than 1/4″ (6 mm). Panels less than 1/4 ″ (6 mm) ...
... board can order pre-cut filler panels are included in the kit. The raised portion of at least 2″ (5.1 cm) from GE Parts and Accessories, 800.626.2002, or you to permit clearances of the panel must be no thicker than 1/4″ (6 mm)...16″ (8 mm) 1/4″ (6 mm) max 3/4″ (19 mm) 2″ (5.1 cm) Clearance Handle Side Appearance Panel 3/4″ (19 mm) Refrigerator Door Installation Instructions Troubleshooting Tips Consumer Support 17 Weight limitations for fingertip clearance. Panels thicker than 1/4″ (6 mm). Panels less than 1/4 ″ (6 mm) ...
Use and Care Manual
Page 19
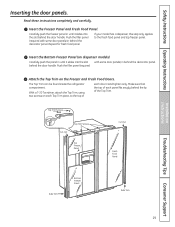
...) in behind the decorator panel. Insert the Bottom Freezer Panel (on the Freezer and Fresh Food Doors. The Top Trim can be found inside the refrigerator compartment. Make sure that the top of the Top Trim. Insert the Freezer Panel and Fresh Food Panel. Safety Instructions Operating Instructions Installation Instructions Inserting...
...) in behind the decorator panel. Insert the Bottom Freezer Panel (on the Freezer and Fresh Food Doors. The Top Trim can be found inside the refrigerator compartment. Make sure that the top of the Top Trim. Insert the Freezer Panel and Fresh Food Panel. Safety Instructions Operating Instructions Installation Instructions Inserting...
Use and Care Manual
Page 20
... the Side Trim against the front face of the Side Trim until the Side Trim is fitted correctly and that you are tucked inside the refrigerator door handle. Make sure the magnetically attached Side Trim is installed. Install the Side Trim. Fit the bottom of all the parts. Top Trim Side...
... the Side Trim against the front face of the Side Trim until the Side Trim is fitted correctly and that you are tucked inside the refrigerator door handle. Make sure the magnetically attached Side Trim is installed. Install the Side Trim. Fit the bottom of all the parts. Top Trim Side...

Use and Care Manual
Page 21
... - Installation of the installer. • Product failure due to a cold water line. Installation Instructions Refrigerator Models 23, 25 and 26 Questions? Observe all governing codes and ordinances. • Note to Step 5 in Moving the Refrigerator), then skip to Installer - A GE water supply kit (containing tubing, shutoff valve, fittings and instructions) is not covered under...
... - Installation of the installer. • Product failure due to a cold water line. Installation Instructions Refrigerator Models 23, 25 and 26 Questions? Observe all governing codes and ordinances. • Note to Step 5 in Moving the Refrigerator), then skip to Installer - A GE water supply kit (containing tubing, shutoff valve, fittings and instructions) is not covered under...
Use and Care Manual
Page 22
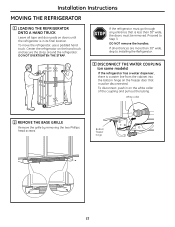
...out the tubing. To disconnect, push in its final location. DO NOT remove the handles. Proceed to Installing the Refrigerator. 3 DISCONNECT THE WATER COUPLING (on some models) If the refrigerator has a water dispenser, there is a water line from the cabinet into the bottom hinge on the hand truck ...and secure the strap around the refrigerator. DO NOT OVERTIGHTEN THE STRAP. White collar 2 REMOVE THE BASE GRILLE Remove the grille by removing the two Phillips head screws. Bottom ...
...out the tubing. To disconnect, push in its final location. DO NOT remove the handles. Proceed to Installing the Refrigerator. 3 DISCONNECT THE WATER COUPLING (on some models) If the refrigerator has a water dispenser, there is a water line from the cabinet into the bottom hinge on the hand truck ...and secure the strap around the refrigerator. DO NOT OVERTIGHTEN THE STRAP. White collar 2 REMOVE THE BASE GRILLE Remove the grille by removing the two Phillips head screws. Bottom ...


