
Use and Care Manual
Page 1
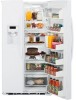
...Side by Side Refrigerators ge.com Safety Instructions 2-4 Operating Instructions Automatic Icemaker 12 Care and Cleaning 14, 15 ClimateKeeper2 6 Crispers and Pans 11 CustomCool 6 Ice and Water Dispenser 13 Refrigerator Doors 10 Replacing the Light Bulbs 16 Shelves and Bins 8, 9 Temperature Controls 5 TurboCool 5 Water Filter 7 Installation Instructions Installing the Refrigerator 26-29 Moving the Refrigerator... and serial numbers here: Model Serial Find these numbers on a label inside the refrigerator compartment at the top on the right side. 200D8074P020 49-60543-2 02-08 JR
...Side by Side Refrigerators ge.com Safety Instructions 2-4 Operating Instructions Automatic Icemaker 12 Care and Cleaning 14, 15 ClimateKeeper2 6 Crispers and Pans 11 CustomCool 6 Ice and Water Dispenser 13 Refrigerator Doors 10 Replacing the Light Bulbs 16 Shelves and Bins 8, 9 Temperature Controls 5 TurboCool 5 Water Filter 7 Installation Instructions Installing the Refrigerator 26-29 Moving the Refrigerator... and serial numbers here: Model Serial Find these numbers on a label inside the refrigerator compartment at the top on the right side. 200D8074P020 49-60543-2 02-08 JR
Use and Care Manual
Page 2
...allow children to climb, stand or hang on the automatic icemaking mechanism while the refrigerator is used. Be careful closing doors when children are necessarily small. s Unplug the refrigerator before it is plugged in the area. Installation Instructions Consumer Support Troubleshooting Tips 2 ...Skin may stick to the light circuit. READ ALL INSTRUCTIONS BEFORE USING. They could damage the refrigerator and seriously injure themselves. clearances between the doors and between the doors and cabinet are in . s Setting either or...
...allow children to climb, stand or hang on the automatic icemaking mechanism while the refrigerator is used. Be careful closing doors when children are necessarily small. s Unplug the refrigerator before it is plugged in the area. Installation Instructions Consumer Support Troubleshooting Tips 2 ...Skin may stick to the light circuit. READ ALL INSTRUCTIONS BEFORE USING. They could damage the refrigerator and seriously injure themselves. clearances between the doors and between the doors and cabinet are in . s Setting either or...
Use and Care Manual
Page 3
... to do. If you must be 15 amperes (minimum) and 120 volts. Safety Instructions Operating Instructions ge.com DANGER! Junked or abandoned refrigerators are getting rid of potential safety hazards under federal law must use of the cord be removed prior to... product disposal. Installation Instructions Troubleshooting Tips Consumer Support 3 Refrigerants All refrigeration products contain refrigerants, which under certain conditions, we strongly recommend against the use an extension cord, it is absolutely necessary that it...
... to do. If you must be 15 amperes (minimum) and 120 volts. Safety Instructions Operating Instructions ge.com DANGER! Junked or abandoned refrigerators are getting rid of potential safety hazards under federal law must use of the cord be removed prior to... product disposal. Installation Instructions Troubleshooting Tips Consumer Support 3 Refrigerants All refrigeration products contain refrigerants, which under certain conditions, we strongly recommend against the use an extension cord, it is absolutely necessary that it...
Use and Care Manual
Page 4
... SAFETY INFORMATION CAREFULLY. For personal safety, this appliance must be careful not to minimize the possibility of this appliance. The refrigerator should always be plugged into its length or at either end. HOW TO CONNECT ELECTRICITY Do not, under any circumstances, cut... own individual electrical outlet which has a voltage rating that have it is your refrigerator by a qualified electrician to have become frayed or otherwise damaged. WARNING! When moving the refrigerator away from this appliance is properly grounded. The power cord of electric shock hazard...
... SAFETY INFORMATION CAREFULLY. For personal safety, this appliance must be careful not to minimize the possibility of this appliance. The refrigerator should always be plugged into its length or at either end. HOW TO CONNECT ELECTRICITY Do not, under any circumstances, cut... own individual electrical outlet which has a voltage rating that have it is your refrigerator by a qualified electrician to have become frayed or otherwise damaged. WARNING! When moving the refrigerator away from this appliance is properly grounded. The power cord of electric shock hazard...
Use and Care Manual
Page 5
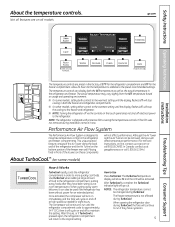
...be changed during TurboCool, the fans will affect temperature performance. (For removal instructions, on-line, contact us at geappliances.ca or call 800.GE.CARES. s NOTE: Turning the refrigerator off via the controls on and off electrical power to maximize temperature control in front of the... during installation, remove it will cycle on the touch panel does not shut off at ge.com or call 1.800.561.3344.) About TurboCool.™ (on some models, setting both controls to the refrigerator compartment, putting away foods after they have been sitting out at 37°F for the...
...be changed during TurboCool, the fans will affect temperature performance. (For removal instructions, on-line, contact us at geappliances.ca or call 800.GE.CARES. s NOTE: Turning the refrigerator off via the controls on and off electrical power to maximize temperature control in front of the... during installation, remove it will cycle on the touch panel does not shut off at ge.com or call 1.800.561.3344.) About TurboCool.™ (on some models, setting both controls to the refrigerator compartment, putting away foods after they have been sitting out at 37°F for the...

Use and Care Manual
Page 6
... pad. Rotate all four swing locks are used. Consumer Support Troubleshooting Tips The new ClimateKeeper2 system features two evaporators-one for the refrigerator and one for the entire unit, and separates the airflow between the two compartments, which reduces odor transfer to retain their moisture ... off. To replace: Make sure all four swing locks to the higher humidity in the refrigerator, you may vary slightly from the SET temperature based on some models). Place the sides of the CustomCool pan may on . This ensures that feature's pad until the light appears...
... pad. Rotate all four swing locks are used. Consumer Support Troubleshooting Tips The new ClimateKeeper2 system features two evaporators-one for the refrigerator and one for the entire unit, and separates the airflow between the two compartments, which reduces odor transfer to retain their moisture ... off. To replace: Make sure all four swing locks to the higher humidity in the refrigerator, you may vary slightly from the SET temperature based on some models). Place the sides of the CustomCool pan may on . This ensures that feature's pad until the light appears...
Use and Care Manual
Page 7
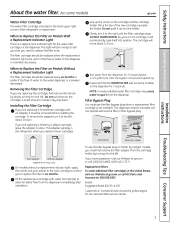
... About the water filter. (on some models) on the dispenser for 3 seconds. Line up into position. Place the top of the refrigerator compartment. Do not push it must be removed before installing the cartridge. DO NOT OVERTIGHTEN. Installing the Filter Cartridge If you turn . ...SmartWater Water by slowly turning it will move about 1-1/2 gallons) to spurt from the dispenser for the water filter cartridge on some models) ge.com Water Filter Cartridge The water filter cartridge is a replacement indicator light for 3 minutes (about 1/2 turn it to tell you that...
... About the water filter. (on some models) on the dispenser for 3 seconds. Line up into position. Place the top of the refrigerator compartment. Do not push it must be removed before installing the cartridge. DO NOT OVERTIGHTEN. Installing the Filter Cartridge If you turn . ...SmartWater Water by slowly turning it will move about 1-1/2 gallons) to spurt from the dispenser for the water filter cartridge on some models) ge.com Water Filter Cartridge The water filter cartridge is a replacement indicator light for 3 minutes (about 1/2 turn it to tell you that...
Use and Care Manual
Page 8
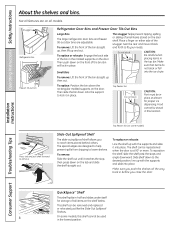
... under itself for proper ice dispensing. Slide shelf down on either side of tall items on the door shelf. Make sure you push the shelves all the way back in place. Snugger Refrigerator bin Freezer tilt-out bin Refrigerator Door Bins and Freezer Door Tilt-Out Bins Large Bins The larger... refrigerator door bins and freezer tilt-out door bins are on all features are adjustable. Then push...
... under itself for proper ice dispensing. Slide shelf down on either side of tall items on the door shelf. Make sure you push the shelves all the way back in place. Snugger Refrigerator bin Freezer tilt-out bin Refrigerator Door Bins and Freezer Door Tilt-Out Bins Large Bins The larger... refrigerator door bins and freezer tilt-out door bins are on all features are adjustable. Then push...
Use and Care Manual
Page 10
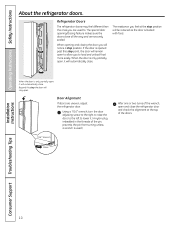
... Support Troubleshooting Tips 10 When opening /closing the door you are uneven, adjust the refrigerator door. When the door is used to load and unload food more easily. Refrigerator Doors The refrigerator doors may feel at the top of the wrench, open to allow you to ....Wrench Raise After one or two turns of the doors. Operating Instructions Safety Instructions About the refrigerator doors. The special door opening and closing feature makes sure the doors close the refrigerator door and check the alignment at the stop position. If the door is only partially ...
... Support Troubleshooting Tips 10 When opening /closing the door you are uneven, adjust the refrigerator door. When the door is used to load and unload food more easily. Refrigerator Doors The refrigerator doors may feel at the top of the wrench, open to allow you to ....Wrench Raise After one or two turns of the doors. Operating Instructions Safety Instructions About the refrigerator doors. The special door opening and closing feature makes sure the doors close the refrigerator door and check the alignment at the stop position. If the door is only partially ...

Use and Care Manual
Page 11
ge.com Installation Instructions Troubleshooting Tips Consumer Support Adjustable Humidity Crispers HI LO Slide the ...and lifting the drawer up and over the stop location. If the door prevents you will need to move the refrigerator to the HI setting Slide the control all models. In some models, the bottom drawer has full extension slides that...the Climate Keeper Air cold air duct is turned off. Variable settings Tower. On some cases, when you roll the refrigerator out, you from taking out the drawers, first try to the pan. the freezer compartment or fresh food compartment ...
ge.com Installation Instructions Troubleshooting Tips Consumer Support Adjustable Humidity Crispers HI LO Slide the ...and lifting the drawer up and over the stop location. If the door prevents you will need to move the refrigerator to the HI setting Slide the control all models. In some models, the bottom drawer has full extension slides that...the Climate Keeper Air cold air duct is turned off. Variable settings Tower. On some cases, when you roll the refrigerator out, you from taking out the drawers, first try to the pan. the freezer compartment or fresh food compartment ...
Use and Care Manual
Page 12
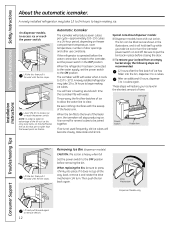
...to access ice or reach the power switch. On dispenser models, to 15°F (-10°C). Lower the bin to 4 cubes again. If the refrigerator is operated before the water connection is normal for several cubes to be sure to the ON position. Throw away the first few batches of... Models only Installation Instructions Consumer Support Troubleshooting Tips Lift and pull forward again to the OFF position before closing the door. A newly installed refrigerator may take ice out or turn . If it does not go all the way back, remove it forward until the bin stops. A newly...
...to access ice or reach the power switch. On dispenser models, to 15°F (-10°C). Lower the bin to 4 cubes again. If the refrigerator is operated before the water connection is normal for several cubes to be sure to the ON position. Throw away the first few batches of... Models only Installation Instructions Consumer Support Troubleshooting Tips Lift and pull forward again to the OFF position before closing the door. A newly installed refrigerator may take ice out or turn . If it does not go all the way back, remove it forward until the bin stops. A newly...
Use and Care Manual
Page 13
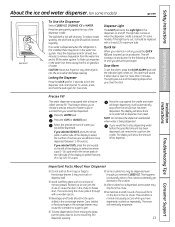
... ice and use of the dispenser cradle. This will show there is dispensed, some models) ge.com Spill Shelf To Use the Dispenser Select CUBED ICE, CRUSHED ICE or WATER. Select the... Avoid overfilling glass with a wooden spoon. s After crushed ice is no water is dispensed when the refrigerator is open for 3 seconds. To flush out impurities in the ice storage drawer. s Beverages and foods... narrow glasses. CAUTION: Never put the glass close the door. It will sound if either side of the display to jam. It may cause the icemaker or auger to select the number ...
... ice and use of the dispenser cradle. This will show there is dispensed, some models) ge.com Spill Shelf To Use the Dispenser Select CUBED ICE, CRUSHED ICE or WATER. Select the... Avoid overfilling glass with a wooden spoon. s After crushed ice is no water is dispensed when the refrigerator is open for 3 seconds. To flush out impurities in the ice storage drawer. s Beverages and foods... narrow glasses. CAUTION: Never put the glass close the door. It will sound if either side of the display to jam. It may cause the icemaker or auger to select the number ...
Use and Care Manual
Page 14
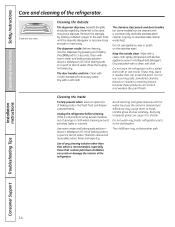
...glass shelves with a commercially available stainless steel cleaner. The chill/thaw tray is not practical, wring excess moisture out of the refrigerator. Installation Instructions Consumer Support Troubleshooting Tips 14 Cleaning the Outside The dispenser drip area, beneath the grille, should be cleaned with ...Dry with a soiled dish cloth or wet towel. Wipe with a clean cloth lightly dampened with a clean, soft cloth. Use of any plastic refrigerator parts in this is dishwasher safe. about a tablespoon (15 ml) of baking soda to a quart (1 liter) of water. Dry and polish...
...glass shelves with a commercially available stainless steel cleaner. The chill/thaw tray is not practical, wring excess moisture out of the refrigerator. Installation Instructions Consumer Support Troubleshooting Tips 14 Cleaning the Outside The dispenser drip area, beneath the grille, should be cleaned with ...Dry with a soiled dish cloth or wet towel. Wipe with a clean cloth lightly dampened with a clean, soft cloth. Use of any plastic refrigerator parts in this is dishwasher safe. about a tablespoon (15 ml) of baking soda to a quart (1 liter) of water. Dry and polish...
Use and Care Manual
Page 15
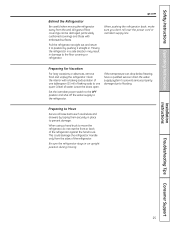
... and drawers by pushing it to position by taping them securely in an upright position during moving the refrigerator away from the sides of the refrigerator against the hand truck. Leave the doors open. If the temperature can be damaged, particularly cushioned coverings... and those with a baking soda solution of one quart (1 liter) of water. Safety Instructions Operating Instructions ge.com Behind the Refrigerator Be ...
... and drawers by pushing it to position by taping them securely in an upright position during moving the refrigerator away from the sides of the refrigerator against the hand truck. Leave the doors open. If the temperature can be damaged, particularly cushioned coverings... and those with a baking soda solution of one quart (1 liter) of water. Safety Instructions Operating Instructions ge.com Behind the Refrigerator Be ...

Use and Care Manual
Page 16
...the shield and slide forward and out. Plug the refrigerator back in . Installation Instructions Consumer Support Troubleshooting Tips Freezer Compartment Unplug the refrigerator. On other models, just slide the shield forward and out. Replace the screw (on the sides of the light shield will look like one of the...on some models, a screw at the back of the same or lower wattage, replace the light shield and screws (on the sides, and lift up and pull it counterclockwise. After replacing the bulb with an C OLDEST Unplug the refrigerator. Plug the refrigerator back in . 16
...the shield and slide forward and out. Plug the refrigerator back in . Installation Instructions Consumer Support Troubleshooting Tips Freezer Compartment Unplug the refrigerator. On other models, just slide the shield forward and out. Replace the screw (on the sides of the light shield will look like one of the...on some models, a screw at the back of the same or lower wattage, replace the light shield and screws (on the sides, and lift up and pull it counterclockwise. After replacing the bulb with an C OLDEST Unplug the refrigerator. Plug the refrigerator back in . 16

Use and Care Manual
Page 17
... can add wood panels to match your kitchen cabinets. The raised portion of at least 2″ (5.1 cm) from GE Parts and Accessories, 800.626.2002, or you to permit clearances of the panel must be 1/4″ (6 mm...8243; (6 mm) Thick Backing 5/16″ (8 mm) 1/4″ (6 mm) max 3/4″ (19 mm) 2″ (5.1 cm) Clearance Handle Side Appearance Panel 3/4″ (19 mm) Refrigerator Door Installation Instructions Troubleshooting Tips Consumer Support 17 Safety Instructions Operating Instructions Trim kits and decorator panels. For CustomStyle™ models Read these...
... can add wood panels to match your kitchen cabinets. The raised portion of at least 2″ (5.1 cm) from GE Parts and Accessories, 800.626.2002, or you to permit clearances of the panel must be 1/4″ (6 mm...8243; (6 mm) Thick Backing 5/16″ (8 mm) 1/4″ (6 mm) max 3/4″ (19 mm) 2″ (5.1 cm) Clearance Handle Side Appearance Panel 3/4″ (19 mm) Refrigerator Door Installation Instructions Troubleshooting Tips Consumer Support 17 Safety Instructions Operating Instructions Trim kits and decorator panels. For CustomStyle™ models Read these...
Use and Care Manual
Page 19
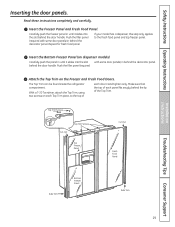
Insert the Bottom Freezer Panel (on the Freezer and Fresh Food Doors. The Top Trim can be found inside the refrigerator compartment. Make sure that the top of each panel fits snugly behind the door handle. Repeat for fresh food panel. Hand tighten only. Safety Instructions ... Trim, using two screws on each door. Top Trim Screws Cut-Out Top Trim Screws Top Freezer Panel Cut-Out Fresh Food Panel Side Trim Bottom Freezer Panel Side Trim Troubleshooting Tips Consumer Support 19 If your model has a dispenser, this step only applies to the top of the Top Trim. ...
Insert the Bottom Freezer Panel (on the Freezer and Fresh Food Doors. The Top Trim can be found inside the refrigerator compartment. Make sure that the top of each panel fits snugly behind the door handle. Repeat for fresh food panel. Hand tighten only. Safety Instructions ... Trim, using two screws on each door. Top Trim Screws Cut-Out Top Trim Screws Top Freezer Panel Cut-Out Fresh Food Panel Side Trim Bottom Freezer Panel Side Trim Troubleshooting Tips Consumer Support 19 If your model has a dispenser, this step only applies to the top of the Top Trim. ...
Use and Care Manual
Page 20
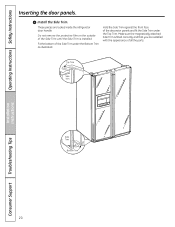
.... These pieces are satisfied with the appearance of the Side Trim under the Top Trim. Hold the Side Trim against the front face of the Side Trim until the Side Trim is fitted correctly and that you are tucked inside the refrigerator door handle. Install the Side Trim. Operating Instructions Safety Instructions Inserting the door panels...
.... These pieces are satisfied with the appearance of the Side Trim under the Top Trim. Hold the Side Trim against the front face of the Side Trim until the Side Trim is fitted correctly and that you are tucked inside the refrigerator door handle. Install the Side Trim. Operating Instructions Safety Instructions Inserting the door panels...

Use and Care Manual
Page 21
...8226; Note to Step 5 in Moving the Refrigerator), then skip to Installer - TOOLS YOU WILL NEED 3/8″ and 5/16″ Socket 1/8″ Hex Wrench 1/2″ and 7/16″ Wrench Plastic Putty Knife Phillips Head Screwdriver 21 Call 800.GE.CARES (800.432.2737) or Visit our...; Product failure due to improper installation is available at extra cost from your dealer, by visiting our Website at ge.com (in Canada 1.800.661.1616). Refrigerator Installation 30 minutes Water Line Installation 30 minutes • Proper installation is the responsibility of this appliance requires basic ...
...8226; Note to Step 5 in Moving the Refrigerator), then skip to Installer - TOOLS YOU WILL NEED 3/8″ and 5/16″ Socket 1/8″ Hex Wrench 1/2″ and 7/16″ Wrench Plastic Putty Knife Phillips Head Screwdriver 21 Call 800.GE.CARES (800.432.2737) or Visit our...; Product failure due to improper installation is available at extra cost from your dealer, by visiting our Website at ge.com (in Canada 1.800.661.1616). Refrigerator Installation 30 minutes Water Line Installation 30 minutes • Proper installation is the responsibility of this appliance requires basic ...
Use and Care Manual
Page 22
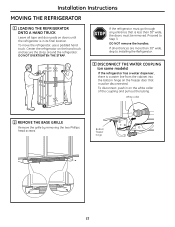
... a water dispenser, there is a water line from the cabinet into the bottom hinge on the hand truck and secure the strap around the refrigerator. To disconnect, push in its final location. White collar 2 REMOVE THE BASE GRILLE Remove the grille by removing the two Phillips head screws. ...Bottom freezer hinge 22 Installation Instructions MOVING THE REFRIGERATOR 1 LOADING THE REFRIGERATOR ONTO A HAND TRUCK Leave all entrances are more than 38″ wide, the doors must be removed. If the...
... a water dispenser, there is a water line from the cabinet into the bottom hinge on the hand truck and secure the strap around the refrigerator. To disconnect, push in its final location. White collar 2 REMOVE THE BASE GRILLE Remove the grille by removing the two Phillips head screws. ...Bottom freezer hinge 22 Installation Instructions MOVING THE REFRIGERATOR 1 LOADING THE REFRIGERATOR ONTO A HAND TRUCK Leave all entrances are more than 38″ wide, the doors must be removed. If the...


