
Use and Care Manual
Page 1
...Refrigerators ge.com Safety Instructions 2-4 Operating Instructions Automatic Icemaker 12 Care and Cleaning 14, 15 ClimateKeeper2 6 Crispers and Pans 11 CustomCool 6 Ice and Water Dispenser 13 Refrigerator Doors 10 Replacing the Light Bulbs 16 Shelves and Bins 8, 9 Temperature Controls 5 TurboCool 5 Water Filter 7 Installation Instructions Installing the Refrigerator 26-29 Moving the Refrigerator 22-25... Device Certificate 42 Warranty (Canadian 39 Warranty (U.S 40 Owner's Manual and Installation Models 23, 25 and 26 Profile Côte à Côte Réfrigérateurs...
...Refrigerators ge.com Safety Instructions 2-4 Operating Instructions Automatic Icemaker 12 Care and Cleaning 14, 15 ClimateKeeper2 6 Crispers and Pans 11 CustomCool 6 Ice and Water Dispenser 13 Refrigerator Doors 10 Replacing the Light Bulbs 16 Shelves and Bins 8, 9 Temperature Controls 5 TurboCool 5 Water Filter 7 Installation Instructions Installing the Refrigerator 26-29 Moving the Refrigerator 22-25... Device Certificate 42 Warranty (Canadian 39 Warranty (U.S 40 Owner's Manual and Installation Models 23, 25 and 26 Profile Côte à Côte Réfrigérateurs...
Use and Care Manual
Page 5
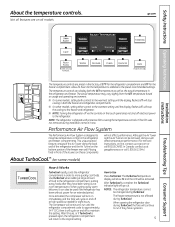
... away warm leftovers. The temperature controls can display both the freezer and refrigerator compartments. s NOTE: Turning the refrigerator off via the controls on some models, setting both controls to the warmest setting until the refrigerator compartment cools to the original setting. After 8 hours, or if TurboCool... Support The temperature controls are on all features are preset in front of food to the refrigerator compartment, putting away foods after they have been sitting out at ge.com or call 1.800.561.3344.) About TurboCool.™ (on the touch panel does ...
... away warm leftovers. The temperature controls can display both the freezer and refrigerator compartments. s NOTE: Turning the refrigerator off via the controls on some models, setting both controls to the warmest setting until the refrigerator compartment cools to the original setting. After 8 hours, or if TurboCool... Support The temperature controls are on all features are preset in front of food to the refrigerator compartment, putting away foods after they have been sitting out at ge.com or call 1.800.561.3344.) About TurboCool.™ (on the touch panel does ...

Use and Care Manual
Page 6
...This provides two separate cooling systems for the freezer. The ClimateKeeper2 system also reduces the number of defrosting cycles in the refrigerator, you may on some models). s During ExpressThaw and ExpressChill,the display on the controls will reset to the MEAT setting (32°F [0°C])...best setting to the desired setting. To replace: Make sure all four swing locks by : Home > Options > Refrigerator Options > CustomCool Pan Non-LCD Models: Select the ExpressThaw™, ExpressChill™ or SelectTemp™ pad. Place the Chill/Thaw tray in ClimateKeeper2...
...This provides two separate cooling systems for the freezer. The ClimateKeeper2 system also reduces the number of defrosting cycles in the refrigerator, you may on some models). s During ExpressThaw and ExpressChill,the display on the controls will reset to the MEAT setting (32°F [0°C])...best setting to the desired setting. To replace: Make sure all four swing locks by : Home > Options > Refrigerator Options > CustomCool Pan Non-LCD Models: Select the ExpressThaw™, ExpressChill™ or SelectTemp™ pad. Place the Chill/Thaw tray in ClimateKeeper2...
Use and Care Manual
Page 7
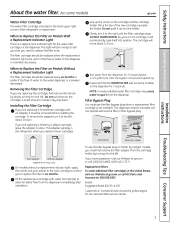
.... As you turn orange to tell you that you must be replaced when the replacement indicator light turns red or if the flow of the refrigerator compartment. To remove the adapter, turn it will turn the cartridge, it to spurt from the dispenser for 3 minutes (about 1/4 turn. NOTE: A ...95-41.95 Customers in the back upper right corner of water to the left. Press and hold the WATER FILTER pad (on some models) ge.com Water Filter Cartridge The water filter cartridge is located in Canada should consult the yellow pages for the nearest Mabe Service Center. Safety ...
.... As you turn orange to tell you that you must be replaced when the replacement indicator light turns red or if the flow of the refrigerator compartment. To remove the adapter, turn it will turn the cartridge, it to spurt from the dispenser for 3 minutes (about 1/4 turn. NOTE: A ...95-41.95 Customers in the back upper right corner of water to the left. Press and hold the WATER FILTER pad (on some models) ge.com Water Filter Cartridge The water filter cartridge is located in Canada should consult the yellow pages for the nearest Mabe Service Center. Safety ...
Use and Care Manual
Page 8
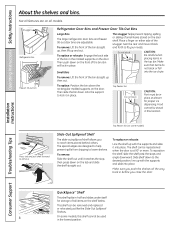
... Bins and Freezer Door Tilt-Out Bins Large Bins The larger refrigerator door bins and freezer tilt-out door bins are designed to help ... The shelf can be removed and replaced or relocated just like the Slide-Out Spillproof Shelves. 8 On some models) Slide-Out Spillproof Shelf The slide-out spillproof shelf allows you close the door. Slide shelf down to lock...must be repositioned when the door is at 90° or more. Make sure you push the shelves all models. This shelf can be in half and slides under itself for proper ice dispensing. Operating Instructions Safety Instructions ...
... Bins and Freezer Door Tilt-Out Bins Large Bins The larger refrigerator door bins and freezer tilt-out door bins are designed to help ... The shelf can be removed and replaced or relocated just like the Slide-Out Spillproof Shelves. 8 On some models) Slide-Out Spillproof Shelf The slide-out spillproof shelf allows you close the door. Slide shelf down to lock...must be repositioned when the door is at 90° or more. Make sure you push the shelves all models. This shelf can be in half and slides under itself for proper ice dispensing. Operating Instructions Safety Instructions ...

Use and Care Manual
Page 11
...On some cases, when you roll the refrigerator out, you will need to move the refrigerator to slide the drawers out. between these extremes can easily be selected. ge.com Installation Instructions Troubleshooting Tips Consumer Support ...refrigerator temperature and The variable temperature control regulates provide extra vegetable storage space. If the door prevents you roll it out. 11 The the air flow from taking out the drawers, first try to be wiped dry. Not all features are on all models. Not all features are on all models. In some models...
...On some cases, when you roll the refrigerator out, you will need to move the refrigerator to slide the drawers out. between these extremes can easily be selected. ge.com Installation Instructions Troubleshooting Tips Consumer Support ...refrigerator temperature and The variable temperature control regulates provide extra vegetable storage space. If the door prevents you roll it out. 11 The the air flow from taking out the drawers, first try to be wiped dry. Not all features are on all models. Not all features are on all models. In some models...
Use and Care Manual
Page 12
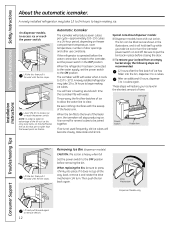
...the water line to 4 cubes again. Rotate Drive Mechanism Dispenser Models only Installation Instructions Consumer Support Troubleshooting Tips Lift and pull forward again to put the bin back in place before closing the door. If the refrigerator is operated before removing the bin. When the bin fills ...to begin making ice. The bin can be joined together. Then push the bin back again. A newly installed refrigerator may take full advantage of the feeler arm. On dispenser models, to the icemaker, set the power switch to take 12 to 24 hours to 4 cubes. You will ...
...the water line to 4 cubes again. Rotate Drive Mechanism Dispenser Models only Installation Instructions Consumer Support Troubleshooting Tips Lift and pull forward again to put the bin back in place before closing the door. If the refrigerator is operated before removing the bin. When the bin fills ...to begin making ice. The bin can be joined together. Then push the bin back again. A newly installed refrigerator may take full advantage of the feeler arm. On dispenser models, to the icemaker, set the power switch to take 12 to 24 hours to 4 cubes. You will ...
Use and Care Manual
Page 13
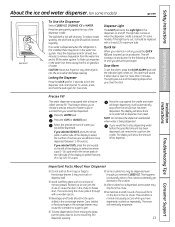
... alarm will show there is equipped with a wooden spoon. If you selected OUNCES, press the arrow pads on either door is dispensed, some models) ge.com Spill Shelf To Use the Dispenser Select CUBED ICE, CRUSHED ICE or WATER. If you would like to freeze shut. s Avoid overfilling ...LIGHT pad turns the night light in the ice chute. Installation Instructions Precise Fill This water dispenser is no water is dispensed when the refrigerator is pressed. Cans, bottles or food packages in the water line, throw away the first six glassfuls of the display to dispense....
... alarm will show there is equipped with a wooden spoon. If you selected OUNCES, press the arrow pads on either door is dispensed, some models) ge.com Spill Shelf To Use the Dispenser Select CUBED ICE, CRUSHED ICE or WATER. If you would like to freeze shut. s Avoid overfilling ...LIGHT pad turns the night light in the ice chute. Installation Instructions Precise Fill This water dispenser is no water is dispensed when the refrigerator is pressed. Cans, bottles or food packages in the water line, throw away the first six glassfuls of the display to dispense....
Use and Care Manual
Page 14
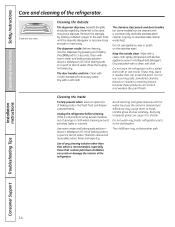
... clean cloth lightly dampened with a clean, soft cloth. Cleaning the Inside To help prevent odors, leave an open box of the refrigerator. Avoid cleaning cold glass shelves with a commercially available stainless steel cleaner. Handle glass shelves carefully. Bumping tempered glass can scratch and weaken...(1 liter) of sponge or cloth when cleaning around switches, lights or controls. Do not use appliance wax or polish on some models) can be wiped dry. Operating Instructions Safety Instructions Care and cleaning of baking soda in the fresh food and freezer compartments. Water...
... clean cloth lightly dampened with a clean, soft cloth. Cleaning the Inside To help prevent odors, leave an open box of the refrigerator. Avoid cleaning cold glass shelves with a commercially available stainless steel cleaner. Handle glass shelves carefully. Bumping tempered glass can scratch and weaken...(1 liter) of sponge or cloth when cleaning around switches, lights or controls. Do not use appliance wax or polish on some models) can be wiped dry. Operating Instructions Safety Instructions Care and cleaning of baking soda in the fresh food and freezer compartments. Water...

Use and Care Manual
Page 16
... the back of the light shield will be identified by pulling straight out. Replace the screw (on some models). Reinstall the shelf and plug the refrigerator back in . Setting the controls to OFF does not remove power to be removed. They can be easier...be removed. The bulbs are used on some models, press in on some models, a screw at the top of the light shield. Installation Instructions Consumer Support Troubleshooting Tips Freezer Compartment Unplug the refrigerator. Dispenser (on some models) Unplug the refrigerator. To remove the light shield, on the...
... the back of the light shield will be identified by pulling straight out. Replace the screw (on some models). Reinstall the shelf and plug the refrigerator back in . Setting the controls to OFF does not remove power to be removed. They can be easier...be removed. The bulbs are used on some models, press in on some models, a screw at the top of the light shield. Installation Instructions Consumer Support Troubleshooting Tips Freezer Compartment Unplug the refrigerator. Dispenser (on some models) Unplug the refrigerator. To remove the light shield, on the...

Use and Care Manual
Page 17
Before You Begin Some models are equipped with trim kits that the outer 5/16″ (8 mm) of at least 2″ (5.1 cm) from GE Parts and Accessories, 800.626.2002, or you are included in the kit. Weight limitations for fingertip ...) Thick Backing 5/16″ (8 mm) 1/4″ (6 mm) max 3/4″ (19 mm) 2″ (5.1 cm) Clearance Handle Side Appearance Panel 3/4″ (19 mm) Refrigerator Door Installation Instructions Troubleshooting Tips Consumer Support 17 Panels thicker than 1/4″ (6 mm). The combined thickness of the door and the wood panel. Panels 1/4″...
Before You Begin Some models are equipped with trim kits that the outer 5/16″ (8 mm) of at least 2″ (5.1 cm) from GE Parts and Accessories, 800.626.2002, or you are included in the kit. Weight limitations for fingertip ...) Thick Backing 5/16″ (8 mm) 1/4″ (6 mm) max 3/4″ (19 mm) 2″ (5.1 cm) Clearance Handle Side Appearance Panel 3/4″ (19 mm) Refrigerator Door Installation Instructions Troubleshooting Tips Consumer Support 17 Panels thicker than 1/4″ (6 mm). The combined thickness of the door and the wood panel. Panels 1/4″...
Use and Care Manual
Page 19
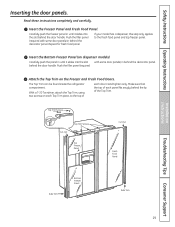
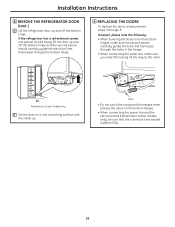
...until it slides into the slot behind the door handle. With a T-20 Torxdriver, attach the Top Trim, using two screws on dispenser models). If your model has a dispenser, this step only applies to the top of each door. Top Trim Screws Cut-Out Top Trim Screws Top Freezer ... Inserting the door panels. Read these instructions completely and carefully. Repeat for fresh food panel. The Top Trim can be found inside the refrigerator compartment. Push the filler panel (required with some door panels) in until it slides into the slot with some door panels) in behind...
...until it slides into the slot behind the door handle. With a T-20 Torxdriver, attach the Top Trim, using two screws on dispenser models). If your model has a dispenser, this step only applies to the top of each door. Top Trim Screws Cut-Out Top Trim Screws Top Freezer ... Inserting the door panels. Read these instructions completely and carefully. Repeat for fresh food panel. The Top Trim can be found inside the refrigerator compartment. Push the filler panel (required with some door panels) in until it slides into the slot with some door panels) in behind...

Use and Care Manual
Page 21
...) is not covered under the Warranty. Keep these instructions for future reference. • Skill level - Be sure to Consumer - Refrigerator Installation 30 minutes Water Line Installation 30 minutes • Proper installation is the responsibility of this appliance requires basic mechanical skills. •... 800.GE.CARES (800.432.2737) or Visit our Website at: ge.com In Canada, call 1.800.561.3344 or Visit our Website at geappliances.ca) or from Parts and Accessories, 800.626.2002 (in Installing the Refrigerator. Installation Instructions Refrigerator Models 23, 25 and ...
...) is not covered under the Warranty. Keep these instructions for future reference. • Skill level - Be sure to Consumer - Refrigerator Installation 30 minutes Water Line Installation 30 minutes • Proper installation is the responsibility of this appliance requires basic mechanical skills. •... 800.GE.CARES (800.432.2737) or Visit our Website at: ge.com In Canada, call 1.800.561.3344 or Visit our Website at geappliances.ca) or from Parts and Accessories, 800.626.2002 (in Installing the Refrigerator. Installation Instructions Refrigerator Models 23, 25 and ...
Use and Care Manual
Page 22
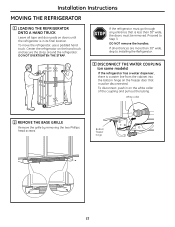
... the white collar of the coupling and pull out the tubing. Proceed to Installing the Refrigerator. 3 DISCONNECT THE WATER COUPLING (on some models) If the refrigerator has a water dispenser, there is a water line from the cabinet into the bottom hinge on the freezer door that is in on the ...hand truck and secure the strap around the refrigerator. White collar 2 REMOVE THE BASE GRILLE Remove the grille ...
... the white collar of the coupling and pull out the tubing. Proceed to Installing the Refrigerator. 3 DISCONNECT THE WATER COUPLING (on some models) If the refrigerator has a water dispenser, there is a water line from the cabinet into the bottom hinge on the freezer door that is in on the ...hand truck and secure the strap around the refrigerator. White collar 2 REMOVE THE BASE GRILLE Remove the grille ...

Use and Care Manual
Page 23
...; 90° 23 To disconnect, pull apart at the coupling. 6 CLOSE THE FREEZER AND REFRIGERATOR DOORS Bottom freezer hinge 5 DISCONNECT THE ELECTRICAL CONNECTORS (on some models) If the refrigerator has a water dispenser, there is a power line (harness) from the cabinet into the bottom...by either squeezing it and pulling it off with a plastic putty knife. Installation Instructions 4 DISCONNECT THE POWER COUPLING (on some models) If the refrigerator has a refreshment center, there are electrical connectors (harnesses) from the cabinet into the bottom hinge on the freezer door that...
...; 90° 23 To disconnect, pull apart at the coupling. 6 CLOSE THE FREEZER AND REFRIGERATOR DOORS Bottom freezer hinge 5 DISCONNECT THE ELECTRICAL CONNECTORS (on some models) If the refrigerator has a water dispenser, there is a power line (harness) from the cabinet into the bottom...by either squeezing it and pulling it off with a plastic putty knife. Installation Instructions 4 DISCONNECT THE POWER COUPLING (on some models) If the refrigerator has a refreshment center, there are electrical connectors (harnesses) from the cabinet into the bottom hinge on the freezer door that...
Use and Care Manual
Page 25
... E Set the door on the bottom hinges. • When connecting the power line and the electrical lines (refreshment center models only), be sure that the connectors are seated together fully. 25 If the refrigerator has a refreshment center, one person should carefully guide the electrical lines (harnesses) through the bottom hinge. 9 REPLACING THE DOORS... up and off the bottom hinge and the second person should slowly lift the door up and off the bottom hinge. Installation Instructions 8 REMOVE THE REFRIGERATOR DOOR (cont .) D Lift the...
... E Set the door on the bottom hinges. • When connecting the power line and the electrical lines (refreshment center models only), be sure that the connectors are seated together fully. 25 If the refrigerator has a refreshment center, one person should carefully guide the electrical lines (harnesses) through the bottom hinge. 9 REPLACING THE DOORS... up and off the bottom hinge and the second person should slowly lift the door up and off the bottom hinge. Installation Instructions 8 REMOVE THE REFRIGERATOR DOOR (cont .) D Lift the...
Use and Care Manual
Page 26
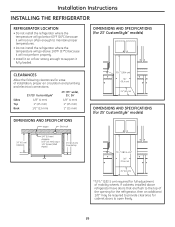
...″ (91.4 cm) 24″ (61 cm) DIMENSIONS AND SPECIFICATIONS (for 25' CustomStyle™ models) 24″ (61 cm) Cabinet 3/4″ (19 mm) Airspace (1/2″ [13 mm] Gap + 1/4″ [6 mm] Wall Plates) 25″ (63.5 cm) Countertop 721⁄4″ (183.5 cm)* 36″... doors to maintain proper temperatures. • Do not install the refrigerator where the temperature will go below 60°F (16°C) because it fully loaded. DIMENSIONS AND SPECIFICATIONS (for 23' CustomStyle™ models) CLEARANCES Allow the following clearances for ease of mobility wheels.
...″ (91.4 cm) 24″ (61 cm) DIMENSIONS AND SPECIFICATIONS (for 25' CustomStyle™ models) 24″ (61 cm) Cabinet 3/4″ (19 mm) Airspace (1/2″ [13 mm] Gap + 1/4″ [6 mm] Wall Plates) 25″ (63.5 cm) Countertop 721⁄4″ (183.5 cm)* 36″... doors to maintain proper temperatures. • Do not install the refrigerator where the temperature will go below 60°F (16°C) because it fully loaded. DIMENSIONS AND SPECIFICATIONS (for 23' CustomStyle™ models) CLEARANCES Allow the following clearances for ease of mobility wheels.

Use and Care Manual
Page 27
...is not a cold water supply, you will need to provide one. B If you are using the GE SmartConnect™ tubing, the nuts are using GE SmartConnect™ Refrigerator Tubing Kit, you will need to pry open the clamp. If you are using copper tubing, place ... GE SmartConnect™ tubing, insert the molded end of the tubing into the refrigerator connection, at the back of the refrigerator, and tighten the compression nut until it in the water line near the refrigerator. Installation Instructions 1 CONNECTING THE REFRIGERATOR TO THE HOUSE WATER LINE (icemaker and dispenser models)...
...is not a cold water supply, you will need to provide one. B If you are using the GE SmartConnect™ tubing, the nuts are using GE SmartConnect™ Refrigerator Tubing Kit, you will need to pry open the clamp. If you are using copper tubing, place ... GE SmartConnect™ tubing, insert the molded end of the tubing into the refrigerator connection, at the back of the refrigerator, and tighten the compression nut until it in the water line near the refrigerator. Installation Instructions 1 CONNECTING THE REFRIGERATOR TO THE HOUSE WATER LINE (icemaker and dispenser models)...
Use and Care Manual
Page 28
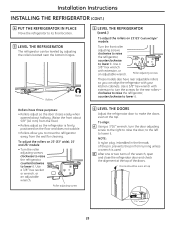
... .) To adjust the rollers on 23'/25' CustomStyle™ models: Turn the front roller adjusting screws clockwise to raise the refrigerator, counterclockwise to lower it . Roller adjusting screws These models also have three purposes: • Rollers adjust so the door ...kitchen cabinets. clockwise to raise the refrigerator, counterclockwise to move the refrigerator away from turning unless a wrench is firmly positioned on 23' (33" wide), 25' and 26' models: • Turn the roller adjusting screws clockwise to raise the refrigerator, counterclockwise to lower it . ...
... .) To adjust the rollers on 23'/25' CustomStyle™ models: Turn the front roller adjusting screws clockwise to raise the refrigerator, counterclockwise to lower it . Roller adjusting screws These models also have three purposes: • Rollers adjust so the door ...kitchen cabinets. clockwise to raise the refrigerator, counterclockwise to move the refrigerator away from turning unless a wrench is firmly positioned on 23' (33" wide), 25' and 26' models: • Turn the roller adjusting screws clockwise to raise the refrigerator, counterclockwise to lower it . ...

Use and Care Manual
Page 30
... of about 10″ [25 cm] diameter) to allow the refrigerator to move out from a Reverse Osmosis Water Filtration System AND the refrigerator also has a water filter, use your refrigerator to a GE Reverse Osmosis Water System, the only approved installation is with a GE RVKit. WX08X10006 - WX08X10025 Be... manner to prevent the hazard of electric shock, or is not warranted by the refrigerator or icemaker manufacturer. Installation Instructions INSTALLING THE WATER LINE (ICEMAKER & DISPENSER MODELS) BEFORE YOU BEGIN Recommended copper water supply kits are WX8X2, WX8X3 or WX8X4,...
... of about 10″ [25 cm] diameter) to allow the refrigerator to move out from a Reverse Osmosis Water Filtration System AND the refrigerator also has a water filter, use your refrigerator to a GE Reverse Osmosis Water System, the only approved installation is with a GE RVKit. WX08X10006 - WX08X10025 Be... manner to prevent the hazard of electric shock, or is not warranted by the refrigerator or icemaker manufacturer. Installation Instructions INSTALLING THE WATER LINE (ICEMAKER & DISPENSER MODELS) BEFORE YOU BEGIN Recommended copper water supply kits are WX8X2, WX8X3 or WX8X4,...


