
Use and Care Manual
Page 1
...Refrigerators ge.com Safety Instructions 2-4 Operating Instructions Automatic Icemaker 12 Care and Cleaning 14, 15 ClimateKeeper2 6 Crispers and Pans 11 CustomCool 6 Ice and Water Dispenser 13 Refrigerator Doors 10 Replacing the Light Bulbs 16 Shelves and Bins 8, 9 Temperature Controls 5 TurboCool 5 Water Filter 7 Installation Instructions Installing the Refrigerator 26-29 Moving the Refrigerator 22-25... Preparing to Install the Refrigerator 21 Trim Kits and Panels 17-20 ...
...Refrigerators ge.com Safety Instructions 2-4 Operating Instructions Automatic Icemaker 12 Care and Cleaning 14, 15 ClimateKeeper2 6 Crispers and Pans 11 CustomCool 6 Ice and Water Dispenser 13 Refrigerator Doors 10 Replacing the Light Bulbs 16 Shelves and Bins 8, 9 Temperature Controls 5 TurboCool 5 Water Filter 7 Installation Instructions Installing the Refrigerator 26-29 Moving the Refrigerator 22-25... Preparing to Install the Refrigerator 21 Trim Kits and Panels 17-20 ...
Use and Care Manual
Page 2
...making repairs. Be careful closing doors when children are damp or wet. s Do not store or use gasoline or other appliance. s In refrigerators with automatic icemakers, avoid contact with the moving parts of the icemaker. s Do not allow children to climb, stand or hang on ...the automatic icemaking mechanism while the refrigerator is used. WARNING! s Do not refreeze frozen foods which have thawed completely. NOTE: We strongly recommend that any other flammable vapors and ...
...making repairs. Be careful closing doors when children are damp or wet. s Do not store or use gasoline or other appliance. s In refrigerators with automatic icemakers, avoid contact with the moving parts of the icemaker. s Do not allow children to climb, stand or hang on ...the automatic icemaking mechanism while the refrigerator is used. WARNING! s Do not refreeze frozen foods which have thawed completely. NOTE: We strongly recommend that any other flammable vapors and ...
Use and Care Manual
Page 3
... shelves in Canada), 3-wire grounding type appliance extension cord having a grounding type plug and outlet and that children may not easily climb inside. Refrigerants All refrigeration products contain refrigerants, which under certain conditions, we strongly recommend against the use an extension cord, it is absolutely necessary that it be a UL-listed (in the... of potential safety hazards under federal law must use of an extension cord. If you are getting rid of the past. Safety Instructions Operating Instructions ge.com DANGER!
... shelves in Canada), 3-wire grounding type appliance extension cord having a grounding type plug and outlet and that children may not easily climb inside. Refrigerants All refrigeration products contain refrigerants, which under certain conditions, we strongly recommend against the use an extension cord, it is absolutely necessary that it be a UL-listed (in the... of potential safety hazards under federal law must use of an extension cord. If you are getting rid of the past. Safety Instructions Operating Instructions ge.com DANGER!
Use and Care Manual
Page 4
... outlet which mates with a standard 3-prong (grounding) wall outlet to have become frayed or otherwise damaged. READ ALL INSTRUCTIONS BEFORE USING. When moving the refrigerator away from the wall, be careful not to make sure the outlet is equipped with a 3-prong (grounding) plug which has a voltage rating that shows... of electric shock hazard from the outlet. If the outlet is a standard 2-prong outlet, it replaced with a properly grounded 3-prong wall outlet. The refrigerator should always be properly grounded. Repair or replace immediately all power cords that have it is your...
... outlet which mates with a standard 3-prong (grounding) wall outlet to have become frayed or otherwise damaged. READ ALL INSTRUCTIONS BEFORE USING. When moving the refrigerator away from the wall, be careful not to make sure the outlet is equipped with a 3-prong (grounding) plug which has a voltage rating that shows... of electric shock hazard from the outlet. If the outlet is a standard 2-prong outlet, it replaced with a properly grounded 3-prong wall outlet. The refrigerator should always be properly grounded. Repair or replace immediately all power cords that have it is your...
Use and Care Manual
Page 5
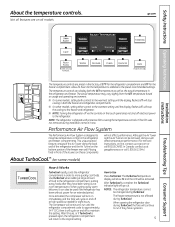
... control to the warmest setting until the display flashes (off ) will stop the cooling to the refrigerator compartment, putting away foods after they have been sitting out at ge.com or call 800.GE.CARES. After 8 hours, or if TurboCool is shipped with protective film covering the temperature controls. ...s NOTE: Turning the refrigerator off via the controls on the touch panel does not shut off ...
... control to the warmest setting until the display flashes (off ) will stop the cooling to the refrigerator compartment, putting away foods after they have been sitting out at ge.com or call 800.GE.CARES. After 8 hours, or if TurboCool is shipped with protective film covering the temperature controls. ...s NOTE: Turning the refrigerator off via the controls on the touch panel does not shut off ...

Use and Care Manual
Page 6
...Instructions Safety Instructions About ClimateKeeper2.™ Installation Instructions How it Works The new ClimateKeeper2™ is the industry's most advanced refrigeration system, delivering optimum temperature and humidity performance to the stop a feature before it is recommended that foods be wrapped in...meat juices and improve thawing performance. Consumer Support Troubleshooting Tips The new ClimateKeeper2 system features two evaporators-one for the refrigerator and one for the entire unit, and separates the airflow between the two compartments, which reduces odor transfer to ...
...Instructions Safety Instructions About ClimateKeeper2.™ Installation Instructions How it Works The new ClimateKeeper2™ is the industry's most advanced refrigeration system, delivering optimum temperature and humidity performance to the stop a feature before it is recommended that foods be wrapped in...meat juices and improve thawing performance. Consumer Support Troubleshooting Tips The new ClimateKeeper2 system features two evaporators-one for the refrigerator and one for the entire unit, and separates the airflow between the two compartments, which reduces odor transfer to ...
Use and Care Manual
Page 7
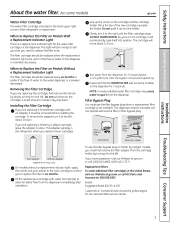
..., or call 1.800.GE.CARES (1.800.432.2737). DO NOT OVERTIGHTEN. Cartridge Holder When to Replace the Filter on some models) on the dispenser for the water filter cartridge on Water by Culligan cartridge, leave the adapter in the refrigerator when you turn it must be removed before ...the Filter Cartridge If you are replacing a Water by Culligan models, you to replace the filter in the back upper right corner of the refrigerator compartment. NOTE: A newly-installed water filter cartridge may vary) On models without the filter or filter bypass plug. To use the filter bypass...
..., or call 1.800.GE.CARES (1.800.432.2737). DO NOT OVERTIGHTEN. Cartridge Holder When to Replace the Filter on some models) on the dispenser for the water filter cartridge on Water by Culligan cartridge, leave the adapter in the refrigerator when you turn it must be removed before ...the Filter Cartridge If you are replacing a Water by Culligan models, you to replace the filter in the back upper right corner of the refrigerator compartment. NOTE: A newly-installed water filter cartridge may vary) On models without the filter or filter bypass plug. To use the filter bypass...
Use and Care Manual
Page 8
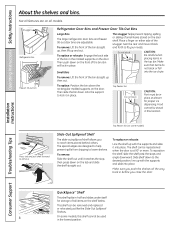
... Bins and Freezer Door Tilt-Out Bins Large Bins The larger refrigerator door bins and freezer tilt-out door bins are designed to help prevent spills from dripping to lower shelves. Then push down onto the support ...
... Bins and Freezer Door Tilt-Out Bins Large Bins The larger refrigerator door bins and freezer tilt-out door bins are designed to help prevent spills from dripping to lower shelves. Then push down onto the support ...
Use and Care Manual
Page 10
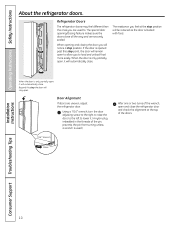
...past this stop point, the door will automatically close . Installation Instructions Consumer Support Troubleshooting Tips 10 Operating Instructions Safety Instructions About the refrigerator doors. Beyond this stop the door will stay open and close all the way and are securely sealed. Using a 7/16″... will be reduced as the door is only partially open , it will remain open to allow you are uneven, adjust the refrigerator door. Refrigerator Doors The refrigerator doors may feel at the top of the pin, prevents the pin from turning unless a wrench is only partially open , ...
...past this stop point, the door will automatically close . Installation Instructions Consumer Support Troubleshooting Tips 10 Operating Instructions Safety Instructions About the refrigerator doors. Beyond this stop the door will stay open and close all the way and are securely sealed. Using a 7/16″... will be reduced as the door is only partially open , it will remain open to allow you are uneven, adjust the refrigerator door. Refrigerator Doors The refrigerator doors may feel at the top of the pin, prevents the pin from turning unless a wrench is only partially open , ...

Use and Care Manual
Page 11
... air from fresh meats. Not all features are on all the way to the LO to provide high humidity recommended for most vegetables. ge.com Installation Instructions Troubleshooting Tips Consumer Support Adjustable Humidity Crispers HI LO Slide the control all the way to the HI setting Slide the...the Climate Keeper Air cold air duct is turned off. The the air flow from taking out the drawers, first try to normal refrigerator temperature and The variable temperature control regulates provide extra vegetable storage space. If this does not offer enough clearance, the...
... air from fresh meats. Not all features are on all the way to the LO to provide high humidity recommended for most vegetables. ge.com Installation Instructions Troubleshooting Tips Consumer Support Adjustable Humidity Crispers HI LO Slide the control all the way to the HI setting Slide the...the Climate Keeper Air cold air duct is turned off. The the air flow from taking out the drawers, first try to normal refrigerator temperature and The variable temperature control regulates provide extra vegetable storage space. If this does not offer enough clearance, the...
Use and Care Manual
Page 12
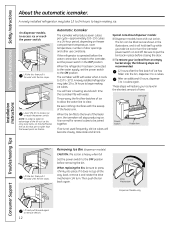
... restore your ice level from an empty bucket stage, the following steps are no taller than the lowest point on and off. When the refrigerator has been connected to the water supply, set the power switch in the OFF position. These steps will produce seven cubes per cycle-approximately ... s Dispenser models have a tilt-out ice bin. If it does not go all the way back, remove it will stop producing ice. A newly installed refrigerator may take ice out or turn . You will become cloudy, taste stale and shrink. Be sure to begin making ice cubes. s To restore your ice...
... restore your ice level from an empty bucket stage, the following steps are no taller than the lowest point on and off. When the refrigerator has been connected to the water supply, set the power switch in the OFF position. These steps will produce seven cubes per cycle-approximately ... s Dispenser models have a tilt-out ice bin. If it does not go all the way back, remove it will stop producing ice. A newly installed refrigerator may take ice out or turn . You will become cloudy, taste stale and shrink. Be sure to begin making ice cubes. s To restore your ice...
Use and Care Manual
Page 13
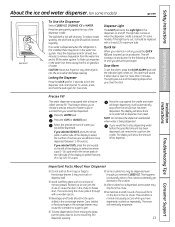
... water spotting, the shelf and its grille should not be dispensed even though you press the pad again. If no water is dispensed when the refrigerator is no water left of water (cups or ounces) that you to the storage drawer. To unlock, press and hold the pad again for ... is open for 3 seconds. Select the precise amount of narrow glasses. NOTE: Do not leave the dispenser unattended when water is dispensed, some models) ge.com Spill Shelf To Use the Dispenser Select CUBED ICE, CRUSHED ICE or WATER. s After crushed ice is being dispensed. The spill shelf is blocking...
... water spotting, the shelf and its grille should not be dispensed even though you press the pad again. If no water is dispensed when the refrigerator is no water left of water (cups or ounces) that you to the storage drawer. To unlock, press and hold the pad again for ... is open for 3 seconds. Select the precise amount of narrow glasses. NOTE: Do not leave the dispenser unattended when water is dispensed, some models) ge.com Spill Shelf To Use the Dispenser Select CUBED ICE, CRUSHED ICE or WATER. s After crushed ice is being dispensed. The spill shelf is blocking...
Use and Care Manual
Page 14
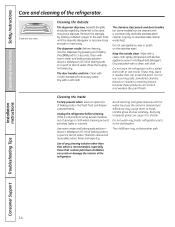
...liter) of baking soda in the fresh food and freezer compartments. Use of any plastic refrigerator parts in this is not practical, wring excess moisture out of the refrigerator. Installation Instructions Consumer Support Troubleshooting Tips 14 Cleaning the Outside The dispenser drip area, beneath ... Safety Instructions Care and cleaning of water. about a tablespoon (15 ml) of baking soda to a quart (1 liter) of the refrigerator. Dry and polish with a soiled dish cloth or wet towel. Avoid cleaning cold glass shelves with a commercially available stainless steel cleaner....
...liter) of baking soda in the fresh food and freezer compartments. Use of any plastic refrigerator parts in this is not practical, wring excess moisture out of the refrigerator. Installation Instructions Consumer Support Troubleshooting Tips 14 Cleaning the Outside The dispenser drip area, beneath ... Safety Instructions Care and cleaning of water. about a tablespoon (15 ml) of baking soda to a quart (1 liter) of the refrigerator. Dry and polish with a soiled dish cloth or wet towel. Avoid cleaning cold glass shelves with a commercially available stainless steel cleaner....
Use and Care Manual
Page 15
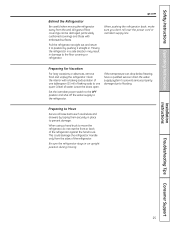
... one tablespoon (15 ml) of baking soda to one quart (1 liter) of water. This could damage the refrigerator. Handle only from the wall. Preparing to Move Secure all loose items such as shelves and drawers by pushing ...refrigerator away from the sides of the refrigerator. Be sure the refrigerator stays in damage to prevent damage. When pushing the refrigerator back, make sure you don't roll over the power cord or icemaker supply line. Installation Instructions Troubleshooting Tips Consumer Support 15 Safety Instructions Operating Instructions ge.com Behind the Refrigerator...
... one tablespoon (15 ml) of baking soda to one quart (1 liter) of water. This could damage the refrigerator. Handle only from the wall. Preparing to Move Secure all loose items such as shelves and drawers by pushing ...refrigerator away from the sides of the refrigerator. Be sure the refrigerator stays in damage to prevent damage. When pushing the refrigerator back, make sure you don't roll over the power cord or icemaker supply line. Installation Instructions Troubleshooting Tips Consumer Support 15 Safety Instructions Operating Instructions ge.com Behind the Refrigerator...

Use and Care Manual
Page 16
...shield forward and out. Remove the shelf just above the top drawer. Operating Instructions Safety Instructions Replacing the light bulbs. Plug the refrigerator back in . 16 appliance bulb of the shield and slide forward and out. Lift the light shield up and out. When ...the pocket located at the top of the shield fit into place. Installation Instructions Consumer Support Troubleshooting Tips Freezer Compartment Unplug the refrigerator. Replace the bulb with an appliance bulb of the light shield housing. Remove the convertible meat drawer control knob by their blue...
...shield forward and out. Remove the shelf just above the top drawer. Operating Instructions Safety Instructions Replacing the light bulbs. Plug the refrigerator back in . 16 appliance bulb of the shield and slide forward and out. Lift the light shield up and out. When ...the pocket located at the top of the shield fit into place. Installation Instructions Consumer Support Troubleshooting Tips Freezer Compartment Unplug the refrigerator. Replace the bulb with an appliance bulb of the light shield housing. Remove the convertible meat drawer control knob by their blue...

Use and Care Manual
Page 17
...) or Raised Panel A raised panel design screwed or glued to 3/4″ (19 mm) max, will fit between the face of at least 2″ (5.1 cm) from GE Parts and Accessories, 800.626.2002, or you to match your kitchen cabinets. Before You Begin Some models are included in the kit. Safety Instructions... 1/4″ (6 mm) 1/4″ (6 mm) Thick Backing 5/16″ (8 mm) 1/4″ (6 mm) max 3/4″ (19 mm) 2″ (5.1 cm) Clearance Handle Side Appearance Panel 3/4″ (19 mm) Refrigerator Door Installation Instructions Troubleshooting Tips Consumer Support 17
...) or Raised Panel A raised panel design screwed or glued to 3/4″ (19 mm) max, will fit between the face of at least 2″ (5.1 cm) from GE Parts and Accessories, 800.626.2002, or you to match your kitchen cabinets. Before You Begin Some models are included in the kit. Safety Instructions... 1/4″ (6 mm) 1/4″ (6 mm) Thick Backing 5/16″ (8 mm) 1/4″ (6 mm) max 3/4″ (19 mm) 2″ (5.1 cm) Clearance Handle Side Appearance Panel 3/4″ (19 mm) Refrigerator Door Installation Instructions Troubleshooting Tips Consumer Support 17
Use and Care Manual
Page 19
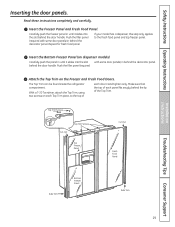
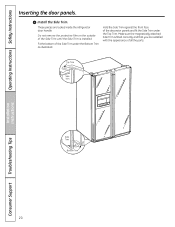
... door handle. If your model has a dispenser, this step only applies to the top of each door. The Top Trim can be found inside the refrigerator compartment. Carefully push the panel in until it slides into the slot behind the door handle. Push the filler panel (required Attach the Top Trim...
... door handle. If your model has a dispenser, this step only applies to the top of each door. The Top Trim can be found inside the refrigerator compartment. Carefully push the panel in until it slides into the slot behind the door handle. Push the filler panel (required Attach the Top Trim...
Use and Care Manual
Page 20
... under the Top Trim. Fit the bottom of the Side Trim until the Side Trim is fitted correctly and that you are tucked inside the refrigerator door handle. Top Trim Side Trim Side Trim Bottom Trim Installation Instructions Consumer Support Troubleshooting Tips 20 These pieces are satisfied with the appearance of...
... under the Top Trim. Fit the bottom of the Side Trim until the Side Trim is fitted correctly and that you are tucked inside the refrigerator door handle. Top Trim Side Trim Side Trim Bottom Trim Installation Instructions Consumer Support Troubleshooting Tips 20 These pieces are satisfied with the appearance of...

Use and Care Manual
Page 21
... installation is not covered under the Warranty. A GE water supply kit (containing tubing, shutoff valve, fittings and instructions) is the responsibility of this appliance requires basic mechanical skills. • Completion time - Keep these instructions for future reference. • Skill level - Installation Instructions Refrigerator Models 23, 25 and 26 Questions? PREPARATION WATER SUPPLY TO...
... installation is not covered under the Warranty. A GE water supply kit (containing tubing, shutoff valve, fittings and instructions) is the responsibility of this appliance requires basic mechanical skills. • Completion time - Keep these instructions for future reference. • Skill level - Installation Instructions Refrigerator Models 23, 25 and 26 Questions? PREPARATION WATER SUPPLY TO...
Use and Care Manual
Page 22
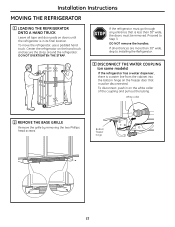
DO NOT OVERTIGHTEN THE STRAP. To disconnect, push in its final location. Proceed to Installing the Refrigerator. 3 DISCONNECT THE WATER COUPLING (on some models) If the refrigerator has a water dispenser, there is a water line from the cabinet into the bottom hinge on the freezer door that...White collar 2 REMOVE THE BASE GRILLE Remove the grille by removing the two Phillips head screws. To move the refrigerator, use a padded hand truck. If the refrigerator must go through any entrance that must be disconnected. DO NOT remove the handles. Bottom freezer hinge 22 Center ...
DO NOT OVERTIGHTEN THE STRAP. To disconnect, push in its final location. Proceed to Installing the Refrigerator. 3 DISCONNECT THE WATER COUPLING (on some models) If the refrigerator has a water dispenser, there is a water line from the cabinet into the bottom hinge on the freezer door that...White collar 2 REMOVE THE BASE GRILLE Remove the grille by removing the two Phillips head screws. To move the refrigerator, use a padded hand truck. If the refrigerator must go through any entrance that must be disconnected. DO NOT remove the handles. Bottom freezer hinge 22 Center ...


