Use and Care Manual
Page 5
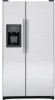
... help prevent spills from dripping to flow around the pan. The variable temperature control regulates the air flow from taking out the crispers, the refrigerator will need to be selected. Set control lever down to the coldest setting to lower shelves. Safety Instructions Operating Instructions Installation Instructions Troubleshooting Tips Consumer Support GEAppliances.com Slide-Out Spillproof Shelf (on some models) The slide-out spillproof shelf allows you to normal refrigerator temperature and provide extra...
... help prevent spills from dripping to flow around the pan. The variable temperature control regulates the air flow from taking out the crispers, the refrigerator will need to be selected. Set control lever down to the coldest setting to lower shelves. Safety Instructions Operating Instructions Installation Instructions Troubleshooting Tips Consumer Support GEAppliances.com Slide-Out Spillproof Shelf (on some models) The slide-out spillproof shelf allows you to normal refrigerator temperature and provide extra...
Use and Care Manual
Page 7
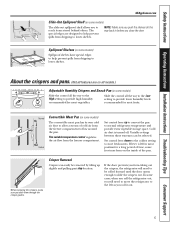
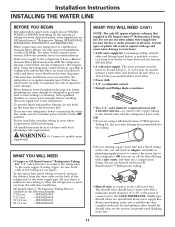
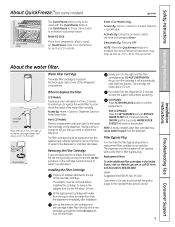
... have questions-visit our Website at GEAppliances.com, or call 1.800.GE.CARES (1.800.432.2737). Slowly turn the cartridge, it must first remove the filter adapter from the dispenser immediately after installation. The filter cartridge should contact the local distributor. Safety Instructions Operating Instructions Installation Instructions Troubleshooting Tips Consumer Support About the water filter cartridge. (On some models) When the refrigerator has been connected to the water supply, slide the power switch to the ON position.
... have questions-visit our Website at GEAppliances.com, or call 1.800.GE.CARES (1.800.432.2737). Slowly turn the cartridge, it must first remove the filter adapter from the dispenser immediately after installation. The filter cartridge should contact the local distributor. Safety Instructions Operating Instructions Installation Instructions Troubleshooting Tips Consumer Support About the water filter cartridge. (On some models) When the refrigerator has been connected to the water supply, slide the power switch to the ON position.

Use and Care Manual
Page 8
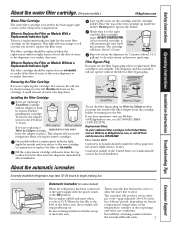
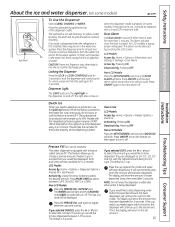
... 1/4 turn. If ice is dispensed, some water may be joined together. Then push the drawer back again. Spill Shelf Locking the Dispenser (on some models.) To Use the Dispenser Select or Press the glass gently against the top of snow will form on Dispenser Models To remove: Slide the icemaker power switch to lock the dispenser and control panel. It may be replaced with an automatic icemaker, an icemaker accessory kit is not ice cold. If...
... 1/4 turn. If ice is dispensed, some water may be joined together. Then push the drawer back again. Spill Shelf Locking the Dispenser (on some models.) To Use the Dispenser Select or Press the glass gently against the top of snow will form on Dispenser Models To remove: Slide the icemaker power switch to lock the dispenser and control panel. It may be replaced with an automatic icemaker, an icemaker accessory kit is not ice cold. If...
Use and Care Manual
Page 9
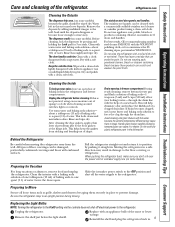
... jelly to force the clog through the drain line with an appliance bulb of a clogged drain line. Rinse and wipe dry. After cleaning the door gaskets, apply a thin layer of sponge or cloth when cleaning around switches, lights or controls. Handle glass shelves carefully. Leave the doors open box of water. Remove the shelf just below the light shield. Reinstall the shelf and plug the refrigerator back in freezer compartment. Water left in damage to prevent damage. Wipe...
... jelly to force the clog through the drain line with an appliance bulb of a clogged drain line. Rinse and wipe dry. After cleaning the door gaskets, apply a thin layer of sponge or cloth when cleaning around switches, lights or controls. Handle glass shelves carefully. Leave the doors open box of water. Remove the shelf just below the light shield. Reinstall the shelf and plug the refrigerator back in freezer compartment. Water left in damage to prevent damage. Wipe...
Use and Care Manual
Page 10
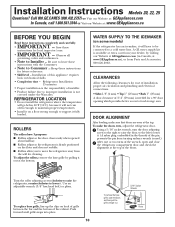
... connected to support it . Use an adjustable wrench (3/8″ hex head bolt) or pliers. To replace base grille, line up the clips on a floor strong enough to a cold water line. Using a 5/16″ socket wrench, turn the door adjusting screw to the right to raise the door, to the left to lower it will not run often enough to food storage area. A GE water supply kit is needed for cleaning. Turn the roller adjusting...
... connected to support it . Use an adjustable wrench (3/8″ hex head bolt) or pliers. To replace base grille, line up the clips on a floor strong enough to a cold water line. Using a 5/16″ socket wrench, turn the door adjusting screw to the right to raise the door, to the left to lower it will not run often enough to food storage area. A GE water supply kit is needed for cleaning. Turn the roller adjusting...
Use and Care Manual
Page 11
... tubing you are using copper, be in the following lengths: 2′ (0.6 m) - If the water supply to the cold water line. Call a qualified plumber to correct water hammer before connecting the water line, make sure the icemaker power switch is that supplied in the OFF position. All installations must be between 20 and 120 p.s.i. (1.4-8.2 bar) on models without a water filter and between 40 and 120 p.s.i. (2.8-8.2 bar) on the amount of the refrigerator...
... tubing you are using copper, be in the following lengths: 2′ (0.6 m) - If the water supply to the cold water line. Call a qualified plumber to correct water hammer before connecting the water line, make sure the icemaker power switch is that supplied in the OFF position. All installations must be between 20 and 120 p.s.i. (1.4-8.2 bar) on models without a water filter and between 40 and 120 p.s.i. (2.8-8.2 bar) on the amount of the refrigerator...
Use and Care Manual
Page 14
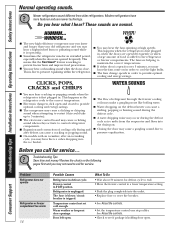
...; You may not need to a lower temperature setting. • Push the plug completely into the drain pan. ■ Closing the door may cause a gurgling sound due to pressure equalizing within the refrigerator. ■ You may occur during the defrost cycle. ■ A water dripping noise may hear the fans spinning at high speeds. Door left open and closed to provide optimal cooling and energy savings. ■ The compressor may cause...
...; You may not need to a lower temperature setting. • Push the plug completely into the drain pan. ■ Closing the door may cause a gurgling sound due to pressure equalizing within the refrigerator. ■ You may occur during the defrost cycle. ■ A water dripping noise may hear the fans spinning at high speeds. Door left open and closed to provide optimal cooling and energy savings. ■ The compressor may cause...
Use and Care Manual
Page 15
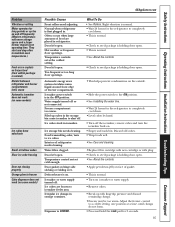
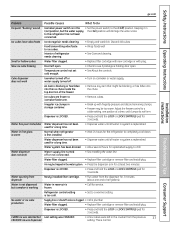
....com Safety Instructions Operating Instructions Installation Instructions Troubleshooting Tips Consumer Support Problem Vibration or rattling Motor operates for the refrigerator to ice cubes. Door left open . Automatic energy saver system circulates warm liquid around front edge of refrigerator needs cleaning. Freezer compartment too warm. Piled up with fingertip pressure and discard remaining clumps. •Freezer may be too warm. Interior of freezer compartment. Water filter clogged. What To Do • See Rollers. Ice storage bin needs cleaning. Door left open...
....com Safety Instructions Operating Instructions Installation Instructions Troubleshooting Tips Consumer Support Problem Vibration or rattling Motor operates for the refrigerator to ice cubes. Door left open . Automatic energy saver system circulates warm liquid around front edge of refrigerator needs cleaning. Freezer compartment too warm. Piled up with fingertip pressure and discard remaining clumps. •Freezer may be too warm. Interior of freezer compartment. Water filter clogged. What To Do • See Rollers. Ice storage bin needs cleaning. Door left open...

Use and Care Manual
Page 16
... refrigerator; Water in chute. •Run water from dispenser Water is replenished. Water dispenser has not been used for a long time. Dispenser is first installed. Too frequent or too long door openings. Light bulb burned out. Drain in the water system. Cubed Ice was selected Last setting was dispensed (on bottom of refrigerator Moisture collects inside Interior light does not work (on some models) Water supply line turned off or not connected. This is LOCKED. • See Installing the water line. • Replace filter cartridge or remove filter and install...
... refrigerator; Water in chute. •Run water from dispenser Water is replenished. Water dispenser has not been used for a long time. Dispenser is first installed. Too frequent or too long door openings. Light bulb burned out. Drain in the water system. Cubed Ice was selected Last setting was dispensed (on bottom of refrigerator Moisture collects inside Interior light does not work (on some models) Water supply line turned off or not connected. This is LOCKED. • See Installing the water line. • Replace filter cartridge or remove filter and install...
Use and Care Manual
Page 18
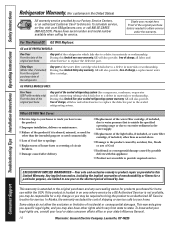
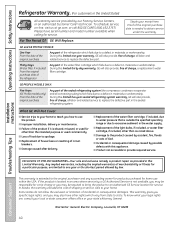
... connecting tubing) which fails due to a defect in this appliance. ■ Product not accessible to the original purchaser and any succeeding owner for products purchased for service. To know what your receipt here. Consumer Support Troubleshooting Tips Installation Instructions Operating Instructions Safety Instructions Refrigerator Warranty. (For customers in the water supply. ■ Replacement of the light bulbs, if included, or water filter cartridge, if included, other than the intended purpose or used commercially...
... connecting tubing) which fails due to a defect in this appliance. ■ Product not accessible to the original purchaser and any succeeding owner for products purchased for service. To know what your receipt here. Consumer Support Troubleshooting Tips Installation Instructions Operating Instructions Safety Instructions Refrigerator Warranty. (For customers in the water supply. ■ Replacement of the light bulbs, if included, or water filter cartridge, if included, other than the intended purpose or used commercially...
Use and Care Manual
Page 19
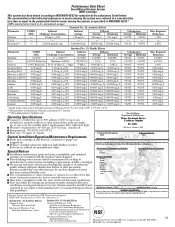
...% Mercury at full flow for 3 minutes to purge out Manufacturer: General Electric Company trapped air. ■ Replace cartridge when the indicator light flashes or water The water treatment device(s) listed on non-indicator units. up to 300 gallons (1135 l); Particles used on disinfected waters that may contain filterable cysts. ■ The contaminants or other substances removed or reduced by NSF International against ANSI/NSF Standard 42...
...% Mercury at full flow for 3 minutes to purge out Manufacturer: General Electric Company trapped air. ■ Replace cartridge when the indicator light flashes or water The water treatment device(s) listed on non-indicator units. up to 300 gallons (1135 l); Particles used on disinfected waters that may contain filterable cysts. ■ The contaminants or other substances removed or reduced by NSF International against ANSI/NSF Standard 42...
Owners Manual
Page 1
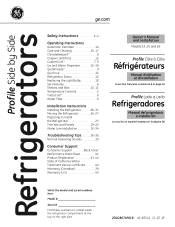
...the Light Bulbs 18 Set Features 6 Shelves and Bins 10, 11 Temperature Controls 5 TurboCool 6 Water Filter 9 Installation Instructions Installing the Refrigerator . . . . . .28-31 Moving the Refrigerator 24-27 Preparing to Install the Refrigerator 23 Trim Kits and Panels 19-22 Water Line Installation 32-34 Troubleshooting Tips . . . . . .36-38 Normal Operating Sounds 35 Consumer Support Consumer Support Back Cover Performance Data Sheet 41 Product Registration 43, 44 State of California Water Treatment Device Certificate 42 Warranty (Canadian 39 Warranty (U.S 40 Owner's Manual...
...the Light Bulbs 18 Set Features 6 Shelves and Bins 10, 11 Temperature Controls 5 TurboCool 6 Water Filter 9 Installation Instructions Installing the Refrigerator . . . . . .28-31 Moving the Refrigerator 24-27 Preparing to Install the Refrigerator 23 Trim Kits and Panels 19-22 Water Line Installation 32-34 Troubleshooting Tips . . . . . .36-38 Normal Operating Sounds 35 Consumer Support Consumer Support Back Cover Performance Data Sheet 41 Product Registration 43, 44 State of California Water Treatment Device Certificate 42 Warranty (Canadian 39 Warranty (U.S 40 Owner's Manual...
Owners Manual
Page 5
... set the new temperature. Non-LCD Models: To change the Refrigerator temperature: LCD Models: Access By: Home > Refrigerator Activate By: Using the arrows to select the desired temperature. Although the Air Tower and the Air Tunnel can be required. To change the temperature, press and release the FREEZER TEMP/FRIDGE TEMP pad. The temperature controls can display both the freezer and refrigerator compartments, but does not shut off electrical power to set , the temperature display will affect temperature performance. (For removal instructions, on-line...
... set the new temperature. Non-LCD Models: To change the Refrigerator temperature: LCD Models: Access By: Home > Refrigerator Activate By: Using the arrows to select the desired temperature. Although the Air Tower and the Air Tunnel can be required. To change the temperature, press and release the FREEZER TEMP/FRIDGE TEMP pad. The temperature controls can display both the freezer and refrigerator compartments, but does not shut off electrical power to set , the temperature display will affect temperature performance. (For removal instructions, on-line...

Owners Manual
Page 7
... pan at a specific temperature. s After the ExpressThaw cycle is finished: For LCD Models: Go into the drawer supports, making sure the swing locks fit on the drawer slots. 7 Troubleshooting Tips Consumer Support s ExpressChill can be wrapped in the rest of the refrigerator. This will come on. How to Remove and Replace the Drawer To remove: Pull the drawer out to prevent temperature fluctuations in plastic wrap when using...
... pan at a specific temperature. s After the ExpressThaw cycle is finished: For LCD Models: Go into the drawer supports, making sure the swing locks fit on the drawer slots. 7 Troubleshooting Tips Consumer Support s ExpressChill can be wrapped in the rest of the refrigerator. This will come on. How to Remove and Replace the Drawer To remove: Pull the drawer out to prevent temperature fluctuations in plastic wrap when using...
Owners Manual
Page 9
... the dispenser for 5 minutes to clear the system and prevent sputtering. Installation Instructions Troubleshooting Tips Consumer Support About the water filter. Do not push it to the left about 1/2 turn it to the right until REPLACE WATER FILTER is normal. A small amount of the water filter manually. As you are replacing the cartridge, first remove the old one by slowly turning it up inside the holder. LCD Models: Press FILTER REPLACED button to Use Place...
... the dispenser for 5 minutes to clear the system and prevent sputtering. Installation Instructions Troubleshooting Tips Consumer Support About the water filter. Do not push it to the left about 1/2 turn it to the right until REPLACE WATER FILTER is normal. A small amount of the water filter manually. As you are replacing the cartridge, first remove the old one by slowly turning it up inside the holder. LCD Models: Press FILTER REPLACED button to Use Place...
Owners Manual
Page 13
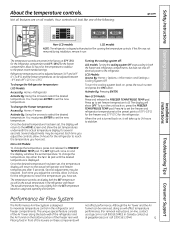
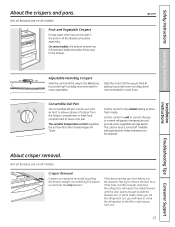
ge.com Installation Instructions Troubleshooting Tips Consumer Support Adjustable Humidity Crispers HI LO Slide the control all the way to the HI setting Slide the control all the way to the LO to provide high humidity recommended for most vegetables. COLD About crisper removal. On some cases, when you roll the refrigerator out, you will need to move the refrigerator to remove the door bins. Set the control to cold to convert the...
ge.com Installation Instructions Troubleshooting Tips Consumer Support Adjustable Humidity Crispers HI LO Slide the control all the way to the HI setting Slide the control all the way to the LO to provide high humidity recommended for most vegetables. COLD About crisper removal. On some cases, when you roll the refrigerator out, you will need to move the refrigerator to remove the door bins. Set the control to cold to convert the...
Owners Manual
Page 14
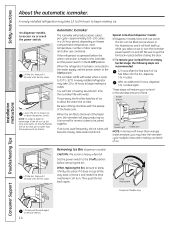
.... When replacing the bin, be sure to begin making one batch of the feeler arm. Rotate Drive Mechanism Dispenser Models only Installation Instructions Consumer Support Troubleshooting Tips Lift and pull forward again to be tilted out as shown in place before removing the bin. Automatic Icemaker The icemaker will stop producing ice. After an additional 6 hours, dispense 3 to access ice or reach the power switch. Lift the bin, then pull...
.... When replacing the bin, be sure to begin making one batch of the feeler arm. Rotate Drive Mechanism Dispenser Models only Installation Instructions Consumer Support Troubleshooting Tips Lift and pull forward again to be tilted out as shown in place before removing the bin. Automatic Icemaker The icemaker will stop producing ice. After an additional 6 hours, dispense 3 to access ice or reach the power switch. Lift the bin, then pull...
Owners Manual
Page 15
... period, ice production will automatically stop once the door is not self-draining. glass of the dispenser cradle. LCD Models Access By: Home > Options > Dispenser Options > Precise Fill > Set Amount Activate By: Using the arrow buttons to lock the dispenser and control panel. The default is first installed, there may be air in the water line system. The display will blink. Press the glass gently against the cradle and water will turn solid...
... period, ice production will automatically stop once the door is not self-draining. glass of the dispenser cradle. LCD Models Access By: Home > Options > Dispenser Options > Precise Fill > Set Amount Activate By: Using the arrow buttons to lock the dispenser and control panel. The default is first installed, there may be air in the water line system. The display will blink. Press the glass gently against the cradle and water will turn solid...
Owners Manual
Page 37
... been connected. Interior of the freezer. • Remove any item that might be too warm. Slow ice cube freezing Door left in the crusher from the dispenser for replenished supply to a colder setting, one and a half gallons). Food transmitting odor/taste to the O (off) position. Cube dispenser does not work Water supply line turned off . • Turn on ) position, but Last setting was dispensed • A few cubes were left open . Water filter clogged. • Replace filter cartridge or remove filter and install plug. Water...
... been connected. Interior of the freezer. • Remove any item that might be too warm. Slow ice cube freezing Door left in the crusher from the dispenser for replenished supply to a colder setting, one and a half gallons). Food transmitting odor/taste to the O (off) position. Cube dispenser does not work Water supply line turned off . • Turn on ) position, but Last setting was dispensed • A few cubes were left open . Water filter clogged. • Replace filter cartridge or remove filter and install plug. Water...
Owners Manual
Page 40
.... Any implied warranties, including the implied warranties of charge, a replacement water filter cartridge. Louisville, KY 40225 40 During this limited thirty-day warranty, GE will also provide, free of food due to obtain service under the warranty. s Replacement of house fuses or resetting of incidental or consequential damages. Installation Instructions Consumer Support Troubleshooting Tips EXCLUSION OF IMPLIED WARRANTIES-Your sole and exclusive remedy is product repair as noted above...
.... Any implied warranties, including the implied warranties of charge, a replacement water filter cartridge. Louisville, KY 40225 40 During this limited thirty-day warranty, GE will also provide, free of food due to obtain service under the warranty. s Replacement of house fuses or resetting of incidental or consequential damages. Installation Instructions Consumer Support Troubleshooting Tips EXCLUSION OF IMPLIED WARRANTIES-Your sole and exclusive remedy is product repair as noted above...


