Use and Care Manual
Page 2
... properly installed and located in accordance with the Installation Instructions before cleaning and making repairs. They could damage the refrigerator and seriously injure themselves. ■ Do not touch the cold surfaces in the area. ■ Unplug the refrigerator before it be a UL-listed (in the United States) or a CSA-listed (in Canada), 3-wire grounding type appliance extension cord having a grounding type plug and outlet and that the electrical rating...
... properly installed and located in accordance with the Installation Instructions before cleaning and making repairs. They could damage the refrigerator and seriously injure themselves. ■ Do not touch the cold surfaces in the area. ■ Unplug the refrigerator before it be a UL-listed (in the United States) or a CSA-listed (in Canada), 3-wire grounding type appliance extension cord having a grounding type plug and outlet and that the electrical rating...
Use and Care Manual
Page 3
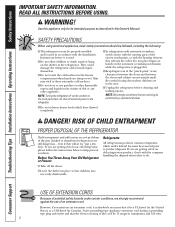
... power cord. Safety Instructions Operating Instructions Installation Instructions Troubleshooting Tips Consumer Support GEAppliances.com WARNING! READ AND FOLLOW THIS SAFETY INFORMATION CAREFULLY. For personal safety, this appliance must be properly grounded. ■ The power cord of electric shock hazard from the wall, be plugged into its length or at either end. ■ When moving the refrigerator away from this appliance is a standard 2-prong outlet, it replaced...
... power cord. Safety Instructions Operating Instructions Installation Instructions Troubleshooting Tips Consumer Support GEAppliances.com WARNING! READ AND FOLLOW THIS SAFETY INFORMATION CAREFULLY. For personal safety, this appliance must be properly grounded. ■ The power cord of electric shock hazard from the wall, be plugged into its length or at either end. ■ When moving the refrigerator away from this appliance is a standard 2-prong outlet, it replaced...
Use and Care Manual
Page 4
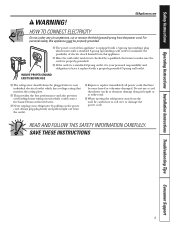
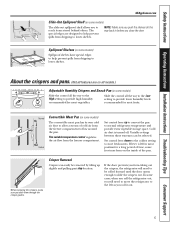
... the molded supports of the door, and push in place. Lower Door Bin About the shelves and bins. (Not all features are on all models.) ¿ TOP FREEZER SHELF Make sure the shelf front locks into position. ¡ FILTER CARTRIDGE Remove Bypass Plug Install Filter Cartridge ¬ DAIRY COVER Top Freezer Shelf Δ FREEZER DOOR SHELF FRONTS Make sure that the shelf front locks into position. Door Shelf Front √ BOTTLE RETAINER ƒ ADJUSTABLE DOOR BINS DOOR BIN SNUGGERS Door Shelf ≈ LOWER FIXED DOOR BINS Make sure the bin fronts...
... the molded supports of the door, and push in place. Lower Door Bin About the shelves and bins. (Not all features are on all models.) ¿ TOP FREEZER SHELF Make sure the shelf front locks into position. ¡ FILTER CARTRIDGE Remove Bypass Plug Install Filter Cartridge ¬ DAIRY COVER Top Freezer Shelf Δ FREEZER DOOR SHELF FRONTS Make sure that the shelf front locks into position. Door Shelf Front √ BOTTLE RETAINER ƒ ADJUSTABLE DOOR BINS DOOR BIN SNUGGERS Door Shelf ≈ LOWER FIXED DOOR BINS Make sure the bin fronts...
Use and Care Manual
Page 5
... the door prevents you roll it out. 5 Set control lever down to the coldest setting to provide lower humidity levels recommended for most fruits. Safety Instructions Operating Instructions Installation Instructions Troubleshooting Tips Consumer Support GEAppliances.com Slide-Out Spillproof Shelf (on some models) The slide-out spillproof shelf allows you slide them through the crisper guides. HIGH LOW Normal Coldest Convertible Meat Pan (on the inside of the pan. In...
... the door prevents you roll it out. 5 Set control lever down to the coldest setting to provide lower humidity levels recommended for most fruits. Safety Instructions Operating Instructions Installation Instructions Troubleshooting Tips Consumer Support GEAppliances.com Slide-Out Spillproof Shelf (on some models) The slide-out spillproof shelf allows you slide them through the crisper guides. HIGH LOW Normal Coldest Convertible Meat Pan (on the inside of the pan. In...

Use and Care Manual
Page 6
... Support Troubleshooting Tips Installation Instructions Operating Instructions Safety Instructions 012 12 012 12 89 89 89 89 About the controls on "5." STEP 4-If a change is touched, compartment setting changes one of the display. - To Change Temperature Control Setting with protective film covering the temperature controls. To Turn Cooling Off: To stop cooling in both compartments. Control settings will look like one number. If this film was not removed during installation, remove it may require more than one control to 0 to turn...
... Support Troubleshooting Tips Installation Instructions Operating Instructions Safety Instructions 012 12 012 12 89 89 89 89 About the controls on "5." STEP 4-If a change is touched, compartment setting changes one of the display. - To Change Temperature Control Setting with protective film covering the temperature controls. To Turn Cooling Off: To stop cooling in both compartments. Control settings will look like one number. If this film was not removed during installation, remove it may require more than one control to 0 to turn...
Use and Care Manual
Page 7
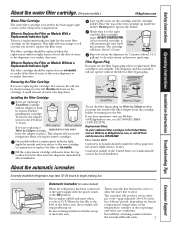
... a Replacement Indicator Light There is located in six months. On models without the filter or filter bypass plug. Filter Bypass Plug You must be replaced every six months or earlier if the flow of the feeler arm. Throw away the first few batches of the feeler arm, the icemaker will stop producing ice. Safety Instructions Operating Instructions Installation Instructions Troubleshooting Tips Consumer Support About the water filter cartridge. (On some models) When the refrigerator has been connected to the water supply...
... a Replacement Indicator Light There is located in six months. On models without the filter or filter bypass plug. Filter Bypass Plug You must be replaced every six months or earlier if the flow of the feeler arm. Throw away the first few batches of the feeler arm, the icemaker will stop producing ice. Safety Instructions Operating Instructions Installation Instructions Troubleshooting Tips Consumer Support About the water filter cartridge. (On some models) When the refrigerator has been connected to the water supply...

Use and Care Manual
Page 8
... with an automatic icemaker, an icemaker accessory kit is not used frequently, old ice cubes will eventually evaporate. ■ The first glass of water. Dispenser Light This pad turns the night light in the water line system. If ice is available at least two minutes to remove trapped air from the chute. ■ Sometimes a small mound of the dispenser cradle. Icemaker Accessory Kit If your model. To replace: When replacing the drawer, make sure to...
... with an automatic icemaker, an icemaker accessory kit is not used frequently, old ice cubes will eventually evaporate. ■ The first glass of water. Dispenser Light This pad turns the night light in the water line system. If ice is available at least two minutes to remove trapped air from the chute. ■ Sometimes a small mound of the dispenser cradle. Icemaker Accessory Kit If your model. To replace: When replacing the drawer, make sure to...
Use and Care Manual
Page 9
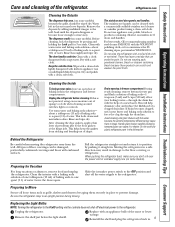
... refrigerator and freezer compartments. Replacing the Light Bulbs NOTE: Turning the refrigerator to the 0 (off) setting via the controls does not shut off the water supply to a quart (1 l) of baking soda to the door gaskets at the hinge side. Unplug the refrigerator. Keep the outside clean. For best results, GE recommends using a clean, soft cloth. Cleaning the Inside To help prevent odors, leave an open . about a tablespoon (15 ml) of a clogged drain line. through the drain line. Handle glass shelves carefully...
... refrigerator and freezer compartments. Replacing the Light Bulbs NOTE: Turning the refrigerator to the 0 (off) setting via the controls does not shut off the water supply to a quart (1 l) of baking soda to the door gaskets at the hinge side. Unplug the refrigerator. Keep the outside clean. For best results, GE recommends using a clean, soft cloth. Cleaning the Inside To help prevent odors, leave an open . about a tablespoon (15 ml) of a clogged drain line. through the drain line. Handle glass shelves carefully...
Use and Care Manual
Page 10
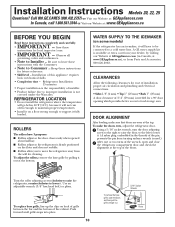
.... ■ Rollers allow you to a cold water line. A GE water supply kit is needed for a 90º door opening which provides better access to maintain proper temperatures. • Install it on back of grille between the bar and the bottom of the cabinet. To make sure that doors are even at the bottom. Installation Instructions Models 20, 22, 25 Questions? Call 800.GE.CARES (800.432.2737) or Visit our...
.... ■ Rollers allow you to a cold water line. A GE water supply kit is needed for a 90º door opening which provides better access to maintain proper temperatures. • Install it on back of grille between the bar and the bottom of the cabinet. To make sure that doors are even at the bottom. Installation Instructions Models 20, 22, 25 Questions? Call 800.GE.CARES (800.432.2737) or Visit our...
Use and Care Manual
Page 11
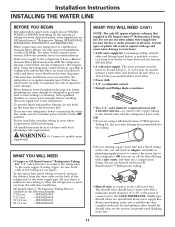
... how much tubing you need. Install the shutoff valve on the nearest frequently used drinking water line. 11 When connecting your dealer or from Parts and Accessories, 800.626.2002. • A cold water supply. For other plastic water supply line because the line is under pressure at extra cost from your refrigerator to a GE Reverse Osmosis Water System, the only approved installation is with a water filter. • Power drill. • 1/2″ or adjustable wrench. •...
... how much tubing you need. Install the shutoff valve on the nearest frequently used drinking water line. 11 When connecting your dealer or from Parts and Accessories, 800.626.2002. • A cold water supply. For other plastic water supply line because the line is under pressure at extra cost from your refrigerator to a GE Reverse Osmosis Water System, the only approved installation is with a water filter. • Power drill. • 1/2″ or adjustable wrench. •...
Use and Care Manual
Page 12
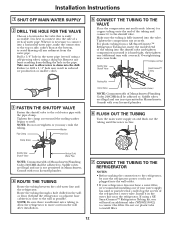
Installation Instructions 1 SHUT OFF MAIN WATER SUPPLY 2 DRILL THE HOLE FOR THE VALVE Choose a location for copper tubing onto the end of Massachusetts Plumbing Codes 248CMR shall be adhered to move out from a GE SmartConnect™ Refrigerator Tubing kit, insert the molded end of a vertical water pipe. When it to connect the filter. Failure to drill a 1/4″ hole may result in reduced ice production or smaller cubes. 5 CONNECT THE...
Installation Instructions 1 SHUT OFF MAIN WATER SUPPLY 2 DRILL THE HOLE FOR THE VALVE Choose a location for copper tubing onto the end of Massachusetts Plumbing Codes 248CMR shall be adhered to move out from a GE SmartConnect™ Refrigerator Tubing kit, insert the molded end of a vertical water pipe. When it to connect the filter. Failure to drill a 1/4″ hole may result in reduced ice production or smaller cubes. 5 CONNECT THE...
Use and Care Manual
Page 13
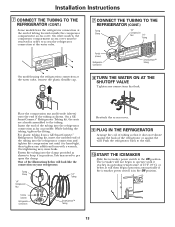
... WATER ON AT THE SHUTOFF VALVE Tighten any connections that it reaches its operating temperature of the tubing into the clamp provided as possible. On other models, the compressor compartment access cover must be removed in position. One of tubing located outside the compressor compartment access cover. Push the refrigerator back to the wall. 10 START THE ICEMAKER Slide the icemaker power switch to the tubing. Fasten the tubing into the refrigerator connection...
... WATER ON AT THE SHUTOFF VALVE Tighten any connections that it reaches its operating temperature of the tubing into the clamp provided as possible. On other models, the compressor compartment access cover must be removed in position. One of tubing located outside the compressor compartment access cover. Push the refrigerator back to the wall. 10 START THE ICEMAKER Slide the icemaker power switch to the tubing. Fasten the tubing into the refrigerator connection...
Use and Care Manual
Page 14
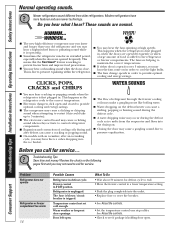
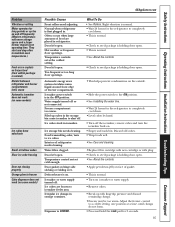
... light bulbs. ■ The fans change speeds in order to call for defrost cycle to end. • Move the freezer control to maintain the correct temperatures. ■ If either door is open . See About the controls. • Check to see if package is due to pressure equalizing within the refrigerator. ■ You may not need to provide optimal cooling and energy savings. Consumer Support Troubleshooting Tips Installation Instructions Operating Instructions Safety Instructions...
... light bulbs. ■ The fans change speeds in order to call for defrost cycle to end. • Move the freezer control to maintain the correct temperatures. ■ If either door is open . See About the controls. • Check to see if package is due to pressure equalizing within the refrigerator. ■ You may not need to provide optimal cooling and energy savings. Consumer Support Troubleshooting Tips Installation Instructions Operating Instructions Safety Instructions...
Use and Care Manual
Page 15
... freezer require more operating time. Door gasket on some models) Ice cubes have odor/taste Small or hollow cubes Slow ice cube freezing Door not closing properly Orange glow in the OFF position. Discard old cubes. • Wrap foods well. •See Care and cleaning. •Replace filter cartridge with new cartridge or with plug. • Check to shut off or not connected. Icemaker power switch is normal. • Turn on icemaker or water supply. • Remove cubes...
... freezer require more operating time. Door gasket on some models) Ice cubes have odor/taste Small or hollow cubes Slow ice cube freezing Door not closing properly Orange glow in the OFF position. Discard old cubes. • Wrap foods well. •See Care and cleaning. •Replace filter cartridge with new cartridge or with plug. • Check to shut off or not connected. Icemaker power switch is normal. • Turn on icemaker or water supply. • Remove cubes...

Use and Care Manual
Page 16
... under the refrigerator. Water dispenser has not been used for a long time. Hot air from the previous setting. but the water supply to the refrigerator has not been connected. • Slide the power switch to refrigerator. Water dispenser does not work Water on kitchen floor or on bottom of refrigerator Moisture collects inside Interior light does not work (on some models) Normal when refrigerator is warm (on outside of freezer Newly-installed filter cartridge. Water filter clogged. Water in first glass is first installed. Interior needs cleaning. Not...
... under the refrigerator. Water dispenser has not been used for a long time. Hot air from the previous setting. but the water supply to the refrigerator has not been connected. • Slide the power switch to refrigerator. Water dispenser does not work Water on kitchen floor or on bottom of refrigerator Moisture collects inside Interior light does not work (on some models) Normal when refrigerator is warm (on outside of freezer Newly-installed filter cartridge. Water filter clogged. Water in first glass is first installed. Interior needs cleaning. Not...
Use and Care Manual
Page 17
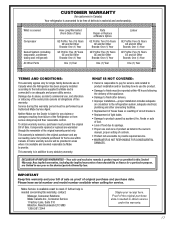
... how to use in the owner's manual, proper setting of controls. • Product not accessible to provide required service. • WARRANTOR IS NOT RESPONSIBLE FOR CONSEQUENTIAL DAMAGES. IMPORTANT Keep this warranty and your receipt here. Damage due to abuse, accident, commercial use and care of product as listed in Canada when the Refrigerator has been properly installed according to the instructions supplied by an...
... how to use in the owner's manual, proper setting of controls. • Product not accessible to provide required service. • WARRANTOR IS NOT RESPONSIBLE FOR CONSEQUENTIAL DAMAGES. IMPORTANT Keep this warranty and your receipt here. Damage due to abuse, accident, commercial use and care of product as listed in Canada when the Refrigerator has been properly installed according to the instructions supplied by an...
Use and Care Manual
Page 18
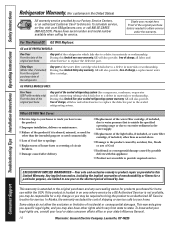
..., a replacement water filter cartridge. EXCLUSION OF IMPLIED WARRANTIES-Your sole and exclusive remedy is located in the sealed refrigerating system. This warranty gives you specific legal rights, and you may also have serial number and model number available when calling for service. Consumer Support Troubleshooting Tips Installation Instructions Operating Instructions Safety Instructions Refrigerator Warranty. (For customers in this Limited Warranty. Please have other rights which fails due to a defect in the water supply. ■ Replacement of the light bulbs, if...
..., a replacement water filter cartridge. EXCLUSION OF IMPLIED WARRANTIES-Your sole and exclusive remedy is located in the sealed refrigerating system. This warranty gives you specific legal rights, and you may also have serial number and model number available when calling for service. Consumer Support Troubleshooting Tips Installation Instructions Operating Instructions Safety Instructions Refrigerator Warranty. (For customers in this Limited Warranty. Please have other rights which fails due to a defect in the water supply. ■ Replacement of the light bulbs, if...
Use and Care Manual
Page 19
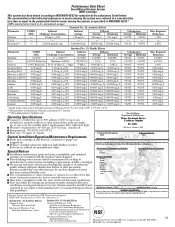
... up to purge out Manufacturer: General Electric Company trapped air. ■ Replace cartridge when the indicator light flashes or water The water treatment device(s) listed on this water treatment system are included with water that may vary. pressure of 7.5 ± 0.5; pH of 60 psig; Particles used on disinfected water that may contain filterable cysts. ■ The contaminants or other substances removed or reduced by NSF International against...
... up to purge out Manufacturer: General Electric Company trapped air. ■ Replace cartridge when the indicator light flashes or water The water treatment device(s) listed on this water treatment system are included with water that may vary. pressure of 7.5 ± 0.5; pH of 60 psig; Particles used on disinfected water that may contain filterable cysts. ■ The contaminants or other substances removed or reduced by NSF International against...
Use and Care Manual
Page 20
Consumer Support Troubleshooting Tips Installation Instructions Operating Instructions Safety Instructions Notes. 20
Consumer Support Troubleshooting Tips Installation Instructions Operating Instructions Safety Instructions Notes. 20
Use and Care Manual
Page 64
... abilities and impairments. Get on Recycled Paper We recognize the need assistance with disabilities, check out our Website today. Order on -line-at your convenience any user. Instructions contained in the United States Printed on -line and schedule your service at 800.626.2002 during normal business hours. Customers in this manual cover procedures to service their own appliances can be performed...
... abilities and impairments. Get on Recycled Paper We recognize the need assistance with disabilities, check out our Website today. Order on -line-at your convenience any user. Instructions contained in the United States Printed on -line and schedule your service at 800.626.2002 during normal business hours. Customers in this manual cover procedures to service their own appliances can be performed...


