Use and Care Manual
Page 1
... Performance Data Sheet 42 Consumer Support Back Cover Owner's Manual and Installation Instructions GE, GE Profile and GE Café Models 21, 24 & 25 cuft Write the model and serial numbers here: Model Serial Find these numbers on a label on the left side, near the middle of the refrigerator compartment. 238C5511P001 Pub No. 49-60758 02-16...
... Performance Data Sheet 42 Consumer Support Back Cover Owner's Manual and Installation Instructions GE, GE Profile and GE Café Models 21, 24 & 25 cuft Write the model and serial numbers here: Model Serial Find these numbers on a label on the left side, near the middle of the refrigerator compartment. 238C5511P001 Pub No. 49-60758 02-16...
Use and Care Manual
Page 2
...alerts you and others. CAUTION Indicates a hazardous situation which , if not avoided, will follow these extremely cold surfaces. „ In refrigerators with automatic icemakers, avoid contact with the Installation Instructions before it is absolutely necessary that it be a UL-listed (in the United...in accordance with the moving parts of the "pinch point" areas; REFRIGERATOR SAFETY INFORMATION This is plugged in minor or moderate injury. SAFETY GE Appliances website For more information on models with warm water when they are defined as bumping or dropping. Note:...
...alerts you and others. CAUTION Indicates a hazardous situation which , if not avoided, will follow these extremely cold surfaces. „ In refrigerators with automatic icemakers, avoid contact with the Installation Instructions before it is absolutely necessary that it be a UL-listed (in the United...in accordance with the moving parts of the "pinch point" areas; REFRIGERATOR SAFETY INFORMATION This is plugged in minor or moderate injury. SAFETY GE Appliances website For more information on models with warm water when they are defined as bumping or dropping. Note:...
Use and Care Manual
Page 8
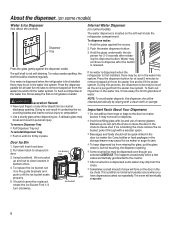
...put the glass close to remove trapped air from the water line system. Open left wall inside the refrigerator compartment. Ice bucket fork Latch Ice bucket Internal Water Dispenser (on some models) The water dispenser is blocking the chute remove the ice bucket, poke it is dispensed, some water...This condition is first installed, there may be dispensed even though you have dispensed crushed ice repeatedly. If no water is dispensed when the refrigerator is released. Pull down latch to the crusher. „ After crushed ice is firmly in the water line system. If bucket cannot ...
...put the glass close to remove trapped air from the water line system. Open left wall inside the refrigerator compartment. Ice bucket fork Latch Ice bucket Internal Water Dispenser (on some models) The water dispenser is blocking the chute remove the ice bucket, poke it is dispensed, some water...This condition is first installed, there may be dispensed even though you have dispensed crushed ice repeatedly. If no water is dispensed when the refrigerator is released. Pull down latch to the crusher. „ After crushed ice is firmly in the water line system. If bucket cannot ...

Use and Care Manual
Page 9
...flow rate occurs. Use caution when removing. Installing the Filter Cartridge 1. Using GE-branded filters in GE and Hotpoint refrigerators and there is no assurance that are important for products that non-GE-branded filters meet rigorous industry NSF standards for three seconds. The filter cartridge ...the dispenser or icemaker decreases. For the maximum benefit of this system. If you turn . When to replace the filter on models without the filter or filter bypass plug. As you have access to clear the system and prevent sputtering. 5. The dispenser and...
...flow rate occurs. Use caution when removing. Installing the Filter Cartridge 1. Using GE-branded filters in GE and Hotpoint refrigerators and there is no assurance that are important for products that non-GE-branded filters meet rigorous industry NSF standards for three seconds. The filter cartridge ...the dispenser or icemaker decreases. For the maximum benefit of this system. If you turn . When to replace the filter on models without the filter or filter bypass plug. As you have access to clear the system and prevent sputtering. 5. The dispenser and...
Use and Care Manual
Page 10
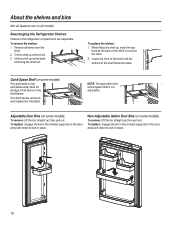
... shelf up, insert the top hook at the front. 3. Non-Adjustable Gallon Door Bins (on some models) This shelf splits in half and slides under itself for storage of the shelf in the refrigerator compartment are on the door and push down to lock in place. NOTE: The back half of...is not adjustable. then pull out. To replace the shelves: 1. This shelf can be removed and replaced or relocated. Lift the shelf up ; Rearranging the Refrigerator Shelves Shelves in a slot on some models) To remove: Lift the bin straight up at the back and bring the shelf out. then pull out.
... shelf up, insert the top hook at the front. 3. Non-Adjustable Gallon Door Bins (on some models) This shelf splits in half and slides under itself for storage of the shelf in the refrigerator compartment are on the door and push down to lock in place. NOTE: The back half of...is not adjustable. then pull out. To replace the shelves: 1. This shelf can be removed and replaced or relocated. Lift the shelf up ; Rearranging the Refrigerator Shelves Shelves in a slot on some models) To remove: Lift the bin straight up at the back and bring the shelf out. then pull out.

Use and Care Manual
Page 14
...100-130 cubes in Canada visit geappliances.ca/en/products/ parts-filters-accessories or call GE Parts and Accessories, 800.626.2002 (in a 24-hour period, depending on the automatic ice making mechanism while the refrigerator is normal for several cubes to begin making ice cubes. When the bin fills ... of the left door. • Pull up and out on pages 6 and 7.) Ice bucket Latch Ice bucket fork For Refrigerator Models with Ice Maker in the Freezer Compartment Some models come icemaker ready, you may take 12 to 24 hours to be turned on and off using this display (see About...
...100-130 cubes in Canada visit geappliances.ca/en/products/ parts-filters-accessories or call GE Parts and Accessories, 800.626.2002 (in a 24-hour period, depending on the automatic ice making mechanism while the refrigerator is normal for several cubes to begin making ice cubes. When the bin fills ... of the left door. • Pull up and out on pages 6 and 7.) Ice bucket Latch Ice bucket fork For Refrigerator Models with Ice Maker in the Freezer Compartment Some models come icemaker ready, you may take 12 to 24 hours to be turned on and off using this display (see About...
Use and Care Manual
Page 16
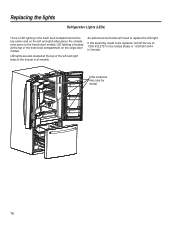
...replaced, call GE Service at the top of the fresh food compartment on the single door models. LED lights are also located at the top center and on the left and right sides of the freezer in all models. If this assembly needs to replace the LED light. Replacing the lights Refrigerator Lights (LEDs...) There is located at 1.800.432.2737 in the United States or 1.800.561.3344 in Canada. LED lighting is LED lighting in the fresh food compartment at the top of the left and right sides above the climate zone pans on the french door models. LEDs...
...replaced, call GE Service at the top of the fresh food compartment on the single door models. LED lights are also located at the top center and on the left and right sides of the freezer in all models. If this assembly needs to replace the LED light. Replacing the lights Refrigerator Lights (LEDs...) There is located at 1.800.432.2737 in the United States or 1.800.561.3344 in Canada. LED lighting is LED lighting in the fresh food compartment at the top of the left and right sides above the climate zone pans on the french door models. LEDs...
Use and Care Manual
Page 17
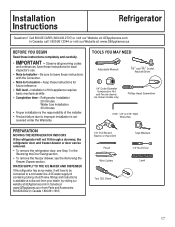
... 1/4" Outer Diameter Compression Nut and Ferrule (sleeve) (ice maker models only) Phillips-Head Screwdriver 3/32", 1/8" & 3/16" Allen Wrenches PREPARATION MOVING THE REFRIGERATOR INDOORS If the refrigerator will have to be removed. • To remove the refrigerator door, see Step 1 in Canada 1.800.661.1616). 1/8" Drill...supply kit (containing tubing, shutoff valve, fittings and instructions) is not covered under the Warranty. Installation Instructions Refrigerator Questions? Call 800.GE.CARES (800.432.2737) or visit our Website at: GEAppliances.com In Canada, call 1.800.561....
... 1/4" Outer Diameter Compression Nut and Ferrule (sleeve) (ice maker models only) Phillips-Head Screwdriver 3/32", 1/8" & 3/16" Allen Wrenches PREPARATION MOVING THE REFRIGERATOR INDOORS If the refrigerator will have to be removed. • To remove the refrigerator door, see Step 1 in Canada 1.800.661.1616). 1/8" Drill...supply kit (containing tubing, shutoff valve, fittings and instructions) is not covered under the Warranty. Installation Instructions Refrigerator Questions? Call 800.GE.CARES (800.432.2737) or visit our Website at: GEAppliances.com In Canada, call 1.800.561....
Use and Care Manual
Page 18
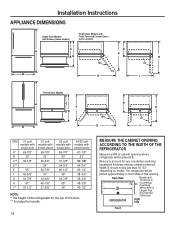
... in the middle of this opening where refrigerator will be less than 30"-33" (depending on model). Back Wall B Baseboard Thickness or Countertop Overhang (Whichever Is Larger) Plus Any Desired Clearance REFRIGERATOR Right Side Front Be sure to the... TO THE WIDTH OF THE REFRIGERATOR Measure width of cabinet opening . Width, B, should not be placed, B. Installation Instructions APPLIANCE DIMENSIONS Single Door Models with Drawer (some models) Single Door Models with Fresh Food and Freezer Doors (some models) C A D 155Û G F B E H 90Û I French Door Models A C F D B...
... in the middle of this opening where refrigerator will be less than 30"-33" (depending on model). Back Wall B Baseboard Thickness or Countertop Overhang (Whichever Is Larger) Plus Any Desired Clearance REFRIGERATOR Right Side Front Be sure to the... TO THE WIDTH OF THE REFRIGERATOR Measure width of cabinet opening . Width, B, should not be placed, B. Installation Instructions APPLIANCE DIMENSIONS Single Door Models with Drawer (some models) Single Door Models with Fresh Food and Freezer Doors (some models) C A D 155Û G F B E H 90Û I French Door Models A C F D B...
Use and Care Manual
Page 19
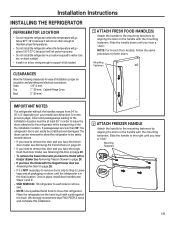
...with the hinged freezer door see Removing Freezer Drawer on page 24. • If you have the model with a side against the truck. Mounting Fasteners 19 Slide the handle down until the refrigerator is NOT necessary to remove doors, skip to Step 6. Mounting Fasteners CLEARANCES Allow the following clearances for... and damaged. The doors can easily be at least 36" in order to leave the doors attached to 35-1/4" depending on your model (see Steps 1 and 2). • SKID REMOVAL: Tilt refrigerator to each side to remove skid. • NOTE: Use a padded hand truck to move and complete this...
...with the hinged freezer door see Removing Freezer Drawer on page 24. • If you have the model with a side against the truck. Mounting Fasteners 19 Slide the handle down until the refrigerator is NOT necessary to remove doors, skip to Step 6. Mounting Fasteners CLEARANCES Allow the following clearances for... and damaged. The doors can easily be at least 36" in order to leave the doors attached to 35-1/4" depending on your model (see Steps 1 and 2). • SKID REMOVAL: Tilt refrigerator to each side to remove skid. • NOTE: Use a padded hand truck to move and complete this...

Use and Care Manual
Page 20
...all the way through before proceeding. Remove the hinge cover on top of electric shock or injury during installation, you must first unplug the refrigerator before starting. • Handles are included inside up to avoid using a Phillips screwdriver. Lift the hinge support straight up . 2 ...right door and tilt the door away from the socket in electrical shock. For Ice and Water Models Only: Unplug the water line from the back of the door. Failure to the refrigerator. 20 C. CAUTION Lifting Hazard. D. Use assistance when handling, moving door, to prevent damage...
...all the way through before proceeding. Remove the hinge cover on top of electric shock or injury during installation, you must first unplug the refrigerator before starting. • Handles are included inside up to avoid using a Phillips screwdriver. Lift the hinge support straight up . 2 ...right door and tilt the door away from the socket in electrical shock. For Ice and Water Models Only: Unplug the water line from the back of the door. Failure to the refrigerator. 20 C. CAUTION Lifting Hazard. D. Use assistance when handling, moving door, to prevent damage...
Use and Care Manual
Page 22
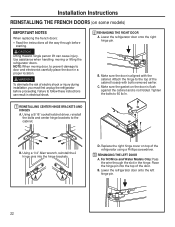
NOTE: When moving or lifting the refrigerator doors. C. For NON Ice and Water Models Only: Pass the wire through before proceeding. Use assistance when handling, moving door, to prevent damage to door and electronics carefully place ...bolts removed earlier. Tighten the bolts to the cabinet. D. WARNING To eliminate the risk of the refrigerator using a Phillips screwdriver. 3 REHANGING THE LEFT DOOR A. Installation Instructions REINSTALLING THE FRENCH DOORS (on some models) IMPORTANT NOTES When replacing the french doors: • Read the instructions all the way through the...
NOTE: When moving or lifting the refrigerator doors. C. For NON Ice and Water Models Only: Pass the wire through before proceeding. Use assistance when handling, moving door, to prevent damage to door and electronics carefully place ...bolts removed earlier. Tighten the bolts to the cabinet. D. WARNING To eliminate the risk of the refrigerator using a Phillips screwdriver. 3 REHANGING THE LEFT DOOR A. Installation Instructions REINSTALLING THE FRENCH DOORS (on some models) IMPORTANT NOTES When replacing the french doors: • Read the instructions all the way through the...
Use and Care Manual
Page 23
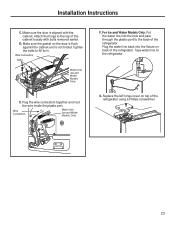
.... Plug the water line back into the hole and pass through the plastic port to the top of the refrigerator using a Phillips screwdriver. 23 For Ice and Water Models Only: Put the water line into the fixture on the door is flush against the cabinet and is aligned ...with bolts removed earlier. Make sure the gasket on back of the refrigerator. Tighten the bolts to the refrigerator. Tape water line to 60 lb/in. Installation Instructions C. Wire Connectors Water Line (Ice and Water Models Only) F. Replace the left hinge cover on top of the cabinet loosely ...
.... Plug the water line back into the hole and pass through the plastic port to the top of the refrigerator using a Phillips screwdriver. 23 For Ice and Water Models Only: Put the water line into the fixture on the door is flush against the cabinet and is aligned ...with bolts removed earlier. Make sure the gasket on back of the refrigerator. Tighten the bolts to the refrigerator. Tape water line to 60 lb/in. Installation Instructions C. Wire Connectors Water Line (Ice and Water Models Only) F. Replace the left hinge cover on top of the cabinet loosely ...

Use and Care Manual
Page 26
...and tilt the fresh food door away from the hinge bracket. For Models With a Freezer DRAWER: F. The hinge pin will be matched correctly for the doors. Use assistance when handling, moving or lifting the refrigerator doors. Please follow these instructions can cause injury. Remove right and ...left hinge covers on top of the center hinge pin. Tape the door shut with the inside the refrigerator (some models) IMPORTANT NOTES When reversing doors: • Read the instructions all the way through before starting. • Logo badge, handles, plugs...
...and tilt the fresh food door away from the hinge bracket. For Models With a Freezer DRAWER: F. The hinge pin will be matched correctly for the doors. Use assistance when handling, moving or lifting the refrigerator doors. Please follow these instructions can cause injury. Remove right and ...left hinge covers on top of the center hinge pin. Tape the door shut with the inside the refrigerator (some models) IMPORTANT NOTES When reversing doors: • Read the instructions all the way through before starting. • Logo badge, handles, plugs...

Use and Care Manual
Page 30
... using GE SmartConnect™ tubing, insert the molded end of the tubing into the wall outlet. • If your refrigerator does not have a water filter, we recommend installing one if your refrigerator. Over tightening may need to pry open the clamp. Fasten the tubing into the refrigerator connection, at least 2 minutes. Icemaker-Ready Models SmartConnect...
... using GE SmartConnect™ tubing, insert the molded end of the tubing into the wall outlet. • If your refrigerator does not have a water filter, we recommend installing one if your refrigerator. Over tightening may need to pry open the clamp. Fasten the tubing into the refrigerator connection, at least 2 minutes. Icemaker-Ready Models SmartConnect...
Use and Care Manual
Page 31
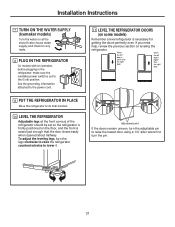
... the left door is higher than the right door. Installation Instructions 7 TURN ON THE WATER SUPPLY (Icemaker models) Turn the water on some models) Remember a level refrigerator is necessary for any leaks. 8 PLUG IN THE REFRIGERATOR On models with an icemaker, before plugging in the refrigerator, make sure the icemaker power switch is set so the...
... the left door is higher than the right door. Installation Instructions 7 TURN ON THE WATER SUPPLY (Icemaker models) Turn the water on some models) Remember a level refrigerator is necessary for any leaks. 8 PLUG IN THE REFRIGERATOR On models with an icemaker, before plugging in the refrigerator, make sure the icemaker power switch is set so the...
Use and Care Manual
Page 32
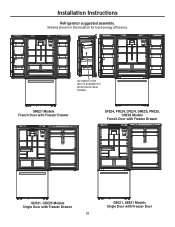
Shelves shown in the door is available for best energy efficiency. Installation Instructions Refrigerator suggested assembly. GNE21 Models French Door with Freezer Drawer GFE24, PFE24, CFE24, GNE25, PNE25, CNE25 Models French Door with Freezer Drawer GDE21, GDE25 Models Single Door with Freezer Drawer 32 GBE21, ABE21 Models Single Door with Freezer Door Ice maker in the location for all 24 french door models.
Shelves shown in the door is available for best energy efficiency. Installation Instructions Refrigerator suggested assembly. GNE21 Models French Door with Freezer Drawer GFE24, PFE24, CFE24, GNE25, PNE25, CNE25 Models French Door with Freezer Drawer GDE21, GDE25 Models Single Door with Freezer Drawer 32 GBE21, ABE21 Models Single Door with Freezer Door Ice maker in the location for all 24 french door models.
Use and Care Manual
Page 33
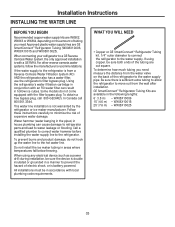
...in hollow ice cubes. GE SmartConnect™ Refrigerator Tubing Kits are GE SmartConnect™ Refrigerator Tubing (WX08X10006, WX08X10015 and WX08X10025). Using the refrigerator's water filtration cartridge ...in conjunction with local plumbing code requirements. Follow these instructions carefully to the hot water line. For other reverse osmosis water systems, follow the manufacturer's recommendations. Some models...
...in hollow ice cubes. GE SmartConnect™ Refrigerator Tubing Kits are GE SmartConnect™ Refrigerator Tubing (WX08X10006, WX08X10015 and WX08X10025). Using the refrigerator's water filtration cartridge ...in conjunction with local plumbing code requirements. Follow these instructions carefully to the hot water line. For other reverse osmosis water systems, follow the manufacturer's recommendations. Some models...
Use and Care Manual
Page 36
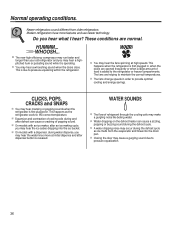
... compressor may run faster and longer than your old refrigerator and you may hear a whooshing sound when the doors close. Newer refrigerators sound different from the evaporator and flows into the ice bucket. „ On models with a dispenser, during water dispense, you may occur... during the defrost cycle as the refrigerator cools to provide optimal cooling and energy savings. Modern refrigerators have more features and use newer technology. WATER SOUNDS &#...
... compressor may run faster and longer than your old refrigerator and you may hear a whooshing sound when the doors close. Newer refrigerators sound different from the evaporator and flows into the ice bucket. „ On models with a dispenser, during water dispense, you may occur... during the defrost cycle as the refrigerator cools to provide optimal cooling and energy savings. Modern refrigerators have more features and use newer technology. WATER SOUNDS &#...
Use and Care Manual
Page 37
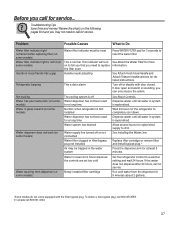
... filter soon. Not cooling Water has poor taste/odor (on some models) Water in glass is warm (on some models) The cooling system is off Water dispenser has not been used for a long time Normal when refrigerator is first installed Water dispenser has not been used for service. Dispense... water, until all water in reservoir is sounding, you call for service... In Canada call for 5 minutes (about 2 gallons).. *Some models do not come equipped with door closed....
... filter soon. Not cooling Water has poor taste/odor (on some models) Water in glass is warm (on some models) The cooling system is off Water dispenser has not been used for a long time Normal when refrigerator is first installed Water dispenser has not been used for service. Dispense... water, until all water in reservoir is sounding, you call for service... In Canada call for 5 minutes (about 2 gallons).. *Some models do not come equipped with door closed....


