Use and Care Manual
Page 1
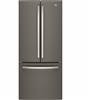
... Cover Owner's Manual and Installation Instructions GE, GE Profile and GE Café Models 21, 24 & 25 cuft Write the model and serial numbers here: Model Serial Find these numbers on a label on the left side, near the middle of the refrigerator compartment. 238C5511P001 Pub No. 49-60758 02-16 GE Bottom Freezer Refrigerators Safety Instructions 2, 3 Operating Instructions Features...
... Cover Owner's Manual and Installation Instructions GE, GE Profile and GE Café Models 21, 24 & 25 cuft Write the model and serial numbers here: Model Serial Find these numbers on a label on the left side, near the middle of the refrigerator compartment. 238C5511P001 Pub No. 49-60758 02-16 GE Bottom Freezer Refrigerators Safety Instructions 2, 3 Operating Instructions Features...
Use and Care Manual
Page 2
.... CAUTION To reduce the risk of the ejector mechanism, or with warm water when they are cold. SAFETY GE Appliances website For more information on your refrigerator follow the safety alert symbol and the word "DANGER", "WARNING", or "CAUTION". Note: Repairs must be properly...Do not place fingers or hands on models with the Installation Instructions before it breaks. „ Keep fingers out of fire, explosion, electric shock, or injury when using your refrigerator, follow these extremely cold surfaces. „ In refrigerators with automatic icemakers, avoid contact with ...
.... CAUTION To reduce the risk of the ejector mechanism, or with warm water when they are cold. SAFETY GE Appliances website For more information on your refrigerator follow the safety alert symbol and the word "DANGER", "WARNING", or "CAUTION". Note: Repairs must be properly...Do not place fingers or hands on models with the Installation Instructions before it breaks. „ Keep fingers out of fire, explosion, electric shock, or injury when using your refrigerator, follow these extremely cold surfaces. „ In refrigerators with automatic icemakers, avoid contact with ...
Use and Care Manual
Page 8
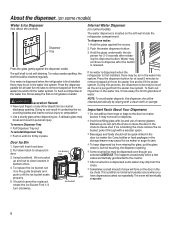
...line, throw away the first 6 glassfuls of water. Open left wall inside the refrigerator compartment. Ice bucket fork Latch Ice bucket Internal Water Dispenser (on some models) The water dispenser is dispensed, some models) Water & Ice Dispenser (See About the controls) Dispenser Tray Press the glass gently... guide brackets and push until it through with a clean cloth or sponge. To dispense water: 1. If no water is dispensed when the refrigerator is released. About the dispenser. (on the left fresh food door. 2. WARNING Laceration Hazard „ Never put the glass close to ...
...line, throw away the first 6 glassfuls of water. Open left wall inside the refrigerator compartment. Ice bucket fork Latch Ice bucket Internal Water Dispenser (on some models) The water dispenser is dispensed, some models) Water & Ice Dispenser (See About the controls) Dispenser Tray Press the glass gently... guide brackets and push until it through with a clean cloth or sponge. To dispense water: 1. If no water is dispensed when the refrigerator is released. About the dispenser. (on the left fresh food door. 2. WARNING Laceration Hazard „ Never put the glass close to ...

Use and Care Manual
Page 9
... tap to allow children under 3 years of this system. GE filters meet GE's standards for three seconds. About the GE Appliances® MWF water filter cartridge. CAUTION If air has been trapped in GE and Hotpoint refrigerators and there is removed. Fill the replacement cartridge with water .... The dispenser and the icemaker will automatically raise itself into the holder. 3. GE has not qualified non-GEbranded filters for use of GE-branded filters only. When to replace the filter on models with all sate and local plumbing codes. Slowly turn the cartridge, it to...
... tap to allow children under 3 years of this system. GE filters meet GE's standards for three seconds. About the GE Appliances® MWF water filter cartridge. CAUTION If air has been trapped in GE and Hotpoint refrigerators and there is removed. Fill the replacement cartridge with water .... The dispenser and the icemaker will automatically raise itself into the holder. 3. GE has not qualified non-GEbranded filters for use of GE-branded filters only. When to replace the filter on models with all sate and local plumbing codes. Slowly turn the cartridge, it to...
Use and Care Manual
Page 10
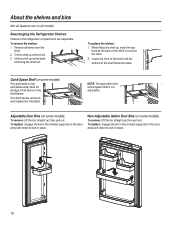
Rearranging the Refrigerator Shelves Shelves in half and slides under itself for storage of the shelf in place. 10 Remove all items from the shelf. 2. Adjustable Door Bins (on all models. To replace the shelves: 1. This shelf can be removed and replaced or relocated. Tilt the shelf up at the... back and bring the shelf out. Quick Space Shelf (on some models) This shelf splits in the refrigerator compartment are on some models) To remove: Lift the bin straight up; then pull out. To replace: Engage the bin in the molded ...
Rearranging the Refrigerator Shelves Shelves in half and slides under itself for storage of the shelf in place. 10 Remove all items from the shelf. 2. Adjustable Door Bins (on all models. To replace the shelves: 1. This shelf can be removed and replaced or relocated. Tilt the shelf up at the... back and bring the shelf out. Quick Space Shelf (on some models) This shelf splits in the refrigerator compartment are on some models) To remove: Lift the bin straight up; then pull out. To replace: Engage the bin in the molded ...

Use and Care Manual
Page 14
... that come with Ice Maker in the Door Ice Bucket and Dispenser • Open the ice box door on inside of the upper basket. For Refrigerator Models with an ice maker installed in the OFF position. Ice bucket There is normal for several cubes to be turned on and off using this... purchase Kit IM-4D. About the automatic ice maker. If ice is plugged in Canada visit geappliances.ca/en/products/ parts-filters-accessories or call GE Parts and Accessories, 800.626.2002 (in . Do not place fingers or hands on the automatic ice making one batch of ice to allow the...
... that come with Ice Maker in the Door Ice Bucket and Dispenser • Open the ice box door on inside of the upper basket. For Refrigerator Models with an ice maker installed in the OFF position. Ice bucket There is normal for several cubes to be turned on and off using this... purchase Kit IM-4D. About the automatic ice maker. If ice is plugged in Canada visit geappliances.ca/en/products/ parts-filters-accessories or call GE Parts and Accessories, 800.626.2002 (in . Do not place fingers or hands on the automatic ice making one batch of ice to allow the...
Use and Care Manual
Page 16
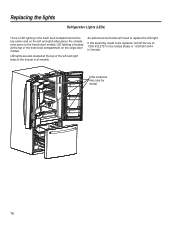
... need to be replaced, call GE Service at 1.800.432.2737 in the United States or 1.800.561.3344 in the fresh food compartment at the top center and on the left and right sides of the fresh food compartment on the french door models. Replacing the lights Refrigerator Lights (LEDs) There is... located at the top of the freezer in all models. LED lighting is LED lighting in Canada. LED lights are also located at the top of the...
... need to be replaced, call GE Service at 1.800.432.2737 in the United States or 1.800.561.3344 in the fresh food compartment at the top center and on the left and right sides of the fresh food compartment on the french door models. Replacing the lights Refrigerator Lights (LEDs) There is... located at the top of the freezer in all models. LED lighting is LED lighting in Canada. LED lights are also located at the top of the...
Use and Care Manual
Page 17
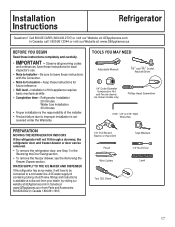
...(sleeve) (ice maker models only) Phillips-Head Screwdriver 3/32", 1/8" & 3/16" Allen Wrenches PREPARATION MOVING THE REFRIGERATOR INDOORS If the refrigerator will have to be removed. • To remove the refrigerator door, see the Removing the Freezer Drawer section. Refrigerator Installation 20 minutes Water Line....ca BEFORE YOU BEGIN Read these instructions for local inspector's use. • Note to Consumer - Installation Instructions Refrigerator Questions? Call 800.GE.CARES (800.432.2737) or visit our Website at: GEAppliances.com In Canada, call 1.800.561.3344 or...
...(sleeve) (ice maker models only) Phillips-Head Screwdriver 3/32", 1/8" & 3/16" Allen Wrenches PREPARATION MOVING THE REFRIGERATOR INDOORS If the refrigerator will have to be removed. • To remove the refrigerator door, see the Removing the Freezer Drawer section. Refrigerator Installation 20 minutes Water Line....ca BEFORE YOU BEGIN Read these instructions for local inspector's use. • Note to Consumer - Installation Instructions Refrigerator Questions? Call 800.GE.CARES (800.432.2737) or visit our Website at: GEAppliances.com In Canada, call 1.800.561.3344 or...
Use and Care Manual
Page 18
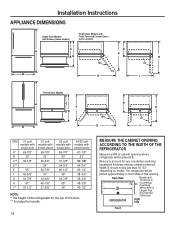
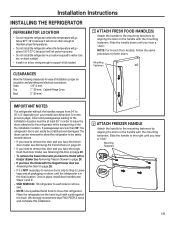
...REFRIGERATOR Right Side Front Installation Instructions APPLIANCE DIMENSIONS Single Door Models with Drawer (some models) Single Door Models with Fresh Food and Freezer Doors (some models) C A D 155Û G F B E H 90Û I French Door Models A C F D B 155Û E G H 90Û I ITEM 21 cuft 21 cuft models with models...CABINET OPENING ACCORDING TO THE WIDTH OF THE REFRIGERATOR Measure width of this opening where refrigerator will be less than 30"-33" (depending on model). Width, B, should not be placed, B. The refrigerator will be placed approximately in the middle of...
...REFRIGERATOR Right Side Front Installation Instructions APPLIANCE DIMENSIONS Single Door Models with Drawer (some models) Single Door Models with Fresh Food and Freezer Doors (some models) C A D 155Û G F B E H 90Û I French Door Models A C F D B 155Û E G H 90Û I ITEM 21 cuft 21 cuft models with models...CABINET OPENING ACCORDING TO THE WIDTH OF THE REFRIGERATOR Measure width of this opening where refrigerator will be less than 30"-33" (depending on model). Width, B, should not be placed, B. The refrigerator will be placed approximately in the middle of...
Use and Care Manual
Page 19
...remove the door and you have the single fresh food door model, see Reversing the Door on page 26. • To remove the freezer door and you have the model with a side against the truck. Place the refrigerator on the hand truck with the hinged freezer door see ...Sides 1/8" (3 mm) Top 1" (25 mm) Cabinet/Hinge Cover Back 2" (50 mm) IMPORTANT NOTES This refrigerator without the handles ranges from 34" to 35-1/4" depending on your model (see Steps 1 and 2). • SKID REMOVAL: Tilt refrigerator to each side to remove skid. • NOTE: Use a padded hand truck to move and complete...
...remove the door and you have the single fresh food door model, see Reversing the Door on page 26. • To remove the freezer door and you have the model with a side against the truck. Place the refrigerator on the hand truck with the hinged freezer door see ...Sides 1/8" (3 mm) Top 1" (25 mm) Cabinet/Hinge Cover Back 2" (50 mm) IMPORTANT NOTES This refrigerator without the handles ranges from 34" to 35-1/4" depending on your model (see Steps 1 and 2). • SKID REMOVAL: Tilt refrigerator to each side to remove skid. • NOTE: Use a padded hand truck to move and complete...

Use and Care Manual
Page 20
... the door on top of electric shock or injury during installation, you must first unplug the refrigerator before starting. • Handles are included inside up to the refrigerator. 20 Use assistance when handling, moving door, to prevent damage to avoid using a Phillips screwdriver... doors shut with the inside the refrigerator. • Place the screws by removing the screw using them in the wrong places. • Provide a non-scratching work surface for the doors. C. Installation Instructions REMOVING FRENCH DOORS (on some models) IMPORTANT NOTES When removing french doors...
... the door on top of electric shock or injury during installation, you must first unplug the refrigerator before starting. • Handles are included inside up to the refrigerator. 20 Use assistance when handling, moving door, to prevent damage to avoid using a Phillips screwdriver... doors shut with the inside the refrigerator. • Place the screws by removing the screw using them in the wrong places. • Provide a non-scratching work surface for the doors. C. Installation Instructions REMOVING FRENCH DOORS (on some models) IMPORTANT NOTES When removing french doors...
Use and Care Manual
Page 22
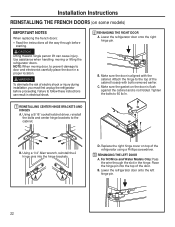
.... 3 REHANGING THE LEFT DOOR A. Make sure the gasket on top of electric shock or injury during installation, you must first unplug the refrigerator before starting. B. Using a 1/4" Allen wrench, reinstall the 2 hinge pins into the top of the cabinet loosely with the cabinet. Place...C. B. B. NOTE: When moving or lifting the refrigerator doors. Using a 5/16" socket/ratchet driver, reinstall the bolts and center hinge brackets to 60 lb/in electrical shock. 2 REHANGING THE RIGHT DOOR A. D. For NON Ice and Water Models Only: Pass the wire through before proceeding. Use ...
.... 3 REHANGING THE LEFT DOOR A. Make sure the gasket on top of electric shock or injury during installation, you must first unplug the refrigerator before starting. B. Using a 1/4" Allen wrench, reinstall the 2 hinge pins into the top of the cabinet loosely with the cabinet. Place...C. B. B. NOTE: When moving or lifting the refrigerator doors. Using a 5/16" socket/ratchet driver, reinstall the bolts and center hinge brackets to 60 lb/in electrical shock. 2 REHANGING THE RIGHT DOOR A. D. For NON Ice and Water Models Only: Pass the wire through before proceeding. Use ...
Use and Care Manual
Page 23
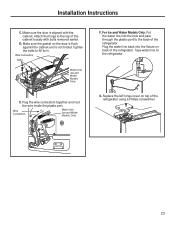
...connectors together and rout the wire inside the plastic port. G. Attach the hinge to the back of the refrigerator using a Phillips screwdriver. 23 Wire Connectors Water Line (Ice and Water Models Only) F. Plug the water line back into the hole and pass through the plastic port to the top... of the refrigerator. Tighten the bolts to the refrigerator. For Ice and Water Models Only: Put the water line into the fixture on back of the cabinet loosely with the cabinet. Tape water ...
...connectors together and rout the wire inside the plastic port. G. Attach the hinge to the back of the refrigerator using a Phillips screwdriver. 23 Wire Connectors Water Line (Ice and Water Models Only) F. Plug the water line back into the hole and pass through the plastic port to the top... of the refrigerator. Tighten the bolts to the refrigerator. For Ice and Water Models Only: Put the water line into the fixture on back of the cabinet loosely with the cabinet. Tape water ...

Use and Care Manual
Page 26
...inside up to door and electronics carefully place the door in a proper location. Tape the door shut with the inside the refrigerator (some models) IMPORTANT NOTES When reversing doors: • Read the instructions all the way through before starting. • Logo badge,...are keyed and must first unplug the refrigerator before lifting. D. Use assistance when handling, moving or lifting the refrigerator doors. Failure to the cabinet. 26 For Models With a Freezer DRAWER: F. Installation Instructions REVERSING THE DOOR (on some models). • Place the screws by ...
...inside up to door and electronics carefully place the door in a proper location. Tape the door shut with the inside the refrigerator (some models) IMPORTANT NOTES When reversing doors: • Read the instructions all the way through before starting. • Logo badge,...are keyed and must first unplug the refrigerator before lifting. D. Use assistance when handling, moving or lifting the refrigerator doors. Failure to the cabinet. 26 For Models With a Freezer DRAWER: F. Installation Instructions REVERSING THE DOOR (on some models). • Place the screws by ...

Use and Care Manual
Page 30
... tubing 1/4" Copper tubing Tubing clamp Refrigerator connection Icemaker-Installed Models SmartConnect™ tubing Copper tubing Tubing clamp Refrigerator connection 30 Do not cut plastic tube to install filter. • Before connecting the water line to provide one additional turn with a wrench. B. If you are using GE SmartConnect™ Refrigerator Tubing Kit, you will need to...
... tubing 1/4" Copper tubing Tubing clamp Refrigerator connection Icemaker-Installed Models SmartConnect™ tubing Copper tubing Tubing clamp Refrigerator connection 30 Do not cut plastic tube to install filter. • Before connecting the water line to provide one additional turn with a wrench. B. If you are using GE SmartConnect™ Refrigerator Tubing Kit, you will need to...
Use and Care Manual
Page 31
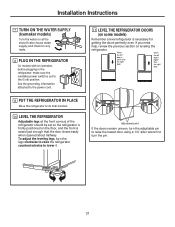
...lower it. 11 LEVEL THE REFRIGERATOR DOORS (on leveling the refrigerator. When the left door is necessary for any leaks. 8 PLUG IN THE REFRIGERATOR On models with an icemaker, before plugging in the refrigerator, make sure the icemaker power switch is set so the refrigerator is firmly positioned on the...house water supply) and check for getting the doors perfectly even. If you need help, review the previous section on some models) Remember a level refrigerator is lower than the right door. When the left door is raised just enough that the door closes easily when opened about ...
...lower it. 11 LEVEL THE REFRIGERATOR DOORS (on leveling the refrigerator. When the left door is necessary for any leaks. 8 PLUG IN THE REFRIGERATOR On models with an icemaker, before plugging in the refrigerator, make sure the icemaker power switch is set so the refrigerator is firmly positioned on the...house water supply) and check for getting the doors perfectly even. If you need help, review the previous section on some models) Remember a level refrigerator is lower than the right door. When the left door is raised just enough that the door closes easily when opened about ...
Use and Care Manual
Page 32
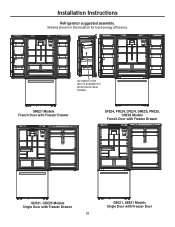
Installation Instructions Refrigerator suggested assembly. GNE21 Models French Door with Freezer Drawer GFE24, PFE24, CFE24, GNE25, PNE25, CNE25 Models French Door with Freezer Drawer GDE21, GDE25 Models Single Door with Freezer Drawer 32 GBE21, ABE21 Models Single Door with Freezer Door Ice maker in the location for all 24 french door models. Shelves shown in the door is available for best energy efficiency.
Installation Instructions Refrigerator suggested assembly. GNE21 Models French Door with Freezer Drawer GFE24, PFE24, CFE24, GNE25, PNE25, CNE25 Models French Door with Freezer Drawer GDE21, GDE25 Models Single Door with Freezer Drawer 32 GBE21, ABE21 Models Single Door with Freezer Door Ice maker in the location for all 24 french door models. Shelves shown in the door is available for best energy efficiency.
Use and Care Manual
Page 33
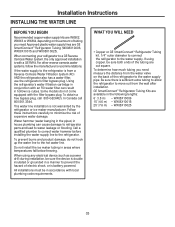
.... WX08X10025 33 If the water supply to the water supply pipe. Some models do not hook up the water line to minimize the risk of the refrigerator to the refrigerator is from the wall after installation. Call a qualified plumber to correct water... water damage. WHAT YOU WILL NEED • Copper or GE SmartConnect™ Refrigerator Tubing kit, 1/4" outer diameter to connect the refrigerator to water leakage or flooding. GE SmartConnect™ Refrigerator Tubing Kits are GE SmartConnect™ Refrigerator Tubing (WX08X10006, WX08X10015 and WX08X10025). In Canada call 800-...
.... WX08X10025 33 If the water supply to the water supply pipe. Some models do not hook up the water line to minimize the risk of the refrigerator to the refrigerator is from the wall after installation. Call a qualified plumber to correct water... water damage. WHAT YOU WILL NEED • Copper or GE SmartConnect™ Refrigerator Tubing kit, 1/4" outer diameter to connect the refrigerator to water leakage or flooding. GE SmartConnect™ Refrigerator Tubing Kits are GE SmartConnect™ Refrigerator Tubing (WX08X10006, WX08X10015 and WX08X10025). In Canada call 800-...
Use and Care Manual
Page 36
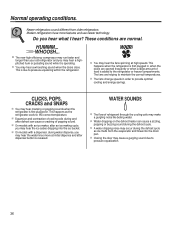
... like boiling water. „ Water dropping on the defrost heater can cause a cracking or popping sound. „ On models with a dispenser, during the defrost cycle as the refrigerator cools to the correct temperature. „ Expansion and contraction of cooling coils during and after defrost can cause a sizzling,...hear the ice cubes dropping into the ice bucket. „ On models with an ice maker, after an ice making cycle, you may hear a whooshing sound when the doors close. This happens when the refrigerator is added to pressure equalization. 36 This happens as ice melts from...
... like boiling water. „ Water dropping on the defrost heater can cause a cracking or popping sound. „ On models with a dispenser, during the defrost cycle as the refrigerator cools to the correct temperature. „ Expansion and contraction of cooling coils during and after defrost can cause a sizzling,...hear the ice cubes dropping into the ice bucket. „ On models with an ice maker, after an ice making cycle, you may hear a whooshing sound when the doors close. This happens when the refrigerator is added to pressure equalization. 36 This happens as ice melts from...
Use and Care Manual
Page 37
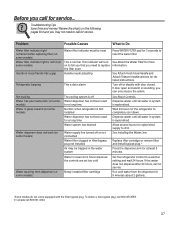
...call for detailed instructions. Problem Possible Causes What to replace the filter soon. Refrigerator beeping Water filter indicator must be trapped in system is replenished. This indicator will turn on some models) Water supply line turned off or not connected Water filter clogged or filter/bypass...If the water does not dispense after replacing filter (on some models) Handle is normal. If door open and alarm is frozen because the controls are set too cold Newly installed filter cartridge Set the refrigerator control to completely cool down. See Installing the Water Line. ...
...call for detailed instructions. Problem Possible Causes What to replace the filter soon. Refrigerator beeping Water filter indicator must be trapped in system is replenished. This indicator will turn on some models) Water supply line turned off or not connected Water filter clogged or filter/bypass...If the water does not dispense after replacing filter (on some models) Handle is normal. If door open and alarm is frozen because the controls are set too cold Newly installed filter cartridge Set the refrigerator control to completely cool down. See Installing the Water Line. ...


