Use and Care Manual
Page 1
...-30 Normal Operating Sounds 27 Consumer Support Consumer Support Back Cover Performance Data Sheet 35 State of the refrigerator compartment. 197D7926P002 49-60599 05-09 JR Customers 33 Owner's Manual and Installation Instructions GE Model 26 Congélateur inférieur Réfrigérateurs Manuel d'utilisation et d'installation La section fran...
...-30 Normal Operating Sounds 27 Consumer Support Consumer Support Back Cover Performance Data Sheet 35 State of the refrigerator compartment. 197D7926P002 49-60599 05-09 JR Customers 33 Owner's Manual and Installation Instructions GE Model 26 Congélateur inférieur Réfrigérateurs Manuel d'utilisation et d'installation La section fran...
Use and Care Manual
Page 4
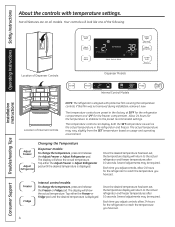
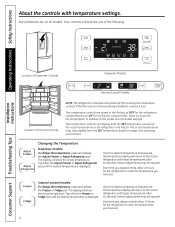
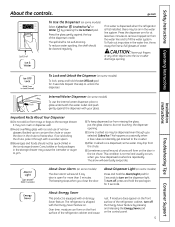
... The display will show the actual temperature. Tap either the Adjust Freezer or Adjust Refrigerator pad until the desired temperature is displayed. Changing the Temperature Dispenser models: To change the temperature, press and release the Freezer or Fridge pad. Several ...Support Troubleshooting Tips Location of Dispenser Controls Dispenser Models Internal Control Models Location of Internal Controls NOTE: The refrigerator is shipped with temperature settings. Your controls will show the actual temperature. Not all models. The temperature controls can display both the SET...
... The display will show the actual temperature. Tap either the Adjust Freezer or Adjust Refrigerator pad until the desired temperature is displayed. Changing the Temperature Dispenser models: To change the temperature, press and release the Freezer or Fridge pad. Several ...Support Troubleshooting Tips Location of Dispenser Controls Dispenser Models Internal Control Models Location of Internal Controls NOTE: The refrigerator is shipped with temperature settings. Your controls will show the actual temperature. Not all models. The temperature controls can display both the SET...
Use and Care Manual
Page 5
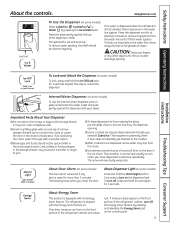
...Ice Off/Lock pad for 3 seconds to , but not touching, the dispenser opening . About Dispenser Light (on the front surface of the refrigerator cabinet and cause rust. To reduce water spotting, the shelf should not be dispensed even though you selected Cubed Ice. To flush out impurities in... with a wooden spoon. Repeat this step to fill the water system. The refrigerator is not self-draining. I Beverages and foods should be air in the chute to the storage drawer. To turn on some models) To lock, press and hold the pad again for at least two minutes ...
...Ice Off/Lock pad for 3 seconds to , but not touching, the dispenser opening . About Dispenser Light (on the front surface of the refrigerator cabinet and cause rust. To reduce water spotting, the shelf should not be dispensed even though you selected Cubed Ice. To flush out impurities in... with a wooden spoon. Repeat this step to fill the water system. The refrigerator is not self-draining. I Beverages and foods should be air in the chute to the storage drawer. To turn on some models) To lock, press and hold the pad again for at least two minutes ...

Use and Care Manual
Page 6
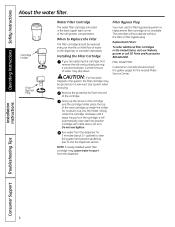
...Holder Filter Bypass Plug Water Filter Cartridge The water filter cartridge is not available. Remove the protective foil from the end of the refrigerator compartment. Replacement Filters: To order additional filter cartridges in Canada should be ejected as it will not operate without the filter or ... be replaced every six months or if the flow of the new cartridge up into position. Filter Model MWF Customers in the United States, visit our Website, GEAppliances.com or call GE Parts and Accessories, 800.626.2002. Cartridge will rotate about 11⁄ 2 gallons) to reset...
...Holder Filter Bypass Plug Water Filter Cartridge The water filter cartridge is not available. Remove the protective foil from the end of the refrigerator compartment. Replacement Filters: To order additional filter cartridges in Canada should be ejected as it will not operate without the filter or ... be replaced every six months or if the flow of the new cartridge up into position. Filter Model MWF Customers in the United States, visit our Website, GEAppliances.com or call GE Parts and Accessories, 800.626.2002. Cartridge will rotate about 11⁄ 2 gallons) to reset...
Use and Care Manual
Page 7
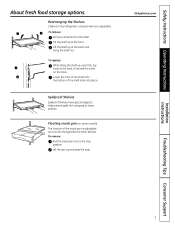
... the shelf up and past the stop position. Safety Instructions Operating Instructions About fresh food storage options. Rearranging the Shelves Shelves in a slot on some models) The location of the shelf locks into place. To remove: Remove all items from dripping to the stop . Lower the front of the shelf until... adjustable and can be changed like the other shelves. Lift the pan up , insert the top hook at the back of the shelf in the refrigerator compartment are adjustable.
... the shelf up and past the stop position. Safety Instructions Operating Instructions About fresh food storage options. Rearranging the Shelves Shelves in a slot on some models) The location of the shelf locks into place. To remove: Remove all items from dripping to the stop . Lower the front of the shelf until... adjustable and can be changed like the other shelves. Lift the pan up , insert the top hook at the back of the shelf in the refrigerator compartment are adjustable.

Use and Care Manual
Page 8
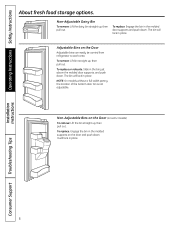
The bin will lock in place. Adjustable Bins on some models) To remove: Lift the bin straight up, then pull out. Non-Adjustable Bins on the Door (on the Door Adjustable bins can easily be carried from refrigerator to work area. Installation Instructions Consumer Support Troubleshooting Tips 8 Non-Adjustable Dairy Bin To remove...
The bin will lock in place. Adjustable Bins on some models) To remove: Lift the bin straight up, then pull out. Non-Adjustable Bins on the Door (on the Door Adjustable bins can easily be carried from refrigerator to work area. Installation Instructions Consumer Support Troubleshooting Tips 8 Non-Adjustable Dairy Bin To remove...
Use and Care Manual
Page 12
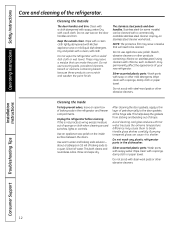
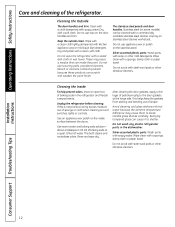
... Instructions Care and cleaning of petroleum jelly to the door gaskets at the hinge side. Stainless steel (on some models) can cause it to break. Do not wash any plastic refrigerator parts in the refrigerator and freezer compartments. Installation Instructions Consumer Support Troubleshooting Tips 12 Dry and polish with a sponge, damp cloth or...
... Instructions Care and cleaning of petroleum jelly to the door gaskets at the hinge side. Stainless steel (on some models) can cause it to break. Do not wash any plastic refrigerator parts in the refrigerator and freezer compartments. Installation Instructions Consumer Support Troubleshooting Tips 12 Dry and polish with a sponge, damp cloth or...
Use and Care Manual
Page 13
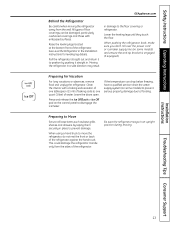
... or icemaker supply line (on the control panel to move the refrigerator, do not rest the front or back of the refrigerator. Press and release the Ice Off/Lock or Ice Off pad on some models) to prevent serious property damage due to Move Secure all loose... drain the water supply system (on some models) and ensure the anti-tip bracket is engaged (if equipped). Clean the interior with embossed surfaces. Leave the doors open. Installation Instructions Troubleshooting Tips Consumer Support 13 See Level the Refrigerator in the Installation Instructions for Vacation For long...
... or icemaker supply line (on the control panel to move the refrigerator, do not rest the front or back of the refrigerator. Press and release the Ice Off/Lock or Ice Off pad on some models) to prevent serious property damage due to Move Secure all loose... drain the water supply system (on some models) and ensure the anti-tip bracket is engaged (if equipped). Clean the interior with embossed surfaces. Leave the doors open. Installation Instructions Troubleshooting Tips Consumer Support 13 See Level the Refrigerator in the Installation Instructions for Vacation For long...

Use and Care Manual
Page 15
...800.661.1616). Be sure to hinge cover top 687⁄ 8″ 355⁄ 8″ Additional Dimensions 15 Refrigerator Installation 20 minutes Water Line Installation 30 minutes • Proper installation is the responsibility of this appliance requires basic mechanical... skills. • Completion time - Installation Instructions Refrigerator GE Model 26 Questions? Installation of the installer. • Product failure due to improper installation is available at extra cost from...
...800.661.1616). Be sure to hinge cover top 687⁄ 8″ 355⁄ 8″ Additional Dimensions 15 Refrigerator Installation 20 minutes Water Line Installation 30 minutes • Proper installation is the responsibility of this appliance requires basic mechanical... skills. • Completion time - Installation Instructions Refrigerator GE Model 26 Questions? Installation of the installer. • Product failure due to improper installation is available at extra cost from...
Use and Care Manual
Page 27
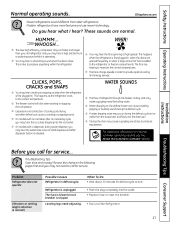
...I Water dropping on the defrost heater can cause a cracking or popping sound. I On models with a dispenser, during the defrost cycle as the refrigerator cools to pressure equalizing within the refrigerator. Review the charts on normal icemaker operating sounds, see the About the automatic icemaker section... hear the water lines move at high speeds. Problem Refrigerator does not operate Vibration or rattling (slight vibration is unplugged. The fuse is blown/circuit breaker is due to the correct temperature. I On models with an icemaker, after an icemaking cycle, you may...
...I Water dropping on the defrost heater can cause a cracking or popping sound. I On models with a dispenser, during the defrost cycle as the refrigerator cools to pressure equalizing within the refrigerator. Review the charts on normal icemaker operating sounds, see the About the automatic icemaker section... hear the water lines move at high speeds. Problem Refrigerator does not operate Vibration or rattling (slight vibration is unplugged. The fuse is blown/circuit breaker is due to the correct temperature. I On models with an icemaker, after an icemaking cycle, you may...
Use and Care Manual
Page 33
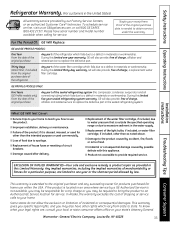
... due to obtain service under the warranty. GE PROFILE MODELS ONLY: Five Years (GE Profile models only) From the date of the original purchase Any part of the sealed refrigerating system (the compressor, condenser, evaporator and all labor and related service to an Authorized GE Service location for service. What GE Will Not Cover: I Damage to the...
... due to obtain service under the warranty. GE PROFILE MODELS ONLY: Five Years (GE Profile models only) From the date of the original purchase Any part of the sealed refrigerating system (the compressor, condenser, evaporator and all labor and related service to an Authorized GE Service location for service. What GE Will Not Cover: I Damage to the...
Use and Care Manual
Page 34
... for a particular purpose, are warranted through the remainder of the original warranty period only. Please have serial number and model number available when calling for service. Proof of the original purchase date is needed concerning this warranty, contact: Manager, ... Year Brands: One (1) Year Brands: One (1) Year Sealed System (including GE Profile: Five (5) Years GE Profile: Five (5) Years GE Profile: Five (5) Years evaporator, condenser GE and All Other GE and All Other GE and All Other tubing and refrigerant) Brands: One (1) Year Brands: One (1) Year Brands: One (1) Year...
... for a particular purpose, are warranted through the remainder of the original warranty period only. Please have serial number and model number available when calling for service. Proof of the original purchase date is needed concerning this warranty, contact: Manager, ... Year Brands: One (1) Year Brands: One (1) Year Sealed System (including GE Profile: Five (5) Years GE Profile: Five (5) Years GE Profile: Five (5) Years evaporator, condenser GE and All Other GE and All Other GE and All Other tubing and refrigerant) Brands: One (1) Year Brands: One (1) Year Brands: One (1) Year...
Installation Instructions
Page 1
... Sheet 39 Product Registration for Canadian Customers 35, 36 Product Registration for U.S. Customers 33, 34 State of the refrigerator compartment. 197D7926P001 49-60551-1 02-08 JR Customers 37 Owner's Manual and Installation Instructions GE Model 26 Congélateur inférieur Réfrigérateurs Manuel d'utilisation et d'installation La section fran...
... Sheet 39 Product Registration for Canadian Customers 35, 36 Product Registration for U.S. Customers 33, 34 State of the refrigerator compartment. 197D7926P001 49-60551-1 02-08 JR Customers 37 Owner's Manual and Installation Instructions GE Model 26 Congélateur inférieur Réfrigérateurs Manuel d'utilisation et d'installation La section fran...
Installation Instructions
Page 4
... Instructions Consumer Support Troubleshooting Tips Location of Dispenser Controls Dispenser Models Internal Control Models Location of Internal Controls NOTE: The refrigerator is displayed. The actual temperature may be required. Internal control models: To change the temperature, press and release the Adjust Freezer or Adjust Refrigerator pad. The display will show the actual temperature. Your controls...
... Instructions Consumer Support Troubleshooting Tips Location of Dispenser Controls Dispenser Models Internal Control Models Location of Internal Controls NOTE: The refrigerator is displayed. The actual temperature may be required. Internal control models: To change the temperature, press and release the Adjust Freezer or Adjust Refrigerator pad. The display will show the actual temperature. Your controls...
Installation Instructions
Page 5
... chute, poke it through with an Energy Saver feature. ge.com Spill Shelf To Use the Dispenser (on the dispenser light. Important Facts About Your Dispenser s Do not add ice from the chute. s Sometimes a small mound of the refrigerator cabinet and cause rust. To reduce water spotting, the ... from missing the glass, put fingers or any door is normal and usually occurs when you close to the storage drawer. The refrigerator is dispensed, some models) Select Cubed Ice , Crushed Ice or Water by pressing and releasing the Energy Saver pad on the front surface of snow will...
... chute, poke it through with an Energy Saver feature. ge.com Spill Shelf To Use the Dispenser (on the dispenser light. Important Facts About Your Dispenser s Do not add ice from the chute. s Sometimes a small mound of the refrigerator cabinet and cause rust. To reduce water spotting, the ... from missing the glass, put fingers or any door is normal and usually occurs when you close to the storage drawer. The refrigerator is dispensed, some models) Select Cubed Ice , Crushed Ice or Water by pressing and releasing the Energy Saver pad on the front surface of snow will...
Installation Instructions
Page 6
...Bypass Plug You must use the filter bypass plug when a replacement filter cartridge is located in the United States, visit our Website, ge.com or call GE Parts and Accessories, 800.626.2002. When to clear the system and prevent sputtering. Slowly rotate the cartridge clockwise until it is...: To order additional filter cartridges in the back upper right corner of the refrigerator compartment. Lining up into position. CAUTION: If air has been trapped in Canada should be ejected as it stops. Filter Model MWF Customers in the system, the filter cartridge may cause water to spurt ...
...Bypass Plug You must use the filter bypass plug when a replacement filter cartridge is located in the United States, visit our Website, ge.com or call GE Parts and Accessories, 800.626.2002. When to clear the system and prevent sputtering. Slowly rotate the cartridge clockwise until it is...: To order additional filter cartridges in the back upper right corner of the refrigerator compartment. Lining up into position. CAUTION: If air has been trapped in Canada should be ejected as it stops. Filter Model MWF Customers in the system, the filter cartridge may cause water to spurt ...
Installation Instructions
Page 8
... bin will lock in the bin just above the molded door supports, and push down . The bin will lock in place. Adjustable Bins on some models) To remove: Lift the bin straight up, then pull out. Non-Adjustable Bins on the Door (on the Door Adjustable bins can easily be carried... from refrigerator to work area. NOTE: On models without a full-width pantry, the location of the bottom door bin is not adjustable. It will lock in place. Operating Instructions Safety...
... bin will lock in the bin just above the molded door supports, and push down . The bin will lock in place. Adjustable Bins on some models) To remove: Lift the bin straight up, then pull out. Non-Adjustable Bins on the Door (on the Door Adjustable bins can easily be carried... from refrigerator to work area. NOTE: On models without a full-width pantry, the location of the bottom door bin is not adjustable. It will lock in place. Operating Instructions Safety...
Installation Instructions
Page 12
...the Outside The door handles and trim. Wipe with a clean cloth lightly dampened with a sponge, damp cloth or paper towel. Unplug the refrigerator before cleaning. Installation Instructions Consumer Support Troubleshooting Tips 12 Dry with soapy water. Stainless steel (on the stainless steel. Use an appliance wax ... warm water and baking soda solution- Rinse and wipe dry. Silver-accented plastic parts. Do not use appliance wax or polish on some models) can cause it to the door gaskets at the hinge side. about a tablespoon (15 ml) of baking soda to break. Avoid ...
...the Outside The door handles and trim. Wipe with a clean cloth lightly dampened with a sponge, damp cloth or paper towel. Unplug the refrigerator before cleaning. Installation Instructions Consumer Support Troubleshooting Tips 12 Dry with soapy water. Stainless steel (on the stainless steel. Use an appliance wax ... warm water and baking soda solution- Rinse and wipe dry. Silver-accented plastic parts. Do not use appliance wax or polish on some models) can cause it to the door gaskets at the hinge side. about a tablespoon (15 ml) of baking soda to break. Avoid ...

Installation Instructions
Page 13
... vacations or absences, remove food and unplug the refrigerator. Safety Instructions Operating Instructions ge.com Behind the Refrigerator Be careful when moving . Moving the refrigerator in a side direction may result in place to the floor covering or refrigerator. Preparing to Move Secure all loose items such ... Press and release the Ice Off/Lock or Ice Off pad on some models) to prevent serious property damage due to move the refrigerator, do not rest the front or back of the refrigerator. When using a hand truck to flooding. Leave the doors open. Installation...
... vacations or absences, remove food and unplug the refrigerator. Safety Instructions Operating Instructions ge.com Behind the Refrigerator Be careful when moving . Moving the refrigerator in a side direction may result in place to the floor covering or refrigerator. Preparing to Move Secure all loose items such ... Press and release the Ice Off/Lock or Ice Off pad on some models) to prevent serious property damage due to move the refrigerator, do not rest the front or back of the refrigerator. When using a hand truck to flooding. Leave the doors open. Installation...

Installation Instructions
Page 15
...these instructions for future reference. • Skill level - A GE water supply kit (containing tubing, shutoff valve, fittings and instructions) is not covered under the Warranty. WATER SUPPLY TO THE ICEMAKER AND DISPENSER If the refrigerator has an icemaker, it will not fit through a doorway, ... BEGIN Read these instructions with the Consumer. • Note to Installer - Installation Instructions Refrigerator GE Model 26 Questions? Call 800.GE.CARES (800.432.2737) or Visit our Website at: ge.com In Canada, call 1.800.561.3344 or Visit our Website at www.geappliances.ca...
...these instructions for future reference. • Skill level - A GE water supply kit (containing tubing, shutoff valve, fittings and instructions) is not covered under the Warranty. WATER SUPPLY TO THE ICEMAKER AND DISPENSER If the refrigerator has an icemaker, it will not fit through a doorway, ... BEGIN Read these instructions with the Consumer. • Note to Installer - Installation Instructions Refrigerator GE Model 26 Questions? Call 800.GE.CARES (800.432.2737) or Visit our Website at: ge.com In Canada, call 1.800.561.3344 or Visit our Website at www.geappliances.ca...


