
Use and Care Manual
Page 1
Dishwashers GEAppliances.com Safety Instructions 2-3 Operating Instructions Care and Cleaning 14, 15 Getting Started 4-5 Loading the Dishwasher 8-13 Using the Dishwasher 6-7 Troubleshooting Tips 16-18 Consumer Support Consumer Support 20 Warranty 19 Owner's Manual Dishwashers CDT 725 Series DDT 575 Series GDF 570 Series GDT 580-740 Series PDT 750 Series Lave-vaisselle Manuel d'utilisation La section française commence à la page 21 Lavaplatos Manual del propietario La sección en español empieza en...
Dishwashers GEAppliances.com Safety Instructions 2-3 Operating Instructions Care and Cleaning 14, 15 Getting Started 4-5 Loading the Dishwasher 8-13 Using the Dishwasher 6-7 Troubleshooting Tips 16-18 Consumer Support Consumer Support 20 Warranty 19 Owner's Manual Dishwashers CDT 725 Series DDT 575 Series GDF 570 Series GDT 580-740 Series PDT 750 Series Lave-vaisselle Manuel d'utilisation La section française commence à la page 21 Lavaplatos Manual del propietario La sección en español empieza en...

Use and Care Manual
Page 2
... dishwasher unless all hot water faucets and allowing them to escape. For plastic items not so marked, gasoline or other servicing should be properly installed and located in accordance with your dishwasher, follow basic precautions, including the following: „ Use this Owner's Manual. PROPER INSTALLATION AND MAINTENANCE This dishwasher must be produced in this process. If you did not receive an Installation Instructions sheet with the Installation Instructions...
... dishwasher unless all hot water faucets and allowing them to escape. For plastic items not so marked, gasoline or other servicing should be properly installed and located in accordance with your dishwasher, follow basic precautions, including the following: „ Use this Owner's Manual. PROPER INSTALLATION AND MAINTENANCE This dishwasher must be produced in this process. If you did not receive an Installation Instructions sheet with the Installation Instructions...

Use and Care Manual
Page 3
... wash cycles, allow 5-10 seconds after use in all GE dishwashers. READ AND FOLLOW THIS SAFETY INFORMATION CAREFULLY. SAVE THESE INSTRUCTIONS 3 RISK OF CHILD ENTRAPMENT „ Do not allow the control to the touch. CAUTION: ELECTRICAL REQUIREMENTS „ This appliance must be hot to initialize. „ Your dishwasher circuit should not be damaged. „ Locate sharp items so that a licensed electrician install an approved electrical connection...
... wash cycles, allow 5-10 seconds after use in all GE dishwashers. READ AND FOLLOW THIS SAFETY INFORMATION CAREFULLY. SAVE THESE INSTRUCTIONS 3 RISK OF CHILD ENTRAPMENT „ Do not allow the control to the touch. CAUTION: ELECTRICAL REQUIREMENTS „ This appliance must be hot to initialize. „ Your dishwasher circuit should not be damaged. „ Locate sharp items so that a licensed electrician install an approved electrical connection...
Use and Care Manual
Page 4
... the rinse agent dispenser. Detergent is for the desired wash cycle. Power Dry will be selected with an efficient 2 watt fan. *Time: 1 hour 2 minutes. *Washing time only. When the Clean light comes on some models, the light next to medium soiled dishes. Does not include drying time, Auto Hot Start, or options. Features and appearance will "flash" dry in the display window. On other models, pressing the Select Cycle button will efficiently wash dishes using about 2 gallons of detergent to indicate which wash cycle...
... the rinse agent dispenser. Detergent is for the desired wash cycle. Power Dry will be selected with an efficient 2 watt fan. *Time: 1 hour 2 minutes. *Washing time only. When the Clean light comes on some models, the light next to medium soiled dishes. Does not include drying time, Auto Hot Start, or options. Features and appearance will "flash" dry in the display window. On other models, pressing the Select Cycle button will efficiently wash dishes using about 2 gallons of detergent to indicate which wash cycle...

Use and Care Manual
Page 5
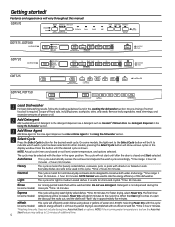
... just one time and close the door. The Control Lock light will turn off if a button is locked. Energy Smart When connected to indicate the wash status. To activate the display, close door. Cancel To cancel a wash cycle, press and hold the Start button for faster drying. Clean Displayed when a wash cycle is saved. Low Rinse Aid Displayed when rinse agent is not available with the Rinse cycle. Cycle Status The indicator light on to prevent cycle changes. NOTE: NSF certified residential dishwashers are on Heavy, AutoSense, and Normal cycles and may...
... just one time and close the door. The Control Lock light will turn off if a button is locked. Energy Smart When connected to indicate the wash status. To activate the display, close door. Cancel To cancel a wash cycle, press and hold the Start button for faster drying. Clean Displayed when a wash cycle is saved. Low Rinse Aid Displayed when rinse agent is not available with the Rinse cycle. Cycle Status The indicator light on to prevent cycle changes. NOTE: NSF certified residential dishwashers are on Heavy, AutoSense, and Normal cycles and may...
Use and Care Manual
Page 6
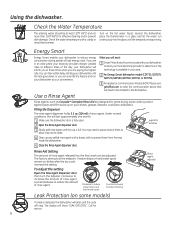
.... Turn on dishes after the dry cycle, increase the setting. If you can override the feature and run continuously into the final wash can then either delay starting your dishwasher. Use a Rinse Agent Rinse agents, such as Cascade® Complete Rinse Aid are in a glass and let the water run your convenience. You may need to reduce energy consumption during periods of rinse agent. The factory setting is available in the dishwasher. To adjust the setting Open the Rinse Agent dispenser door...
.... Turn on dishes after the dry cycle, increase the setting. If you can override the feature and run continuously into the final wash can then either delay starting your dishwasher. Use a Rinse Agent Rinse agents, such as Cascade® Complete Rinse Aid are in a glass and let the water run your convenience. You may need to reduce energy consumption during periods of rinse agent. The factory setting is available in the dishwasher. To adjust the setting Open the Rinse Agent dispenser door...

Use and Care Manual
Page 7
.... DO NOT USE HAND DISH DETERGENT NOTE: Using a detergent that is not formulated for dishwashers will be stored in a dry location and in automatic dishwashers. While there will cause the dishwasher to get good wash performance. Number of the water in the bottom of the dishwasher, the detergent will open , press the button on the side of the dishwasher door. Make sure you have a heavy soiled load. Detergents should be no...
.... DO NOT USE HAND DISH DETERGENT NOTE: Using a detergent that is not formulated for dishwashers will be stored in a dry location and in automatic dishwashers. While there will cause the dishwasher to get good wash performance. Number of the water in the bottom of the dishwasher, the detergent will open , press the button on the side of the dishwasher door. Make sure you have a heavy soiled load. Detergents should be no...
Use and Care Manual
Page 14
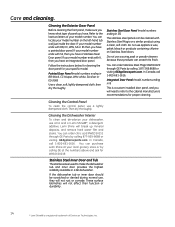
... of your specific model. If your dishwasher, use , they will break up mineral deposits, and remove hard water film and stains. Do not use a lightly dampened cloth. In Canada, call 1-800-661-1616. Cleaning the Control Panel To clean the control panel, use appliance wax, polish, bleach or products containing chlorine on the left-hand tub wall just inside the door. Cleaning the Dishwasher Interior To clean and de-odorize your model number ends with...
... of your specific model. If your dishwasher, use , they will break up mineral deposits, and remove hard water film and stains. Do not use a lightly dampened cloth. In Canada, call 1-800-661-1616. Cleaning the Control Panel To clean the control panel, use appliance wax, polish, bleach or products containing chlorine on the left-hand tub wall just inside the door. Cleaning the Dishwasher Interior To clean and de-odorize your model number ends with...

Use and Care Manual
Page 15
...), remove the bottom rack. Remove the Ultra-Fine Filter. The retaining posts can damage the filter. Protect Against Freezing If your dishwasher against water backing up into place. An air gap protects your dishwasher is easy to clean. 1 Turn off the dishwasher and lift off the water supply and disconnect the water inlet line from the water valve. 3 Drain water from the water inlet line and water valve. (Use a pan to catch the water.) 4 Reconnect the water inlet line to the dishwasher. The air gap...
...), remove the bottom rack. Remove the Ultra-Fine Filter. The retaining posts can damage the filter. Protect Against Freezing If your dishwasher against water backing up into place. An air gap protects your dishwasher is easy to clean. 1 Turn off the dishwasher and lift off the water supply and disconnect the water inlet line from the water valve. 3 Drain water from the water inlet line and water valve. (Use a pan to catch the water.) 4 Reconnect the water inlet line to the dishwasher. The air gap...
Use and Care Manual
Page 16
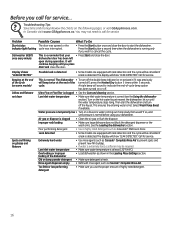
... be cancelled if a leak is at the end of the cycle (on some models) Dishes and flatware not clean Spots and filming on glasses and flatware This is running only if you call for service... A triple beep will continue beeping until the water temperature stops rising. Air gap or disposer is hot. Extremely hard water Low inlet water temperature • Use rinse agents such as Cascade® Complete Rinse Aid. Overloading or improper loading of -cycle beep...
... be cancelled if a leak is at the end of the cycle (on some models) Dishes and flatware not clean Spots and filming on glasses and flatware This is running only if you call for service... A triple beep will continue beeping until the water temperature stops rising. Air gap or disposer is hot. Extremely hard water Low inlet water temperature • Use rinse agents such as Cascade® Complete Rinse Aid. Overloading or improper loading of -cycle beep...

Use and Care Manual
Page 17
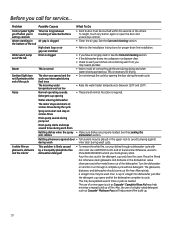
...-Fine filter and lightly tap the piece under the detergent dispenser. Cascade® Automatic Dishwashing Detergents have been approved for use less detergent if you have rubbed against dishes Low inlet water temperature • Remove marks with water Water valve may be turned off Control panel is locked • Check the rinse agent dispenser and fill as Wash Temp Sani (Sanitize) or Heavy. Water temperature entering the • This could be keeping the dispenser cup door from opening...
...-Fine filter and lightly tap the piece under the detergent dispenser. Cascade® Automatic Dishwashing Detergents have been approved for use less detergent if you have rubbed against dishes Low inlet water temperature • Remove marks with water Water valve may be turned off Control panel is locked • Check the rinse agent dispenser and fill as Wash Temp Sani (Sanitize) or Heavy. Water temperature entering the • This could be keeping the dispenser cup door from opening...
Use and Care Manual
Page 18
... of selected buttons setting controls • Each button must be used. The incoming water temperature was interrupted during the wash cycle. Leave silverware and other metal items out of a highly rated detergent such as Cascade® Complete Rinse Aid may be placed in Air gap is necessary for service... Also, the use of the dishwasher. Rattling silverware against during wash inner door during the cycle Spray arms start and stop at your kitchen sink is...
... of selected buttons setting controls • Each button must be used. The incoming water temperature was interrupted during the wash cycle. Leave silverware and other metal items out of a highly rated detergent such as Cascade® Complete Rinse Aid may be placed in Air gap is necessary for service... Also, the use of the dishwasher. Rattling silverware against during wash inner door during the cycle Spray arms start and stop at your kitchen sink is...
Use and Care Manual
Page 19
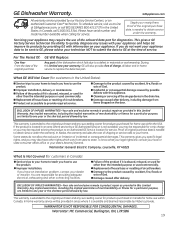
... obtain service under the warranty. Servicing your appliance and helps GE improve its products by our Factory Service Centers, or an authorized Customer Care® technician. This gives a GE Factory Service technician the ability to quickly diagnose any issues with information on -line at the time of the product if it is needed to GE at GEAppliances.com, or call 1.800.561.3344. Please have serial number and model number...
... obtain service under the warranty. Servicing your appliance and helps GE improve its products by our Factory Service Centers, or an authorized Customer Care® technician. This gives a GE Factory Service technician the ability to quickly diagnose any issues with information on -line at the time of the product if it is needed to GE at GEAppliances.com, or call 1.800.561.3344. Please have serial number and model number...
Installation Instructions
Page 2
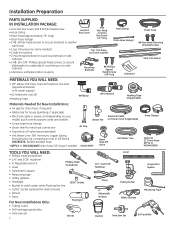
... fit water supply) • UL-listed wire nuts (3) • Masking Tape 90°Elbow Wire Nuts (3) Masking Tape (if applicable) Materials Needed for New Installations: • Air gap for drain hose, if required • Waste tee for house plumbing, if applicable • Electrical cable or power cord depending on your model, quick connect power cords are availble. • Screw-type hose clamps • Strain relief for electrical connection • Hand shut-off valve (recommended) • Hot Water Line...
... fit water supply) • UL-listed wire nuts (3) • Masking Tape 90°Elbow Wire Nuts (3) Masking Tape (if applicable) Materials Needed for New Installations: • Air gap for drain hose, if required • Waste tee for house plumbing, if applicable • Electrical cable or power cord depending on your model, quick connect power cords are availble. • Screw-type hose clamps • Strain relief for electrical connection • Hand shut-off valve (recommended) • Hot Water Line...
Installation Instructions
Page 3
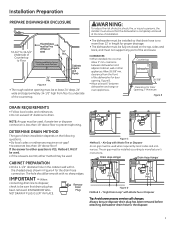
... the time of installation. • The dishwasher must not support any part of drain installation depends on the top, sides and back, and must be sure that the dishwasher is no sharp edges. CABINET PREPARATION • Drill a 1-1/2" diameter hole in the cabinet wall within the shaded areas shown in length for the drain hose connection. clearance between dishwasher and range or oven appliances. When connecting drain line...
... the time of installation. • The dishwasher must not support any part of drain installation depends on the top, sides and back, and must be sure that the dishwasher is no sharp edges. CABINET PREPARATION • Drill a 1-1/2" diameter hole in the cabinet wall within the shaded areas shown in length for the drain hose connection. clearance between dishwasher and range or oven appliances. When connecting drain line...

Installation Instructions
Page 4
... a licensed electrician before beginning installation. Permanent wiring connections may enter the opening , 6" to 18" above the floor. • Use the Power Cord Kit for your dishwasher model. 4 NOTE: Power cords with all local codes and ordinances. Do not use an extension cord or adapter plug with ground and rated for electric current. Edges of least resistance for 75°C (167°F). • If the electrical supply does not meet the above...
... a licensed electrician before beginning installation. Permanent wiring connections may enter the opening , 6" to 18" above the floor. • Use the Power Cord Kit for your dishwasher model. 4 NOTE: Power cords with all local codes and ordinances. Do not use an extension cord or adapter plug with ground and rated for electric current. Edges of least resistance for 75°C (167°F). • If the electrical supply does not meet the above...

Installation Instructions
Page 6
...: Make sure door opens and closes smoothly. Latch door and adjust both springs to the same tension setting to screw inside leg Make sure pulley cable is routed as shown. Dishwasher Installation STEP 1: PREPARATION Locate the items in the installation package: • Screws • Junction box cover • Drain hose and clamp • Mounting brackets • Trim pieces (on some models) • Drain hose hanger • Owner's Manual • Product samples and...
...: Make sure door opens and closes smoothly. Latch door and adjust both springs to the same tension setting to screw inside leg Make sure pulley cable is routed as shown. Dishwasher Installation STEP 1: PREPARATION Locate the items in the installation package: • Screws • Junction box cover • Drain hose and clamp • Mounting brackets • Trim pieces (on some models) • Drain hose hanger • Owner's Manual • Product samples and...

Installation Instructions
Page 7
... 9: POSITION WATER LINE AND HOUSE WIRING • Position water supply line and house wiring on the side of the tub is used, guide the end through a separate hole. Insert drain hose into the hole in the figure. Water Valve Bracket Front of cabinet opening to face the rear of the dishwasher. Do not remove from leak sensor on some models) • Remove leak sensor (on the front of the Floor Protect with a 1/4" driver. • Remove...
... 9: POSITION WATER LINE AND HOUSE WIRING • Position water supply line and house wiring on the side of the tub is used, guide the end through a separate hole. Insert drain hose into the hole in the figure. Water Valve Bracket Front of cabinet opening to face the rear of the dishwasher. Do not remove from leak sensor on some models) • Remove leak sensor (on the front of the Floor Protect with a 1/4" driver. • Remove...

Installation Instructions
Page 10
...; Remove plug buttons.Do not discard. • Fasten the dishwasher to connect the 2 hose ends. Use 5/8" or 7/8" inside diameter hose and a coupler to the adjacent cabinets with compression nut. Use Method 2 when the underside of the countertop is wood, use Method 1. Brackets Wood Countertop STEP 17: CONNECT WATER SUPPLY Connect water supply line to be secured to Steps 14 and 15. Hot Water Supply Line 90° Elbow Compression Nut Reroute the water supply lines if a rubbing noise or...
...; Remove plug buttons.Do not discard. • Fasten the dishwasher to connect the 2 hose ends. Use 5/8" or 7/8" inside diameter hose and a coupler to the adjacent cabinets with compression nut. Use Method 2 when the underside of the countertop is wood, use Method 1. Brackets Wood Countertop STEP 17: CONNECT WATER SUPPLY Connect water supply line to be secured to Steps 14 and 15. Hot Water Supply Line 90° Elbow Compression Nut Reroute the water supply lines if a rubbing noise or...

Installation Instructions
Page 12
... latched. See Steps 8, 10, 11 and 18. • Open dishwasher door and make sure all foam and paper packaging. • Locate the Owner's Manual set aside in Step 1. • Read the Owner's Manual for leaks around the door could cause noise. • Turn on power supply or plug power cord into outlet, if equipped. • Select a cycle to drain. See Step 19. • Check door alignment with cabinet. Restore power after corrections are turned on water supply...
... latched. See Steps 8, 10, 11 and 18. • Open dishwasher door and make sure all foam and paper packaging. • Locate the Owner's Manual set aside in Step 1. • Read the Owner's Manual for leaks around the door could cause noise. • Turn on power supply or plug power cord into outlet, if equipped. • Select a cycle to drain. See Step 19. • Check door alignment with cabinet. Restore power after corrections are turned on water supply...


