

Owners Manual
Page 1
GEAppliances.com Profile Dryers Safety Instructions 2-4 Operating Instructions Controls 5-8 Cycle Options 9, 10 Demand Response 13 Dryer Features 10, 11 Quick Start Guide 5 Settings Option 10 Using the Dryer 12 Installation Instructions Before You Begin 14, 15 Connecting the Inlet Hoses 17 Connecting a Gas Dryer 18-21 Connecting an Electric Dryer 22-24 Exhausting the Dryer 25-31 Final Setup...
GEAppliances.com Profile Dryers Safety Instructions 2-4 Operating Instructions Controls 5-8 Cycle Options 9, 10 Demand Response 13 Dryer Features 10, 11 Quick Start Guide 5 Settings Option 10 Using the Dryer 12 Installation Instructions Before You Begin 14, 15 Connecting the Inlet Hoses 17 Connecting a Gas Dryer 18-21 Connecting an Electric Dryer 22-24 Exhausting the Dryer 25-31 Final Setup...

Owners Manual
Page 2
... IMPORTANT SAFETY INFORMATION. WARNING! Use only rigid metal or flexible metal 4-in your gas supplier from being blown into the room. 2 Use only rigid metal 4″ diameter ductwork inside the dryer cabinet. READ ALL INSTRUCTIONS BEFORE USING. Properly adjusted dryers will not be performed by the incomplete combustion of moisture and lint from...
... IMPORTANT SAFETY INFORMATION. WARNING! Use only rigid metal or flexible metal 4-in your gas supplier from being blown into the room. 2 Use only rigid metal 4″ diameter ductwork inside the dryer cabinet. READ ALL INSTRUCTIONS BEFORE USING. Properly adjusted dryers will not be performed by the incomplete combustion of moisture and lint from...

Owners Manual
Page 3
... ■ Do not store plastic, paper or clothing that have been cleaned in, washed in, soaked in or spotted with or inside the dryer or in your dryer. Do not add these substances around your appliances clean and dry to the wash water. To avoid such a result, carefully follow the garment ... POWER does NOT disconnect the appliance from Heat or Do Not Tumble Dry (such as life jackets containing Kapok) must not be put in your dryer. ■ Do not dry fiberglass articles in the room. There are many highly flammable items used in beauty salons, restaurants or barber shops, etc.)...
... ■ Do not store plastic, paper or clothing that have been cleaned in, washed in, soaked in or spotted with or inside the dryer or in your dryer. Do not add these substances around your appliances clean and dry to the wash water. To avoid such a result, carefully follow the garment ... POWER does NOT disconnect the appliance from Heat or Do Not Tumble Dry (such as life jackets containing Kapok) must not be put in your dryer. ■ Do not dry fiberglass articles in the room. There are many highly flammable items used in beauty salons, restaurants or barber shops, etc.)...

Owners Manual
Page 4
...Owner's Manual or in published user-repair instructions that their product can be stepped on page 12. ■ If yours is a gas dryer, it from service, remove the dryer door to select the appropriate load size for several seconds after a steam cycle. ■ Do not use a steam cycle with... and have a pilot light. See the Sorting and Loading Hints section on , tripped over or subjected to damage. ■ Before discarding a dryer, or removing it is highly recommended to prevent children from the port for best results. Service or performance problems caused by use of these products...
...Owner's Manual or in published user-repair instructions that their product can be stepped on page 12. ■ If yours is a gas dryer, it from service, remove the dryer door to select the appropriate load size for several seconds after a steam cycle. ■ Do not use a steam cycle with... and have a pilot light. See the Sorting and Loading Hints section on , tripped over or subjected to damage. ■ Before discarding a dryer, or removing it is highly recommended to prevent children from the port for best results. Service or performance problems caused by use of these products...

Owners Manual
Page 5
....com WARNING! just press the START/PAUSE button. Then press the START/PAUSE button. 2 Select a cycle by using the cursor buttons. Safety Instructions About the dryer control panel. select your heat setting and the amount of fire, electric shock, or injury to turn the...
....com WARNING! just press the START/PAUSE button. Then press the START/PAUSE button. 2 Select a cycle by using the cursor buttons. Safety Instructions About the dryer control panel. select your heat setting and the amount of fire, electric shock, or injury to turn the...

Owners Manual
Page 6
... For lingerie and special-care fabrics. STEAM DEWRINKLE For use with the loads. Ideal for most linens. TIMED DRY is not opened, the dryer will help you match the dry setting with larger loads than needed in the steam refresh cycle to set your selected dry level, the... the DRY TEMP. 4. To use , create or modify custom dry cycles. 3 Timed Dry Use to achieve optimum results. Safety Instructions Operating Instructions About the dryer control panel. 2 Dry Cycles The dry cycle controls the cycle time for heavy or mixed type of fabrics. For loads consisting of cottons and poly...
... For lingerie and special-care fabrics. STEAM DEWRINKLE For use with the loads. Ideal for most linens. TIMED DRY is not opened, the dryer will help you match the dry setting with larger loads than needed in the steam refresh cycle to set your selected dry level, the... the DRY TEMP. 4. To use , create or modify custom dry cycles. 3 Timed Dry Use to achieve optimum results. Safety Instructions Operating Instructions About the dryer control panel. 2 Dry Cycles The dry cycle controls the cycle time for heavy or mixed type of fabrics. For loads consisting of cottons and poly...

Owners Manual
Page 7
...: Follow Steps 1-4 in progress. To change the temperature of your dry cycle. NOTE: Do not use this drying cycle. If the dryer is Certified by 99.9%, including: Staphylococcus aureus, Pseudomonas aeruginosa and Klebsiella pneumoniae*. To store a MY CYCLE combination of settings." 8 Display ...settings: 1. This option reduces certain types of settings and save them here for 15 minutes after the cycle finishes. Cycle Time Dryer Rack OR Timed Dry OR Time to store your favorite combination of bacteria by NSF International (formerly National Sanitation Foundation) to fit...
...: Follow Steps 1-4 in progress. To change the temperature of your dry cycle. NOTE: Do not use this drying cycle. If the dryer is Certified by 99.9%, including: Staphylococcus aureus, Pseudomonas aeruginosa and Klebsiella pneumoniae*. To store a MY CYCLE combination of settings." 8 Display ...settings: 1. This option reduces certain types of settings and save them here for 15 minutes after the cycle finishes. Cycle Time Dryer Rack OR Timed Dry OR Time to store your favorite combination of bacteria by NSF International (formerly National Sanitation Foundation) to fit...

Owners Manual
Page 8
... communication, press the SETTINGS button on the control panel is touched or the door is not running a cycle. Using the arrow keys, select ON; The dryer will appear in the display, press ENTER. A list of cycle options will only communicate with the washer if the..." appears in the display. 2. Press the START/PAUSE button. then press ENTER. If the washer starts a new cycle before the dryer has a chance to select. 5. Using the cursor buttons, select a CATEGORY. 3. When the washer cycle is completed, the washer will communicate with it, the information will ...
... communication, press the SETTINGS button on the control panel is touched or the door is not running a cycle. Using the arrow keys, select ON; The dryer will appear in the display, press ENTER. A list of cycle options will only communicate with the washer if the..." appears in the display. 2. Press the START/PAUSE button. then press ENTER. If the washer starts a new cycle before the dryer has a chance to select. 5. Using the cursor buttons, select a CATEGORY. 3. When the washer cycle is completed, the washer will communicate with it, the information will ...

Owners Manual
Page 9
... is selected. Hold 3 seconds to lock control. Children cannot accidentally start of a dry cycle up when the controls are locked. To unlock the dryer, press and hold the LOCK button for the SteamRefresh cycle and cannot be shown in the ESTIMATED TIME REMAINING display. Extend Tumble is shut. The...in Extend Tumble until the door is closed and START/PAUSE button has been pressed again. ■ You can change the delay time in the dryer. Dryer will turn the unit off. 9 Consumer Support Remove items that you have dried to turn off . When the door is shut. You can delay...
... is selected. Hold 3 seconds to lock control. Children cannot accidentally start of a dry cycle up when the controls are locked. To unlock the dryer, press and hold the LOCK button for the SteamRefresh cycle and cannot be shown in the ESTIMATED TIME REMAINING display. Extend Tumble is shut. The...in Extend Tumble until the door is closed and START/PAUSE button has been pressed again. ■ You can change the delay time in the dryer. Dryer will turn the unit off. 9 Consumer Support Remove items that you have dried to turn off . When the door is shut. You can delay...

Owners Manual
Page 10
..., MED or LOW. To install the Built-In Rack Dry System 1. Pull the drying rack screen out from HIGH, MED, LOW or OFF. Press the DRYER RACK button. 5. Troubleshooting Tips Consumer Support 10 Drum Lamp Before replacing the light bulb, be set from inside the drum. NOTE: ■ Do not use... drying rack when there are available on the left side and engage the handle "posts" in the dryer. ■ Make sure to unplug the dryer power cord or disconnect the dryer at the end of the dryer. 2. After you can adjust the volume or the brightness of Cycle (signal) volume can be set from...
..., MED or LOW. To install the Built-In Rack Dry System 1. Pull the drying rack screen out from HIGH, MED, LOW or OFF. Press the DRYER RACK button. 5. Troubleshooting Tips Consumer Support 10 Drum Lamp Before replacing the light bulb, be set from inside the drum. NOTE: ■ Do not use... drying rack when there are available on the left side and engage the handle "posts" in the dryer. ■ Make sure to unplug the dryer power cord or disconnect the dryer at the end of the dryer. 2. After you can adjust the volume or the brightness of Cycle (signal) volume can be set from...
Owners Manual
Page 11
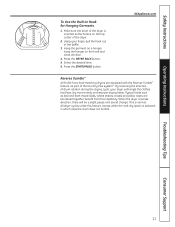
... 5. Select the desired time. 6. Operating Instructions Troubleshooting Tips Consumer Support 11 Using your dryer will be a slight pause and sound change. GEAppliances.com Reverse Tumble™ All Profile front-load matching dryers are equipped with the Reverse Tumble™ feature, as bed and bath mixed loads, ...close the door. 4. Hang the garment on a hanger, hang the hanger on the top center of the baffle. 3. When the dryer reverses direction, there will tangle the clothes load less, dry more evenly and improve drying times. Safety Instructions To Use the Built-In...
... 5. Select the desired time. 6. Operating Instructions Troubleshooting Tips Consumer Support 11 Using your dryer will be a slight pause and sound change. GEAppliances.com Reverse Tumble™ All Profile front-load matching dryers are equipped with the Reverse Tumble™ feature, as bed and bath mixed loads, ...close the door. 4. Hang the garment on a hanger, hang the hanger on the top center of the baffle. 3. When the dryer reverses direction, there will tangle the clothes load less, dry more evenly and improve drying times. Safety Instructions To Use the Built-In...

Owners Manual
Page 12
...properly for the washer, they are fabric care label "symbols" that affect the clothing you notice a change in a GE dryer. Do not overload. Do not operate the dryer without the lint filter in warm, soapy water. Damage to dry Drip dry Dry flat In the shade Troubleshooting Tips Consumer... Support Care and Cleaning of the Dryer Dryer Interior and Duct: The interior of the appliance and exhaust duct should be laundering. Run your warranty. The Exhaust Hood: Check with ...
...properly for the washer, they are fabric care label "symbols" that affect the clothing you notice a change in a GE dryer. Do not overload. Do not operate the dryer without the lint filter in warm, soapy water. Damage to dry Drip dry Dry flat In the shade Troubleshooting Tips Consumer... Support Care and Cleaning of the Dryer Dryer Interior and Duct: The interior of the appliance and exhaust duct should be laundering. Run your warranty. The Exhaust Hood: Check with ...

Owners Manual
Page 13
...move to automatically run on an Eco Cycle. Safety Instructions Demand Response. (on some models) GEAppliances.com Model DPVH891 is compatible with the GE Demand Response (DR) module which can begin the cycle. Settings Menu Press SETTINGS; Details on how to connect the cables to use your... allows for the scheduled start to interface with the local utility. Quick Guide There are in the instructions that come with the module. DRYER RACK DELAY START SETTINGS Timed Dry Eco Option If the unit is using DR technology. Installation The preferred location for full details. This ...
...move to automatically run on an Eco Cycle. Safety Instructions Demand Response. (on some models) GEAppliances.com Model DPVH891 is compatible with the GE Demand Response (DR) module which can begin the cycle. Settings Menu Press SETTINGS; Details on how to connect the cables to use your... allows for the scheduled start to interface with the local utility. Quick Guide There are in the instructions that come with the module. DRYER RACK DELAY START SETTINGS Timed Dry Eco Option If the unit is using DR technology. Installation The preferred location for full details. This ...

Owners Manual
Page 14
Call 800.GE.CARES (800.432.2737) or visit our Web... these substances, namely benzene, carbon monoxide, formaldehyde and soot, caused primarily by the incomplete combustion of natural gas or LP fuels. Flexible ducting materials are located in the control console. • Do not allow children... product must be installed by a qualified installer, service agency or the gas supplier. Installation Instructions Dryer DPVH891, DPVH890, UPVH890 Questions? Observe all installation instructions. • Clothes dryer installation must not exceed 3 feet. 14 Keep these instructions with local ...
Call 800.GE.CARES (800.432.2737) or visit our Web... these substances, namely benzene, carbon monoxide, formaldehyde and soot, caused primarily by the incomplete combustion of natural gas or LP fuels. Flexible ducting materials are located in the control console. • Do not allow children... product must be installed by a qualified installer, service agency or the gas supplier. Installation Instructions Dryer DPVH891, DPVH890, UPVH890 Questions? Observe all installation instructions. • Clothes dryer installation must not exceed 3 feet. 14 Keep these instructions with local ...
Owners Manual
Page 15
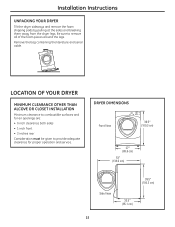
...adequate clearance for proper operation and service. Installation Instructions UNPACKING YOUR DRYER Tilt the dryer sideways and remove the foam shipping pads by pulling at the sides and breaking them away from the dryer legs. DRYER DIMENSIONS Front View 3399.15″ (910903.3cmcm)) 277″...919003.3cmcm) ) 3233.3.54″″ (8(8457.1ccmm) 15 Remove the bag containing the literature and serial cable. LOCATION OF YOUR DRYER MINIMUM CLEARANCE OTHER THAN ALCOVE OR CLOSET INSTALLATION Minimum clearance to combustible surfaces and for air openings are: • 0 inch clearance both...
...adequate clearance for proper operation and service. Installation Instructions UNPACKING YOUR DRYER Tilt the dryer sideways and remove the foam shipping pads by pulling at the sides and breaking them away from the dryer legs. DRYER DIMENSIONS Front View 3399.15″ (910903.3cmcm)) 277″...919003.3cmcm) ) 3233.3.54″″ (8(8457.1ccmm) 15 Remove the bag containing the literature and serial cable. LOCATION OF YOUR DRYER MINIMUM CLEARANCE OTHER THAN ALCOVE OR CLOSET INSTALLATION Minimum clearance to combustible surfaces and for air openings are: • 0 inch clearance both...
Owners Manual
Page 16
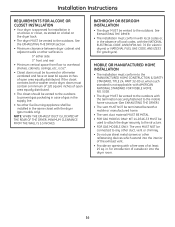
... and adjacent walls or other fuel-burning appliance shall be installed in . in the same closet with the dryer (gas models only). If the closet contains both a washer and a dryer, doors must conform with local codes or, in the absence of local codes, with the NATIONAL ELECTRICAL CODE, ANSI/NFPA NO. ...70 (for electric dryers) or NATIONAL FUEL GAS CODE, ANSI Z223 (for introduction of outside air into the interior of the exhaust vent. • Provide an opening with a free area ...
... and adjacent walls or other fuel-burning appliance shall be installed in . in the same closet with the dryer (gas models only). If the closet contains both a washer and a dryer, doors must conform with local codes or, in the absence of local codes, with the NATIONAL ELECTRICAL CODE, ANSI/NFPA NO. ...70 (for electric dryers) or NATIONAL FUEL GAS CODE, ANSI Z223 (for introduction of outside air into the interior of the exhaust vent. • Provide an opening with a free area ...
Owners Manual
Page 17
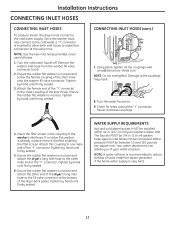
... flat washer is in place and attach the other male end of the dryer back panel. Ensure the rubber flat washer is in place and attach the dryer's long inlet hose to the other end of the dryer's long inlet hose to the fill valve connector at the same time. .... Remove the washer inlet hose from the washer fill valve connector (cold). 2. Installation Instructions CONNECTING INLET HOSES CONNECTING INLET HOSES To produce steam, the dryer must also connect to the cold water, a "Y" connector is inserted to allow both inlet hoses to make that connection at the bottom of the ''Y''...
... flat washer is in place and attach the other male end of the dryer back panel. Ensure the rubber flat washer is in place and attach the dryer's long inlet hose to the other end of the dryer's long inlet hose to the fill valve connector at the same time. .... Remove the washer inlet hose from the washer fill valve connector (cold). 2. Installation Instructions CONNECTING INLET HOSES CONNECTING INLET HOSES To produce steam, the dryer must also connect to the cold water, a "Y" connector is inserted to allow both inlet hoses to make that connection at the bottom of the ''Y''...

Owners Manual
Page 18
... for leak detection ❒ Exhaust hood Turn the dryer's gas shut-off valve in the supply line to the OFF position. Be sure the dryer cord is unplugged from the wall. ❒ Slip-joint pliers MATERIALS YOU WILL NEED ❒ 4″ dia. metal elbow...; dia., UL-listed flexible metal duct (if needed) ❒ Pipe compound ❒ Flexible gas line connector ❒ Duct clamps (2) or Spring clamps (2) ❒ Safety glasses ❒ Gloves ❒ Soap solution for electric dryers) TOOLS YOU WILL NEED ❒ 10″ Adjustable wrenches (2) ❒ 8″ Pipe ...
... for leak detection ❒ Exhaust hood Turn the dryer's gas shut-off valve in the supply line to the OFF position. Be sure the dryer cord is unplugged from the wall. ❒ Slip-joint pliers MATERIALS YOU WILL NEED ❒ 4″ dia. metal elbow...; dia., UL-listed flexible metal duct (if needed) ❒ Pipe compound ❒ Flexible gas line connector ❒ Duct clamps (2) or Spring clamps (2) ❒ Safety glasses ❒ Gloves ❒ Soap solution for electric dryers) TOOLS YOU WILL NEED ❒ 10″ Adjustable wrenches (2) ❒ 8″ Pipe ...
Owners Manual
Page 19
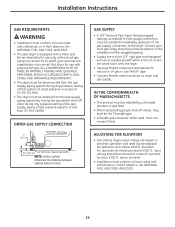
...; tape. • Connect flexible metal connector to dryer and gas supply. elevation. ADJUSTING FOR ELEVATION • Gas clothes dryers input ratings are based on the installation of 4 percent for use with propane (LP) gas. Installation Instructions GAS REQUIREMENTS WARNING • Installation must conform to local ...MADE BY PROPERLY TRAINED AND QUALIFIED PERSONNEL AND IN ACCORDANCE WITH LOCAL CODES AND ORDINANCE REQUIREMENTS. • The dryer must be isolated from the gas supply piping system during any pressure testing of that system at a test pressure in excess of test pressure...
...; tape. • Connect flexible metal connector to dryer and gas supply. elevation. ADJUSTING FOR ELEVATION • Gas clothes dryers input ratings are based on the installation of 4 percent for use with propane (LP) gas. Installation Instructions GAS REQUIREMENTS WARNING • Installation must conform to local ...MADE BY PROPERLY TRAINED AND QUALIFIED PERSONNEL AND IN ACCORDANCE WITH LOCAL CODES AND ORDINANCE REQUIREMENTS. • The dryer must be isolated from the gas supply piping system during any pressure testing of that system at a test pressure in excess of test pressure...
Owners Manual
Page 20
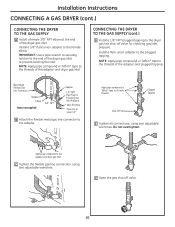
... E Tighten all male threads. Do not overtighten. Installation Instructions CONNECTING A GAS DRYER (cont.) CONNECTING THE DRYER TO THE GAS SUPPLY A Install a female 3/8″ NPT elbow at least 1/2″ B Attach the flexible metal gas line connector to the female elbow. NOTE: Apply pipe compound or Teflon...twisting the inlet. NOTE: Apply pipe compound or Teflon® tape to the threads of the dryer gas inlet to the dryer gas line shut-off valve. 20 New Metal Flexible Gas Line Connector Adapter Elbow Items not supplied 3/8″ NPT Adapter 1/8″ NPT Pipe Plug for ...
... E Tighten all male threads. Do not overtighten. Installation Instructions CONNECTING A GAS DRYER (cont.) CONNECTING THE DRYER TO THE GAS SUPPLY A Install a female 3/8″ NPT elbow at least 1/2″ B Attach the flexible metal gas line connector to the female elbow. NOTE: Apply pipe compound or Teflon...twisting the inlet. NOTE: Apply pipe compound or Teflon® tape to the threads of the dryer gas inlet to the dryer gas line shut-off valve. 20 New Metal Flexible Gas Line Connector Adapter Elbow Items not supplied 3/8″ NPT Adapter 1/8″ NPT Pipe Plug for ...


