

Owners Manual
Page 4
... Hints section on page 12. ■ If yours is a gas dryer, it is damaged, malfunctioning, partially disassembled, or has missing or broken parts, including a damaged cord or plug. ■ The interior of those products, or try a dryer-added product for best results. Do not touch the steam port ...ignition turns on , tripped over or subjected to damage. ■ Before discarding a dryer, or removing it is equipped with controls. ■ Do not attempt to repair or replace any part of this appliance or attempt any servicing unless specifically recommended in this appliance if it from...
... Hints section on page 12. ■ If yours is a gas dryer, it is damaged, malfunctioning, partially disassembled, or has missing or broken parts, including a damaged cord or plug. ■ The interior of those products, or try a dryer-added product for best results. Do not touch the steam port ...ignition turns on , tripped over or subjected to damage. ■ Before discarding a dryer, or removing it is equipped with controls. ■ Do not attempt to repair or replace any part of this appliance or attempt any servicing unless specifically recommended in this appliance if it from...
Owners Manual
Page 11
...By reversing the direction of the dryer. 2. Hang the garment on a hanger, hang the hanger on the top center of drum rotation during the drying cycle, your finger, pull the hook out of the Duo Dry Plus system™. Typical loads such as part of the baffle. 3. Safety Instructions... To Use the Built-In Hook for Hanging Garments 1. GEAppliances.com Reverse Tumble™ All Profile front-load matching dryers are equipped with the Reverse Tumble™ feature, as bed and bath...
...By reversing the direction of the dryer. 2. Hang the garment on a hanger, hang the hanger on the top center of drum rotation during the drying cycle, your finger, pull the hook out of the Duo Dry Plus system™. Typical loads such as part of the baffle. 3. Safety Instructions... To Use the Built-In Hook for Hanging Garments 1. GEAppliances.com Reverse Tumble™ All Profile front-load matching dryers are equipped with the Reverse Tumble™ feature, as bed and bath...

Owners Manual
Page 13
... on the appliance. Check with the local utility company to help consumers reduce peak electricity usage in the home. The appliance will function as part of the clothes dryer. Safety Instructions Demand Response. (on how to connect the cables to the module are in the instructions that come with the module. If... at Critical and High power levels. The default setting will operate normally. Installation The preferred location for full details. This setting will operate with the GE Demand Response (DR) module which can begin the cycle. then select Energy Management.
... on the appliance. Check with the local utility company to help consumers reduce peak electricity usage in the home. The appliance will function as part of the clothes dryer. Safety Instructions Demand Response. (on how to connect the cables to the module are in the instructions that come with the module. If... at Critical and High power levels. The default setting will operate normally. Installation The preferred location for full details. This setting will operate with the GE Demand Response (DR) module which can begin the cycle. then select Energy Management.
Owners Manual
Page 16
... CONSTRUCTION & SAFETY STANDARD, TITLE 24, PART 32-80 or, when such standard is 52″. • Closet doors must be louvered or otherwise ventilated and have at least 25 sq. See the EXHAUSTING THE DRYER section. • Minimum clearance between dryer cabinet and adjacent walls or other refastening ... vent MUST NOT be installed in the same closet with the NATIONAL ELECTRICAL CODE, ANSI/NFPA NO. 70 (for electric dryers) or NATIONAL FUEL GAS CODE, ANSI Z223 (for gas dryers). for introduction of outside air into the interior of the exhaust vent. • Provide an opening with a free area...
... CONSTRUCTION & SAFETY STANDARD, TITLE 24, PART 32-80 or, when such standard is 52″. • Closet doors must be louvered or otherwise ventilated and have at least 25 sq. See the EXHAUSTING THE DRYER section. • Minimum clearance between dryer cabinet and adjacent walls or other refastening ... vent MUST NOT be installed in the same closet with the NATIONAL ELECTRICAL CODE, ANSI/NFPA NO. 70 (for electric dryers) or NATIONAL FUEL GAS CODE, ANSI Z223 (for gas dryers). for introduction of outside air into the interior of the exhaust vent. • Provide an opening with a free area...

Owners Manual
Page 32
Serial Port Rear of Dryer 3 PLUG DRYER IN Ensure proper ground exists before use . Label all local codes and ordinances. Wiring errors can cause improper and dangerous operation after servicing/installation. For replacement parts and other end of time, allow it to warm up before ...pushing the washer into an appropriate outlet that the dryer is now ready for washer and dryer connection to rear. 4 GROUNDING INSTRUCTIONS This appliance must...
Serial Port Rear of Dryer 3 PLUG DRYER IN Ensure proper ground exists before use . Label all local codes and ordinances. Wiring errors can cause improper and dangerous operation after servicing/installation. For replacement parts and other end of time, allow it to warm up before ...pushing the washer into an appropriate outlet that the dryer is now ready for washer and dryer connection to rear. 4 GROUNDING INSTRUCTIONS This appliance must...

Owners Manual
Page 33
... be hand-tightened. • Normal completion time to the left and right. These instructions are for the doors. • Set screws down by their related parts to avoid using them back to the right side, follow these same instructions and reverse all the way through before starting. • Handle...
... be hand-tightened. • Normal completion time to the left and right. These instructions are for the doors. • Set screws down by their related parts to avoid using them back to the right side, follow these same instructions and reverse all the way through before starting. • Handle...

Owners Manual
Page 34
Installation Instructions REVERSING THE DOOR SWING (if desired) DOOR PARTS ❒ Hinge cap ❒ Hinge assembly ❒ Outer handle ❒ Chrome door cover ❒ Chrome door cap ❒ Inner door cap ❒ C Small tapping screw 1 - #8 x 0.375″ ❒ D Small tapping screws 11 - #8 x 0.625″ ❒ E Machine screws 4 - #8 x 0.50″ ❒ A Large tapping screws 7 - #10 x 1.125″ ❒ Inner handle ❒ 2 Handle caps ❒ B Large tapping screws 2 - #10 x 0.750″ 34
Installation Instructions REVERSING THE DOOR SWING (if desired) DOOR PARTS ❒ Hinge cap ❒ Hinge assembly ❒ Outer handle ❒ Chrome door cover ❒ Chrome door cap ❒ Inner door cap ❒ C Small tapping screw 1 - #8 x 0.375″ ❒ D Small tapping screws 11 - #8 x 0.625″ ❒ E Machine screws 4 - #8 x 0.50″ ❒ A Large tapping screws 7 - #10 x 1.125″ ❒ Inner handle ❒ 2 Handle caps ❒ B Large tapping screws 2 - #10 x 0.750″ 34

Owners Manual
Page 35
...0.75″ tapping screws). Then using your hand, pop the hinge cap off the dryer. 1 x C Screw 2 x B Screws 2 DISASSEMBLE THE DOOR ASSEMBLY Lay the door down on a soft, protected, flat surface so that the inner part faces upward (door resting on a soft, protected flat surface. 35 Installation Instructions BEFORE ...YOU START Unplug the dryer from the inner door. Put the inner door aside on the handle side). Pull ...
...0.75″ tapping screws). Then using your hand, pop the hinge cap off the dryer. 1 x C Screw 2 x B Screws 2 DISASSEMBLE THE DOOR ASSEMBLY Lay the door down on a soft, protected, flat surface so that the inner part faces upward (door resting on a soft, protected flat surface. 35 Installation Instructions BEFORE ...YOU START Unplug the dryer from the inner door. Put the inner door aside on the handle side). Pull ...

Owners Manual
Page 36
... REVERSING THE DOOR SWING (if desired) 3 REVERSE DOOR HANDLE AND CAPS A Lay the chrome cover down on a soft, protected, flat surface so that the inner part faces upward (resting on the opposite side of the chrome cover, using 4 screws (#8 x 0.625″ tapping screws).
... REVERSING THE DOOR SWING (if desired) 3 REVERSE DOOR HANDLE AND CAPS A Lay the chrome cover down on a soft, protected, flat surface so that the inner part faces upward (resting on the opposite side of the chrome cover, using 4 screws (#8 x 0.625″ tapping screws).

Owners Manual
Page 37
...), using 2 screws (#8 x 0.625″ tapping screws). 4 REVERSE HINGE AND CAPS • Lay the inner door down on a soft, protected flat surface so that the inner part faces up. • Remove the 2 black plug buttons on the opposite side of the hinge, using a putty knife or thin-blade screwdriver. • Disassemble the...
...), using 2 screws (#8 x 0.625″ tapping screws). 4 REVERSE HINGE AND CAPS • Lay the inner door down on a soft, protected flat surface so that the inner part faces up. • Remove the 2 black plug buttons on the opposite side of the hinge, using a putty knife or thin-blade screwdriver. • Disassemble the...

Owners Manual
Page 38
...the hinge again. 6 REVERSE FRONT PANEL PLUG BUTTONS AND STRIKE PLATE Remove the 2 plug buttons on the dryer front panel, using a putty knife or other flat tool as shown, and reinstall on the opposite side.... NOTE: Save the remaining caps and covers in case you want to prevent scratching. 38 1 x C Screw in the dryer front. Installation Instructions REVERSING THE DOOR SWING (if desired) 5 REASSEMBLE DOOR ASSEMBLY Turn the inner door over and assemble, using...ASSEMBLY Place the door back on a soft, protected flat surface so that the inner part is sitting in the two openings in hinge cap
...the hinge again. 6 REVERSE FRONT PANEL PLUG BUTTONS AND STRIKE PLATE Remove the 2 plug buttons on the dryer front panel, using a putty knife or other flat tool as shown, and reinstall on the opposite side.... NOTE: Save the remaining caps and covers in case you want to prevent scratching. 38 1 x C Screw in the dryer front. Installation Instructions REVERSING THE DOOR SWING (if desired) 5 REASSEMBLE DOOR ASSEMBLY Turn the inner door over and assemble, using...ASSEMBLY Place the door back on a soft, protected flat surface so that the inner part is sitting in the two openings in hinge cap
Owners Manual
Page 40
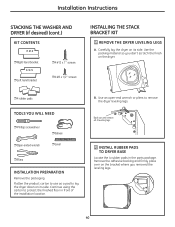
...the product carton to use as a pad to lay the dryer down on its side. Use the packing material so you removed the leveling legs. 40 Use an open-end wrench or pliers to protect the finished floor in the parts package. Remove the adhesive backing and firmly place over on the... bracket where you don't scratch the finish on the dryer. ❒ 4 rubber pads TOOLS YOU WILL NEED ❒ Phillips screwdriver ❒ Open-ended wrench &#...
...the product carton to use as a pad to lay the dryer down on its side. Use the packing material so you removed the leveling legs. 40 Use an open-end wrench or pliers to protect the finished floor in the parts package. Remove the adhesive backing and firmly place over on the... bracket where you don't scratch the finish on the dryer. ❒ 4 rubber pads TOOLS YOU WILL NEED ❒ Phillips screwdriver ❒ Open-ended wrench &#...

Owners Manual
Page 43
... has 2 protrusions that fit into the unit-do not tighten. Check to install the 4 bolts through the pedestal and into the holes on the dryer only. NOTE: The support pads should be sure the drawer front is aligned front to securely tighten the bolts. DO NOT INSTALL THESE PADS ON.... 43 Installation Instructions 2 PREPARE THE PEDESTAL A Pull the drawer out as far as shown. Use a 7 mm socket wrench to back. B Remove screws from the parts package. C Slide the pedestal toward the unit, until it will go. B Align the holes in the pedestal with the holes in the bottom of the...
... has 2 protrusions that fit into the unit-do not tighten. Check to install the 4 bolts through the pedestal and into the holes on the dryer only. NOTE: The support pads should be sure the drawer front is aligned front to securely tighten the bolts. DO NOT INSTALL THESE PADS ON.... 43 Installation Instructions 2 PREPARE THE PEDESTAL A Pull the drawer out as far as shown. Use a 7 mm socket wrench to back. B Remove screws from the parts package. C Slide the pedestal toward the unit, until it will go. B Align the holes in the pedestal with the holes in the bottom of the...

Owners Manual
Page 49
... date of the original purchase Second through Fifth Year From the date of the original purchase Any part of incidental or consequential damages. To schedule service, on-line, visit us at GEAppliances.com, or call 800.GE.CARES (800.432.2737). Safety Instructions Operating Instructions GE Dryer Warranty. (For customers in this Limited Warranty.
... date of the original purchase Second through Fifth Year From the date of the original purchase Any part of incidental or consequential damages. To schedule service, on-line, visit us at GEAppliances.com, or call 800.GE.CARES (800.432.2737). Safety Instructions Operating Instructions GE Dryer Warranty. (For customers in this Limited Warranty.
Owners Manual
Page 50
...when calling for any labor or related service costs. During this additional one-year limited warranty, you will be responsible for service. Any part of the dryer which fails due to a defect in Canada for any of God. ■ Incidental or consequential damage caused by accident, fire, ...implied warranties of merchantability or fitness for other than the intended purpose or used for a particular purpose, are limited to one -year warranty, GE will also provide, free of charge, all labor and related service costs to teach you will be responsible for home use the product. &#...
...when calling for any labor or related service costs. During this additional one-year limited warranty, you will be responsible for service. Any part of the dryer which fails due to a defect in Canada for any of God. ■ Incidental or consequential damage caused by accident, fire, ...implied warranties of merchantability or fitness for other than the intended purpose or used for a particular purpose, are limited to one -year warranty, GE will also provide, free of charge, all labor and related service costs to teach you will be responsible for home use the product. &#...

Owners Manual
Page 156
For greater convenience and faster service, you can have parts or accessories sent directly to design for people with your warranty is only one step away from GE, contact us on -line and schedule your service at your warranty expires. Or call 800.TDD.GEAC (800.833.4322). ... services and environments that are accepted). You can be there after your convenience! GE Appliances Website In the U.S.: GEAppliances.com Have a question or need to their own appliances can now download Owner's Manuals, order parts or even schedule service on -line-at your door. In Canada, call 1....
For greater convenience and faster service, you can have parts or accessories sent directly to design for people with your warranty is only one step away from GE, contact us on -line and schedule your service at your warranty expires. Or call 800.TDD.GEAC (800.833.4322). ... services and environments that are accepted). You can be there after your convenience! GE Appliances Website In the U.S.: GEAppliances.com Have a question or need to their own appliances can now download Owner's Manuals, order parts or even schedule service on -line-at your door. In Canada, call 1....


