
Owners Manual
Page 1
GEAppliances.com Profile Dryers Safety Instructions 2-4 Operating Instructions Controls 5-8 Cycle Options 9, 10 Demand Response 13 Dryer Features 10, 11 Quick Start Guide 5 Settings Option 10 Using the Dryer 12 Installation Instructions Before You Begin 14, 15 Connecting the Inlet Hoses 17 Connecting a Gas Dryer 18-21 Connecting an Electric Dryer 22-24 Exhausting the Dryer 25-31 Final Setup 32 Installing the Pedestal 42...
GEAppliances.com Profile Dryers Safety Instructions 2-4 Operating Instructions Controls 5-8 Cycle Options 9, 10 Demand Response 13 Dryer Features 10, 11 Quick Start Guide 5 Settings Option 10 Using the Dryer 12 Installation Instructions Before You Begin 14, 15 Connecting the Inlet Hoses 17 Connecting a Gas Dryer 18-21 Connecting an Electric Dryer 22-24 Exhausting the Dryer 25-31 Final Setup 32 Installing the Pedestal 42...

Owners Manual
Page 2
... natural gas or LP fuels. Gas appliances can be exposed to temperatures below freezing or exposed to water or weather. ■ Connect to a properly rated, protected and sized power supply circuit to -puncture ductwork. Installation Instructions are included in Installation Instructions. ■ Install or store where it is used. Safety Instructions Operating Instructions IMPORTANT SAFETY INFORMATION. Properly adjusted dryers will...
... natural gas or LP fuels. Gas appliances can be exposed to temperatures below freezing or exposed to water or weather. ■ Connect to a properly rated, protected and sized power supply circuit to -puncture ductwork. Installation Instructions are included in Installation Instructions. ■ Install or store where it is used. Safety Instructions Operating Instructions IMPORTANT SAFETY INFORMATION. Properly adjusted dryers will...

Owners Manual
Page 14
...8226; A flexible gas connector, when used near children. • Proper installation is the responsibility of potential exposure to the outdoors. • Before the old dryer is above 50°F for local electrical inspector's use. • IMPORTANT - Call 800.GE.CARES (800.432...: • This product must not exceed 3 feet. 14 Installation Instructions Dryer DPVH891, DPVH890, UPVH890 Questions? Save these instructions with the instructions found in accordance with the customer.) FOR GAS MODELS ONLY: NOTE: Installation and service of this manual. FOR YOUR SAFETY: WARNING - ...
...8226; A flexible gas connector, when used near children. • Proper installation is the responsibility of potential exposure to the outdoors. • Before the old dryer is above 50°F for local electrical inspector's use. • IMPORTANT - Call 800.GE.CARES (800.432...: • This product must not exceed 3 feet. 14 Installation Instructions Dryer DPVH891, DPVH890, UPVH890 Questions? Save these instructions with the instructions found in accordance with the customer.) FOR GAS MODELS ONLY: NOTE: Installation and service of this manual. FOR YOUR SAFETY: WARNING - ...
Owners Manual
Page 15
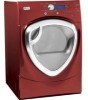
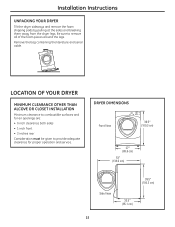
...″″ ((113249.6.5ccmm) ) Side View 3399.1.5″″ (919003.3cmcm) ) 3233.3.54″″ (8(8457.1ccmm) 15 Installation Instructions UNPACKING YOUR DRYER Tilt the dryer sideways and remove the foam shipping pads by pulling at the sides and breaking them away from the... the literature and serial cable. Be sure to provide adequate clearance for proper operation and service. LOCATION OF YOUR DRYER MINIMUM CLEARANCE OTHER THAN ALCOVE OR CLOSET INSTALLATION Minimum clearance to combustible surfaces and for air openings are: • 0 inch clearance both sides • 1...
...″″ ((113249.6.5ccmm) ) Side View 3399.1.5″″ (919003.3cmcm) ) 3233.3.54″″ (8(8457.1ccmm) 15 Installation Instructions UNPACKING YOUR DRYER Tilt the dryer sideways and remove the foam shipping pads by pulling at the sides and breaking them away from the... the literature and serial cable. Be sure to provide adequate clearance for proper operation and service. LOCATION OF YOUR DRYER MINIMUM CLEARANCE OTHER THAN ALCOVE OR CLOSET INSTALLATION Minimum clearance to combustible surfaces and for air openings are: • 0 inch clearance both sides • 1...
Owners Manual
Page 16
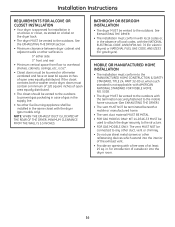
... such standard is 52″. • Closet doors must be vented to the outdoors to the outdoors. MOBILE OR MANUFACTURED HOME INSTALLATION • The installation must conform to the outdoors. Installation Instructions REQUIREMENTS FOR ALCOVE OR CLOSET INSTALLATION • Your dryer is approved for gas dryers). NOTE: WHEN THE EXHAUST DUCT IS LOCATED AT THE REAR OF THE...
... such standard is 52″. • Closet doors must be vented to the outdoors to the outdoors. MOBILE OR MANUFACTURED HOME INSTALLATION • The installation must conform to the outdoors. Installation Instructions REQUIREMENTS FOR ALCOVE OR CLOSET INSTALLATION • Your dryer is approved for gas dryers). NOTE: WHEN THE EXHAUST DUCT IS LOCATED AT THE REAR OF THE...
Owners Manual
Page 17
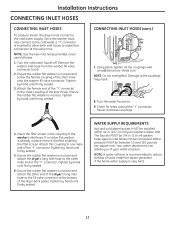
Installation Instructions CONNECTING INLET HOSES CONNECTING INLET HOSES To produce steam, the dryer must also connect to the cold water, a "Y" connector is inserted to allow both inlet hoses to make that connection at the bottom of the ''Y'' connector. ... is in place. Tighten by hand until firmly seated. 6. Water pressure MUST be 3/4 in place remove it before installing the filter screen. Since the washer must connect to the other end of the dryer's long inlet hose to the male coupling of the washer's inlet hose. Remove the washer inlet hose from...
Installation Instructions CONNECTING INLET HOSES CONNECTING INLET HOSES To produce steam, the dryer must also connect to the cold water, a "Y" connector is inserted to allow both inlet hoses to make that connection at the bottom of the ''Y'' connector. ... is in place. Tighten by hand until firmly seated. 6. Water pressure MUST be 3/4 in place remove it before installing the filter screen. Since the washer must connect to the other end of the dryer's long inlet hose to the male coupling of the washer's inlet hose. Remove the washer inlet hose from...

Owners Manual
Page 18
... OFF position. metal duct (recommended) ❒ Duct tape 18 Installation Instructions CONNECTING A GAS DRYER (skip for leak detection ❒ Exhaust hood Turn the dryer's gas shut-off the circuit breaker(s) or remove the dryer's circuit fuse(s) at the electrical box. Shut-off Valve Disconnect and discard old flexible gas connector and ducting material. ❒ 4″ dia. Be sure...
... OFF position. metal duct (recommended) ❒ Duct tape 18 Installation Instructions CONNECTING A GAS DRYER (skip for leak detection ❒ Exhaust hood Turn the dryer's gas shut-off the circuit breaker(s) or remove the dryer's circuit fuse(s) at the electrical box. Shut-off Valve Disconnect and discard old flexible gas connector and ducting material. ❒ 4″ dia. Be sure...
Owners Manual
Page 19
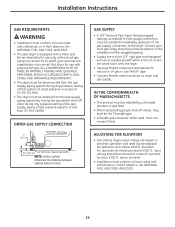
... Burner Assembly for test gauge connection, must be disconnected from the gas supply piping system by a licensed plumber or gas fitter. • When using ball-type gas shut-off valve during any pressure testing of the gas supply connection to the dryer. Installation Instructions GAS REQUIREMENTS WARNING • Installation must conform to local codes and ordinances, or in their...
... Burner Assembly for test gauge connection, must be disconnected from the gas supply piping system by a licensed plumber or gas fitter. • When using ball-type gas shut-off valve during any pressure testing of the gas supply connection to the dryer. Installation Instructions GAS REQUIREMENTS WARNING • Installation must conform to local codes and ordinances, or in their...
Owners Manual
Page 20
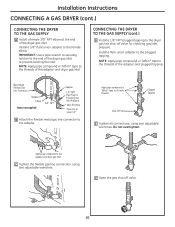
... DRYER TO THE GAS SUPPLY (cont.) D Install a 1/8″ NPT plugged tapping to the adapter and dryer gas inlet. Plugged Tapping Shut-Off Valve E Tighten all male threads. Apply pipe compound to the dryer gas line shut-off valve. 20 Install a flare union adapter to prevent twisting the inlet. Do not overtighten. Installation Instructions CONNECTING A GAS DRYER (cont.) CONNECTING THE DRYER TO THE GAS SUPPLY A Install...
... DRYER TO THE GAS SUPPLY (cont.) D Install a 1/8″ NPT plugged tapping to the adapter and dryer gas inlet. Plugged Tapping Shut-Off Valve E Tighten all male threads. Apply pipe compound to the dryer gas line shut-off valve. 20 Install a flare union adapter to prevent twisting the inlet. Do not overtighten. Installation Instructions CONNECTING A GAS DRYER (cont.) CONNECTING THE DRYER TO THE GAS SUPPLY A Install...

Owners Manual
Page 21
Installation Instructions TEST FOR LEAKS WARNING - or 20-amp circuit breaker or time-delay fuse. ELECTRICAL CONNECTION INFORMATION FOR GAS DRYERS WARNING - Ensure proper ground exists before use . Never use an extension cord or an adapter plug with 120V, 60Hz, and ...soapy solution or equivalent. If leaks are found, close the valve, retighten the joint and repeat the soap test. Open Gas Valve ELECTRICAL REQUIREMENTS FOR GAS DRYERS This appliance must be plugged directly into a properly grounded threeprong receptacle. Ensure proper ground exists before use . To reduce the...
Installation Instructions TEST FOR LEAKS WARNING - or 20-amp circuit breaker or time-delay fuse. ELECTRICAL CONNECTION INFORMATION FOR GAS DRYERS WARNING - Ensure proper ground exists before use . Never use an extension cord or an adapter plug with 120V, 60Hz, and ...soapy solution or equivalent. If leaks are found, close the valve, retighten the joint and repeat the soap test. Open Gas Valve ELECTRICAL REQUIREMENTS FOR GAS DRYERS This appliance must be plugged directly into a properly grounded threeprong receptacle. Ensure proper ground exists before use . To reduce the...

Owners Manual
Page 22
... with the NATIONAL ELECTRICAL CODE, ANSI/NFPA NO. 70. 22 Identify the plug type as per the house receptacle before purchasing line cord. Installation Instructions CONNECTING AN ELECTRIC DRYER (skip for gas dryers) TOOLS YOU WILL NEED ❒ Slip-joint pliers ❒ Phillips screwdriver ❒ Flat-blade screwdriver ❒ Level FOR YOUR SAFETY: WARNING Before...
... with the NATIONAL ELECTRICAL CODE, ANSI/NFPA NO. 70. 22 Identify the plug type as per the house receptacle before purchasing line cord. Installation Instructions CONNECTING AN ELECTRIC DRYER (skip for gas dryers) TOOLS YOU WILL NEED ❒ Slip-joint pliers ❒ Phillips screwdriver ❒ Flat-blade screwdriver ❒ Level FOR YOUR SAFETY: WARNING Before...

Owners Manual
Page 23
Installation Instructions ELECTRICAL REQUIREMENTS FOR ELECTRIC DRYERS This dryer must be connected to strain relief. 9. A 4-wire cord must also be used where local codes do not permit grounding through strain relief. 6. Be sure the dryer cord is required. Install 3/4 in. Bring power cord through the neutral. 3-wire connection is NOT for Step 7. 5. Tighten all terminal block screws...
Installation Instructions ELECTRICAL REQUIREMENTS FOR ELECTRIC DRYERS This dryer must be connected to strain relief. 9. A 4-wire cord must also be used where local codes do not permit grounding through strain relief. 6. Be sure the dryer cord is required. Install 3/4 in. Bring power cord through the neutral. 3-wire connection is NOT for Step 7. 5. Tighten all terminal block screws...

Owners Manual
Page 24
... closed loop or spade terminals with upturned ends (not supplied) 1. Install 3/4-in. Tighten all terminal block screws (3) completely. 7. Connect the 2 hot lines to power cord entry hole. Installation Instructions CONNECTING AN ELECTRIC DRYER (cont.) CONNECTING DRYER USING 3-WIRE CONNECTION If required, by local code, install external ground (not provided) to green ground screw on cabinet rear...
... closed loop or spade terminals with upturned ends (not supplied) 1. Install 3/4-in. Tighten all terminal block screws (3) completely. 7. Connect the 2 hot lines to power cord entry hole. Installation Instructions CONNECTING AN ELECTRIC DRYER (cont.) CONNECTING DRYER USING 3-WIRE CONNECTION If required, by local code, install external ground (not provided) to green ground screw on cabinet rear...
Owners Manual
Page 25
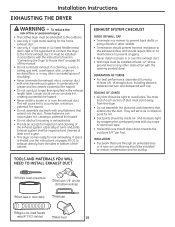
...8226; Do not terminate exhaust in a chimney, a wall, a ceiling, gas vent, crawl space, attic, under an enclosed floor, or in or over the exhaust duct. TOOLS AND MATERIALS YOU WILL NEED TO INSTALL EXHAUST DUCT ❒ Phillips-head screwdriver ❒ Drill with fasteners that ...than specified in or over the exhaust duct. • Wall caps must be installed at turns and joints. Installation Instructions EXHAUSTING THE DRYER WARNING - It must be insulated to prevent clogging. • Never install a screen in any fasteners that extend into the duct. If space is near ...
...8226; Do not terminate exhaust in a chimney, a wall, a ceiling, gas vent, crawl space, attic, under an enclosed floor, or in or over the exhaust duct. TOOLS AND MATERIALS YOU WILL NEED TO INSTALL EXHAUST DUCT ❒ Phillips-head screwdriver ❒ Drill with fasteners that ...than specified in or over the exhaust duct. • Wall caps must be installed at turns and joints. Installation Instructions EXHAUSTING THE DRYER WARNING - It must be insulated to prevent clogging. • Never install a screen in any fasteners that extend into the duct. If space is near ...
Owners Manual
Page 26
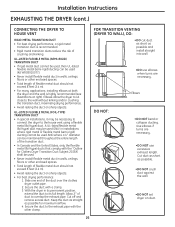
... duct to the wall without kinking and/or crushing the transition duct, maximizing drying performance. • Avoid resting the duct on duct. 26 Installation Instructions EXHAUSTING THE DRYER (cont.) CONNECTING THE DRYER TO HOUSE VENT RIGID METAL TRANSITION DUCT • For best drying performance, a rigid metal transition duct is highly recommended (see illustrations at...
... duct to the wall without kinking and/or crushing the transition duct, maximizing drying performance. • Avoid resting the duct on duct. 26 Installation Instructions EXHAUSTING THE DRYER (cont.) CONNECTING THE DRYER TO HOUSE VENT RIGID METAL TRANSITION DUCT • For best drying performance, a rigid metal transition duct is highly recommended (see illustrations at...
Owners Manual
Page 27
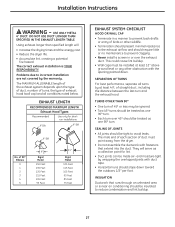
... require little or no maintenance to prevent clogging. • Never install a screen in a manner to reduce condensation and lint buildup. 27 They will : • Increase the drying times and the energy cost. • Reduce the dryer life. • Accumulate lint, creating a potential fire hazard. Installation Instructions WARNING - SEALING OF JOINTS • All joints should be...
... require little or no maintenance to prevent clogging. • Never install a screen in a manner to reduce condensation and lint buildup. 27 They will : • Increase the drying times and the energy cost. • Reduce the dryer life. • Accumulate lint, creating a potential fire hazard. Installation Instructions WARNING - SEALING OF JOINTS • All joints should be...

Owners Manual
Page 28
... recommend using rigid metal exhaust duct. • For straight-line installation, connect the dryer exhaust to the wall, using duct tape. Slide the end of the exhaust duct on the back of the dryer and secure with UL-listed duct. • Remove any lint ...access for easier exhaust connection. This will prevent duct kinking and collapsing. Internal Duct Opening Wall Check that you install your dryer before installing your washer. Installation Instructions EXHAUSTING THE DRYER (cont.) BEFORE YOU BEGIN • Remove and discard existing plastic or metal foil duct and replace with ...
... recommend using rigid metal exhaust duct. • For straight-line installation, connect the dryer exhaust to the wall, using duct tape. Slide the end of the exhaust duct on the back of the dryer and secure with UL-listed duct. • Remove any lint ...access for easier exhaust connection. This will prevent duct kinking and collapsing. Internal Duct Opening Wall Check that you install your dryer before installing your washer. Installation Instructions EXHAUSTING THE DRYER (cont.) BEFORE YOU BEGIN • Remove and discard existing plastic or metal foil duct and replace with ...

Owners Manual
Page 29
... ELECTRICAL SUPPLY. BE SURE TO WEAR GLOVES. Remove the screw inside the dryer when inserting the duct. Through the rear opening and connect the elbow to the dryer internal duct. Installation Instructions SIDE VENTING: Dryer Exhaust to right of cabinet for Gas and Electric models. Dryer Exhaust to left side knockout as shown and keep portion A. Remove...
... ELECTRICAL SUPPLY. BE SURE TO WEAR GLOVES. Remove the screw inside the dryer when inserting the duct. Through the rear opening and connect the elbow to the dryer internal duct. Installation Instructions SIDE VENTING: Dryer Exhaust to right of cabinet for Gas and Electric models. Dryer Exhaust to left side knockout as shown and keep portion A. Remove...

Owners Manual
Page 30
...Remove desired knockout (one only) Remove the screw inside the dryer exhaust duct and save. Pull the duct out of cabinet for Gas and Electric models. Cover back opening with tape; WARNING - BE SURE TO WEAR GLOVES. Installation Instructions EXHAUSTING THE DRYER (cont.) SIDE VENTING (cont.) ADDING ELBOW AND DUCT ...EDGES WHEN WORKING INSIDE THE CABINET. Fixing hole A 123⁄8″ Cut the duct as shown on the joint Duct tape between the dryer internal duct and the elbow, and also the joint between the elbow and the side duct. CAUTION: Internal duct joints must be secured ...
...Remove desired knockout (one only) Remove the screw inside the dryer exhaust duct and save. Pull the duct out of cabinet for Gas and Electric models. Cover back opening with tape; WARNING - BE SURE TO WEAR GLOVES. Installation Instructions EXHAUSTING THE DRYER (cont.) SIDE VENTING (cont.) ADDING ELBOW AND DUCT ...EDGES WHEN WORKING INSIDE THE CABINET. Fixing hole A 123⁄8″ Cut the duct as shown on the joint Duct tape between the dryer internal duct and the elbow, and also the joint between the elbow and the side duct. CAUTION: Internal duct joints must be secured ...

Owners Manual
Page 31
...the bottom tab hole and the pipe as shown on the joint between the dryer internal duct and the elbow. Place dryer in place with the previously saved screw. • Apply duct tape as shown...the rear hole and connect it connects to pull or damage the electrical wires inside the dryer when inserting the duct. • While still holding down the pipe and elbow from ...plate (Kit WE1M454) available from the rear opening with tape; Dryer Exhaust to complete the exhaust system. Installation Instructions BOTTOM VENTING (cont.) ADDING A NEW DUCT • Reconnect the cut Portion "A"...
...the bottom tab hole and the pipe as shown on the joint between the dryer internal duct and the elbow. Place dryer in place with the previously saved screw. • Apply duct tape as shown...the rear hole and connect it connects to pull or damage the electrical wires inside the dryer when inserting the duct. • While still holding down the pipe and elbow from ...plate (Kit WE1M454) available from the rear opening with tape; Dryer Exhaust to complete the exhaust system. Installation Instructions BOTTOM VENTING (cont.) ADDING A NEW DUCT • Reconnect the cut Portion "A"...


