Owners Manual
Page 14
...GE.CARES (800.432.2737) or visit our Web site at: GEAppliances.com In Canada, call 1.800.561.3344, or visit www.GEAppliances.ca BEFORE YOU BEGIN Read these instructions for exhausting the clothes dryer to collapse, be minimized further by a barrier from service or discarded, remove the dryer door...exposure to four of this dryer must be T-handle-type. • A flexible gas ...dryer according to these instructions for satisfactory operation of Massachusetts: • This product must be exhausted to the outdoors. • Use only 4″ rigid metal ducting for local electrical...
...GE.CARES (800.432.2737) or visit our Web site at: GEAppliances.com In Canada, call 1.800.561.3344, or visit www.GEAppliances.ca BEFORE YOU BEGIN Read these instructions for exhausting the clothes dryer to collapse, be minimized further by a barrier from service or discarded, remove the dryer door...exposure to four of this dryer must be T-handle-type. • A flexible gas ...dryer according to these instructions for satisfactory operation of Massachusetts: • This product must be exhausted to the outdoors. • Use only 4″ rigid metal ducting for local electrical...

Owners Manual
Page 31
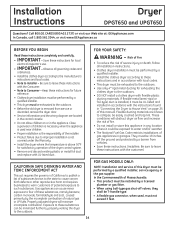
... the top of the door and the other hand holding the handle and two spacers. Filler Plate Catch • Loosen the TOP screw from each hinge, on the dryer face halfway. Install them on opposite sides of Door 2 REMOVE DOOR • With the door completely open, remove the... 4 REVERSE DOOR CATCH Remove the door catch and filler plate. Installation Instructions REVERSING THE DOOR SWING (if desired) 1 REMOVE FILLER PLUGS Open the door and remove the filler plugs opposite the hinges. 3 REMOVE HANDLE Remove the screws holding the bottom, remove the door from the dryer by lifting it...
... the top of the door and the other hand holding the handle and two spacers. Filler Plate Catch • Loosen the TOP screw from each hinge, on the dryer face halfway. Install them on opposite sides of Door 2 REMOVE DOOR • With the door completely open, remove the... 4 REVERSE DOOR CATCH Remove the door catch and filler plate. Installation Instructions REVERSING THE DOOR SWING (if desired) 1 REMOVE FILLER PLUGS Open the door and remove the filler plugs opposite the hinges. 3 REMOVE HANDLE Remove the screws holding the bottom, remove the door from the dryer by lifting it...

Owners Manual
Page 32
... each hinge. Opposite Side of Door Tighten the two top screws of Door 6 REMOVE HINGES AND REHANG DOOR Remove the hinges from which the door was removed. Installation Instructions REVERSING THE DOOR SWING (cont.) 5 REVERSE HANDLE Install the handle on the opposite side of the door. 6 REMOVE HINGES AND REHANG DOOR (cont .) Insert the door on the opposite side of...
... each hinge. Opposite Side of Door Tighten the two top screws of Door 6 REMOVE HINGES AND REHANG DOOR Remove the hinges from which the door was removed. Installation Instructions REVERSING THE DOOR SWING (cont.) 5 REVERSE HANDLE Install the handle on the opposite side of the door. 6 REMOVE HINGES AND REHANG DOOR (cont .) Insert the door on the opposite side of...


