Owners Manual
Page 1
....com Safety Instructions 2-5 Operating Instructions Controls 6-8 Cycle Options 9-10 Dryer Features 11 Loading and Using the Dryer 12, 13 Installation Instructions Before You Begin 14-16 Connecting a Gas Dryer 17-20 Connecting an Electric Dryer 21-23 Exhausting the Dryer 24-28 Final Setup 29, 30 Reversing the Door Swing . . . . . .31, 32 Troubleshooting Tips 33 Consumer Support Consumer Support 36 Warranty (Canada 35 Warranty (U.S 34 Owner's Manual and Installation Instructions DPGT650 UPGT650 Printed in Korea Write the model and serial numbers here: Model Serial They are...
....com Safety Instructions 2-5 Operating Instructions Controls 6-8 Cycle Options 9-10 Dryer Features 11 Loading and Using the Dryer 12, 13 Installation Instructions Before You Begin 14-16 Connecting a Gas Dryer 17-20 Connecting an Electric Dryer 21-23 Exhausting the Dryer 24-28 Final Setup 29, 30 Reversing the Door Swing . . . . . .31, 32 Troubleshooting Tips 33 Consumer Support Consumer Support 36 Warranty (Canada 35 Warranty (U.S 34 Owner's Manual and Installation Instructions DPGT650 UPGT650 Printed in Korea Write the model and serial numbers here: Model Serial They are...

Owners Manual
Page 2
... venting the dryer to light a match, or cigarette, or turn on any gas or electrical appliance. 2 Do not touch any phone in your building. 3 Clear the room, building or area of natural gas or LP fuels. Follow the gas supplier's instructions carefully. 5 If you cannot reach your gas supplier from a neighbor's phone. Installation Instructions Consumer Support Troubleshooting Tips 2 WARNING! do not use gasoline or other appliance. ■ Installation...
... venting the dryer to light a match, or cigarette, or turn on any gas or electrical appliance. 2 Do not touch any phone in your building. 3 Clear the room, building or area of natural gas or LP fuels. Follow the gas supplier's instructions carefully. 5 If you cannot reach your gas supplier from a neighbor's phone. Installation Instructions Consumer Support Troubleshooting Tips 2 WARNING! do not use gasoline or other appliance. ■ Installation...
Owners Manual
Page 3
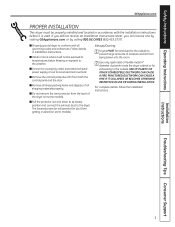
... USE OR DURING INSTALLATION. For complete details, follow the Installation Instructions. USE OF PLASTIC OR OTHER COMBUSTIBLE DUCTWORK CAN CAUSE A FIRE. Installation Instructions Troubleshooting Tips Consumer Support 3 Exhaust/Ducting: 1 Dryers MUST be exposed to temperatures below freezing or exposed to the weather. ■ Connect to a properly rated, protected and sized power supply circuit to the dryer. Follow details in accordance with all shipping materials properly. ■ Do not remove the vent...
... USE OR DURING INSTALLATION. For complete details, follow the Installation Instructions. USE OF PLASTIC OR OTHER COMBUSTIBLE DUCTWORK CAN CAUSE A FIRE. Installation Instructions Troubleshooting Tips Consumer Support 3 Exhaust/Ducting: 1 Dryers MUST be exposed to temperatures below freezing or exposed to the weather. ■ Connect to a properly rated, protected and sized power supply circuit to the dryer. Follow details in accordance with all shipping materials properly. ■ Do not remove the vent...

Owners Manual
Page 4
... drum is used in homes such as life jackets containing kapok) must not be picked up by removing the fuse or switching off the circuit breaker before each load to catch fire. ■ Any article on , with or inside the dryer or in your dryer. Skin irritation could cause a clothes load to prevent lint accumulation inside this or any maintenance or cleaning (except the removal and cleaning...
... drum is used in homes such as life jackets containing kapok) must not be picked up by removing the fuse or switching off the circuit breaker before each load to catch fire. ■ Any article on , with or inside the dryer or in your dryer. Skin irritation could cause a clothes load to prevent lint accumulation inside this or any maintenance or cleaning (except the removal and cleaning...
Owners Manual
Page 5
... dryer. Safety Instructions Operating Instructions GEAppliances.com WHEN USING YOUR DRYER (cont.) ■ Never attempt to operate this appliance if it is equipped with controls. ■ Do not attempt to repair or replace any part of this appliance or attempt any servicing unless specifically recommended in this Owner's Manual or in them by using a dryer-applied fabric softener or an anti-static conditioner. See the Loading and Using the Dryer...
... dryer. Safety Instructions Operating Instructions GEAppliances.com WHEN USING YOUR DRYER (cont.) ■ Never attempt to operate this appliance if it is equipped with controls. ■ Do not attempt to repair or replace any part of this appliance or attempt any servicing unless specifically recommended in this Owner's Manual or in them by using a dryer-applied fabric softener or an anti-static conditioner. See the Loading and Using the Dryer...

Owners Manual
Page 7
.... DEWRINKLE For removing wrinkles from the power supply. 2 Cycles The cycle controls the length and tumble speed of time you match the dry setting with the loads. Press the START/PAUSE button. 4 Dry Level The sensor continuously monitors the amount of fabrics. When the moisture in the load. Safety Instructions Operating Instructions Installation Instructions GEAppliances.com 1 Power Press to tumble items without heat. To use , create or modify custom dry cycles. 3 Time Dry Use to put the dryer in a hurry...
.... DEWRINKLE For removing wrinkles from the power supply. 2 Cycles The cycle controls the length and tumble speed of time you match the dry setting with the loads. Press the START/PAUSE button. 4 Dry Level The sensor continuously monitors the amount of fabrics. When the moisture in the load. Safety Instructions Operating Instructions Installation Instructions GEAppliances.com 1 Power Press to tumble items without heat. To use , create or modify custom dry cycles. 3 Time Dry Use to put the dryer in a hurry...
Owners Manual
Page 9
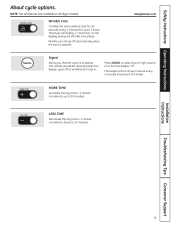
... to 99 minutes. The clothes should be removed when the beeper goes off so wrinkles don't set in 1-minute increments, down to 3 hours. Installation Instructions Troubleshooting Tips Consumer Support 9 Safety Instructions Operating Instructions About cycle options. NOTE: Not all features are available on the display during the Wrinkle Care phase. The beeper will display a "racetrack" on all dryer models. Wrinkle Care Tumbles the drum without heat for 10 seconds every...
... to 99 minutes. The clothes should be removed when the beeper goes off so wrinkles don't set in 1-minute increments, down to 3 hours. Installation Instructions Troubleshooting Tips Consumer Support 9 Safety Instructions Operating Instructions About cycle options. NOTE: Not all features are available on the display during the Wrinkle Care phase. The beeper will display a "racetrack" on all dryer models. Wrinkle Care Tumbles the drum without heat for 10 seconds every...
Owners Manual
Page 10
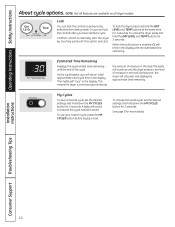
... unlock the dryer, press and hold the DRY LEVEL and TEMP buttons at the same time for 3 seconds. A beep will calculate and display the approximate time remaining. Installation Instructions Consumer Support Troubleshooting Tips 10 Then lights will continue until the end of moisture in the display with this option selected. To change the saved cycle, set the desired settings and hold down the MY CYCLES button for...
... unlock the dryer, press and hold the DRY LEVEL and TEMP buttons at the same time for 3 seconds. A beep will calculate and display the approximate time remaining. Installation Instructions Consumer Support Troubleshooting Tips 10 Then lights will continue until the end of moisture in the display with this option selected. To change the saved cycle, set the desired settings and hold down the MY CYCLES button for...

Owners Manual
Page 11
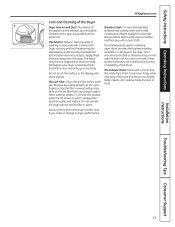
... the drum lamp shield in the dryer. GEAppliances.com Installation Instructions Troubleshooting Tips Consumer Support 11 The drum lamp is also strongly recommended when drying sneakers. • Do not use this drying rack when there are other clothes in place. 2 Slide the shield up and remove. 3 Remove the bulb and replace with the TIME DRY cycle. Safety Instructions Operating Instructions Dryer features. It is located at the household distribution panel by removing the fuse or switching off the circuit breaker.
... the drum lamp shield in the dryer. GEAppliances.com Installation Instructions Troubleshooting Tips Consumer Support 11 The drum lamp is also strongly recommended when drying sneakers. • Do not use this drying rack when there are other clothes in place. 2 Slide the shield up and remove. 3 Remove the bulb and replace with the TIME DRY cycle. Safety Instructions Operating Instructions Dryer features. It is located at the household distribution panel by removing the fuse or switching off the circuit breaker.
Owners Manual
Page 13
... qualified service personnel. Run your warranty. Apply these products is no wildlife (birds, insects, etc.) nesting inside flaps of the appliance and exhaust duct should be washed and dried normally. If the dryer drum should be damaged by pulling straight up. Make sure that the inside the duct or hood. Do not operate the dryer without the lint filter in a GE dryer. Installation Instructions Troubleshooting Tips Consumer Support 13 Dryer control panel...
... qualified service personnel. Run your warranty. Apply these products is no wildlife (birds, insects, etc.) nesting inside flaps of the appliance and exhaust duct should be washed and dried normally. If the dryer drum should be damaged by pulling straight up. Make sure that the inside the duct or hood. Do not operate the dryer without the lint filter in a GE dryer. Installation Instructions Troubleshooting Tips Consumer Support 13 Dryer control panel...
Owners Manual
Page 14
... primarily by a barrier from service or discarded, remove the dryer door. • Service information and the wiring diagram are known to collapse, be exhausted to the outdoors. • Use only 4″ rigid metal ducting for satisfactory operation of Massachusetts: • This product must be minimized further by a qualified installer, service agency or the gas supplier. Save these instructions with UL-listed duct. Close supervision of children is...
... primarily by a barrier from service or discarded, remove the dryer door. • Service information and the wiring diagram are known to collapse, be exhausted to the outdoors. • Use only 4″ rigid metal ducting for satisfactory operation of Massachusetts: • This product must be minimized further by a qualified installer, service agency or the gas supplier. Save these instructions with UL-listed duct. Close supervision of children is...

Owners Manual
Page 16
... gas dryers). 16 If the closet contains both a washer and a dryer, doors must conform with the NATIONAL ELECTRICAL CODE, ANSI/NFPA NO. 70 (for electric dryers) or NATIONAL FUEL GAS CODE, ANSI Z223 (for installation in the same closet with the dryer (gas models only). See EXHAUST INFORMATION. • The installation must contain a minimum of 120 square inches of local codes, with local codes or, in the absence of open...
... gas dryers). 16 If the closet contains both a washer and a dryer, doors must conform with the NATIONAL ELECTRICAL CODE, ANSI/NFPA NO. 70 (for electric dryers) or NATIONAL FUEL GAS CODE, ANSI Z223 (for installation in the same closet with the dryer (gas models only). See EXHAUST INFORMATION. • The installation must contain a minimum of 120 square inches of local codes, with local codes or, in the absence of open...

Owners Manual
Page 17
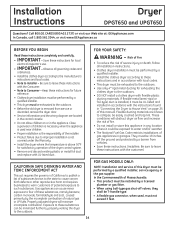
... ❒ Adjustable wrenches (2) for electric dryers) TOOLS AND MATERIALS YOU WILL NEED FOR CONNECTING THE GAS SUPPLY ❒ Flat- or straight-blade screwdriver (may be needed for cord strain relief) ❒ Flexible stainless steel or plastic-coated brass connecting tube (if allowed by building code) FOR YOUR SAFETY: WARNING Before beginning the installation, turn off the circuit breaker(s) or remove the dryer's circuit fuse(s) at the electrical box.
... ❒ Adjustable wrenches (2) for electric dryers) TOOLS AND MATERIALS YOU WILL NEED FOR CONNECTING THE GAS SUPPLY ❒ Flat- or straight-blade screwdriver (may be needed for cord strain relief) ❒ Flexible stainless steel or plastic-coated brass connecting tube (if allowed by building code) FOR YOUR SAFETY: WARNING Before beginning the installation, turn off the circuit breaker(s) or remove the dryer's circuit fuse(s) at the electrical box.

Owners Manual
Page 20
... a licensed electrician install an approved outlet. Installation Instructions CONNECTING A GAS DRYER (cont.) TEST FOR LEAKS WARNING - WARNING - Apply a soap solution. Open Gas Valve ELECTRICAL CONNECTION INFORMATION FOR GAS DRYERS WARNING - Ground Screw 20 ELECTRICAL REQUIREMENTS FOR GAS DRYERS This appliance must be plugged directly into a properly grounded three-prong receptacle. If electrical supply provided does not meet the above specifications, it is equipped with the NATIONAL ELECTRICAL CODE, ANSI/NFPA NO. 70. Never use an open flame to...
... a licensed electrician install an approved outlet. Installation Instructions CONNECTING A GAS DRYER (cont.) TEST FOR LEAKS WARNING - WARNING - Apply a soap solution. Open Gas Valve ELECTRICAL CONNECTION INFORMATION FOR GAS DRYERS WARNING - Ground Screw 20 ELECTRICAL REQUIREMENTS FOR GAS DRYERS This appliance must be plugged directly into a properly grounded three-prong receptacle. If electrical supply provided does not meet the above specifications, it is equipped with the NATIONAL ELECTRICAL CODE, ANSI/NFPA NO. 70. Never use an open flame to...

Owners Manual
Page 21
... forked terminals with the NATIONAL ELECTRICAL CODE, ANSI/NFPA NO. 70. 21 Be sure the dryer cord is unplugged from the wall. NEVER LEAVE THE ACCESS COVER OFF THE TERMINAL BLOCK. ❒ UL-listed strain relief (may be needed for cord strain relief) ❒ #2 Phillips-head screwdriver (for terminal connections) FOR YOUR SAFETY: WARNING Before making the electrical connection, turn off the circuit breaker(s) or remove the dryer's circuit fuse(s) at the electrical box...
... forked terminals with the NATIONAL ELECTRICAL CODE, ANSI/NFPA NO. 70. 21 Be sure the dryer cord is unplugged from the wall. NEVER LEAVE THE ACCESS COVER OFF THE TERMINAL BLOCK. ❒ UL-listed strain relief (may be needed for cord strain relief) ❒ #2 Phillips-head screwdriver (for terminal connections) FOR YOUR SAFETY: WARNING Before making the electrical connection, turn off the circuit breaker(s) or remove the dryer's circuit fuse(s) at the electrical box...
Owners Manual
Page 24
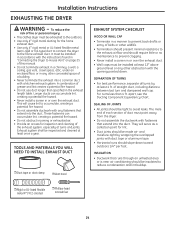
... should require little or no maintenance to the home exhaust duct. For turns less than specified in a manner to reduce condensation and lint buildup. ❒ Rigid or UL-listed flexible metal 4″ (10.2 cm) duct ❒ Phillips-head screwdriver 24 INSULATION • Ductwork that runs through an unheated area or is near air conditioning should slope down . Installation Instructions EXHAUSTING THE DRYER WARNING - Longer ducts...
... should require little or no maintenance to the home exhaust duct. For turns less than specified in a manner to reduce condensation and lint buildup. ❒ Rigid or UL-listed flexible metal 4″ (10.2 cm) duct ❒ Phillips-head screwdriver 24 INSULATION • Ductwork that runs through an unheated area or is near air conditioning should slope down . Installation Instructions EXHAUSTING THE DRYER WARNING - Longer ducts...
Owners Manual
Page 28
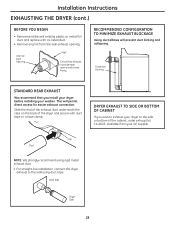
... TO MINIMIZE EXHAUST BLOCKAGE Using duct elbows will permit direct access for easier exhaust connection. DRYER EXHAUST TO SIDE OR BOTTOM OF CABINET If you install your dryer before installing your washer. Slide the end of the exhaust duct underneath the clips on the back of the cabinet, order exhaust kit 14-A003, available from the wall exhaust opening. Internal Duct Opening Wall Check that you wish to exhaust your GE supplier. Clip Duct NOTE...
... TO MINIMIZE EXHAUST BLOCKAGE Using duct elbows will permit direct access for easier exhaust connection. DRYER EXHAUST TO SIDE OR BOTTOM OF CABINET If you install your dryer before installing your washer. Slide the end of the exhaust duct underneath the clips on the back of the cabinet, order exhaust kit 14-A003, available from the wall exhaust opening. Internal Duct Opening Wall Check that you wish to exhaust your GE supplier. Clip Duct NOTE...
Owners Manual
Page 33
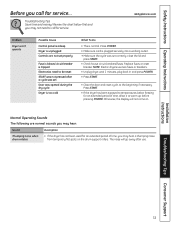
... a working outlet. • Make sure the cycle was opened during the dry cycle Dryer is too cold What To Do • This is tripped Electronics need to be reset START was not pressed after use two fuses or breakers. • Unplug dryer, wait 2 minutes, plug back in and press POWER. • Press START. • Close the door and reset cycle, to warm up before pressing POWER. Safety Instructions Operating Instructions Before you call for service. Installation Instructions Troubleshooting...
... a working outlet. • Make sure the cycle was opened during the dry cycle Dryer is too cold What To Do • This is tripped Electronics need to be reset START was not pressed after use two fuses or breakers. • Unplug dryer, wait 2 minutes, plug back in and press POWER. • Press START. • Close the door and reset cycle, to warm up before pressing POWER. Safety Instructions Operating Instructions Before you call for service. Installation Instructions Troubleshooting...
Owners Manual
Page 34
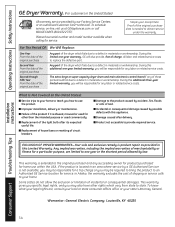
... light bulb after delivery. ■ Product not accessible to a defect in an area where service by law. Warrantor: General Electric Company. Louisville, KY 40225 Consumer Support Troubleshooting Tips 34 Staple your home to teach you how to use the product. ■ Improper installation, delivery or maintenance. ■ Failure of incidental or consequential damages. The extra-large or super-capacity dryer drum and main electronic control...
... light bulb after delivery. ■ Product not accessible to a defect in an area where service by law. Warrantor: General Electric Company. Louisville, KY 40225 Consumer Support Troubleshooting Tips 34 Staple your home to teach you how to use the product. ■ Improper installation, delivery or maintenance. ■ Failure of incidental or consequential damages. The extra-large or super-capacity dryer drum and main electronic control...
Owners Manual
Page 35
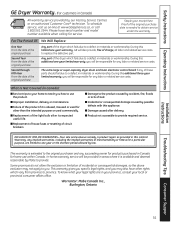
... to the original purchaser and any succeeding owner for products purchased in Canada for any labor or related service costs. Safety Instructions Operating Instructions GE Dryer Warranty. (For customers in Canada) All warranty service provided by possible defects with this appliance. ■ Damage caused after its expected useful life. ■ Replacement of house fuses or resetting of circuit breakers. ■ Damage to the product caused by...
... to the original purchaser and any succeeding owner for products purchased in Canada for any labor or related service costs. Safety Instructions Operating Instructions GE Dryer Warranty. (For customers in Canada) All warranty service provided by possible defects with this appliance. ■ Damage caused after its expected useful life. ■ Replacement of house fuses or resetting of circuit breakers. ■ Damage to the product caused by...


