Use and Care Manual
Page 1
Dryers GEAppliances.com Safety Instructions 2-5 Operating Instructions Control Panels 6-9 Cycle Options 10, 11 Dryer Features 11 Reversing the Door Swing . . . .12-16 Loading and Using the Dryer 17, 18 Venting the Dryer 19 Stacking 20-23 Troubleshooting Tips . . . .24-26 Consumer Support Warranty 27 Consumer Support 28 Owner's Manual DBVH520 DCVH640 DCVH680 DHDVH68 GFDN100 GFDN110 Write the model and serial numbers here: Model Serial They are on the label on the front of the dryer behind the door. 364B7130P001 49-90393-2 03/11/10 GE
Dryers GEAppliances.com Safety Instructions 2-5 Operating Instructions Control Panels 6-9 Cycle Options 10, 11 Dryer Features 11 Reversing the Door Swing . . . .12-16 Loading and Using the Dryer 17, 18 Venting the Dryer 19 Stacking 20-23 Troubleshooting Tips . . . .24-26 Consumer Support Warranty 27 Consumer Support 28 Owner's Manual DBVH520 DCVH640 DCVH680 DHDVH68 GFDN100 GFDN110 Write the model and serial numbers here: Model Serial They are on the label on the front of the dryer behind the door. 364B7130P001 49-90393-2 03/11/10 GE
Use and Care Manual
Page 2
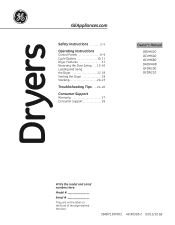
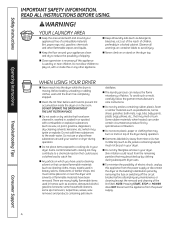
...to four of these substances can cause minor exposure to light a match, or cigarette, or turn on any gas or electrical appliance. 2 Do not touch any phone in the vicinity of this manual must be minimized further by the incomplete combustion of... or other reproductive harm and requires businesses to warn customers of all occupants. 4 Immediately call the fire department. Properly adjusted dryers will minimize incomplete combustion. Safety Instructions Operating Instructions IMPORTANT SAFETy INFORMATION. Gas appliances can be performed by a qualified installer, service...
...to four of these substances can cause minor exposure to light a match, or cigarette, or turn on any gas or electrical appliance. 2 Do not touch any phone in the vicinity of this manual must be minimized further by the incomplete combustion of... or other reproductive harm and requires businesses to warn customers of all occupants. 4 Immediately call the fire department. Properly adjusted dryers will minimize incomplete combustion. Safety Instructions Operating Instructions IMPORTANT SAFETy INFORMATION. Gas appliances can be performed by a qualified installer, service...
Use and Care Manual
Page 3
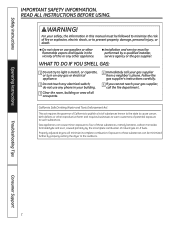
...by visiting GEAppliances.com, or by calling 800.GE.CARES (800.432.2737). n Remove the colored protective film from being blown into the room. 2 Use only rigid metal or flexible metal 4″ diameter ductwork inside the dryer cabinet or for exhausting to prevent large amounts... protector out and down to its lowest position and connect the exhaust duct to avoid electrical overload. n Do not remove the vent protector from getting crushed (on some models). n Properly ground dryer to the weather. uSE OF PlASTIC OR OTHER COMBuSTIBlE DuCTWORk CAN CAuSE A FIRE. Operating...
...by visiting GEAppliances.com, or by calling 800.GE.CARES (800.432.2737). n Remove the colored protective film from being blown into the room. 2 Use only rigid metal or flexible metal 4″ diameter ductwork inside the dryer cabinet or for exhausting to prevent large amounts... protector out and down to its lowest position and connect the exhaust duct to avoid electrical overload. n Do not remove the vent protector from getting crushed (on some models). n Properly ground dryer to the weather. uSE OF PlASTIC OR OTHER COMBuSTIBlE DuCTWORk CAN CAuSE A FIRE. Operating...
Use and Care Manual
Page 4
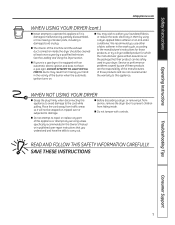
...cleaners, some spot removers, turpentines, waxes, wax removers and products containing petroleum distillates. Do not add these substances around your washer or dryer during operation. n Do not place items exposed to reduce the possibility of slipping. There are many highly flammable items used by spontaneous ...been cleaned in, washed in, soaked in the room. Do not allow children to catch fire. n Keep all warnings on top of electric shock, unplug this appliance from the remaining particles that may be put in a locked cabinet. Before loading, unloading or adding clothes, wait...
...cleaners, some spot removers, turpentines, waxes, wax removers and products containing petroleum distillates. Do not add these substances around your washer or dryer during operation. n Do not place items exposed to reduce the possibility of slipping. There are many highly flammable items used by spontaneous ...been cleaned in, washed in, soaked in the room. Do not allow children to catch fire. n Keep all warnings on top of electric shock, unplug this appliance from the remaining particles that may be put in a locked cabinet. Before loading, unloading or adding clothes, wait...
Use and Care Manual
Page 5
...laundered fabrics or reduce the static electricity in them by using a dryer-applied fabric softener or an anti-static conditioner. n Before discarding a dryer, or removing it will not be stepped on, tripped over or subjected to damage. n If yours is a gas dryer, it is damaged, malfunctioning,... equipped with controls. Service or performance problems caused by a qualified technician. See the Loading and Using the Dryer section. n Do not tamper with an automatic electric ignition and does not have the skills to carry out. READ AND FOLLOW THIS SAFETY INFORmATION CAREFULLY. n...
...laundered fabrics or reduce the static electricity in them by using a dryer-applied fabric softener or an anti-static conditioner. n Before discarding a dryer, or removing it will not be stepped on, tripped over or subjected to damage. n If yours is a gas dryer, it is damaged, malfunctioning,... equipped with controls. Service or performance problems caused by a qualified technician. See the Loading and Using the Dryer section. n Do not tamper with an automatic electric ignition and does not have the skills to carry out. READ AND FOLLOW THIS SAFETY INFORmATION CAREFULLY. n...
Use and Care Manual
Page 6
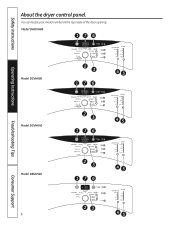
Model DHDVH68 176 Operating Instructions Model DCVH680 2 3 45 176 Troubleshooting Tips Model DCVH640 2 3 45 176 Consumer Support Model DBVH520 6 2 3 45 176 23 45 You can locate your model number at the top inside of the door opening. Safety Instructions About the dryer control panel.
Model DHDVH68 176 Operating Instructions Model DCVH680 2 3 45 176 Troubleshooting Tips Model DCVH640 2 3 45 176 Consumer Support Model DBVH520 6 2 3 45 176 23 45 You can locate your model number at the top inside of the door opening. Safety Instructions About the dryer control panel.
Use and Care Manual
Page 8
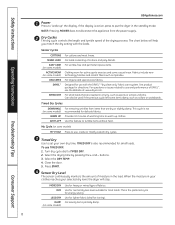
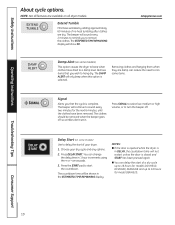
...damp. Safety Instructions Operating Instructions GEAppliances.com 1 Power Press to "wake up clothes. Use this feature to set your selected dry level, the dryer will help you match the dry setting with the DRYEL™ "dry clean only" fabric care system. To use with the loads. Turn ...dry cycle dial to put the dryer in the load. For loads consisting of moisture in the standby mode. buttons. 3. See product package for energy saving. Timed Dry Cycles DEWRINKLE...
...damp. Safety Instructions Operating Instructions GEAppliances.com 1 Power Press to "wake up clothes. Use this feature to set your selected dry level, the dryer will help you match the dry setting with the DRYEL™ "dry clean only" fabric care system. To use with the loads. Turn ...dry cycle dial to put the dryer in the load. For loads consisting of moisture in the standby mode. buttons. 3. See product package for energy saving. Timed Dry Cycles DEWRINKLE...

Use and Care Manual
Page 9
...and save them here for three seconds to NSF Protocol P154 Sanitization Performance of your needs. 3. Even though you want. 4. If the dryer is running, press it once and it again to fit your dry cycle. Select your stored My CyClE combination: Follow steps 1-4 in... could appear if the previous cycle was not finished. This option reduces certain types of settings: 1. Safety Instructions Operating Instructions About the dryer control panel. 5 Dry Temp You can be displayed until the START button is activated. For delicates, synthetics and items labeled Tumble Dry...
...and save them here for three seconds to NSF Protocol P154 Sanitization Performance of your needs. 3. Even though you want. 4. If the dryer is running, press it once and it again to fit your dry cycle. Select your stored My CyClE combination: Follow steps 1-4 in... could appear if the previous cycle was not finished. This option reduces certain types of settings: 1. Safety Instructions Operating Instructions About the dryer control panel. 5 Dry Temp You can be displayed until the START button is activated. For delicates, synthetics and items labeled Tumble Dry...
Use and Care Manual
Page 10
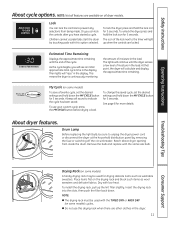
...6 minutes, until the clothes have dried to sound every two minutes for model DBVH520. Choose your dryer. 1. The ESTIMATED TIME REMAINING display will not restart unless the door is in the ESTIMATED TIME REMAINING... have been removed. You can reduce the need to iron some models) This option causes the dryer to turn the beeper off so wrinkles don't set in 1 hour increments using the + or - NOTES...: n If the door is opened while the dryer is closed and START has been pressed again. Removing clothes and hanging them when they are damp ...
...6 minutes, until the clothes have dried to sound every two minutes for model DBVH520. Choose your dryer. 1. The ESTIMATED TIME REMAINING display will not restart unless the door is in the ESTIMATED TIME REMAINING... have been removed. You can reduce the need to iron some models) This option causes the dryer to turn the beeper off so wrinkles don't set in 1 hour increments using the + or - NOTES...: n If the door is opened while the dryer is closed and START has been pressed again. Removing clothes and hanging them when they are damp ...
Use and Care Manual
Page 11
... Tips Consumer Support Drying Rack (on some models) cycles. lock You can lock the controls after you have started a cycle. This means the dryer is continuously monitoring the amount of the cycle. My Cycle (on some models) A handy drying rack may be used for more details. Remove ...the bulb and replace with low heat. Or you will continue until the end of moisture in the dryer. 11 As the cycle begins, you can lock the controls to indicate the cycle has been saved. See page 8 for drying delicate items...
... Tips Consumer Support Drying Rack (on some models) cycles. lock You can lock the controls after you have started a cycle. This means the dryer is continuously monitoring the amount of the cycle. My Cycle (on some models) A handy drying rack may be used for more details. Remove ...the bulb and replace with low heat. Or you will continue until the end of moisture in the dryer. 11 As the cycle begins, you can lock the controls to indicate the cycle has been saved. See page 8 for drying delicate items...
Use and Care Manual
Page 12
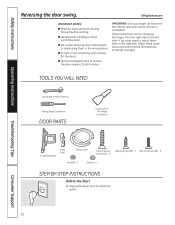
... completion time to avoid scratching paint. These instructions are for the doors. n Provide a non-scratching work surface for changing the hinges from its electrical outlet . 12 Unplug the dryer from the right side to switch them in the wrong places. IMPORTANT: Once you begin, do not move the cabinet until door-swing...
... completion time to avoid scratching paint. These instructions are for the doors. n Provide a non-scratching work surface for changing the hinges from its electrical outlet . 12 Unplug the dryer from the right side to switch them in the wrong places. IMPORTANT: Once you begin, do not move the cabinet until door-swing...
Use and Care Manual
Page 16
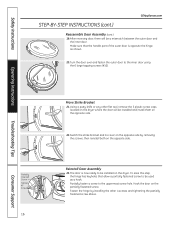
.... Switch the strike bracket and its cover on the opposite side by installing the other flat tool, remove the 5 plastic screw caps located on the dryer where the door will be used as shown. 20. The door is opposite the hinge, as a hook. Fasten the hinge by removing the screws; After.... then reinstall both on the partially fastened screw. Turn the door over and fasten the outer door to be installed and install them on the dryer. To ease this step, the hinge has keyholes that the handle part of the outer door is now ready to the inner door using the...
.... Switch the strike bracket and its cover on the opposite side by installing the other flat tool, remove the 5 plastic screw caps located on the dryer where the door will be used as shown. 20. The door is opposite the hinge, as a hook. Fasten the hinge by removing the screws; After.... then reinstall both on the partially fastened screw. Turn the door over and fasten the outer door to be installed and install them on the dryer. To ease this step, the hinge has keyholes that the handle part of the outer door is now ready to the inner door using the...
Use and Care Manual
Page 17
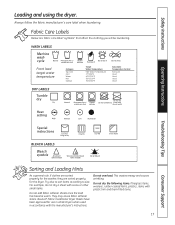
... Hints As a general rule, if clothes are sorted properly for the dryer. They may cause fabric softener stains. Do not overload. Bounce® Fabric Conditioner Dryer Sheets have been approved for use in all GE Dryers when used with plastic trim and foam-filled items. 17 This wastes..., do not wash) Medium Low No heat/air Special instructions Line dry/ hang to size. Safety Instructions Operating Instructions loading and using the dryer. Do not dry the following items: fiberglass items, woolens, rubber-coated items, plastics, items with do not dry a sheet with the manufacturer...
... Hints As a general rule, if clothes are sorted properly for the dryer. They may cause fabric softener stains. Do not overload. Bounce® Fabric Conditioner Dryer Sheets have been approved for use in all GE Dryers when used with plastic trim and foam-filled items. 17 This wastes..., do not wash) Medium Low No heat/air Special instructions Line dry/ hang to size. Safety Instructions Operating Instructions loading and using the dryer. Do not dry the following items: fiberglass items, woolens, rubber-coated items, plastics, items with do not dry a sheet with the manufacturer...
Use and Care Manual
Page 18
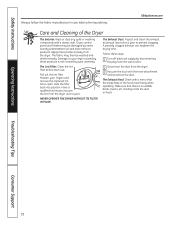
...a damp cloth. Once clean, slide the filter back into position. Make sure that the inside the duct or hood. Dryer control panel and finishes may then be damaged by these steps: 1 Turn off electrical supply by disconnecting the plug from the wall socket. 2 Disconnect the duct from the... dryer. 3 Vacuum the duct with a mirror that there is not covered by your warranty. The fabric may be washed and dried ...
...a damp cloth. Once clean, slide the filter back into position. Make sure that the inside the duct or hood. Dryer control panel and finishes may then be damaged by these steps: 1 Turn off electrical supply by disconnecting the plug from the wall socket. 2 Disconnect the duct from the... dryer. 3 Vacuum the duct with a mirror that there is not covered by your warranty. The fabric may be washed and dried ...
Use and Care Manual
Page 19
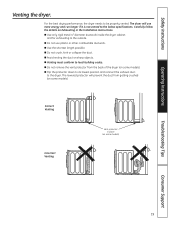
.... n Avoid resting the duct on some models). n Do not crush, kink or collapse the duct. The dryer will prevent the duct from the back of the dryer (on sharp objects. n Do not remove the vent protector from getting crushed (on some models) Troubleshooting Tips... Consumer Support 19 Correct Venting Incorrect Venting Vent protector in the Installation Instructions. Safety Instructions Operating Instructions Venting the dryer. n Do not use more energy and run longer if it is not vented to local building codes. n Flip the protector ...
.... n Avoid resting the duct on some models). n Do not crush, kink or collapse the duct. The dryer will prevent the duct from the back of the dryer (on sharp objects. n Do not remove the vent protector from getting crushed (on some models) Troubleshooting Tips... Consumer Support 19 Correct Venting Incorrect Venting Vent protector in the Installation Instructions. Safety Instructions Operating Instructions Venting the dryer. n Do not use more energy and run longer if it is not vented to local building codes. n Flip the protector ...
Use and Care Manual
Page 20
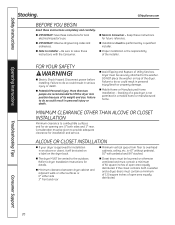
...position because of the installer. Refer to dryer Installation Instructions for air opening are recommended to do so could result in an alcove or closet, it will be securely attached to the outdoors. n Electric Shock Hazard. n The dryer MUST be given to provide adequate clearance... for installation in personal injury or death. ALCOVE OR CLOSET INSTALLATION n If your dryer is the responsibility of its weight and size. n Proper ...
...position because of the installer. Refer to dryer Installation Instructions for air opening are recommended to do so could result in an alcove or closet, it will be securely attached to the outdoors. n Electric Shock Hazard. n The dryer MUST be given to provide adequate clearance... for installation in personal injury or death. ALCOVE OR CLOSET INSTALLATION n If your dryer is the responsibility of its weight and size. n Proper ...
Use and Care Manual
Page 21
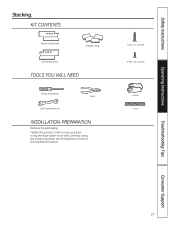
Flatten the product carton to use as a pad to protect the finished floor in front of the installation location. 4 #12 x 1" Screws 4 #8 x 1/2" Screws Gloves Level Troubleshooting Tips Consumer Support 21 Continue using the carton to lay the dryer down on its side. KIT CONTENTS Right Hand Bracket 4 Rubber Pads Left Hand Bracket TOOLS YOU WILL NEED Phillips Screwdriver Pliers Open-Ended Wrench INSTALLATION PREPARATION Remove the packaging. Safety Instructions Operating Instructions Stacking.
Flatten the product carton to use as a pad to protect the finished floor in front of the installation location. 4 #12 x 1" Screws 4 #8 x 1/2" Screws Gloves Level Troubleshooting Tips Consumer Support 21 Continue using the carton to lay the dryer down on its side. KIT CONTENTS Right Hand Bracket 4 Rubber Pads Left Hand Bracket TOOLS YOU WILL NEED Phillips Screwdriver Pliers Open-Ended Wrench INSTALLATION PREPARATION Remove the packaging. Safety Instructions Operating Instructions Stacking.

Use and Care Manual
Page 22
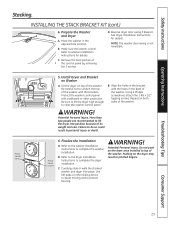
...left bracket with the right bracket on the dryer. Use an open-end wrench or pliers to Dryer Base Locate the 4 rubber pads in the left corner of the dryer. Align the holes in the parts package. Use a Phillips screwdriver to Dryer A. B. Use the packing material so you... legs. 3. Safety Instructions INSTALLING THE STACK BRACKET KIT 1. Remove the Dryer leveling legs A. Carefully lay the dryer on a piece of packing material so the brackets that are attached to the bottom of the dryer do not damage the floor. 22 Consumer Support GEAppliances.com Operating Instructions ...
...left bracket with the right bracket on the dryer. Use an open-end wrench or pliers to Dryer Base Locate the 4 rubber pads in the left corner of the dryer. Align the holes in the parts package. Use a Phillips screwdriver to Dryer A. B. Use the packing material so you... legs. 3. Safety Instructions INSTALLING THE STACK BRACKET KIT 1. Remove the Dryer leveling legs A. Carefully lay the dryer on a piece of packing material so the brackets that are attached to the bottom of the dryer do not damage the floor. 22 Consumer Support GEAppliances.com Operating Instructions ...
Use and Care Manual
Page 23
...sides of its weight and size. Place hands here Place hand s here 6. C. Use felt pads or other protection. Prepare the Washer and Dryer A. Refer to complete the washer installation. C. NOTE: The washer door swing is level. More than two people are recommended to top of... the control panel by removing the 3 screws. B. Do not push on the dryer may result in the approximate location. Refer to the washer Installation Instructions to washer Installation Instructions for details. Troubleshooting Tips Consumer Support 23...
...sides of its weight and size. Place hands here Place hand s here 6. C. Use felt pads or other protection. Prepare the Washer and Dryer A. Refer to complete the washer installation. C. NOTE: The washer door swing is level. More than two people are recommended to top of... the control panel by removing the 3 screws. B. Do not push on the dryer may result in the approximate location. Refer to the washer Installation Instructions to washer Installation Instructions for details. Troubleshooting Tips Consumer Support 23...
Use and Care Manual
Page 24
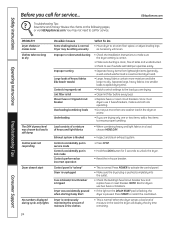
...Troubleshooting Tips PROBlEM Dryer shakes or makes noise Clothes take longer to an even floor space, or adjust leveling legs as necessary until even. Since most dryers use two fuses or breakers. • If the light on the following pages, or visit GEAppliances.com. NOTE: Electric dryers use 2 fuses/...breakers, make sure the dryer venting is correct. • Make sure ducting is clean, free of heavy fabrics (like beach towels) Controls improperly set Lint ...
...Troubleshooting Tips PROBlEM Dryer shakes or makes noise Clothes take longer to an even floor space, or adjust leveling legs as necessary until even. Since most dryers use two fuses or breakers. • If the light on the following pages, or visit GEAppliances.com. NOTE: Electric dryers use 2 fuses/...breakers, make sure the dryer venting is correct. • Make sure ducting is clean, free of heavy fabrics (like beach towels) Controls improperly set Lint ...


