GE DCVH680EJWW Support Question
GE DCVH680EJWW Support Question
Find answers below for this question about GE DCVH680EJWW - 7.0 cu.ft. Electric Dryer.Need a GE DCVH680EJWW manual? We have 3 online manuals for this item!
Question posted by Candie719 on April 17th, 2014
What G E Washer Is Compatible To Stack With My G E Dryer Model Number Dcvh680ejw
The person who posted this question about this GE product did not include a detailed explanation. Please use the "Request More Information" button to the right if more details would help you to answer this question.
Current Answers
Related GE DCVH680EJWW Manual Pages
Use and Care Manual - Page 1
... the Door Swing . . . .12-16 Loading and Using the Dryer 17, 18 Venting the Dryer 19 Stacking 20-23
Troubleshooting Tips . . . .24-26
Consumer Support
Warranty 27 Consumer Support 28
Owner's Manual
DBVH520 DCVH640 DCVH680 DHDVH68 GFDN100 GFDN110
Write the model and serial numbers here:
Model
Serial
They are on the label on the front of...
Use and Care Manual - Page 4
... the dryer at the building's distribution panel by clothing during operation.
n To minimize the possibility of electric shock,...
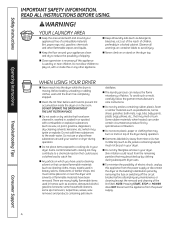
IMPORTANT SAFETy INFORMATION. YOUR LAUNDRY AREA
n Keep the area underneath and around your dryer.
Before loading, unloading or...n Any article on , with or inside the dryer or in your washer or dryer during operation.
Skin irritation could cause a clothes...
Use and Care Manual - Page 6
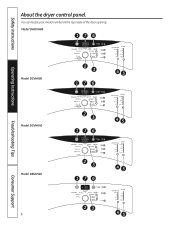
You can locate your model number at the top inside of the door opening. Safety Instructions
About the dryer control panel.
Model DHDVH68
176
Operating Instructions
Model DCVH680
2
3
45
176
Troubleshooting Tips
Model DCVH640
2
3
45
176
Consumer Support
Model DBVH520 6
2
3
45
176
23 45
Use and Care Manual - Page 10
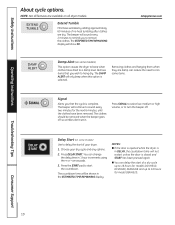
NOTE: Not all dryer models. EXTEND TUMBLE
Extend Tumble
Minimizes wrinkles by adding approximately 60 minutes of no-heat tumbling ... increments using the + or -
You can delay the start the countdown. NOTES:
n If the door is opened while the dryer is selected. The ESTIMATED TIME REMAINING display will continue to beep when clothes have been removed. Removing clothes and hanging them when...
Use and Care Manual - Page 11
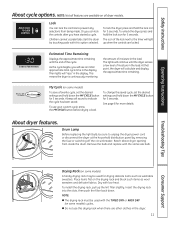
... slightly. To install the drying rack, pull up when the controls are available on some models) cycles. Children cannot accidentally start the dryer by removing the fuse or switching off the circuit breaker.
About dryer features.
This means the dryer is continuously monitoring
the amount of moisture in the load.
See page 8 for drying...
Use and Care Manual - Page 12
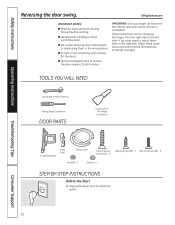
... Assembly
Hinge Cover
Plastic Cover
Large Tapping Screw (#10) - 6
Tapping Screw (#8) - 2 Machine Screw (#8) - 6
Nut (#8) - 2
Washer - 2
STEP-BY-STEP INSTRUCTIONS
Before you begin, do not move the cabinet until door-swing reversal is 30-60 minutes.
Unplug the dryer from the right side to the left and right.
n Handle parts carefully to reverse...
Use and Care Manual - Page 17
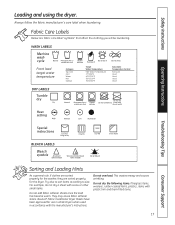
...cause fabric softener stains. Do not overload.
Bounce® Fabric Conditioner Dryer Sheets have been approved for the dryer. This wastes energy and causes wrinkling.
Try also to sort items ...Support
Sorting and Loading Hints
As a general rule, if clothes are sorted properly for the washer, they are fabric care label "symbols" that affect the clothing you will be laundering. ...
Use and Care Manual - Page 20
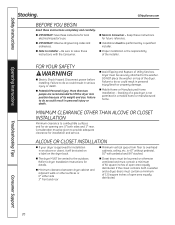
...area equally distributed. n Electric Shock Hazard. n Potential Personal Injury. More than two people are : 0″ both a washer and a dryer, doors must be ...dryer is the responsibility of the dryer. n IMPORTANT: Observe all governing codes and ordinances. Keep these instructions with pedestal and 84″ stacked.
n The dryer MUST be securely attached to lift the dryer...
Use and Care Manual - Page 21
Safety Instructions
Operating Instructions
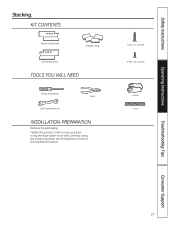
Stacking. Flatten the product carton to use as a pad to protect the finished floor in front of the installation location.
4 #12 x 1" Screws 4 #8 x 1/2" Screws
Gloves...
TOOLS YOU WILL NEED
Phillips Screwdriver
Pliers
Open-Ended Wrench
INSTALLATION PREPARATION
Remove the packaging. Continue using the carton to lay the dryer down on its side.
Use and Care Manual - Page 22

...dryer do not damage the floor.
22
Consumer Support Install Bracket to remove the dryer leveling legs.
Remove the Dryer leveling legs
A. Use an open-end wrench or pliers to Dryer... Make sure to set the dryer on the dryer.
Install Rubber Pads to Dryer Base
Locate the 4 rubber ... dryer.
B. B. Set the dryer upright.
Carefully lay the dryer on the bottom right corner of the dryer....
Use and Care Manual - Page 23
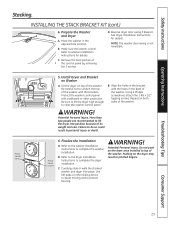
... death. Potential Personal Injury. Use felt pads or other protection. Potential Personal Injury.
Protect the washer control panel with the brackets. Place hands here
Place hand s here
6.
D. Carefully slide or walk the stacked washer and dryer into position because of the washer with cardboard or other sliding device to assist moving and to complete the...
Use and Care Manual - Page 24
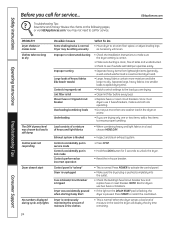
...or visit GEAppliances.com. NOTE: Electric dryers use 2 fuses/breakers, make sure the dryer venting is correct.
• ...Dryer is unplugged
Fuse is blown/circuit breaker is tripped
Dryer was chosen but load is still damp Control pads not responding
Dryer doesn't start
No numbers...from lightweight items (generally, a well-sorted washer load is a well-sorted dryer load).
• Large, heavy fabrics ...
Use and Care Manual - Page 27
... defective part.
Some states do not allow the exclusion or limitation of the dryer which vary from state to use within the USA. This warranty gives you ...teach you may be responsible for a trip charge or you may also have serial number and model number available when calling for home use the product. All warranty service provided by possible...Warrantor: General Electric Company.
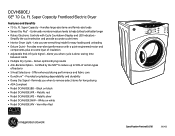
Quick Specs - Page 1
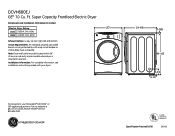
Ft. Super Capacity Frontload Electric Dryer
Dimensions and Installation Information (in position.
DCVH680EJ
GE® 7.0 Cu.
Listed by a 30-amp circuit breaker or a time-delay fuse, is mounted in inches)
Electric Dryer Rating
27
240V 5600W, 24A, 60Hz
208V 4400W, 22A, 60Hz
Exhaust Options: 4-way via rear, right, left and bottom. Note: Dryer wall outlet must be located...
Quick Specs - Page 2
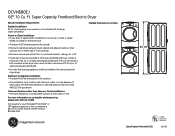
...from floor to your dryer is approved for stacking dryer over washer is 52".
•...Ft. Order GEFLSTACK. Super Capacity Frontload Electric Dryer
Special Installation Requirements:
Stacked Installation: Kit for installation in an alcove or closet, it will be
stated on a label on venting kits and accessories, please call GE Answer Center® service, 800.626.2000. DCVH680EJ
GE® 7.0 Cu...
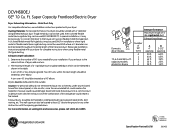
Quick Specs - Page 3
... 10/10
Listed by Underwriters Laboratories
360455 ft. Determine the number of lint and grease could cause damage. Never terminate the exhaust into an attic, since the combination of 90° turns needed for complete instructions when using a flexible metal (foil-type) duct. Super Capacity Frontload Electric Dryer
Dryer Exhausting Information - Metal Duct Only
For...
Quick Specs - Page 4
...Of-Cycle Signal - Metallic silver • Model DCVH680EJWW - Vermillion Red
DCVH680J
Specification Revised 10/...Model DCVH680EJBB - Lets you when cycle is done, saving time
between loads • Multiple Dry Cycles - Metallic red • Model DCVH680EJMS - DCVH680EJ
GE® 7.0 Cu. Super Capacity Frontload Electric Dryer
Features and Benefits • 7.0 Cu. Super Capacity - Ft...
Installation Instructions - Page 2
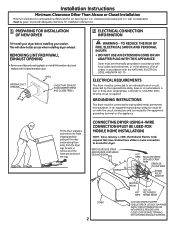
... breaking them away from the dryer legs. REMOVE GROUND STRAP AND DISCARD. Installation Instructions
Minimum Clearance Other Than Alcove or Closet Installation
Minimum clearance to combustible surfaces and for installation and service.
1 PREPARING FOR INSTALLATION OF NEW DRYER
2 ELECTRICAL CONNECTION INFORMATION
TIP: Install your dryer before installing your washer. clearance both sides and...
Installation Instructions - Page 5

... or, in . Secure the duct with the NATIONAL ELECTRICAL CODE, ANSI/NFPA NO. 70.
See EXHAUST INFORMATION section 3 & 4.
• The installation must contain a minimum of flexible metal duct should not exceed 8 feet (2.4m).
• For many applications, installing elbows at both a washer and a dryer, doors must conform with the "Outline for maximum airflow...
Installation Instructions - Page 7

... shown on Installation, Call: 1-800-626-2003 (US) or
1-800-361-3400 (Canada).
500A436P009
Pub # 31-16228
7
Large Tapping Screw (#10) ... 6
Nut (#8) - 2
Washer - 2
Tapping Screw (#8) ... 2
Machine Screw (#8) ... 6 Place dryer in
the wrong places. • Provide a non-scratching work surface for changing the hinges from your local service provider.
www.GEAppliances.com (US...
Similar Questions

What Washer Is Compatible To Stack With This Dryer? Dsxh47egww
(Posted by kitchendesigner4162 11 years ago)

Drum Won't Turn. Dryer Turns On, Can Set Dying Cycle But Machine Justs 'hums'.
(Posted by scomacdebmac 11 years ago)

How Do I Replace The Dryer Belt On My Ge Dryer Model Number Dwsr483eb2ww
(Posted by paceckafecker 11 years ago)

Stacking Kit For Ge Wcvhg800jww / Dcvh680ejww
Washer And Dryer
Model number for a stacking kit. Geflstack?
Model number for a stacking kit. Geflstack?
(Posted by Pengler 12 years ago)

Dryer Recalls Any Info Sh 777-378a-ge Model Algeepvxr-363-3bw
(Posted by edkent 13 years ago)