GE DCVH680EJWW Support Question
GE DCVH680EJWW Support Question
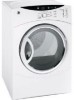
Find answers below for this question about GE DCVH680EJWW - 7.0 cu.ft. Electric Dryer.Need a GE DCVH680EJWW manual? We have 3 online manuals for this item!
Question posted by scomacdebmac on February 22nd, 2013
Drum Won't Turn. Dryer Turns On, Can Set Dying Cycle But Machine Justs 'hums'.
The person who posted this question about this GE product did not include a detailed explanation. Please use the "Request More Information" button to the right if more details would help you to answer this question.
Current Answers
Related GE DCVH680EJWW Manual Pages
Use and Care Manual - Page 2
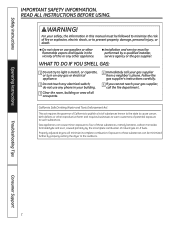
...must be minimized further by properly venting the dryer to prevent property damage, personal injury, or death.
Properly adjusted dryers will minimize incomplete combustion.
Safety Instructions
Operating Instructions...potential exposure to light a match, or cigarette, or turn on any gas or electrical
appliance.
2 Do not touch any electrical switch;
n Do not store or use any phone ...
Use and Care Manual - Page 4
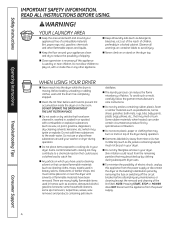
... each load to the wash water.
Observe all laundry aids (such as detergents, bleaches, etc.) out of the reach of electric shock, unplug this appliance from Heat or Do Not...combustion. Do not add these substances around your dryer. n The laundry process can under certain circumstances produce fire by or near the dryer until the drum has completely stopped.
n To minimize the ...
Use and Care Manual - Page 5
... a pilot light. Place the cord away from hiding inside the dryer should be safely used in the wash cycle, according to the cord while pulling.
Service or performance problems caused... using a dryer-applied fabric softener or an anti-static conditioner.
n You may result from having your laundered fabrics or reduce the static electricity in the vicinity of the machine and the ...
Use and Care Manual - Page 8
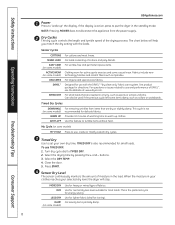
... also be used if the previous cycle left some models)
DELICATES DRYEL™
SPEED DRY
For cottons and most loads. Turn dry cycle dial to put the dryer in your clothes reaches your own...Designed for ironing).
This cycle is active, press to TIMED DRy. 2.
Use this feature to set your selected dry level, the dryer will help you match the dry setting with the DRYEL™ ...
Use and Care Manual - Page 10
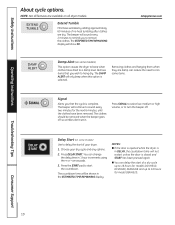
...TIME REMAINING display will sound every 2 minutes to remind you wish to turn the beeper off so wrinkles don't set in 1 hour increments using the + or -
Press SIGNAl to select... door is opened while the dryer is closed and START has been pressed again.
Troubleshooting Tips
Consumer Support
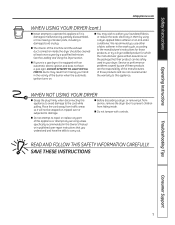
10 Safety Instructions
Operating Instructions
About cycle options. GEAppliances.com
DAMP ALERT...
Use and Care Manual - Page 11
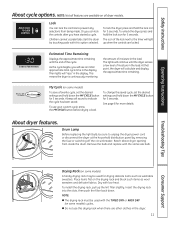
... desired settings and hold down the My CyClE button for 3 seconds.
This means the dryer is continuously monitoring
the amount of the cycle. The lights will calculate and display the approximate time remaining. At that point, the dryer will continue until the end of moisture in the display. To use this option selected. Drum lamp
Before...
Use and Care Manual - Page 12
... Cover
Plastic Cover
Large Tapping Screw (#10) - 6
Tapping Screw (#8) - 2 Machine Screw (#8) - 6
Nut (#8) - 2
Washer - 2
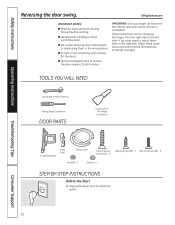
STEP-BY-STEP INSTRUCTIONS
Before... door-swing reversal is 30-60 minutes. Unplug the dryer from the right side to switch them in the wrong...same instructions and reverse all the way through before starting. n Set screws down by their related parts to avoid using them back...
Use and Care Manual - Page 13
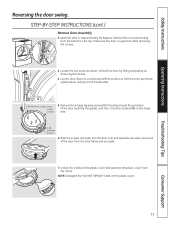
... the "DO NOT REMOVE" label on the handle side).
2 #8 Machine Screws 6 #10 Large Screws
5.
Remove the 6 large tapping screws ...plastic cover. Unlock the 4 tabs on the hinge side.
2 #8 Machine Screws
6.
Remove the four screws
3. STEP-BY-STEP INSTRUCTIONS (cont.)... removed, turn the door over and separate the silver cover part of the door outlining the gasket, and the 2 machine screws ...
Use and Care Manual - Page 16
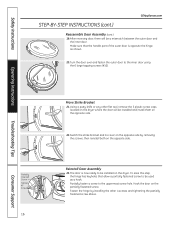
... opposite side by installing the other flat tool, remove the 5 plastic screw caps located on the dryer where the door will be installed and install them on the dryer. Fasten the hinge by removing the screws;
Turn the door over and fasten the outer door to the uppermost screw hole. The door is...
Use and Care Manual - Page 18
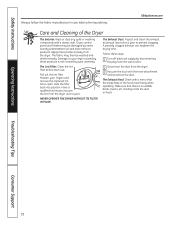
...the lint filter.
Follow these steps:
1
Turn off electrical supply by disconnecting the plug from the wall socket.
2 Disconnect the duct from the dryer.
3
Vacuum the duct with a mirror... your dryer caused by some laundry pretreatment soil and stain remover products.
Once clean, slide the filter back into position. Have a qualified technician vacuum the lint from the dryer. Make...
Use and Care Manual - Page 22

... left bracket with the right bracket on the bottom right corner of the dryer.
Use an open-end wrench or pliers to Dryer
A. Install Bracket to remove the dryer leveling legs. B. Set the dryer upright. Install Rubber Pads to the bottom of the dryer do not damage the floor.
22
Consumer Support NOTE: Make sure to...
Use and Care Manual - Page 25
...dryer after a short time
The door was opened mid-cycle. • A dry cycle must be different.
• The load size, types of fabric, wetness of clothes and the length and condition of the drum... dry cycle
• This is not displayed. Select a lESS DRy or DAMP setting.
• Remove items when cycle ends and... then removed from an electric to a gas (natural or LP) dryer, or vice versa, ...
Quick Specs - Page 1
...30-amp circuit breaker or a time-delay fuse, is mounted in inches)
Electric Dryer Rating
27
240V 5600W, 24A, 60Hz
208V 4400W, 22A, 60Hz
Exhaust ...® service, 800.626.2000. DCVH680EJ
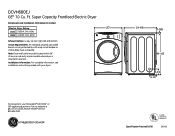
GE® 7.0 Cu. Super Capacity Frontload Electric Dryer
Dimensions and Installation Information (in position.
Ft. Note: Dryer wall outlet must be located within 36" of service cord entry and...
Quick Specs - Page 2
...dryer MUST be
stated on a label on venting kits and accessories, please call GE Answer Center® service, 800.626.2000. Stacked Dimensions (in .
If this closet contains both sides, 3" rear.
DCVH680EJ
GE® 7.0 Cu... dryer is approved for gas dryers. Bathroom or Bedroom Installation: • The dryer MUST be installed in . Ft. is not included with the National Electric Code...
Quick Specs - Page 3
...Duct Only
For complete information, see installation instruction packed with 4" diameter all electric dryers
Number of 90°
turns
0 1 2 3 4
A 4" opening
60 ft. 45 ft. 35 ft. 25 ft. 15 ft.
rigid metal duct
Exhaust hood type
B
Domestic 2-1/2 dryer models
7.0, 6.0 and 5.8 cu. Specification Revised 10/10
Listed by Underwriters Laboratories
360455 A A
4
Best performance
Maximum...
Quick Specs - Page 4
... motor and
components, plus an extra layer of bacteria • 5 Heat Selections - Super Capacity Frontload Electric Dryer
Features and Benefits • 7.0 Cu. Lets you when cycle is done, saving time
between loads • Multiple Dry Cycles - Metallic silver • Model DCVH680EJWW - Deliver optimal drying results • Anti-Bacteria Option - White on black • Model...
Installation Instructions - Page 3
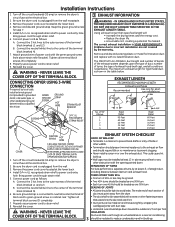
... (marked N).
6. EXHAUST LENGTH
RECOMMENDED MAXIMUM LENGTH
Exhaust Hood Types
Recommended
Use only for step 7. 5. Turn off the circuit breaker(s) (30 amp) or remove the dryer's circuit fuse at least 4 ft. Remove the power cord cover located at the electrical box.
2. Connect the neutral (white) line to incorrect installation are not covered by the warranty...
Installation Instructions - Page 4
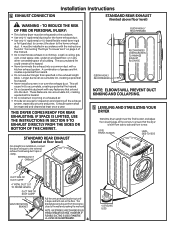
.... • Never install a screen in the exhaust length table. STANDARD REAR EXHAUST
(Vented at turns and joints. The bracket prevents the unit from side to side and front to rear. This will... RECOMMENDED
NOTE: ELBOWS WILL PREVENT DUCT KINKING AND COLLAPSING.
5 LEVELING AND STABILIZING YOUR DRYER
Stand the dryer upright near the final location and adjust the 4 leveling legs, at least once a...
Installation Instructions - Page 8
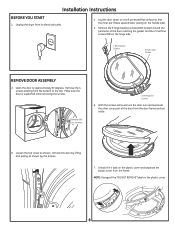
...the screws. With the screws removed, turn the door over and separate the silver cover part of the door outlining the gasket and the 2 machine screws (#8) on the plastic cover and ...top screw as shown by the arrows.
7. Unplug the dryer from the door frame and set aside.
3. Unlock the 4 tabs on the hinge side.
2 #8 Machine Screws
6 #10 Large Screws
REMOVE DOOR ASSEMBLY
2. Installation ...
Installation Instructions - Page 11

... the hinge has keyholes that allow a partially fastened screw to be installed and install them on the dryer. Partially fasten a screw to the inner door using the 6 large tapping screws (#10).
LABEL ALL...flat tool, remove the 5 plastic screw caps located on the dryer where the door will be installed on the opposite side.
22. Turn the door over and fasten the outer door to the uppermost ...
Similar Questions

Dryer Keeps Cutting Off Mid Cycle While Drying Clothes
(Posted by Mccoyurundi 1 year ago)
Do I Have To Run A Water Line?
Can I use without a water line?
Can I use without a water line?
(Posted by christalseabrook 2 years ago)

What G E Washer Is Compatible To Stack With My G E Dryer Model Number Dcvh680ejw
(Posted by Candie719 10 years ago)
Stacking Kit For Ge Wcvhg800jww / Dcvh680ejww
Washer And Dryer
Model number for a stacking kit. Geflstack?
Model number for a stacking kit. Geflstack?
(Posted by Pengler 12 years ago)

Dryer Recalls Any Info Sh 777-378a-ge Model Algeepvxr-363-3bw
(Posted by edkent 13 years ago)