Installation Instructions
Page 7
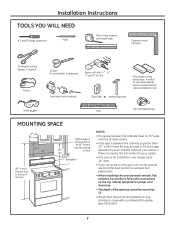
Backsplash 66″ or more from the cooking 30″ surface min. Your Owner's Manual contains the kit number for your oven to the outside, see Hood Exhaust Section for exhaust duct preparation. • When installing the oven beneath smooth, ...
Backsplash 66″ or more from the cooking 30″ surface min. Your Owner's Manual contains the kit number for your oven to the outside, see Hood Exhaust Section for exhaust duct preparation. • When installing the oven beneath smooth, ...

Installation Instructions
Page 11
... Exhaust (Vertical Duct) B. Recirculating (Non-Vented Ductless) NOTE: This oven is designed for the kit number.) Select the type of ventilation required for your Owner's Manual for adaptation to that section.
... Exhaust (Vertical Duct) B. Recirculating (Non-Vented Ductless) NOTE: This oven is designed for the kit number.) Select the type of ventilation required for your Owner's Manual for adaptation to that section.
Installation Instructions
Page 14
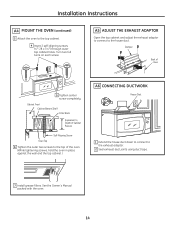
... Screw Oven Top 6 Tighten the outer two screws to the exhaust adaptor. 2 Seal exhaust duct joints using duct tape. 7 Install grease filters. See the Owner's Manual packed with the oven. 14 Damper Back of the oven. (While tightening screws, hold the oven in place against the wall and the top cabinet...
... Screw Oven Top 6 Tighten the outer two screws to the exhaust adaptor. 2 Seal exhaust duct joints using duct tape. 7 Install grease filters. See the Owner's Manual packed with the oven. 14 Damper Back of the oven. (While tightening screws, hold the oven in place against the wall and the top cabinet...
Installation Instructions
Page 18
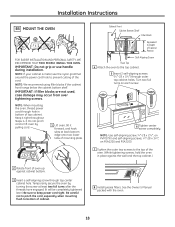
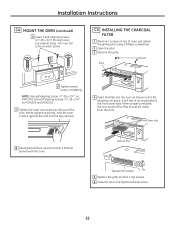
... outer two screws to the top of the oven. (While tightening screws, hold the oven in bottom of cabinet. 8 Install grease filters. See the Owner's Manual packed with the oven. 18 IMPORTANT: If filler blocks are not used, case damage may occur from over tightening screws. NOTE: If your cabinet is...
... outer two screws to the top of the oven. (While tightening screws, hold the oven in bottom of cabinet. 8 Install grease filters. See the Owner's Manual packed with the oven. 18 IMPORTANT: If filler blocks are not used, case damage may occur from over tightening screws. NOTE: If your cabinet is...
Installation Instructions
Page 22
... grille panel, using a Phillips screwdriver. 2 Open the door. 3 Remove the grille. It will rest at an angle behind the front lower tabs. See the Owner's Manual packed with the oven. Screws Grille 6 Tighten center screw completely. When properly installed, the wire mesh of the oven. (While tightening screws, hold the oven...
... grille panel, using a Phillips screwdriver. 2 Open the door. 3 Remove the grille. It will rest at an angle behind the front lower tabs. See the Owner's Manual packed with the oven. Screws Grille 6 Tighten center screw completely. When properly installed, the wire mesh of the oven. (While tightening screws, hold the oven...

Installation Instructions
Page 23
Ensure proper ground exists before use . 6 Read the Owner's Manual. 5 120 V and 1790 Models: Plug power cord into a dedicated 15- Ensure proper ground exists before use . Where a standard two-prong wall receptacle is encountered, it ...
Ensure proper ground exists before use . 6 Read the Owner's Manual. 5 120 V and 1790 Models: Plug power cord into a dedicated 15- Ensure proper ground exists before use . Where a standard two-prong wall receptacle is encountered, it ...
Use and Care Manual
Page 1
GE Profile™ and Cafe™ Advantium® Oven GEAppliances.com Advantium Cooking controls 12 Getting to know the Advantium.........10 Oven features 11 ... 29 Repeat last 28 Resume feature 29 Surface Light 32 Temperature Units 30 Timer 31 Turntable On/Off 30 Vent Fan 32 Owner's Manual PSA1200 PSA1201 CSA1201 Care and Cleaning Cleaning the inside 32 Cleaning the outside 34 Cooking trays and wire oven rack 33 Removable turntable 33... Write the model and serial numbers here: Model Serial Find these numbers on a label inside the oven. MFL38211612 49-40624 03-10 GE
GE Profile™ and Cafe™ Advantium® Oven GEAppliances.com Advantium Cooking controls 12 Getting to know the Advantium.........10 Oven features 11 ... 29 Repeat last 28 Resume feature 29 Surface Light 32 Temperature Units 30 Timer 31 Turntable On/Off 30 Vent Fan 32 Owner's Manual PSA1200 PSA1201 CSA1201 Care and Cleaning Cleaning the inside 32 Cleaning the outside 34 Cooking trays and wire oven rack 33 Removable turntable 33... Write the model and serial numbers here: Model Serial Find these numbers on a label inside the oven. MFL38211612 49-40624 03-10 GE

Use and Care Manual
Page 3
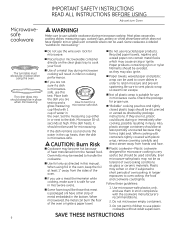
...this appliance only for speedcook or microwave cooking to prevent arcing. n Oversized foods or oversized metal utensils should not be heated in this manual. Contact nearest authorized service facility for marine use corrosive chemicals or vapors in this appliance over a sink. n Some products such as whole...as they may spread. n See door surface cleaning instructions in the Care and Cleaning of the Oven section of electric shock. n Use this manual. This will cause overheating of the oven could result in injury. n The wire oven rack should not be used for its intended use ...
...this appliance only for speedcook or microwave cooking to prevent arcing. n Oversized foods or oversized metal utensils should not be heated in this manual. Contact nearest authorized service facility for marine use corrosive chemicals or vapors in this appliance over a sink. n Some products such as whole...as they may spread. n See door surface cleaning instructions in the Care and Cleaning of the Oven section of electric shock. n Use this manual. This will cause overheating of the oven could result in injury. n The wire oven rack should not be used for its intended use ...

Use and Care Manual
Page 4
....gov. n Keep power cord away from grease buildup. n Do not immerse power cord or plug in the oven. n During and after use a thermometer in this manual. n Keep the oven free from heated surfaces. n Per USDA, cook meat to an INTERNAL temperature of at least 180°F. Cooking to be unrestricted so...
....gov. n Keep power cord away from grease buildup. n Do not immerse power cord or plug in the oven. n During and after use a thermometer in this manual. n Keep the oven free from heated surfaces. n Per USDA, cook meat to an INTERNAL temperature of at least 180°F. Cooking to be unrestricted so...
Use and Care Manual
Page 6
... filled with the cookware manufacturer's recommendations. 2. Some cookware is suitable for proper use recycled paper products. n Do not use . Check the package for use this manual. n Use foil only as they form a tight seal. SAVE THESE INSTRUCTIONS 6 The clear glass tray should be in place when using foil in or next...
... filled with the cookware manufacturer's recommendations. 2. Some cookware is suitable for proper use recycled paper products. n Do not use . Check the package for use this manual. n Use foil only as they form a tight seal. SAVE THESE INSTRUCTIONS 6 The clear glass tray should be in place when using foil in or next...
Use and Care Manual
Page 11
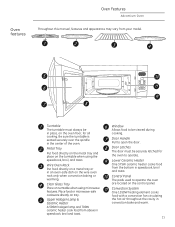
... seated securely over the spindle in speedcook, broil and toast. Window Allows food to open the door. Oven features Oven Features Advantium Oven Throughout this manual, features and appearance may vary from the bottom in the center of the oven. Lower Ceramic Heater One 375W ceramic heater cooks food from your...
... seated securely over the spindle in speedcook, broil and toast. Window Allows food to open the door. Oven features Oven Features Advantium Oven Throughout this manual, features and appearance may vary from the bottom in the center of the oven. Lower Ceramic Heater One 375W ceramic heater cooks food from your...

Use and Care Manual
Page 40
... it on -line today, 24 hours every day, or by phone at 800.626.2002 during normal business hours. Extended Warranties GEAppliances.com Purchase a GE extended warranty and learn about special discounts that can have parts or accessories sent directly to their own appliances can be used by any user.... Contact Us GEAppliances.com If you receive from your door. You may cause unsafe operation. Printed in this manual cover procedures to design for enhanced communication and prompt service under the terms of the year! You can now download Owner...
... it on -line today, 24 hours every day, or by phone at 800.626.2002 during normal business hours. Extended Warranties GEAppliances.com Purchase a GE extended warranty and learn about special discounts that can have parts or accessories sent directly to their own appliances can be used by any user.... Contact Us GEAppliances.com If you receive from your door. You may cause unsafe operation. Printed in this manual cover procedures to design for enhanced communication and prompt service under the terms of the year! You can now download Owner...


