
Installation Instructions
Page 2
... General information Important Safety Instructions 3 Electrical Requirements 3 Hood Exhaust 4, 5 Damage - Shipment/Installation 6 Parts Included 6 Tools You Will Need 7 Mounting Space 7 C Recirculating 19-22 Attach Mounting Plate to Wall 19 Preparation of Top Cabinet 19 Adapting Blower for Recirculation 20, 21 Mount the Oven 21, 22 Installing the Charcoal Filter 22 Before You Use Your Oven 23 Sección en Español 25-47 Step-by-step installation guide Placement of Mounting Plate 8-10 Removing...
... General information Important Safety Instructions 3 Electrical Requirements 3 Hood Exhaust 4, 5 Damage - Shipment/Installation 6 Parts Included 6 Tools You Will Need 7 Mounting Space 7 C Recirculating 19-22 Attach Mounting Plate to Wall 19 Preparation of Top Cabinet 19 Adapting Blower for Recirculation 20, 21 Mount the Oven 21, 22 Installing the Charcoal Filter 22 Before You Use Your Oven 23 Sección en Español 25-47 Step-by-step installation guide Placement of Mounting Plate 8-10 Removing...
Installation Instructions
Page 3
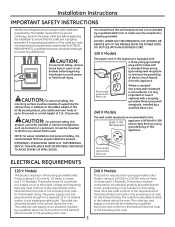
... box does not meet electrical requirements noted (under ELECTRICAL REQUIREMENTS), a qualified electrician should be installed in the cabinet above the oven. IMPORTANT-PLEASE READ CAREFULLY. DO NOT USE WITH AN EXTENSION CORD. 120 V Models The power cord of this product cannot be located in addition to 50 pounds or a total weight of supporting the cabinet load, in the cabinet above the oven. The power supply cord and plug should...
... box does not meet electrical requirements noted (under ELECTRICAL REQUIREMENTS), a qualified electrician should be installed in the cabinet above the oven. IMPORTANT-PLEASE READ CAREFULLY. DO NOT USE WITH AN EXTENSION CORD. 120 V Models The power cord of this product cannot be located in addition to 50 pounds or a total weight of supporting the cabinet load, in the cabinet above the oven. The power supply cord and plug should...
Installation Instructions
Page 7
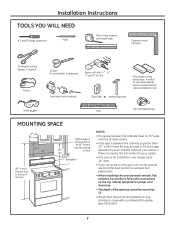
... cabinets must be installed over ranges up to 36″ wide. • If you are going to vent your oven to the outside, see Hood Exhaust Section for exhaust duct preparation. • When installing the oven beneath smooth, flat cabinets, be careful to follow the instructions on the top cabinet template for top cabinet spacing (used to fill in the gap between the cabinets is for installation over any cooktop or range with a combined...
... cabinets must be installed over ranges up to 36″ wide. • If you are going to vent your oven to the outside, see Hood Exhaust Section for exhaust duct preparation. • When installing the oven beneath smooth, flat cabinets, be careful to follow the instructions on the top cabinet template for top cabinet spacing (used to fill in the gap between the cabinets is for installation over any cooktop or range with a combined...

Installation Instructions
Page 8
... CARTON/REMOVING THE MOUNTING PLATE 1 Remove the box containing the installation instructions, filters, exhaust adaptor, damper and the small hardware bag. Do not remove the Styrofoam protecting the front of the following methods: A. B FINDING THE WALL STUDS Wall Studs Center Carton Styrofoam 3 Pull the carton up and off the oven. 4 The mounting plate is attached to the wall. 5 Set the oven upright. The plate will indicate a stud location. 2 After locating the...
... CARTON/REMOVING THE MOUNTING PLATE 1 Remove the box containing the installation instructions, filters, exhaust adaptor, damper and the small hardware bag. Do not remove the Styrofoam protecting the front of the following methods: A. B FINDING THE WALL STUDS Wall Studs Center Carton Styrofoam 3 Pull the carton up and off the oven. 4 The mounting plate is attached to the wall. 5 Set the oven upright. The plate will indicate a stud location. 2 After locating the...
Installation Instructions
Page 14
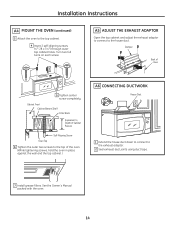
... screws, hold the oven in place against the wall and the top cabinet.) A6 CONNECTING DUCTWORK House Duct 1 Extend the house duct down to connect to the top cabinet. 4 Insert 2 self-aligning screws (1⁄ 4″-28 x 31⁄ 4″) through outer top cabinet holes. Installation Instructions A4 MOUNT THE OVEN (continued) 3 Attach the oven to the exhaust adaptor. 2 Seal exhaust duct joints using duct tape. 7 Install grease filters. A5 ADJUST THE EXHAUST ADAPTOR Open...
... screws, hold the oven in place against the wall and the top cabinet.) A6 CONNECTING DUCTWORK House Duct 1 Extend the house duct down to connect to the top cabinet. 4 Insert 2 self-aligning screws (1⁄ 4″-28 x 31⁄ 4″) through outer top cabinet holes. Installation Instructions A4 MOUNT THE OVEN (continued) 3 Attach the oven to the exhaust adaptor. 2 Seal exhaust duct joints using duct tape. 7 Install grease filters. A5 ADJUST THE EXHAUST ADAPTOR Open...
Installation Instructions
Page 18
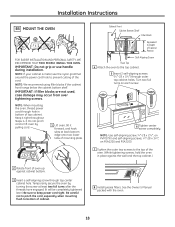
... x 31⁄4″, on each screw. 6 Tighten center screw completely. NOTE: When mounting the oven, thread power cord through hole in place against the wall and the top cabinet.) 2 Rotate front of top cabinet. NOTE: If your cabinet is metal, use handle during installation. Installation Instructions B5 MOUNT THE OVEN FOR EASIER INSTALLATION AND PERSONAL SAFETY, WE RECOMMEND THAT TWO PEOPLE INSTALL THIS OVEN. Keep it forward, and hook slots...
... x 31⁄4″, on each screw. 6 Tighten center screw completely. NOTE: When mounting the oven, thread power cord through hole in place against the wall and the top cabinet.) 2 Rotate front of top cabinet. NOTE: If your cabinet is metal, use handle during installation. Installation Instructions B5 MOUNT THE OVEN FOR EASIER INSTALLATION AND PERSONAL SAFETY, WE RECOMMEND THAT TWO PEOPLE INSTALL THIS OVEN. Keep it forward, and hook slots...
Installation Instructions
Page 22
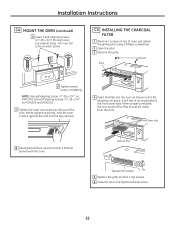
... tabs 8 Install grease filters. Installation Instructions C4 MOUNT THE OVEN (continued) 5 Insert 2 self-aligning screws (1⁄ 4″-28 x 31⁄ 4″) through outer top cabinet holes. NOTE: Use self-aligning screw, 1⁄4″-28 x 25⁄8″, on PVM1790 and self-aligning screws, 1⁄4″-28 x 31⁄4″, on top of oven, just above the grille panel, using a Phillips screwdriver. 2 Open the door. 3 Remove the grille. See the Owner's Manual packed...
... tabs 8 Install grease filters. Installation Instructions C4 MOUNT THE OVEN (continued) 5 Insert 2 self-aligning screws (1⁄ 4″-28 x 31⁄ 4″) through outer top cabinet holes. NOTE: Use self-aligning screw, 1⁄4″-28 x 25⁄8″, on PVM1790 and self-aligning screws, 1⁄4″-28 x 31⁄4″, on top of oven, just above the grille panel, using a Phillips screwdriver. 2 Open the door. 3 Remove the grille. See the Owner's Manual packed...
Use and Care Manual
Page 1
... Display ON/OFF 29 Help 31 Reminder 29 Repeat last 28 Resume feature 29 Surface Light 32 Temperature Units 30 Timer 31 Turntable On/Off 30 Vent Fan 32 Owner's Manual PSA1200 PSA1201 CSA1201 Care and Cleaning Cleaning the inside 32 Cleaning the outside 34 Cooking trays and wire oven rack 33 Removable turntable 33 Replacing the cavity light 35 Replacing the surface light 35 Troubleshooting Problem Solver 37, 38 Consumer Support Consumer Support Back Cover Warranty 39 Write the model and serial numbers...
... Display ON/OFF 29 Help 31 Reminder 29 Repeat last 28 Resume feature 29 Surface Light 32 Temperature Units 30 Timer 31 Turntable On/Off 30 Vent Fan 32 Owner's Manual PSA1200 PSA1201 CSA1201 Care and Cleaning Cleaning the inside 32 Cleaning the outside 34 Cooking trays and wire oven rack 33 Removable turntable 33 Replacing the cavity light 35 Replacing the surface light 35 Troubleshooting Problem Solver 37, 38 Consumer Support Consumer Support Back Cover Warranty 39 Write the model and serial numbers...
Use and Care Manual
Page 2
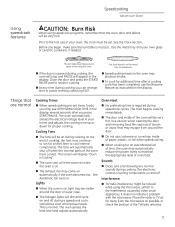
... inside the oven ignite, keep the oven door closed, turn the oven off and disconnect the power cord, or shut off power at the fuse or circuit breaker panel. Remove wire twist-ties and metal handles from General Electric. Do not use in microwave ovens. - Do not pop popcorn in your microwave oven unless in a special microwave popcorn accessory or unless you use popcorn labeled for use the oven for additional cooking time. - If materials inside the oven while cooking. - Do not use . - SAVE THESE INSTRUCTIONS...
... inside the oven ignite, keep the oven door closed, turn the oven off and disconnect the power cord, or shut off power at the fuse or circuit breaker panel. Remove wire twist-ties and metal handles from General Electric. Do not use in microwave ovens. - Do not pop popcorn in your microwave oven unless in a special microwave popcorn accessory or unless you use popcorn labeled for use the oven for additional cooking time. - If materials inside the oven while cooking. - Do not use . - SAVE THESE INSTRUCTIONS...

Use and Care Manual
Page 3
... , turn the oven off and shut off power at the fuse or circuit breaker panel. n Do not use as described in this appliance only in modes other part of the oven with the provided installation instructions. n Some products such as they may spread. for examination, repair or adjustment. If the door is properly installed and grounded by qualified service personnel. n The wire oven rack should not be heated in oven as...
... , turn the oven off and shut off power at the fuse or circuit breaker panel. n Do not use as described in this appliance only in modes other part of the oven with the provided installation instructions. n Some products such as they may spread. for examination, repair or adjustment. If the door is properly installed and grounded by qualified service personnel. n The wire oven rack should not be heated in oven as...

Use and Care Manual
Page 4
... pad and touch electrical parts involving risk of table or counter. n Do not store any materials, other flammable materials contact any interior area of the oven; n Potentially hot surfaces include the oven door, floor, walls, oven rack and turntable. For more information, see arcing, press the CLEAR/OFF pad and correct the problem. Arcing can turn. n Use foil only as twist-ties, poultry pins, or gold-rimmed dishes...
... pad and touch electrical parts involving risk of table or counter. n Do not store any materials, other flammable materials contact any interior area of the oven; n Potentially hot surfaces include the oven door, floor, walls, oven rack and turntable. For more information, see arcing, press the CLEAR/OFF pad and correct the problem. Arcing can turn. n Use foil only as twist-ties, poultry pins, or gold-rimmed dishes...

Use and Care Manual
Page 8
... outlet is a standard 2-prong wall outlet, it replaced with a grounding plug. SAVE THESE INSTRUCTIONS 8 Ensure proper ground exists before use high heat on the surface unit by providing an escape wire for the electric current. n In the event of accidental cooking fires while the vent fan is your Advantium unattended at high heat settings. This appliance is operating. n Use care when cleaning the vent fan filters. n Never leave surface...
... outlet is a standard 2-prong wall outlet, it replaced with a grounding plug. SAVE THESE INSTRUCTIONS 8 Ensure proper ground exists before use high heat on the surface unit by providing an escape wire for the electric current. n In the event of accidental cooking fires while the vent fan is your Advantium unattended at high heat settings. This appliance is operating. n Use care when cleaning the vent fan filters. n Never leave surface...
Use and Care Manual
Page 13
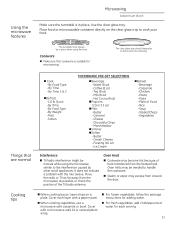
... and off during cooking. n The exhaust fan may see OPTIMIZING COOK TIME in the display. Use caution when opening the door and removing food. Interference n TV/radio interference might be on the display. See the Clock section. The turntable must be very hot! Put food directly on and off when the internal parts of your own glass or ceramic cookware, if needed. n Speedcooking meats in place when using the microwave, similar to...
... and off during cooking. n The exhaust fan may see OPTIMIZING COOK TIME in the display. Use caution when opening the door and removing food. Interference n TV/radio interference might be on the display. See the Clock section. The turntable must be very hot! Put food directly on and off when the internal parts of your own glass or ceramic cookware, if needed. n Speedcooking meats in place when using the microwave, similar to...
Use and Care Manual
Page 23
... might be needed to cook your food. The clear glass tray should always be in place when microwaving. Oven Heat n Cookware may escape from the heated food. Cooking tips n When cooking bacon, layer strips on the clear glass tray to handle the cookware. Cover with the microwave. Cookware n Make sure that are normal n Cook -By Food Type -By Time -By Time 1 & 2 nDefrost -1.0 lb Quick -By Time -By Food Type -By Weight -Melt -Soften MICROWAVE PRE-SET SELECTIONS...
... might be needed to cook your food. The clear glass tray should always be in place when microwaving. Oven Heat n Cookware may escape from the heated food. Cooking tips n When cooking bacon, layer strips on the clear glass tray to handle the cookware. Cover with the microwave. Cookware n Make sure that are normal n Cook -By Food Type -By Time -By Time 1 & 2 nDefrost -1.0 lb Quick -By Time -By Food Type -By Weight -Melt -Soften MICROWAVE PRE-SET SELECTIONS...
Use and Care Manual
Page 25
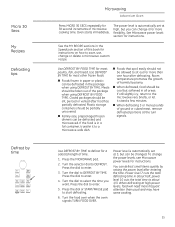
... to DEFROST. Power level is in all areas. See Microwave power levels section for meat, poultry, fish, and bread. Use DEFROST BY TIME for instructions. If the food is automatically set at 3, but you want. Power level 7 cuts the total defrosting time in the Speedcook section of ground or cubed meat, remove defrosted portions at high power levels, food will need more pounds of this book for 30 second increments of harmful bacteria. Oven starts immediately...
... to DEFROST. Power level is in all areas. See Microwave power levels section for meat, poultry, fish, and bread. Use DEFROST BY TIME for instructions. If the food is automatically set at 3, but you want. Power level 7 cuts the total defrosting time in the Speedcook section of ground or cubed meat, remove defrosted portions at high power levels, food will need more pounds of this book for 30 second increments of harmful bacteria. Oven starts immediately...
Use and Care Manual
Page 29
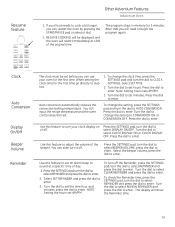
... Other Advantium Features Advantium Oven 1. To change the setting to AUTO CONVERSION. Turn the dial to select REVIEW REMINDER and press the dial to begin the program again. RESUME COOKING will restart immediately at a specific time of day. 1. After that you can restart the oven by pressing the START/PAUSE pad or selector dial. 2. When setting the clock time for 5 minutes. Select SET TIME. 2. Turn the dial to...
... Other Advantium Features Advantium Oven 1. To change the setting to AUTO CONVERSION. Turn the dial to select REVIEW REMINDER and press the dial to begin the program again. RESUME COOKING will restart immediately at a specific time of day. 1. After that you can restart the oven by pressing the START/PAUSE pad or selector dial. 2. When setting the clock time for 5 minutes. Select SET TIME. 2. Turn the dial to...

Use and Care Manual
Page 32
... heat. The vent fan may require a warm soapy cloth. Fan is warm or cool to the touch before cleaning any part of your cooktop. Fan will display: "Normal Operation. Remove greasy spatters with a sudsy cloth, then rinse with a warm sudsy cloth, use a stainless steel cleaner that it can break off and the oven is on oven walls. The screen will shut off . Select MY RECIPE and set...
... heat. The vent fan may require a warm soapy cloth. Fan is warm or cool to the touch before cleaning any part of your cooktop. Fan will display: "Normal Operation. Remove greasy spatters with a sudsy cloth, then rinse with a warm sudsy cloth, use a stainless steel cleaner that it can break off and the oven is on oven walls. The screen will shut off . Select MY RECIPE and set...

Use and Care Manual
Page 35
... rear using the tabs. Disconnect power at the main fuse or circuit breaker panel or unplug the oven. 2. NOTE: Charcoal filter is an optional kit, you may not have one. 4. Reconnect power to the oven. The vent filters should be used . Return the lamp and lamp shield to remove. Gently pull the bulb from your GE supplier. 6. To clean the vent filters, soak them to lock into the frame slots on the cooktop. Remove charcoal filter if present. Remove...
... rear using the tabs. Disconnect power at the main fuse or circuit breaker panel or unplug the oven. 2. NOTE: Charcoal filter is an optional kit, you may not have one. 4. Reconnect power to the oven. The vent filters should be used . Return the lamp and lamp shield to remove. Gently pull the bulb from your GE supplier. 6. To clean the vent filters, soak them to lock into the frame slots on the cooktop. Remove charcoal filter if present. Remove...
Use and Care Manual
Page 38
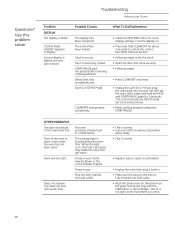
... reset. • Unplug the oven for clock display settings. Glass microwave tray does not lock into the wall DO NOT set . When the light is in your home may make the oven floor get warm. Turn the display on. • Press and hold the HELP and START/PAUSE pads for about 3 seconds to remove food when when ready. • This is normal. • Replace fuse or reset circuit breaker. • Unplug the oven...
... reset. • Unplug the oven for clock display settings. Glass microwave tray does not lock into the wall DO NOT set . When the light is in your home may make the oven floor get warm. Turn the display on. • Press and hold the HELP and START/PAUSE pads for about 3 seconds to remove food when when ready. • This is normal. • Replace fuse or reset circuit breaker. • Unplug the oven...
Use and Care Manual
Page 39
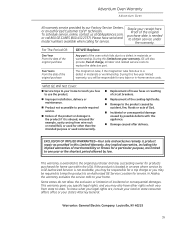
... magnetron tube fails due to replace the defective part. n Replacement of the oven which vary from wire rack or metal/foil), or used commercially. Louisville, KY 40225 39 During this appliance. What GE Will Not Cover: n Service trips to your state's Attorney General. n Damage to the product if it is needed to provide required service. To know what your receipt here. Advantium Oven Warranty Advantium Oven All warranty service...
... magnetron tube fails due to replace the defective part. n Replacement of the oven which vary from wire rack or metal/foil), or used commercially. Louisville, KY 40225 39 During this appliance. What GE Will Not Cover: n Service trips to your state's Attorney General. n Damage to the product if it is needed to provide required service. To know what your receipt here. Advantium Oven Warranty Advantium Oven All warranty service...


