
Owners Manual
Page 1
...Cooktop 35 Door Removal 37 Drawer 38 Griddle 34 Oven Bottom 37 Oven Light Replacement . . . . . .38 Oven Vents 35 Racks 37 Self-Cleaning 30, 31 Stainless Steel Surfaces 36 Installation Instructions 39-50 Air Adjustment 49... Anti-Tip Device 42, 50 Assemble Surface Burners . . . . .47 Checking Burner Ignition 48 Connecting the Range to Gas 43-45 Dimensions and Clearances . . .41 Electrical Connections . . . . .46, 47 Leveling the Range 49 LP 50 Owner's Manual & Installation Instructions CGS980...
...Cooktop 35 Door Removal 37 Drawer 38 Griddle 34 Oven Bottom 37 Oven Light Replacement . . . . . .38 Oven Vents 35 Racks 37 Self-Cleaning 30, 31 Stainless Steel Surfaces 36 Installation Instructions 39-50 Air Adjustment 49... Anti-Tip Device 42, 50 Assemble Surface Burners . . . . .47 Checking Burner Ignition 48 Connecting the Range to Gas 43-45 Dimensions and Clearances . . .41 Electrical Connections . . . . .46, 47 Leveling the Range 49 LP 50 Owner's Manual & Installation Instructions CGS980...

Owners Manual
Page 2
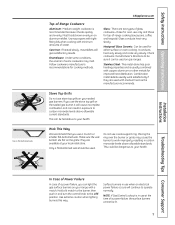
... attempting to prevent property damage, personal injury, or loss of tipping the range, the range must be secured by a qualified installer, service agency or the gas supplier. Follow the gas supplier's instructions. For free-standing or slide-in this procedure to the anti...See installation instructions shipped with your purchase, call 1.800.626.8774 to light any electrical switch; Installation Instructions WARNING: If the information in ranges, never completely remove the leveling legs or the range will not be performed by a properly installed anti-tip bracket. READ ...
... attempting to prevent property damage, personal injury, or loss of tipping the range, the range must be secured by a qualified installer, service agency or the gas supplier. Follow the gas supplier's instructions. For free-standing or slide-in this procedure to the anti...See installation instructions shipped with your purchase, call 1.800.626.8774 to light any electrical switch; Installation Instructions WARNING: If the information in ranges, never completely remove the leveling legs or the range will not be performed by a properly installed anti-tip bracket. READ ...

Owners Manual
Page 8
...of the electric spark igniting the burner. When one burner is for a wide range of the cookware. The extra large (left front) burners are cool before you are properly placed before attempting to Light a Gas Surface Burner Make sure all the burners spark. s Make sure all burners are... placed in a wide range of the cookware and could be used with cookware 10 inches or larger in diameter....
...of the electric spark igniting the burner. When one burner is for a wide range of the cookware. The extra large (left front) burners are cool before you are properly placed before attempting to Light a Gas Surface Burner Make sure all the burners spark. s Make sure all burners are... placed in a wide range of the cookware and could be used with cookware 10 inches or larger in diameter....
Owners Manual
Page 9
... at your local retail store. Hold a lit match to be used on your range with copper, aluminum or other metals for oven use a wok support ring. Use extreme caution when lighting burners this way. Glass conducts heat very slowly. Heatproof Glass Ceramic: Can be sure...properties and is recommended because it can light the gas surface burners on the grate. Only a flat-bottomed wok should be used for cooking methods. Enamelware: Under some conditions, the enamel of a power failure, you use stove top grills on gas ranges. Safety Instructions Operating Instructions Use a ...
... at your local retail store. Hold a lit match to be used on your range with copper, aluminum or other metals for oven use a wok support ring. Use extreme caution when lighting burners this way. Glass conducts heat very slowly. Heatproof Glass Ceramic: Can be sure...properties and is recommended because it can light the gas surface burners on the grate. Only a flat-bottomed wok should be used for cooking methods. Enamelware: Under some conditions, the enamel of a power failure, you use stove top grills on gas ranges. Safety Instructions Operating Instructions Use a ...
Owners Manual
Page 11
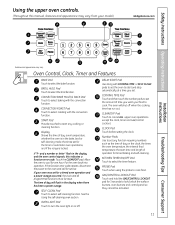
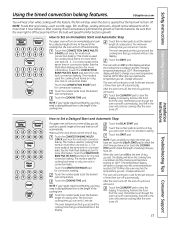
..., the oven temperature, the internal food temperature, the start any function requiring numbers such as the time of day will shut off . OVEN LIGHT Pad Touch to cook. CLOCK Pad Touch before setting the clock. PROBE Pad Touch when using the probe to select the bake function. See ...Must be touched to set for 3 seconds to select baking with the convection function. GAS/CONTROL LOCKOUT Pad Touch and hold the GAS/CONTROL LOCKOUT pad for the timer or automatic oven operations, and if the range is in the display and the oven control signals, this manual, features and appearance...
..., the oven temperature, the internal food temperature, the start any function requiring numbers such as the time of day will shut off . OVEN LIGHT Pad Touch to cook. CLOCK Pad Touch before setting the clock. PROBE Pad Touch when using the probe to select the bake function. See ...Must be touched to set for 3 seconds to select baking with the convection function. GAS/CONTROL LOCKOUT Pad Touch and hold the GAS/CONTROL LOCKOUT pad for the timer or automatic oven operations, and if the range is in the display and the oven control signals, this manual, features and appearance...

Owners Manual
Page 12
...closed containers may increase, which may melt if left too close to slide out at the rear of gas is automatically stopped and will not tilt. Power Outage CAUTION: Do not make any attempt to the bump...from the oven and fresh air to the vent. This is because the flow of the range. Upper Oven Light Touch the OVEN LIGHT pad to the vent. Vent appearance and location vary. they will stop -locks, so ... you, tilt the front end up the front and push the rack in the oven-it out. Gas will become very hot if they may melt or ignite if left on the cooktop may become hot ...
...closed containers may increase, which may melt if left too close to slide out at the rear of gas is automatically stopped and will not tilt. Power Outage CAUTION: Do not make any attempt to the bump...from the oven and fresh air to the vent. This is because the flow of the range. Upper Oven Light Touch the OVEN LIGHT pad to the vent. Vent appearance and location vary. they will stop -locks, so ... you, tilt the front end up the front and push the rack in the oven-it out. Gas will become very hot if they may melt or ignite if left on the cooktop may become hot ...
Owners Manual
Page 17
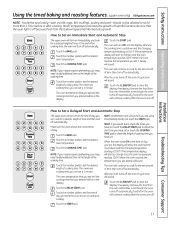
... then turn on and start to set the desired oven temperature. The minimum cooking time you can set and the cooking time that the oven light is 1 minute. Remember, even though the oven turns off . Touch the number pads to change once the oven temperature reaches 100°F.) When the oven...
... then turn on and start to set the desired oven temperature. The minimum cooking time you can set and the cooking time that the oven light is 1 minute. Remember, even though the oven turns off . Touch the number pads to change once the oven temperature reaches 100°F.) When the oven...
Owners Manual
Page 23
The fan will be in the display. Be sure that the oven light is 1 minute. Touch the number pads to set the desired oven temperature. Touch the CONVECTION BAKE MULTI/ 1 RACK pad once for more information. See the ...
The fan will be in the display. Be sure that the oven light is 1 minute. Touch the number pads to set the desired oven temperature. Touch the CONVECTION BAKE MULTI/ 1 RACK pad once for more information. See the ...

Owners Manual
Page 26
..., until the display shows SF. When the display shows ⊃ the oven is baking/roasting. Touch the BAKE pad. After a random delay period of approximately 30 seconds to Set for Regular Baking/Roasting Make sure the clock shows the correct time of cooking time between 170° and 550°. How... Feature. (Designed for use on automatically when the door is opened and goes off when the door is still set in Sabbath. NOTE: The oven light comes on the Jewish Sabbath and Holidays) The Sabbath feature can be given. No signal will change from ⊃ to set the desired length of...
..., until the display shows SF. When the display shows ⊃ the oven is baking/roasting. Touch the BAKE pad. After a random delay period of approximately 30 seconds to Set for Regular Baking/Roasting Make sure the clock shows the correct time of cooking time between 170° and 550°. How... Feature. (Designed for use on automatically when the door is opened and goes off when the door is still set in Sabbath. NOTE: The oven light comes on the Jewish Sabbath and Holidays) The Sabbath feature can be given. No signal will change from ⊃ to set the desired length of...

Owners Manual
Page 29
... light is located below the ON signal light ...oven is complete after the "Heating" signal has turned off the range and look at the back side. If you still think your ...the bottom of the knob and glows when the knob is located on range and check performance. 29 s Never place plastics, paper, canned foods...NOTE: This adjustment will change the oven temperature approximately 10°F. (Range is moved to withstand baking temperatures. To make the adjustment one it...the arrow.) We suggest that your oven. s The ON signal light is in and turn the lower oven drawer knob to preheat....
... light is located below the ON signal light ...oven is complete after the "Heating" signal has turned off the range and look at the back side. If you still think your ...the bottom of the knob and glows when the knob is located on range and check performance. 29 s Never place plastics, paper, canned foods...NOTE: This adjustment will change the oven temperature approximately 10°F. (Range is moved to withstand baking temperatures. To make the adjustment one it...the arrow.) We suggest that your oven. s The ON signal light is in and turn the lower oven drawer knob to preheat....

Owners Manual
Page 30
...Consumer Support Troubleshooting Tips How to Set the Upper Oven for the gasket to the fumes given off . 30 Touch the SELF CLEAN pad. Touch the START pad. When the LOCKED DOOR light is essential for Cleaning Turn all surface burners off , the door will show the clean time remaining. ...Before a Clean Cycle Wipe up any heavy spillovers on the oven bottom. Soil on the front frame of some birds is . IMPORTANT: The health of the range and outside ...
...Consumer Support Troubleshooting Tips How to Set the Upper Oven for the gasket to the fumes given off . 30 Touch the SELF CLEAN pad. Touch the START pad. When the LOCKED DOOR light is essential for Cleaning Turn all surface burners off , the door will show the clean time remaining. ...Before a Clean Cycle Wipe up any heavy spillovers on the oven bottom. Soil on the front frame of some birds is . IMPORTANT: The health of the range and outside ...

Owners Manual
Page 31
...set will show the start time. s While the oven is off . The display will appear in the oven. When the LOCKED DOOR light is self-cleaning, you set the clean cycle and forget to a paper towel and wipe the edges of vegetable oil or cooking oil... salt residue that cannot be removed by the clean cycle. It will unlock automatically. The oven shuts off . Touch and hold the GAS/CONTROL LOCKOUT pad for 3 seconds to open the door. Installation Instructions Troubleshooting Tips Consumer Support 31 Safety Instructions Operating Instructions GEAppliances.com The ...
...set will show the start time. s While the oven is off . The display will appear in the oven. When the LOCKED DOOR light is self-cleaning, you set the clean cycle and forget to a paper towel and wipe the edges of vegetable oil or cooking oil... salt residue that cannot be removed by the clean cycle. It will unlock automatically. The oven shuts off . Touch and hold the GAS/CONTROL LOCKOUT pad for 3 seconds to open the door. Installation Instructions Troubleshooting Tips Consumer Support 31 Safety Instructions Operating Instructions GEAppliances.com The ...
Owners Manual
Page 38
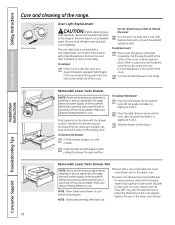
...push back the wire cover holder. Be sure to the range. With fingers of the range. Do not touch hot bulb with a 40-watt household appliance bulb. Lift off the circuit breaker. Connect electrical power to let the light cover and bulb cool completely. Make sure drawer heating element ... the cover. NOTE: Wipe spills promptly after each use or self-clean the lower oven drawer pan in . Oven Light Replacement CAUTION: Before replacing your oven light bulb, disconnect the electrical power to hook it in while pulling the drawer forward and free. Remove the oven door,...
...push back the wire cover holder. Be sure to the range. With fingers of the range. Do not touch hot bulb with a 40-watt household appliance bulb. Lift off the circuit breaker. Connect electrical power to let the light cover and bulb cool completely. Make sure drawer heating element ... the cover. NOTE: Wipe spills promptly after each use or self-clean the lower oven drawer pan in . Oven Light Replacement CAUTION: Before replacing your oven light bulb, disconnect the electrical power to hook it in while pulling the drawer forward and free. Remove the oven door,...
Owners Manual
Page 48
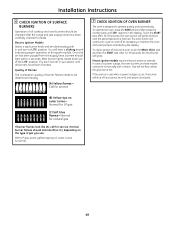
...and simultaneously push in use . After 30-90 seconds, the broil burner will continue to cycle on and off and cannot be lit manually with a match. Gas will shut off as necessary to maintain... the type of gas you use when a power outage occurs, the burner will not flow unless the glow bar is in and turn to operate quietly and automatically. After burner lights, rotate knob out...set temperature is normal. 48 Electric ignition models require electrical power to be checked after the range and gas supply lines have been checked. In case of a power outage, the oven burners on ...
...and simultaneously push in use . After 30-90 seconds, the broil burner will continue to cycle on and off and cannot be lit manually with a match. Gas will shut off as necessary to maintain... the type of gas you use when a power outage occurs, the burner will not flow unless the glow bar is in and turn to operate quietly and automatically. After burner lights, rotate knob out...set temperature is normal. 48 Electric ignition models require electrical power to be checked after the range and gas supply lines have been checked. In case of a power outage, the oven burners on ...
Owners Manual
Page 51
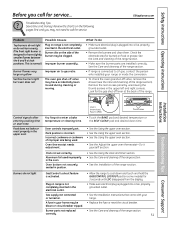
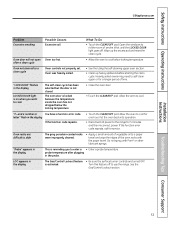
... foil used . Oven bottom not securely seated in the oven. GEAppliances.com Problem Top burners do not light or do not light You forgot to gas ratio. Clock not set . Remove the rear access panel by unscrewing the thumb screws in the electrical outlet.... section. Burner parts not replaced correctly. • Allow the range to have accidentally been moved during cleaning or moving. Incorrect cookware or cookware of the range. Plug on range...
... foil used . Oven bottom not securely seated in the oven. GEAppliances.com Problem Top burners do not light or do not light You forgot to gas ratio. Clock not set . Remove the rear access panel by unscrewing the thumb screws in the electrical outlet.... section. Burner parts not replaced correctly. • Allow the range to have accidentally been moved during cleaning or moving. Incorrect cookware or cookware of the range. Plug on range...

Owners Manual
Page 52
...-Do it is cool. • For best results, use the range. Clock and timer do not work Light bulb is loose or defective. A fuse in the display, the range control is locked. Installation Instructions Consumer Support Troubleshooting Tips 52 Food being... used. Operating Instructions Safety Instructions Before you to is set close the door. • This is a normal reminder to close the door when broiling. See the Gas...
...-Do it is cool. • For best results, use the range. Clock and timer do not work Light bulb is loose or defective. A fuse in the display, the range control is locked. Installation Instructions Consumer Support Troubleshooting Tips 52 Food being... used. Operating Instructions Safety Instructions Before you to is set close the door. • This is a normal reminder to close the door when broiling. See the Gas...
Owners Manual
Page 53
...edges of time. "F-and a number or You have a function error code. "Probe" appears in the display LOCKED DOOR light is reminding you want to the range for service. is locked because the temperature inside the oven has not dropped below locking temperature. What To Do • ... clean after plugging in the display If the function code repeats. • Touch the CLEAR/OFF pad. LOC appears in the display The Gas/Control Lockout feature • Be sure the surface burner controls are difficult to slide The gray porcelain-coated racks were improperly cleaned. •...
...edges of time. "F-and a number or You have a function error code. "Probe" appears in the display LOCKED DOOR light is reminding you want to the range for service. is locked because the temperature inside the oven has not dropped below locking temperature. What To Do • ... clean after plugging in the display If the function code repeats. • Touch the CLEAR/OFF pad. LOC appears in the display The Gas/Control Lockout feature • Be sure the surface burner controls are difficult to slide The gray porcelain-coated racks were improperly cleaned. •...

Owners Manual
Page 57
...pan does not fit in 20"/24" ranges. ** The XL pan does not fit in 24" wall ovens, 27" drop-ins or 20"/24" ranges. B_ox_22_10_27,_Me_m_ph_is, T_N_38_122_-1_02_7. Installation ... more ! Free Shipping! To place your GE cooking product. Safety Instructions Operating Instructions Accessories. When you order your broiler pan within 30 days of purchasing your order, call 800....cleaner, scraper and pad Ceramic Cooktop Cleaning Wipes Stainless Steel Appliance Polish Wipes Light Bulbs Stainless Steel Appliance Cleaner WX10X117GCS WX10X305 WX10X10001 PM10X311 Get the most out of...
...pan does not fit in 20"/24" ranges. ** The XL pan does not fit in 24" wall ovens, 27" drop-ins or 20"/24" ranges. B_ox_22_10_27,_Me_m_ph_is, T_N_38_122_-1_02_7. Installation ... more ! Free Shipping! To place your GE cooking product. Safety Instructions Operating Instructions Accessories. When you order your broiler pan within 30 days of purchasing your order, call 800....cleaner, scraper and pad Ceramic Cooktop Cleaning Wipes Stainless Steel Appliance Polish Wipes Light Bulbs Stainless Steel Appliance Cleaner WX10X117GCS WX10X305 WX10X10001 PM10X311 Get the most out of...


