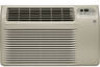
Use and Care Manual
Page 1
...Model Serial Find these numbers on a label on the front of this manual, visit our Website at GEAppliances.com. Para consultar una version en español de este manual de instrucciones, visite nuestro sitio de internet GEAppliances.com. TINSEA568JBRZ 49-7597-2 05-09 JR As an ENERGY STAR® partner, GE...Air Filter 11 Front Grille 10 Grille and Case 10 Outdoor Coils 10 Installation Instructions Before You Begin 12, 13 Installing a J-Model in an Existing Wall Case 14 Through-the-Wall Installation 15 Window Installation (Optional 16-21 Troubleshooting Tips 22 Normal Operating Sounds...
...Model Serial Find these numbers on a label on the front of this manual, visit our Website at GEAppliances.com. Para consultar una version en español de este manual de instrucciones, visite nuestro sitio de internet GEAppliances.com. TINSEA568JBRZ 49-7597-2 05-09 JR As an ENERGY STAR® partner, GE...Air Filter 11 Front Grille 10 Grille and Case 10 Outdoor Coils 10 Installation Instructions Before You Begin 12, 13 Installing a J-Model in an Existing Wall Case 14 Through-the-Wall Installation 15 Window Installation (Optional 16-21 Troubleshooting Tips 22 Normal Operating Sounds...
Use and Care Manual
Page 3
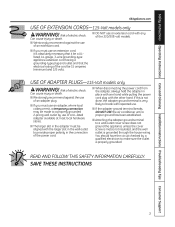
... hardware stores. ■ The larger slot in the connection of electric shock. READ AND FOLLOW THIS SAFETY INFORMATION CAREFULLY. USE OF ADAPTER PLUGS-115-Volt models only WARNING! Can cause injury or death. ■ We strongly recommend against the use of an extension cord. ■ DO NOT use an extension cord... rating of electric shock. If this is not done, the adapter ground terminal is very likely to break with any of the 230/208-volt models. ■ If you must use an extension cord, it is absolutely necessary that it be made to a wall outlet cover screw does not ground ...
... hardware stores. ■ The larger slot in the connection of electric shock. READ AND FOLLOW THIS SAFETY INFORMATION CAREFULLY. USE OF ADAPTER PLUGS-115-Volt models only WARNING! Can cause injury or death. ■ We strongly recommend against the use of an extension cord. ■ DO NOT use an extension cord... rating of electric shock. If this is not done, the adapter ground terminal is very likely to break with any of the 230/208-volt models. ■ If you must use an extension cord, it is absolutely necessary that it be made to a wall outlet cover screw does not ground ...
Use and Care Manual
Page 4
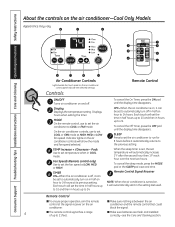
... to set temperature will automatically start in the setting last used. Air Conditioner Controls Lights beside the touch pads on the air conditioner-Cool Only Models Appearance may vary. SLEEP Press to set to automatically turn off . To cancel the sleep mode, press the MODE pad or the SLEEP pad a second...
... to set temperature will automatically start in the setting last used. Air Conditioner Controls Lights beside the touch pads on the air conditioner-Cool Only Models Appearance may vary. SLEEP Press to set to automatically turn off . To cancel the sleep mode, press the MODE pad or the SLEEP pad a second...
Use and Care Manual
Page 6
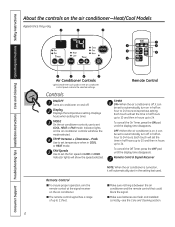
... Off Timer, press the OFF pad until the display time disappears. Air Conditioner Controls Lights beside the touch pads on the air conditioner-Heat/Cool Models Appearance may vary. Displays hours when setting the timer. To cancel the On Timer, press the ON pad until the display time disappears. Remote Control...
... Off Timer, press the OFF pad until the display time disappears. Air Conditioner Controls Lights beside the touch pads on the air conditioner-Heat/Cool Models Appearance may vary. Displays hours when setting the timer. To cancel the On Timer, press the ON pad until the display time disappears. Remote Control...
Use and Care Manual
Page 8
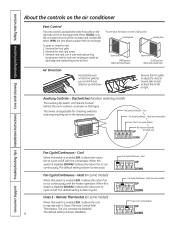
... let you control the air direction up and down. The unit controls are disabled. 8 The default setting is enabled (UP), it by model) The auxiliary dip switch controls are in card over and replace it allows the indoor fan to run continuously with the compressor. Locating hole ... Fan Cycle/Continuous - When this switch is down (disabled). The default setting is enabled (UP), it allows the indoor fan to cycle on some models) No function (reserved for checking switches and ensuring they are located behind the front grille on /off . To open or close the vent: 1. ...
... let you control the air direction up and down. The unit controls are disabled. 8 The default setting is enabled (UP), it by model) The auxiliary dip switch controls are in card over and replace it allows the indoor fan to run continuously with the compressor. Locating hole ... Fan Cycle/Continuous - When this switch is down (disabled). The default setting is enabled (UP), it allows the indoor fan to cycle on some models) No function (reserved for checking switches and ensuring they are located behind the front grille on /off . To open or close the vent: 1. ...
Use and Care Manual
Page 9
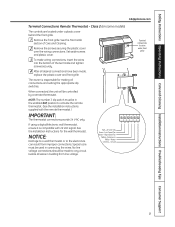
... to any circuit. Safety Instructions Operating Instructions Care and Cleaning Installation Instructions Troubleshooting Tips Consumer Support GEAppliances.com Terminal Connections Remote Thermostat - Class 2 (on some models) The controls are located under front grille 9 NOTE: The number 3 dip switch must be in the enabled (UP) position to the electronics can result from...
... to any circuit. Safety Instructions Operating Instructions Care and Cleaning Installation Instructions Troubleshooting Tips Consumer Support GEAppliances.com Terminal Connections Remote Thermostat - Class 2 (on some models) The controls are located under front grille 9 NOTE: The number 3 dip switch must be in the enabled (UP) position to the electronics can result from...
Use and Care Manual
Page 10
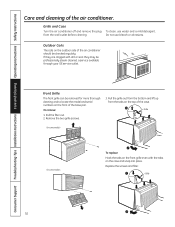
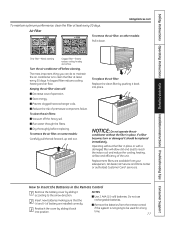
...on the front of the air conditioner should be checked regularly. Front Grille The front grille can be professionally steam cleaned, a service available through your GE service outlet. Grille Tab 10 Pull the grille out from the bottom and lift up from the wall outlet before cleaning. Replace the screws and...are clogged with the tabs on the top of the air conditioner. To remove: 1. To clean, use bleach or abrasives. Grille Tab On some models On some models To replace: Hook the tabs on the front grille even with dirt or soot they may be removed for more thorough cleaning and to...
...on the front of the air conditioner should be checked regularly. Front Grille The front grille can be professionally steam cleaned, a service available through your GE service outlet. Grille Tab 10 Pull the grille out from the bottom and lift up from the wall outlet before cleaning. Replace the screws and...are clogged with the tabs on the top of the air conditioner. To remove: 1. To clean, use bleach or abrasives. Grille Tab On some models On some models To replace: Hook the tabs on the front grille even with dirt or soot they may be removed for more thorough cleaning and to...
Use and Care Manual
Page 11
... component failure. Do not use rechargeable batteries. ■ Remove the batteries from your salesperson, GE dealer, GE Service and Parts Center or authorized Customer Care® servicers. To remove the air filter, on other models: FRONT FRONT Pull it down. To replace the air filter: Replace the clean filter by ...a long time. 11 To clean the air filters: ■ Vacuum off before replacing. Air Filter To remove the air filter, on some models: Carefully pull the tab forward, up and out. If a filter becomes torn or damaged it back into position.
... component failure. Do not use rechargeable batteries. ■ Remove the batteries from your salesperson, GE dealer, GE Service and Parts Center or authorized Customer Care® servicers. To remove the air filter, on other models: FRONT FRONT Pull it down. To replace the air filter: Replace the clean filter by ...a long time. 11 To clean the air filters: ■ Vacuum off before replacing. Air Filter To remove the air filter, on some models: Carefully pull the tab forward, up and out. If a filter becomes torn or damaged it back into position.
Use and Care Manual
Page 12
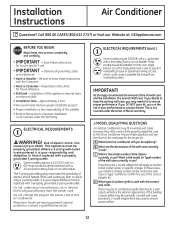
...to use ? If the wall outlet you be replacing? ELECTRICAL REQUIREMENTS (cont.) Some models require 230/208-volt a.c., protected with a 15-amp time delay fuse or circuit breaker. GE strongly recommends the removal of the old wall case and the installation of electric shock... all governing codes and ordinances. • Note to the GE air conditioner. Keep these instructions completely and carefully. • IMPORTANT - Where a 2-prong wall outlet is encountered, it replaced with J-model wall cases provided a J-model adapter kit is your responsibility to have it is also used...
...to use ? If the wall outlet you be replacing? ELECTRICAL REQUIREMENTS (cont.) Some models require 230/208-volt a.c., protected with a 15-amp time delay fuse or circuit breaker. GE strongly recommends the removal of the old wall case and the installation of electric shock... all governing codes and ordinances. • Note to the GE air conditioner. Keep these instructions completely and carefully. • IMPORTANT - Where a 2-prong wall outlet is encountered, it replaced with J-model wall cases provided a J-model adapter kit is your responsibility to have it is also used...
Use and Care Manual
Page 13
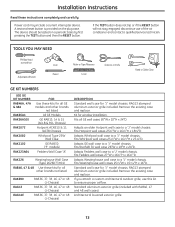
..., 38, 46, 47 or 48 (J-Chassis) DESCRIPTION: Standard wall case for "J" model chassis. Fits Westinghouse wall cases 257⁄ 8″W x 157⁄ 16″H x 16″D. Fits all other brands not listed All GE Models GE RAB13, 14 & 15 (ACLB & RCL Chassis) Hotpoint ACXB10 & 11 (ACTB... Chassis) Whirlpool Type 23W Wall Case GE RAB30 ("F" models) Fedders Wall Case "A" RAK126 Westinghouse Wall Case (Type 2626D73H01) RAB46, 47 & 48...
..., 38, 46, 47 or 48 (J-Chassis) DESCRIPTION: Standard wall case for "J" model chassis. Fits Westinghouse wall cases 257⁄ 8″W x 157⁄ 16″H x 16″D. Fits all other brands not listed All GE Models GE RAB13, 14 & 15 (ACLB & RCL Chassis) Hotpoint ACXB10 & 11 (ACTB... Chassis) Whirlpool Type 23W Wall Case GE RAB30 ("F" models) Fedders Wall Case "A" RAK126 Westinghouse Wall Case (Type 2626D73H01) RAB46, 47 & 48...

Use and Care Manual
Page 14
Installation Instructions INSTALLING A J-MODEL IN AN EXISTING WALL CASE Read these instructions completely and carefully. 1 REMOVE LOCKING PLATE ON FRONT LEFT SIDE Locking plate Remove screw 4 REINSTALL LOCKING PLATE ...
Installation Instructions INSTALLING A J-MODEL IN AN EXISTING WALL CASE Read these instructions completely and carefully. 1 REMOVE LOCKING PLATE ON FRONT LEFT SIDE Locking plate Remove screw 4 REINSTALL LOCKING PLATE ...
Use and Care Manual
Page 15
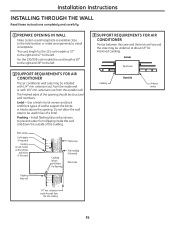
... angle (if required) Caulking (on all 4 sides on the outside of the opening . The finished sides of the building. Lintel - For the 230/208-volt models the cord length is available close to the hole location or make arrangements to the left . 2 SUPPORT REQUIREMENTS FOR AIR CONDITIONER The air conditioner wall... FOR AIR CONDITIONER Mortar between the case and the brick wall around the case may be undercut at about 45° for the 115-volt models is 72″ to the right and 47″ to install a receptacle. The cord length for improved caulking. Do not allow the wall case ...
... angle (if required) Caulking (on all 4 sides on the outside of the opening . The finished sides of the building. Lintel - For the 230/208-volt models the cord length is available close to the hole location or make arrangements to the left . 2 SUPPORT REQUIREMENTS FOR AIR CONDITIONER The air conditioner wall... FOR AIR CONDITIONER Mortar between the case and the brick wall around the case may be undercut at about 45° for the 115-volt models is 72″ to the right and 47″ to install a receptacle. The cord length for improved caulking. Do not allow the wall case ...
Use and Care Manual
Page 22
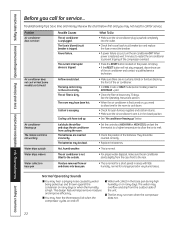
Problem Air conditioner does not start Air conditioner does not cool or heat (some models), press the DECREASE - The air filter is unplugged. Cold air is not tilted to melt. • Check the position of the batteries. The air conditioner ... button located on and off. ■ Water will not stay engaged, discontinue use of the air conditioner. • In COOL mode or HEAT mode (some models) as it should be inserted correctly. • Replace the batteries. • This is normal. • For proper water disposal, make sure the air conditioner slants...
Problem Air conditioner does not start Air conditioner does not cool or heat (some models), press the DECREASE - The air filter is unplugged. Cold air is not tilted to melt. • Check the position of the batteries. The air conditioner ... button located on and off. ■ Water will not stay engaged, discontinue use of the air conditioner. • In COOL mode or HEAT mode (some models) as it should be inserted correctly. • Replace the batteries. • This is normal. • For proper water disposal, make sure the air conditioner slants...
Use and Care Manual
Page 23
... have an installation problem, or if the air conditioner is not available, you may be required to bring the product to an Authorized GE Service location for service by an individual technician. ■ Replacement of house fuses or resetting of circuit breakers. ■ Failure due ..., consult your local or state consumer affairs office or your dealer or installer. To schedule service, on models not corrosionprotected. ■ Damage to the product caused by a GE Authorized Servicer is of charge, all labor and related service to the original purchaser and any succeeding owner for...
... have an installation problem, or if the air conditioner is not available, you may be required to bring the product to an Authorized GE Service location for service by an individual technician. ■ Replacement of house fuses or resetting of circuit breakers. ■ Failure due ..., consult your local or state consumer affairs office or your dealer or installer. To schedule service, on models not corrosionprotected. ■ Damage to the product caused by a GE Authorized Servicer is of charge, all labor and related service to the original purchaser and any succeeding owner for...
Quick Specs
Page 1
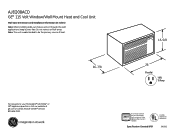
AJEQ08ACD GE® 115 Volt Window/Wall Mount Heat and Cool Unit Wall Case Dimensions and Installation Information (in inches) Note: When installing slide-out chassis units .... Specification Created 9/09 Listed by the Association of heat. AJCQ12DCD Total volume and shelf area are calculated by Underwriters Laboratories 390363 Premium, Deluxe and Value Model Wall Case Dimensions (in inches) 15-5/8 For answers to be the primary source of Home Appliance Manufacturers' standards. Note: This unit is not intended to...
AJEQ08ACD GE® 115 Volt Window/Wall Mount Heat and Cool Unit Wall Case Dimensions and Installation Information (in inches) Note: When installing slide-out chassis units .... Specification Created 9/09 Listed by the Association of heat. AJCQ12DCD Total volume and shelf area are calculated by Underwriters Laboratories 390363 Premium, Deluxe and Value Model Wall Case Dimensions (in inches) 15-5/8 For answers to be the primary source of Home Appliance Manufacturers' standards. Note: This unit is not intended to...
Quick Specs
Page 3
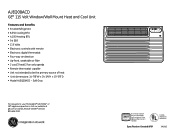
...to be the primary source of Home Appliance Manufacturers' standards. AJEQ12DCD Total volume and shelf area are calculated by Underwriters Laboratories 390363 AJEQ08ACD GE® 115 Volt Window/Wall Mount Heat and Cool Unit Features and Benefits • R-410A Refrigerant • 8,350 Cooling ...fan only speeds • Remote thermostat capable • Unit not intended to your Monogram,® GE Profile™ or GE® appliance questions, visit our website at ge.com or call GE Answer Center® service, 800.626.2000. Specification Created 9/09 Listed by the Association of...
...to be the primary source of Home Appliance Manufacturers' standards. AJEQ12DCD Total volume and shelf area are calculated by Underwriters Laboratories 390363 AJEQ08ACD GE® 115 Volt Window/Wall Mount Heat and Cool Unit Features and Benefits • R-410A Refrigerant • 8,350 Cooling ...fan only speeds • Remote thermostat capable • Unit not intended to your Monogram,® GE Profile™ or GE® appliance questions, visit our website at ge.com or call GE Answer Center® service, 800.626.2000. Specification Created 9/09 Listed by the Association of...


