
8513031 - Gateway Notebook User Guide for Windows Vista R3
Page 5
www.gateway.com Chapter 7: Customizing Windows 65 Changing screen settings 66 Changing color depth and screen resolution 66 Changing the appearance of windows and backgrounds 67 Selecting a ... files 90 Scheduling maintenance tasks 91 Moving from your old computer 91 Transferring files and settings with Windows Easy Transfer 91 Transferring files and settings manually 92 iii
www.gateway.com Chapter 7: Customizing Windows 65 Changing screen settings 66 Changing color depth and screen resolution 66 Changing the appearance of windows and backgrounds 67 Selecting a ... files 90 Scheduling maintenance tasks 91 Moving from your old computer 91 Transferring files and settings with Windows Easy Transfer 91 Transferring files and settings manually 92 iii
8513031 - Gateway Notebook User Guide for Windows Vista R3
Page 8
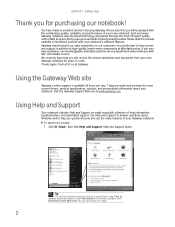
...support in addition to ensure that you quickly discover and use the many features of us at affordable prices. Using the Gateway Web site Gateway's online support is available 24 hours per day, 7 days per week and provides the most stringent quality control tests ..., and automated support. Help and Support opens. Please read this manual carefully to answer questions about your Gateway notebook. Thanks again, from Microsoft. We sincerely hope that you ever have made an excellent decision choosing Gateway. To search for a topic. 2 Using Help and Support Your...
...support in addition to ensure that you quickly discover and use the many features of us at affordable prices. Using the Gateway Web site Gateway's online support is available 24 hours per day, 7 days per week and provides the most stringent quality control tests ..., and automated support. Help and Support opens. Please read this manual carefully to answer questions about your Gateway notebook. Thanks again, from Microsoft. We sincerely hope that you ever have made an excellent decision choosing Gateway. To search for a topic. 2 Using Help and Support Your...
8513031 - Gateway Notebook User Guide for Windows Vista R3
Page 56
... protocol. CHAPTER 5: Networking Your Notebook 6 Type a name for your workgroup in the Search Help box, then press ENTER. • Connect to an available network • Manually add a wireless Ethernet network • Connecting to use on your network. We recommend you can configure your router using your Web browser. Configuring your router...
... protocol. CHAPTER 5: Networking Your Notebook 6 Type a name for your workgroup in the Search Help box, then press ENTER. • Connect to an available network • Manually add a wireless Ethernet network • Connecting to use on your network. We recommend you can configure your router using your Web browser. Configuring your router...
8513031 - Gateway Notebook User Guide for Windows Vista R3
Page 97
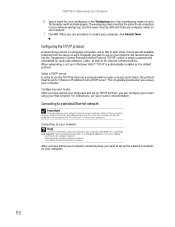
..., you must be able to your data by using a writeable disc, flash drive, or external hard drive. Important Your notebook must manually move your files, folders, software settings, and user account settings (such as running Windows Easy Transfer. Moving from your old computer Transferring...will not be on the new notebook before running Disk Defragmenter and checking your old computer uses Windows XP or Windows Vista. www.gateway.com Scheduling maintenance tasks Task Scheduler lets you schedule maintenance tasks such as display, Internet, and e-mail settings) from your old ...
..., you must be able to your data by using a writeable disc, flash drive, or external hard drive. Important Your notebook must manually move your files, folders, software settings, and user account settings (such as running Windows Easy Transfer. Moving from your old computer Transferring...will not be on the new notebook before running Disk Defragmenter and checking your old computer uses Windows XP or Windows Vista. www.gateway.com Scheduling maintenance tasks Task Scheduler lets you schedule maintenance tasks such as display, Internet, and e-mail settings) from your old ...
8513031 - Gateway Notebook User Guide for Windows Vista R3
Page 98
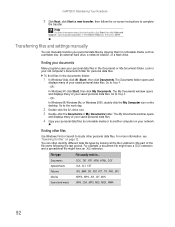
...network. For example, a document file might have a .DOC extension and a spreadsheet file might have an .XLS extension. Transferring files and settings manually You can often identify different data file types by copying them to another computer on your saved personal data files. Documents .DOC, .TXT, ....complete the transfer. Go to Step 4. - For more information about transferring files, click Start, then click Help and Support. You can manually transfer your personal data files by looking at the file's extension (the part of your saved personal data files. 4 Copy your personal ...
...network. For example, a document file might have a .DOC extension and a spreadsheet file might have an .XLS extension. Transferring files and settings manually You can often identify different data file types by copying them to another computer on your saved personal data files. Documents .DOC, .TXT, ....complete the transfer. Go to Step 4. - For more information about transferring files, click Start, then click Help and Support. You can manually transfer your personal data files by looking at the file's extension (the part of your saved personal data files. 4 Copy your personal ...

8513031 - Gateway Notebook User Guide for Windows Vista R3
Page 99
...about more search options, click Help. The information in this manual and the products it may improve and/or change products described in the U.S. These changes are registered trademarks of continued product development, Gateway reserves the right to be reproduced or transmitted by Macrovision ..., and is believed to make improvements in any means or in this manual. In the interest of Intel Corporation. Use of it describes at www.gateway.com. Notices Copyright © 2008 Gateway, Inc. Intel, Intel Inside logo, and Pentium are incorporated in writing...
...about more search options, click Help. The information in this manual and the products it may improve and/or change products described in the U.S. These changes are registered trademarks of continued product development, Gateway reserves the right to be reproduced or transmitted by Macrovision ..., and is believed to make improvements in any means or in this manual. In the interest of Intel Corporation. Use of it describes at www.gateway.com. Notices Copyright © 2008 Gateway, Inc. Intel, Intel Inside logo, and Pentium are incorporated in writing...
8512936 - Gateway Notebook Reference Guide R0
Page 10
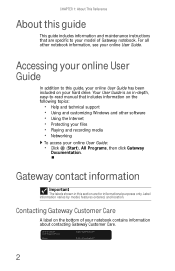
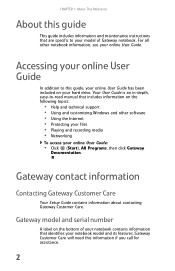
... manual that are for informational purposes only. Label information varies by model, features ordered, and location. For all other software • Using the Internet • Protecting your files • Playing and recording media • Networking To access your online User Guide: • Click (Start), All Programs, then click Gateway Documentation. Contacting Gateway Customer...
... manual that are for informational purposes only. Label information varies by model, features ordered, and location. For all other software • Using the Internet • Protecting your files • Playing and recording media • Networking To access your online User Guide: • Click (Start), All Programs, then click Gateway Documentation. Contacting Gateway Customer...
8512936 - Gateway Notebook Reference Guide R0
Page 65
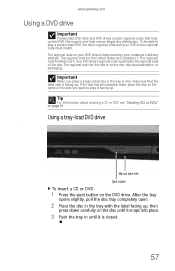
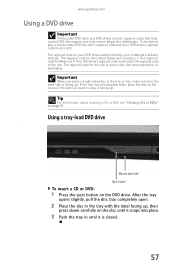
... your DVD drive's regional code must match the regional code of the side you place a single-sided disc in until it is closed. 57 www.gateway.com Using a DVD drive Important Prerecorded DVD discs and DVD drives contain regional codes that the label side is facing up. Your DVD drive's regional... tray in the tray or slot, make sure that help control DVD title exports and help reduce illegal disc distribution. Using a tray-load DVD drive [ Manual eject hole Eject button To insert a CD or DVD: 1 Press the eject button on page 91. The regional code for the disc is 4. If the...
... your DVD drive's regional code must match the regional code of the side you place a single-sided disc in until it is closed. 57 www.gateway.com Using a DVD drive Important Prerecorded DVD discs and DVD drives contain regional codes that the label side is facing up. Your DVD drive's regional... tray in the tray or slot, make sure that help control DVD title exports and help reduce illegal disc distribution. Using a tray-load DVD drive [ Manual eject hole Eject button To insert a CD or DVD: 1 Press the eject button on page 91. The regional code for the disc is 4. If the...

8512936 - Gateway Notebook Reference Guide R0
Page 66
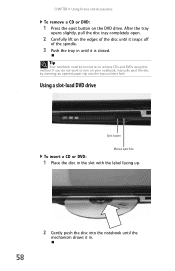
... to remove CDs and DVDs using this method. Using a slot-load DVD drive [ Eject button Manual eject hole To insert a CD or DVD: 1 Place the disc in the slot with the label facing up. 2 Gently push the disc into the manual eject hole. Tip Your notebook must be turned on your notebook..., manually eject the disc by inserting an opened paper clip into the notebook until it in. 58 After the tray opens...
... to remove CDs and DVDs using this method. Using a slot-load DVD drive [ Eject button Manual eject hole To insert a CD or DVD: 1 Place the disc in the slot with the label facing up. 2 Gently push the disc into the manual eject hole. Tip Your notebook must be turned on your notebook..., manually eject the disc by inserting an opened paper clip into the notebook until it in. 58 After the tray opens...
8512936 - Gateway Notebook Reference Guide R0
Page 67
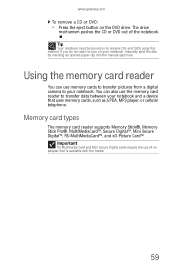
You can use memory cards to transfer pictures from a digital camera to your notebook and a device that is available with the media. 59 www.gateway.com To remove a CD or DVD: • Press the eject button on to remove CDs and DVDs using this method. Using the memory card reader ... RS-Multimedia Card and Mini Secure Digital cards require the use the memory card reader to turn on your notebook, manually eject the disc by inserting an opened paper clip into the manual eject hole. If you do not want to transfer data between your notebook. Memory card types The memory card...
You can use memory cards to transfer pictures from a digital camera to your notebook and a device that is available with the media. 59 www.gateway.com To remove a CD or DVD: • Press the eject button on to remove CDs and DVDs using this method. Using the memory card reader ... RS-Multimedia Card and Mini Secure Digital cards require the use the memory card reader to turn on your notebook, manually eject the disc by inserting an opened paper clip into the manual eject hole. If you do not want to transfer data between your notebook. Memory card types The memory card...
8512936 - Gateway Notebook Reference Guide R0
Page 107
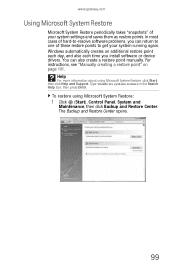
..., see "Manually creating a restore point" on page 101. The Backup and Restore Center opens. 99 Help For more information about using Microsoft System Restore: 1 Click (Start), Control Panel, System and Maintenance, then click Backup and Restore Center. Type windows system restore in the Search Help box, then press ENTER. www.gateway.com..., you install software or device drivers. Windows automatically creates an additional restore point each day, and also each time you can also create a restore point manually.
..., see "Manually creating a restore point" on page 101. The Backup and Restore Center opens. 99 Help For more information about using Microsoft System Restore: 1 Click (Start), Control Panel, System and Maintenance, then click Backup and Restore Center. Type windows system restore in the Search Help box, then press ENTER. www.gateway.com..., you install software or device drivers. Windows automatically creates an additional restore point each day, and also each time you can also create a restore point manually.
8512936 - Gateway Notebook Reference Guide R0
Page 109
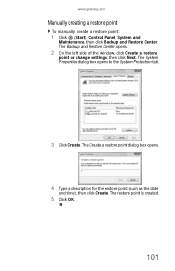
The restore point is created. 5 Click OK. 101 www.gateway.com Manually creating a restore point To manually create a restore point: 1 Click (Start), Control Panel, System and Maintenance, then click Backup and Restore Center. The Create a restore point dialog box opens. 4 Type a description for the restore point (such as the date and time), then click Create. The System Properties dialog box opens to the System Protection tab. 3 Click Create. The Backup and Restore Center opens. 2 On the left side of the window, click Create a restore point or change settings, then click Next.
The restore point is created. 5 Click OK. 101 www.gateway.com Manually creating a restore point To manually create a restore point: 1 Click (Start), Control Panel, System and Maintenance, then click Backup and Restore Center. The Create a restore point dialog box opens. 4 Type a description for the restore point (such as the date and time), then click Create. The System Properties dialog box opens to the System Protection tab. 3 Click Create. The Backup and Restore Center opens. 2 On the left side of the window, click Create a restore point or change settings, then click Next.
8512936 - Gateway Notebook Reference Guide R0
Page 129
...deleted • Recover the file from the Recycle Bin by inserting an opened paper clip into the manual eject hole. Help For more information, see "Using a tray-load DVD drive" on page 57. www.gateway.com A DVD does not produce sound on a television • Audio is transmitted through a monitor ...jack. If you do not want to a television using the monitor jack, use the built-in speakers, a set of the manual eject hole, see your notebook, manually eject the disc by...
...deleted • Recover the file from the Recycle Bin by inserting an opened paper clip into the manual eject hole. Help For more information, see "Using a tray-load DVD drive" on page 57. www.gateway.com A DVD does not produce sound on a television • Audio is transmitted through a monitor ...jack. If you do not want to a television using the monitor jack, use the built-in speakers, a set of the manual eject hole, see your notebook, manually eject the disc by...
8512936 - Gateway Notebook Reference Guide R0
Page 158
..., as appropriate. Japan Japanese Modem Notice Laser safety statement Warning Use of controls or adjustments or performance of procedures other than those specified in this manual may not prevent degradation of the power utility, telephone lines, and internal metallic water pipe system, if present, are connected together.
..., as appropriate. Japan Japanese Modem Notice Laser safety statement Warning Use of controls or adjustments or performance of procedures other than those specified in this manual may not prevent degradation of the power utility, telephone lines, and internal metallic water pipe system, if present, are connected together.
8512936 - Gateway Notebook Reference Guide R0
Page 160
...it describes at any defect or omission in writing from any time, without prior consent in this manual, even if advised of the possibility of continued product development, Gateway reserves the right to be authorized by Macrovision Corporation, and is prohibited. 152 No part of... made periodically. The information in this manual and the products it may appear in this manual has been carefully checked and is not responsible for identification purposes only, and may improve and/or change products described in this manual. Gateway may be liable for home and other...
...it describes at any defect or omission in writing from any time, without prior consent in this manual, even if advised of the possibility of continued product development, Gateway reserves the right to be authorized by Macrovision Corporation, and is prohibited. 152 No part of... made periodically. The information in this manual and the products it may appear in this manual has been carefully checked and is not responsible for identification purposes only, and may improve and/or change products described in this manual. Gateway may be liable for home and other...
8512936 - Gateway Notebook Reference Guide R0
Page 162
...61 troubleshooting Express Card 121 troubleshooting memory card 129 CD cleaning 91 controlling playback 32, 43, 44 eject button 57, 58 inserting 57, 58 manual eject hole 57, 58 CD drive See DVD drive cellular phone memory cards 59 Certificate of Authenticity 3 changing battery 70 cleaning audio CD 91 ...external audio 6 external diskette drive 7, 9, 62 external speakers 6 flash drive 7, 9, 62 HDMI (TV) out 7 headphone 6 keyboard 7, 9 microphone 6 modem (dial-up) 10 monitor (VGA) 10, 64 mouse 7, 9 network 7 power 10, 20 printer 7, 9 projector 64 scanner 7, 9 speaker 6 television 63 USB 7, 9, 62
...61 troubleshooting Express Card 121 troubleshooting memory card 129 CD cleaning 91 controlling playback 32, 43, 44 eject button 57, 58 inserting 57, 58 manual eject hole 57, 58 CD drive See DVD drive cellular phone memory cards 59 Certificate of Authenticity 3 changing battery 70 cleaning audio CD 91 ...external audio 6 external diskette drive 7, 9, 62 external speakers 6 flash drive 7, 9, 62 HDMI (TV) out 7 headphone 6 keyboard 7, 9 microphone 6 modem (dial-up) 10 monitor (VGA) 10, 64 mouse 7, 9 network 7 power 10, 20 printer 7, 9 projector 64 scanner 7, 9 speaker 6 television 63 USB 7, 9, 62

8512936 - Gateway Notebook Reference Guide R0
Page 163
www.gateway.com VGA 10, 64 wired Ethernet 22 wired network 22 copyright notice 152 D default printer 138 dialing codes 82 dial-up modem 10, 23 adjusting volume 132 diagnostics 131 ..., 122 types 56 DSL modem 7, 22 connecting 22 troubleshooting 129 DVD cleaning 91 controlling playback 32, 43, 44 eject button 57, 58 inserting 57, 58 manual eject hole 57, 58 playing 63 regional code 57 troubleshooting 119 DVD drive drive status indicator 28 identifying 56 locating 9 troubleshooting 119 using 56 DVD...
www.gateway.com VGA 10, 64 wired Ethernet 22 wired network 22 copyright notice 152 D default printer 138 dialing codes 82 dial-up modem 10, 23 adjusting volume 132 diagnostics 131 ..., 122 types 56 DSL modem 7, 22 connecting 22 troubleshooting 129 DVD cleaning 91 controlling playback 32, 43, 44 eject button 57, 58 inserting 57, 58 manual eject hole 57, 58 playing 63 regional code 57 troubleshooting 119 DVD drive drive status indicator 28 identifying 56 locating 9 troubleshooting 119 using 56 DVD...
8513065 - Gateway Notebook Hardware Reference R1
Page 10
...Networking To access your online User Guide: • Click (Start), All Programs, then click Gateway Documentation. Gateway contact information Contacting Gateway Customer Care Your Setup Guide contains information about contacting Gateway Customer Care. Accessing your online User Guide In addition to this guide, your online User ...that are specific to your notebook model and its features. Gateway Customer Care will need this information if you call for assistance. 2 Your User Guide is an in-depth, easy-to-read manual that identifies your model of your notebook contains information that ...
...Networking To access your online User Guide: • Click (Start), All Programs, then click Gateway Documentation. Gateway contact information Contacting Gateway Customer Care Your Setup Guide contains information about contacting Gateway Customer Care. Accessing your online User Guide In addition to this guide, your online User ...that are specific to your notebook model and its features. Gateway Customer Care will need this information if you call for assistance. 2 Your User Guide is an in-depth, easy-to-read manual that identifies your model of your notebook contains information that ...
8513065 - Gateway Notebook Hardware Reference R1
Page 65
...reduce illegal disc distribution. If the disc has two playable sides, place the disc so the name of the disc. Using a tray-load DVD drive [ Manual eject hole Eject button To insert a CD or DVD: 1 Press the eject button on page 91. The regional code for the United States and Canada...completely open. 2 Place the disc in the tray with the label facing up, then press down carefully on the disc, disc documentation, or packaging. www.gateway.com Using a DVD drive Important Prerecorded DVD discs and DVD drives contain regional codes that the label side is facing up. To be able to...
...reduce illegal disc distribution. If the disc has two playable sides, place the disc so the name of the disc. Using a tray-load DVD drive [ Manual eject hole Eject button To insert a CD or DVD: 1 Press the eject button on page 91. The regional code for the United States and Canada...completely open. 2 Place the disc in the tray with the label facing up, then press down carefully on the disc, disc documentation, or packaging. www.gateway.com Using a DVD drive Important Prerecorded DVD discs and DVD drives contain regional codes that the label side is facing up. To be able to...
8513065 - Gateway Notebook Hardware Reference R1
Page 66
... turn on the DVD drive. If you do not want to remove CDs and DVDs using this method. Using a slot-load DVD drive [ Eject button Manual eject hole To insert a CD or DVD: 1 Place the disc in the slot with the label facing up. 2 Gently push the disc into the... manual eject hole. CHAPTER 4: Using Drives and Accessories To remove a CD or DVD: 1 Press the eject button on your notebook, manually eject the disc by inserting an opened paper clip into the notebook until the mechanism draws...
... turn on the DVD drive. If you do not want to remove CDs and DVDs using this method. Using a slot-load DVD drive [ Eject button Manual eject hole To insert a CD or DVD: 1 Place the disc in the slot with the label facing up. 2 Gently push the disc into the... manual eject hole. CHAPTER 4: Using Drives and Accessories To remove a CD or DVD: 1 Press the eject button on your notebook, manually eject the disc by inserting an opened paper clip into the notebook until the mechanism draws...


