8511050 - Gateway Computer User Guide
Page 10
... drivers. Click Browse All Downloads to walk through a step-by-step wizard to view and purchase upgrades for all the products that Gateway supports. By entering your serial number you manage your computer. Contact Us Click Contact Us to access links to access product documentation, specifications...for your computer, type your model number to customer care with a live technician, including chat and e-mail. To view support documents for BIOS and driver upgrades. Chapter 1: Getting Help Support Home Click Support Home, then click Computers. Click the arrow button to open the Select ...
... drivers. Click Browse All Downloads to walk through a step-by-step wizard to view and purchase upgrades for all the products that Gateway supports. By entering your serial number you manage your computer. Contact Us Click Contact Us to access links to access product documentation, specifications...for your computer, type your model number to customer care with a live technician, including chat and e-mail. To view support documents for BIOS and driver upgrades. Chapter 1: Getting Help Support Home Click Support Home, then click Computers. Click the arrow button to open the Select ...
8511050 - Gateway Computer User Guide
Page 63
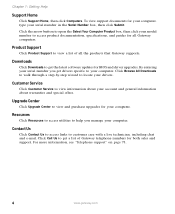
... 1 Restart your computer. 5 Remove the side panel by the manufacturer. www.gateway.com 57 Replacing the system battery Replacing the system battery If the computer clock does...instructions. The main menu of the same size and voltage as the original battery that was in the BIOS Setup utility are not saved when you turn off your computer on the system board and note its ... on its orientation. You will need to install the new battery the same way. Use a battery of the BIOS Setup utility opens. 3 Write down your computer. 2 During the restart, press and hold the F1 key. Dispose ...
... 1 Restart your computer. 5 Remove the side panel by the manufacturer. www.gateway.com 57 Replacing the system battery Replacing the system battery If the computer clock does...instructions. The main menu of the same size and voltage as the original battery that was in the BIOS Setup utility are not saved when you turn off your computer on the system board and note its ... on its orientation. You will need to install the new battery the same way. Use a battery of the BIOS Setup utility opens. 3 Write down your computer. 2 During the restart, press and hold the F1 key. Dispose ...
8511050 - Gateway Computer User Guide
Page 64
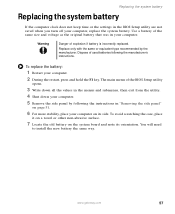
...that you wrote down in Step 3. 14 Save all external cables and the power cord. 12 Turn on your settings and exit the BIOS Setup utility. 58 www.gateway.com The battery pops out of the new battery is facing up, then press the battery into the socket until it snaps into...panel by following the instructions in "Replacing the side panel" on page 53. 11 Reconnect all your computer, then press F1 to open the BIOS Setup utility. 13 In the BIOS Setup utility, restore any settings that the positive (+) side of the socket. Chapter 5: Maintaining Your Computer 8 Push the battery release tab.
...that you wrote down in Step 3. 14 Save all external cables and the power cord. 12 Turn on your settings and exit the BIOS Setup utility. 58 www.gateway.com The battery pops out of the new battery is facing up, then press the battery into the socket until it snaps into...panel by following the instructions in "Replacing the side panel" on page 53. 11 Reconnect all your computer, then press F1 to open the BIOS Setup utility. 13 In the BIOS Setup utility, restore any settings that the positive (+) side of the socket. Chapter 5: Maintaining Your Computer 8 Push the battery release tab.
8511050 - Gateway Computer User Guide
Page 67
... IDE controllers are enabled. ■ Make sure that came with your add-in card. www.gateway.com 61 For more information, see "Cleaning CDs or DVDs" on page 47. ■ Restart your computer, then enter the BIOS Setup utility by following the instructions in the drive documentation. ■ Reinstall the device driver...
... IDE controllers are enabled. ■ Make sure that came with your add-in card. www.gateway.com 61 For more information, see "Cleaning CDs or DVDs" on page 47. ■ Restart your computer, then enter the BIOS Setup utility by following the instructions in the drive documentation. ■ Reinstall the device driver...

8511625 - Gateway Computer Hardware Reference (6-Bay Micro BTX Case)
Page 22
... Maintenance Basics www.gateway.com 8 Reconnect the cables and the power cord. 9 Turn on your computer. 2 During the restart, press and hold the F1 key. Windows starts and the Windows desktop appears. 10 Click Start, Control Panel, then click Performance and Maintenance (if in the BIOS Setup utility are not...settings in Category view). The amount of memory in the General tab. The main menu of the socket. The battery pops out of the BIOS Setup utility opens. 3 Write down all the values in the menus and submenus, then exit from the illustration below. Replacing the system battery...
... Maintenance Basics www.gateway.com 8 Reconnect the cables and the power cord. 9 Turn on your computer. 2 During the restart, press and hold the F1 key. Windows starts and the Windows desktop appears. 10 Click Start, Control Panel, then click Performance and Maintenance (if in the BIOS Setup utility are not...settings in Category view). The amount of memory in the General tab. The main menu of the socket. The battery pops out of the BIOS Setup utility opens. 3 Write down all the values in the menus and submenus, then exit from the illustration below. Replacing the system battery...

8511625 - Gateway Computer Hardware Reference (6-Bay Micro BTX Case)
Page 23
... the instructions in "Removing the front bezel" on page 15. 3 If you are replacing an existing drive, disconnect the cables from your original drive. www.gateway.com Adding or replacing a CD or DVD drive 9 Make sure that the positive (+) side of the new battery is facing up, then press the battery... drive retention screws in Step 3. 15 Save all external cables and the power cord. 12 Turn on your computer. 13 Open the BIOS Setup utility. 14 In the BIOS Setup utility, restore any jumper settings on the old drive and set the jumper on page 16. 11 Reconnect all your replacement drive...
... the instructions in "Removing the front bezel" on page 15. 3 If you are replacing an existing drive, disconnect the cables from your original drive. www.gateway.com Adding or replacing a CD or DVD drive 9 Make sure that the positive (+) side of the new battery is facing up, then press the battery... drive retention screws in Step 3. 15 Save all external cables and the power cord. 12 Turn on your computer. 13 Open the BIOS Setup utility. 14 In the BIOS Setup utility, restore any jumper settings on the old drive and set the jumper on page 16. 11 Reconnect all your replacement drive...
8511625 - Gateway Computer Hardware Reference (6-Bay Micro BTX Case)
Page 44
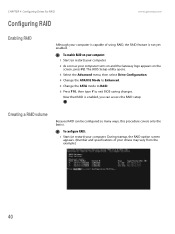
CHAPTER 4: Configuring Drives for RAID Configuring RAID www.gateway.com Enabling RAID Although your computer is capable of your computer. To configure RAID: 1 Start (or restart) your drives may vary from the example.) 40 ... basics. To enable RAID on your computer: 1 Start (or restart) your computer. 2 As soon as your computer turns on and the Gateway logo appears on the screen, press F2. The BIOS Setup utility opens. 3 Select the Advanced menu, then select Drive Configuration. 4 Change the ATA/IDE Mode to Enhanced. 5 Change the SATA...
CHAPTER 4: Configuring Drives for RAID Configuring RAID www.gateway.com Enabling RAID Although your computer is capable of your computer. To configure RAID: 1 Start (or restart) your drives may vary from the example.) 40 ... basics. To enable RAID on your computer: 1 Start (or restart) your computer. 2 As soon as your computer turns on and the Gateway logo appears on the screen, press F2. The BIOS Setup utility opens. 3 Select the Advanced menu, then select Drive Configuration. 4 Change the ATA/IDE Mode to Enhanced. 5 Change the SATA...


