
Gateway 510-Series Computer User's Guide
Page 7
... drive 194 Replacing the hard drive 197 Adding or replacing add-in cards 199 Replacing the power supply 202 Replacing the system board 205 Installing memory 207 Replacing the system battery 211 14 Troubleshooting 213 Safety guidelines 214 First steps 214 Software support tools 215 Troubleshooting 216 Add-in cards 216...
... drive 194 Replacing the hard drive 197 Adding or replacing add-in cards 199 Replacing the power supply 202 Replacing the system board 205 Installing memory 207 Replacing the system battery 211 14 Troubleshooting 213 Safety guidelines 214 First steps 214 Software support tools 215 Troubleshooting 216 Add-in cards 216...
Gateway 510-Series Computer User's Guide
Page 8
CD, DVD, or recordable drives 216 Cleaning CDs and DVDs 218 Computer 218 File management 219 Hard drive 219 Internet 220 Keyboard 222 Memory 222 Modem (dial-up 223 Monitor 227 Mouse 229 Power 229 Printer 230 Sound 231 Using the BIOS Setup utility 232 Telephone support 234 Before calling Gateway Technical Support 234 Telephone support 235 Tutoring and training 236 Self-help 236 Tutoring 236 Training 237 A Safety, Regulatory, and Legal Information 239 Index 249 vi
CD, DVD, or recordable drives 216 Cleaning CDs and DVDs 218 Computer 218 File management 219 Hard drive 219 Internet 220 Keyboard 222 Memory 222 Modem (dial-up 223 Monitor 227 Mouse 229 Power 229 Printer 230 Sound 231 Using the BIOS Setup utility 232 Telephone support 234 Before calling Gateway Technical Support 234 Telephone support 235 Tutoring and training 236 Self-help 236 Tutoring 236 Training 237 A Safety, Regulatory, and Legal Information 239 Index 249 vi
Gateway 510-Series Computer User's Guide
Page 16
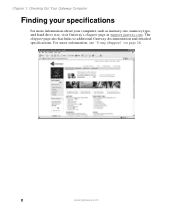
The eSupport page also has links to additional Gateway documentation and detailed specifications. For more information about your specifications For more information, see "Using eSupport" on page 26. 8 www.gateway.com Chapter 1: Checking Out Your Gateway Computer Finding your computer, such as memory size, memory type, and hard drive size, visit Gateway's eSupport page at support.gateway.com.
The eSupport page also has links to additional Gateway documentation and detailed specifications. For more information about your specifications For more information, see "Using eSupport" on page 26. 8 www.gateway.com Chapter 1: Checking Out Your Gateway Computer Finding your computer, such as memory size, memory type, and hard drive size, visit Gateway's eSupport page at support.gateway.com.
Gateway 510-Series Computer User's Guide
Page 18
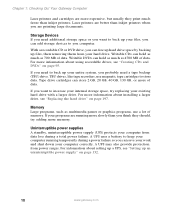
Chapter 1: Checking Out Your Gateway Computer Laser printers and cartridges are running temporarily during a total power failure. For more expensive, but usually they should, try replacing your entire system, you can hold as much as 4700 MB of memory. If you need to keep your ... may also provide protection from power surges. A UPS uses a battery to back up an uninterruptible power supply" on page 132. 10 www.gateway.com Laser printers are better than inkjet printers. Writable CDs can add storage devices to store data. TBU drives, like tape recorders, use a...
Chapter 1: Checking Out Your Gateway Computer Laser printers and cartridges are running temporarily during a total power failure. For more expensive, but usually they should, try replacing your entire system, you can hold as much as 4700 MB of memory. If you need to keep your ... may also provide protection from power surges. A UPS uses a battery to back up an uninterruptible power supply" on page 132. 10 www.gateway.com Laser printers are better than inkjet printers. Writable CDs can add storage devices to store data. TBU drives, like tape recorders, use a...
Gateway 510-Series Computer User's Guide
Page 135
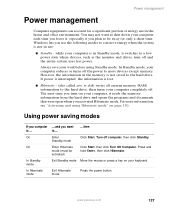
...especially if you use the following modes to conserve energy when the system is not in the memory is lost. ■ Hibernate - (also called save your computer completely off. www.gateway.com 127 Windows lets you plan to be hold SHIFT, then click Hibernate. Always save ...to disk) writes all current memory (RAM) information to the hard drive, then turns your work before using Hibernate...
...especially if you use the following modes to conserve energy when the system is not in the memory is lost. ■ Hibernate - (also called save your computer completely off. www.gateway.com 127 Windows lets you plan to be hold SHIFT, then click Hibernate. Always save ...to disk) writes all current memory (RAM) information to the hard drive, then turns your work before using Hibernate...

Gateway 510-Series Computer User's Guide
Page 193
If you are not comfortable with these procedures, get help from a more experienced computer user or computer service technician. 185 13 Upgrading Your Computer This chapter provides information about upgrading and replacing components in cards ■ Remove and install system boards ■ Add memory ■ Change the battery You must open the computer case to upgrade or replace components. Read this chapter to learn how to: ■ Open and close the computer case ■ Remove and install drives and components ■ Remove and install add-in your computer.
If you are not comfortable with these procedures, get help from a more experienced computer user or computer service technician. 185 13 Upgrading Your Computer This chapter provides information about upgrading and replacing components in cards ■ Remove and install system boards ■ Add memory ■ Change the battery You must open the computer case to upgrade or replace components. Read this chapter to learn how to: ■ Open and close the computer case ■ Remove and install drives and components ■ Remove and install add-in your computer.
Gateway 510-Series Computer User's Guide
Page 213
...place your notes from the system board, noting their locations and orientation. (You will reconnect the cables after you install the new board.) www.gateway.com 205 To avoid scratching the case, place it on a towel or other non-abrasive surface. 3 Remove all of the add-in cards... by following the instructions in "Adding or replacing add-in "Installing memory" on page 199. 4 Remove the memory modules. See the power supply documentation for further instructions. 8 Close the case by following the instructions in "Removing the side panel...
...place your notes from the system board, noting their locations and orientation. (You will reconnect the cables after you install the new board.) www.gateway.com 205 To avoid scratching the case, place it on a towel or other non-abrasive surface. 3 Remove all of the add-in cards... by following the instructions in "Adding or replacing add-in "Installing memory" on page 199. 4 Remove the memory modules. See the power supply documentation for further instructions. 8 Close the case by following the instructions in "Removing the side panel...
Gateway 510-Series Computer User's Guide
Page 214
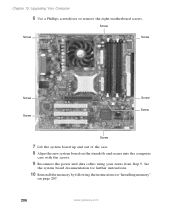
See the system board documentation for further instructions. 10 Reinstall the memory by following the instructions in "Installing memory" on the standoffs and secure into the computer case with the screws. 9 Reconnect the power and data cables using your notes from Step 5. Chapter 13: Upgrading Your Computer 6 Use a Phillips screwdriver to remove the eight motherboard screws. Screw Screw Screw Screw Screw Screw Screw Screw 7 Lift the system board up and out of the case. 8 Align the new system board on page 207. 206 www.gateway.com
See the system board documentation for further instructions. 10 Reinstall the memory by following the instructions in "Installing memory" on the standoffs and secure into the computer case with the screws. 9 Reconnect the power and data cables using your notes from Step 5. Chapter 13: Upgrading Your Computer 6 Use a Phillips screwdriver to remove the eight motherboard screws. Screw Screw Screw Screw Screw Screw Screw Screw 7 Lift the system board up and out of the case. 8 Align the new system board on page 207. 206 www.gateway.com
Gateway 510-Series Computer User's Guide
Page 215
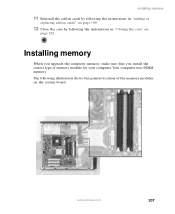
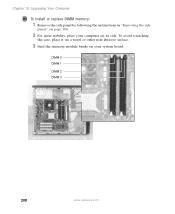
Installing memory When you upgrade the computer memory, make sure that you install the correct type of the memory modules on page 192. www.gateway.com 207 The following the instructions in "Closing the case" on the system board. Installing memory 11 Reinstall the add-in cards by following the instructions in "Adding or replacing add-in cards" on page 199. 12 Close the case by following illustration shows the general location of memory module for your computer. Your computer uses DIMM memory.
Installing memory When you upgrade the computer memory, make sure that you install the correct type of the memory modules on page 192. www.gateway.com 207 The following the instructions in "Closing the case" on the system board. Installing memory 11 Reinstall the add-in cards by following the instructions in "Adding or replacing add-in cards" on page 199. 12 Close the case by following illustration shows the general location of memory module for your computer. Your computer uses DIMM memory.
Gateway 510-Series Computer User's Guide
Page 216
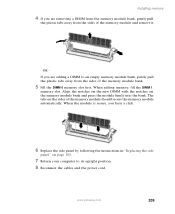
DIMM 0 DIMM 1 DIMM 2 DIMM 3 208 www.gateway.com To avoid scratching the case, place it on a towel or other non-abrasive surface. 3 Find the memory module banks on your computer on page 188. 2 For more stability, place your system board. Chapter 13: Upgrading Your Computer To install or replace DIMM memory: 1 Remove the side panel by following the instructions in "Removing the side panel" on its side.
DIMM 0 DIMM 1 DIMM 2 DIMM 3 208 www.gateway.com To avoid scratching the case, place it on a towel or other non-abrasive surface. 3 Find the memory module banks on your computer on page 188. 2 For more stability, place your system board. Chapter 13: Upgrading Your Computer To install or replace DIMM memory: 1 Remove the side panel by following the instructions in "Removing the side panel" on its side.
Gateway 510-Series Computer User's Guide
Page 217
... bank, gently pull the plastic tabs away from the sides of the memory module bank. 5 Fill the DIMM 0 memory slot first. The tabs on the sides of the memory module should secure the memory module automatically. www.gateway.com 209 OR - Installing memory 4 If you are adding a DIMM to its upright position. 8 Reconnect the cables and...
... bank, gently pull the plastic tabs away from the sides of the memory module bank. 5 Fill the DIMM 0 memory slot first. The tabs on the sides of the memory module should secure the memory module automatically. www.gateway.com 209 OR - Installing memory 4 If you are adding a DIMM to its upright position. 8 Reconnect the cables and...
Gateway 510-Series Computer User's Guide
Page 218
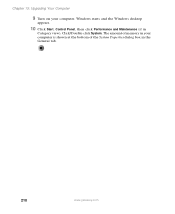
Windows starts and the Windows desktop appears. 10 Click Start, Control Panel, then click Performance and Maintenance (if in the General tab. 210 www.gateway.com The amount of memory in your computer. Chapter 13: Upgrading Your Computer 9 Turn on your computer is shown at the bottom of the System Properties dialog box in Category view). Click/Double-click System.
Windows starts and the Windows desktop appears. 10 Click Start, Control Panel, then click Performance and Maintenance (if in the General tab. 210 www.gateway.com The amount of memory in your computer. Chapter 13: Upgrading Your Computer 9 Turn on your computer is shown at the bottom of the System Properties dialog box in Category view). Click/Double-click System.
Gateway 510-Series Computer User's Guide
Page 224
.... ■ Try a different disc. To identify your drive type, see "Reinstalling device drivers" on page 82. ■ Your computer may not be experiencing some temporary memory problems. Shut down and restart your computer. ■ Some music CDs have copy protection software. Chapter 14: Troubleshooting Troubleshooting Add-in cards The computer does... and restart your computer. ■ Make sure that came with your computer restarts. For more information, see "Identifying drive types" on page 177. 216 www.gateway.com
.... ■ Try a different disc. To identify your drive type, see "Reinstalling device drivers" on page 82. ■ Your computer may not be experiencing some temporary memory problems. Shut down and restart your computer. ■ Some music CDs have copy protection software. Chapter 14: Troubleshooting Troubleshooting Add-in cards The computer does... and restart your computer. ■ Make sure that came with your computer restarts. For more information, see "Identifying drive types" on page 177. 216 www.gateway.com
Gateway 510-Series Computer User's Guide
Page 230
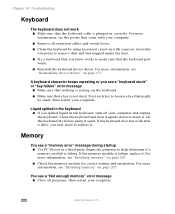
... is not stuck. You see "Installing memory" on page 177. Liquid spilled in correctly. Let the keyboard dry before using an aerosol can of air with your computer. ■ Remove all programs, then restart your computer. 222 www.gateway.com Press each key to make sure that ...a key is failing, replace it . For more information, see "Installing memory" on the keyboard. ■ Make sure that the keyboard port works. ■ ...
... is not stuck. You see "Installing memory" on page 177. Liquid spilled in correctly. Let the keyboard dry before using an aerosol can of air with your computer. ■ Remove all programs, then restart your computer. 222 www.gateway.com Press each key to make sure that ...a key is failing, replace it . For more information, see "Installing memory" on the keyboard. ■ Make sure that the keyboard port works. ■ ...

Gateway 510-Series Computer User's Guide
Page 231
...3 Click the location from your telephone line, then check for your case in "Checking Out Your Gateway Computer" on page 1. ■ Make sure that all settings are correct. www.gateway.com 223 If your telephone service to get the correct code to the telephone line and the telephone...using the modem. Contact your Control Panel is connected to temporarily disable the service. Troubleshooting Help and Support For more information about troubleshooting memory errors in the Search box , then click the arrow. Use the setup poster to make sure that the modem dialing properties are ...
...3 Click the location from your telephone line, then check for your case in "Checking Out Your Gateway Computer" on page 1. ■ Make sure that all settings are correct. www.gateway.com 223 If your telephone service to get the correct code to the telephone line and the telephone...using the modem. Contact your Control Panel is connected to temporarily disable the service. Troubleshooting Help and Support For more information about troubleshooting memory errors in the Search box , then click the arrow. Use the setup poster to make sure that the modem dialing properties are ...
Gateway 510-Series Computer User's Guide
Page 239
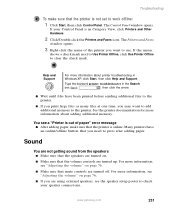
...adding paper. For more information about printer troubleshooting in Windows XP, click Start, then click Help and Support. For more information about adding additional memory. Sound You are not getting sound from the speakers ■ Make sure that the speakers are turned on. ■ Make sure that ... are using external speakers, see "Adjusting the volume" on page 76. ■ If you need to check your Control Panel is online. www.gateway.com 231 Help and Support For more information, see a "Printer is out of the printer you may want to work offline: 1 Click Start,...
...adding paper. For more information about printer troubleshooting in Windows XP, click Start, then click Help and Support. For more information about adding additional memory. Sound You are not getting sound from the speakers ■ Make sure that the speakers are turned on. ■ Make sure that ... are using external speakers, see "Adjusting the volume" on page 76. ■ If you need to check your Control Panel is online. www.gateway.com 231 Help and Support For more information, see a "Printer is out of the printer you may want to work offline: 1 Click Start,...
Gateway 510-Series Computer User's Guide
Page 241
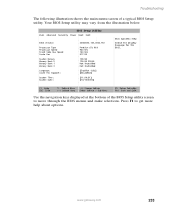
BIOS Setup Utility Main Advanced Security Power Boot Exit BIOS Version Processor Type Processor Speed Front Side Bus Speed Cache Ram System Memory Memory Bank 0 Memory Bank 1 Memory Bank 2 Language: Cache ECC Support: System Time: System Date: 4W4SB0X0.15A.0004.P02 Pentium (R) III 933 MHz 133 MHz 512 KB...Sub-Menu F9 Setup Defaults F10 Save and Exit Use the navigation keys displayed at the bottom of a typical BIOS Setup utility. www.gateway.com 233 Your BIOS Setup utility may vary from the illustration below. Press F1 to move through the BIOS menus and make selections. ...
BIOS Setup Utility Main Advanced Security Power Boot Exit BIOS Version Processor Type Processor Speed Front Side Bus Speed Cache Ram System Memory Memory Bank 0 Memory Bank 1 Memory Bank 2 Language: Cache ECC Support: System Time: System Date: 4W4SB0X0.15A.0004.P02 Pentium (R) III 933 MHz 133 MHz 512 KB...Sub-Menu F9 Setup Defaults F10 Save and Exit Use the navigation keys displayed at the bottom of a typical BIOS Setup utility. www.gateway.com 233 Your BIOS Setup utility may vary from the illustration below. Press F1 to move through the BIOS menus and make selections. ...
Gateway 510-Series Computer User's Guide
Page 259
... camera 9 connecting 111 locating serial port 5 locating USB port 3, 5 digital photography connecting a digital camera 111 digital video camera 9 connecting 112 IEEE 1394 port 3 DIMM See memory directional keys 18 Disk Cleanup 164 Disk Defragmenter 167 diskette drive adding 194 replacing 194 display changing resolution 118 using screen saver 122 documentation...
... camera 9 connecting 111 locating serial port 5 locating USB port 3, 5 digital photography connecting a digital camera 111 digital video camera 9 connecting 112 IEEE 1394 port 3 DIMM See memory directional keys 18 Disk Cleanup 164 Disk Defragmenter 167 diskette drive adding 194 replacing 194 display changing resolution 118 using screen saver 122 documentation...
Gateway 510-Series Computer User's Guide
Page 262
... drive 194 DVD/CD-RW drive 194 DVD-RAM/-RW/CD-RW drive 194 expansion cards 199 Fax 64 front bezel 191 hard drive 197 memory 207 Microsoft Fax 64 peripheral devices 21, 154 Pinnacle Expression 112 power supply 202 printer 21, 154 programs 156, 180 scanner 21, 154 side panel...
... drive 194 DVD/CD-RW drive 194 DVD-RAM/-RW/CD-RW drive 194 expansion cards 199 Fax 64 front bezel 191 hard drive 197 memory 207 Microsoft Fax 64 peripheral devices 21, 154 Pinnacle Expression 112 power supply 202 printer 21, 154 programs 156, 180 scanner 21, 154 side panel...
Gateway 510-Series Computer User's Guide
Page 263
... cleaning mouse 173 defragmenting 167 deleting files 164 suggested schedule 159 using Scheduled Task Wizard 169 virus protection 160 maximize button 35 Media Player 80 memory 10 adding 207 installing 207 replacing 207 troubleshooting 222 menu bar 35 messages checking e-mail 61 sending e-mail 60 microphone jack 5 Microsoft Fax 63 Microsoft...
... cleaning mouse 173 defragmenting 167 deleting files 164 suggested schedule 159 using Scheduled Task Wizard 169 virus protection 160 maximize button 35 Media Player 80 memory 10 adding 207 installing 207 replacing 207 troubleshooting 222 menu bar 35 messages checking e-mail 61 sending e-mail 60 microphone jack 5 Microsoft Fax 63 Microsoft...


